Monday, November 29, 2010

Trapping the cold

Warm air rises, right?  And, well, cold air sinks.

Does your refrigerator or icebox have a drain?  If so, what is keeping the drain from draining away the cold air?

You need a trap.  And as a shipwright I know frequently reminds me, drainage holes on a boat should always be sized "to pass a soggy Cheeto." Here is my answer, made up of plumbing fittings and plastic hose.

Bigger than a soggy Cheeto

Wednesday, November 24, 2010

Giving thanks

The fourth Thursday in November is set aside in the US as a day of Thanksgiving.  Those of us who live on boats have a lot to be thankful for.

We will be spending the next few days with our whole family, so brief post today.

From the crew of Eolian to yours: Happy Thanksgiving!

Monday, November 22, 2010

Into the modern world

Do you know what this is?

You've probably seen these on packaging or elsewhere - it is a 2-D barcode.  Because it is two-dimensional, it can encode far more information than the one-dimensional kind (like the UPC codes you see on virtually everything now). 

In the modern world, there are apps for your smart phone that can interpret these symbols using the phone's camera.  If you have one, try it!  This one encodes a URL for a website.

If you are making boat cards, you might want to consider putting one of these symbols on the card somewhere (I put this one on the back of ours).  By doing so, you eliminate the need for reading tiny type and remove the possibility of making a typo.  You can find any number of online apps for generating the QR code of your choice - just Google "generate qr code".

Saturday, November 20, 2010

Leave something behind

Business folks do it, because it works.  When they meet someone, one of the first things they do is exchange business cards.  Because th card helps jog the memory, and because it contains all the important contact info.

Why not boaters too?  Many do, including us.  Avery makes some very nice pre-perfed business card stock that will go thru your printer, and with the right template in you word processor, you can print 10 at a time.


When I first started doing this years ago, I made all 10 on the sheet the same, like business cards.  But then I thought, "Why?"  Now, I make them all different - its more fun that way.

It's a great little inside project for a crummy weather day.

Wednesday, November 17, 2010

Don't leave home without it

Anyone who hacks on cars knows that a coat hanger is nearly the equivalent of duct tape - the things you can fix with a  coat hanger are almost innumerable.  You should have a few on your boat too.

ClampTite.JPG
Ah, but add this tool (featured on Craft a Craft), and the list grows even more, perhaps especially for boats.  Because with this tool and an old coat hanger, you can make a hose clamp, custom-sized to the application. 

Well, OK, you really should use the stainless wire that ClampTite sells - it *is* stainless, and it is specially selected to work with the tool.  But in a pinch, you really could use a coat hanger.

Now there's another thing I need to have onboard Eolian.


He who dies with the most tools, wins.

Monday, November 15, 2010

Lilies to guard the liquor

As a part of the larger project to refurbish the starboard side of the saloon on Eolian, the revamp of the liquor cabinet doors qualifies as a "small" boat project.

Originally, the doors were made with the ubiquitous teak louvers, but I wanted something a little fancier. So for my first ever stained glass project, I decided to make something to fill the 5x7 inch opening in newly-made doors. I originally considered something using beveled glass (and I may yet go back and do it), but I settled instead on a *very* stylistic representation of Calla lilies. Each one only took 3 pieces of glass, none of which were fiddly or delicate.


Kind of looks like martini glasses too
When I made them, I cut a 3/8" rabbit in the back of the doors, so it was easy to mount the glass panels by just bedding them in some polysulphide. To keep from having a tremendous mess with the polysulphide (this stuff seems to go everywhere as soon as you open the tube), I masked both the door frame and the edge of the glass before applying it. Then, after smoothing it but before it had begun to cure, I removed the tape.


I still wonder about the beveled glass tho...

Friday, November 12, 2010

Uses for a baby bath?

Lotte over at Reiter's Bureau has found new uses onboard for something from an entirely different original application...

I have bought baby items. Not because there are babies in waiting, but because I have found the most ingenious baby bathtub, which I'm sure is going to become our friend. It's brilliant because it folds. And because it does not contain phthalates, PVC, Bisphenol-a (BPA) or other nasty stuff.


My plan for the purchase is that it can be used to collect water when it rains, and (and here is where "foldable" really stands out) to bring ashore when shopping for fruit and vegetables. Everything must be washed before it is allowed to come aboard. There are two really good reasons. One is that vegetables coming from the ground (potatoes, parsnips, carrots, sweet potatoes, kasava, ginger, etc.) will keep longer when they are clean of soil residues. The second compelling reason to rinse thoroughly (but gently) is that we can thereby minimize the risk of insect eggs, and especially cockroach eggs, aboard. Not to mention spiders, cockroaches and other unwelcome guests who already have hatched.

Flexi Bath is a Danish invention and the main target group has basically been parents living in apartments or other housing types where there is so little space that the storage of a traditional baby bath can be a challenge. I imagine that it is also practical to carry on trips, to the cottage and the beach. The bathtub has won numerous awards, including the Formland Prize last year, which is not surprising considering the craftsmanship and materials. You can watch a presentation video here and also read more about the product and the idea behind here .

I know that many have bought the Flexi Bath to use it as a plant container (the drainage hole in the bottom comes in handy in this case too) and my own use of it is indeed far from bathing babies too - now we are even considering if we need one more, so that we also have a bowl for fish, laundry or similar uses. For $39.99 (to find a store near you: http://www.easywalker.nl/usa/flexibath_dealers.asp?prov=&Submit=View) it's more or less just the matter of choosing the color that holds us back.
Some the best things on boats are "re-purposed" from an entirely different field. This is another of those.

And there is a "side story" to this.  Lotte says:

I recommended the flexibath to Boatmama: http://boatmama.blogspot.com/2010/05/eating-beets-and-bath-in-cockpit.html who of course uses the tub for what it was originally meant for. After this I wrote an email to the two guys who invented the tub, suggesting boat people as a target group for advertising (since this tub is absolutely brilliant for plenty of things on a boat) - and they got so pleased with this email, that they sent me another tub for free. So now we actually carry two tubs aboard Lunde, one for the "clean" jobs, and ond for the more "dirty" ones (fish and the like) - thanks to the blogosphere and the willingness to share ideas. - Which is also why I like your blog so much!
*blushes*

Wednesday, November 10, 2010

Obsolete is still good

What to do with 3 obsolete low-power solar panels that came with Eolian when we bought her? 

Why not mount them on the shop roof, and with one of those cheap grid-tie inverters now available, let them pay back part of the energy deficit of the kegerator?

Monday, November 8, 2010

Liquid antenna


If there is one thing cruising boats have plenty of, it is sea water.  Everyone uses it as the ground or counterpoise in their antenna systems.  But could you use it to make the antenna too?  Sure!

Friday, November 5, 2010

The right tool

When doing any project, there is a tendency to use the project as a reason to acquire another tool (he who dies with the most tools, wins).  But then this delays the project, which now depends on shopping for the tool.

Sometimes, the "best" tool for the job is the one you have, rather than the shiny, expensive, special-purpose one you see in the catalog.  Because with the tools you have, you can get right to work.  Bob over at Boat Bits talks about a personal example of this.

On the other hand, one should not fall into the trap of the lazy craftsman either:

"All tools are hammers, except for screwdrivers.  Screwdrivers are chisels."

Wednesday, November 3, 2010

Keeping the water out

Here in Seattle, keeping the water out is a nearly full-time job.  Aaron and Nicole from s/v Bella Star walk us thru a very well-done repair here:
We’ve had a leak since we got the boat that we were finally able to fix with some helpful insight from another HC33 owner.  Thanks Steve!  The leak was coming from the hole in the deck where our diesel heater’s stove pipe passes through the deck.

To fix it, the first thing I did was remove the charlie noble (boat chimney) to get at the hole.
IMG_6560 (Small)
Next was to remove the fairing block – it was cracked in half so I used epoxy to glue it back together.  For this project I used West System G/Flex due to its greater elasticity.

We could see right where the water was coming in.
IMG_6556

With the fairing block removed I used a Dremel with a sanding cylinder bit to clean out the old sealant and prepare the surface for some epoxy and fiberglass tape.
IMG_6564

Then I applied the epoxy and fiberglass tape.
IMG_6570

I let that cure overnight and then cut off the excess with the Dremel and a cutoff wheel.  ALL HAIL THE DREMEL!  I also sealed up the holes in the deck where the fairing is screwed down.
IMG_6589

Then I taped off the area in preparation for applying the sealant. 
IMG_6591

I reattached the newly fixed-up fairing pad and tightened the screws just enough to that the sealant was squishing out.  Then wiped away the excess.  (With sealants you want to wait until it’s cured before you screw down the item tightly.)
IMG_6593

I pulled the tape while the sealant was still wet.
IMG_6594

I let that cure overnight, then tightened up the screws.

Next was to repeat the tape and sealant process with the charlie noble.
IMG_6734

So after we got everything put back together all we had to do was wait for it to rain.  We didn’t have to wait long.  Fortunately the work paid off and the leak is fixed.
IMG_6736
Usually, finding the leak is much more difficult than fixing it.

Monday, November 1, 2010

Standoffish?

One of the problems with running this blog is that I end up with lots things that I see that I need to do. This is another... I have been putting this off for some time - with the current *very* extended sunspot cycle minimum, my interest in radio projects has waned along with the propagation conditions. Carol on s/v Estrellita 5.10b describes here the installation of the wiring between their SSB radio and their insulated backstay:
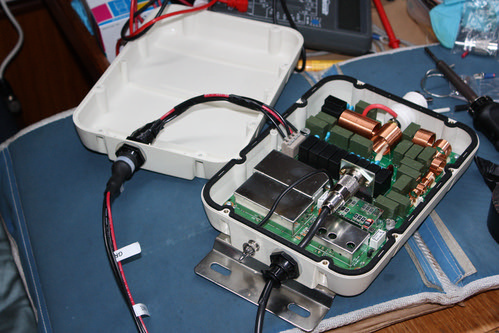
We use one of the big wires on that run from the deck to the top of our mast as an antenna for our single sideband radio. This wire is called a backstay, and thus the antenna is called a backstay antenna. In order to use the wire that way you have to also have a tuner to tune your wire during SSB usage.

Below, images from an install that I never blogged about. In order to connect the back stay to the tuner I had to cut the co-ax and reinstall it on the tuner. In order to do that I had to solder a PL-259 connector.

Rrrright. So, I don't know how to solder. Many youtube videos and a borrowed solder gun later, I had a not pretty but the good news is that the ugly solder is so far effective because our signal is good. Let's hope it lasts... The work stations, old & new connectors:


I was then able to open our AH-4 tuner and connect the new cord:

The wire was threaded through the ceiling of the aft cabin to the aft port section of the lazarette space and the tuner was installed there. The antenna wire then went from the tuner, through the cockpit combing to the backstay which serves as our antenna.

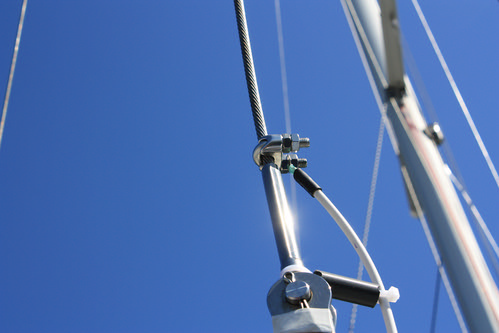
I used some nylon rod to keep the GTO-15 wire from touching the backstay. I had the brilliant idea to drill holes prior to cutting it so there would be a notch for the wire to sit into. Alas, it turns out the hole I drilled wasn’t really big enough or necessary. Just cutting the rod into 2” sections would have been plenty.


The installation with stainless still wire nut, nylon spacers connected with zip ties, and although you can’t see it the wire terminates in a ring terminal that has been double shrink wrapped at the connection
So, making standoffs for Eolian's antenna connection is now on the list of projects generated from this blog:
Related Posts Plugin for WordPress, Blogger...