Free is always good, except this is not quite free.
Or rather, it is free if you use any sort of holding tank treatment chemical.
I've done all sorts of holding tank stuff for Practical Sailor Mag. Chemicals, hoses, vent filters. Fun stuff. And in the process, in addition to learning all sorts subtleties, I solved all of my own odor problems, save one; odor from the bowl itself. If I flush with seawater and leave it a few days, there's some stink; sulfate in seawater is converted to hydrogen sulfide by millions of wee bacteria. If I flush with fresh water, it's better, but not zero; I guess something sneaks back down the waste hose, or perhaps up the feed hose. And either way, the bowl tends to get ratty, as marine flush volumes are limited and the water isn't chlorinated. I hate scrubbing.
Place a 20% solution of holding tank treatment in a spray bottle and mist the bowl down with each use, or at least each day, or and certainly whenever you'll be leaving the boat for a while. This cleans the bowl, treats the water in the bowl, and treats the water in the waste hose, preventing stink. And since it's the same treatment you would be using anyway, just subtract this from the usual dosage.
However, not all treatments work.
Less work. Less money.
- No blue sterilizing treatments, containing with formaldehyde and the like. Toxic, smelly, stain-prone, and well... gross. Too much like a portable toilet. Very tough on joker valves. Formaldehyde is listed as a human carcinogen. I don't understand why they still make these. Ban them from your boat.
- No bacterial treatments, like Bactank T3 or Happy Camper. They grow in the bottle and get gross. They are quite effective in the tank, just not for this.
- Pick a scent you like, preferably very mild. I like Forespar Refresh and Raritan CP, but Camco TST Ultra-concentrate is our favorite
. These are compatible with any type of holding tank treatment, including bacterial treatments. I tested a bunch for Practical Sailor Mag (February 2012 and December 2012).
Showing posts with label head. Show all posts
Showing posts with label head. Show all posts
Tuesday, April 25, 2017
Something Lazy, Something Free
As usual, Drew over at Sail Delmarva has been messing about with chemicals - here's a tip he has for everyone with a head...

Tuesday, May 31, 2016
Getting aHead
Please welcome new contributors Dave and Anke, who are living aboard and simultaneously constructing s/v Wayward, a beautifully constructed sailing barge, in SE Alaska. As I mentioned, Wayward is still under construction; here Dave works out how to fit in a head:
By Jo Hudson
from the SEARUNNER Construction Manual by Jim Brown
Viewed objectively there is nothing more absurd than the usual sea-going toilet of the modern production yacht. What expense and engineering, what a profligate use of space and materials, what a baroque concoction of pipes and valves and pumps and skin fittings, what a sop to over-developed human sensitivities, all for the purpose of transferring a small amount of matter a distance of about twelve inches, from here on the inside of the hull, to there on the outside of the hull.
-- From Mingming and the Art of Minimal Ocean Sailing by Roger D. Taylor
Getting aHead
To date, Anke and I have never built an enclosed Head into one of our boats.
Our boats are small to begin with. Partitioning a chunk off for a room that's in use for a few scant albeit imperative minutes a day seems to needlessly cramp our style. The walls block the view (high crime, in our book) and crowd the remaining space.
Anke and I are mostly alone together, and quite comfortable with our nitty gritty. When friends come along... let's just say things are 'up close and personal'.
So a little more privacy would accommodate the sensitivities of our guests, not all of whom are as... um... earthy as others.
On the other hand, the one thing we've always longed for but never had was a Wet Locker; a place to let our raingear drip dry. Heads are traditionally not too bad for that purpose, though their ventilation is often wanting.
To that end we came up with the following:
Note the Head/Wet Locker at the lower, right (port, aft),
outboard of Companionway steps.
What we're looking at is a row of coat hooks along the wall, outboard of a section of flip up counter. This allows space for hanging outdoor gear, especially raingear, where it can drip harmlessly to a well-sealed floor.
The counter, when horizontal, extends the galley counter by (about) 3ft. It also doubles as the port, pilothouse seat, from which we can steer the boat under cover (workbench shares the same role, opposite).
When flipped vertical - hinged along its forward edge, it locks into position to form a partial wall. A curtain may be drawn across the inboard face, and voila! A semi-enclosed head!
It's not as isolated as the typical Head, but visual privacy is ensured. It's positioned under a pilothouse window, so ventilation is better than most. It's still a bucket affair, but a two bucket compost system isn't out-of-the-question. (Here's a great resource on DIY composting toilets from one of our readers).
Set-up and -down take but a matter of seconds, for those in haste.
So this has been a paper possibility for a couple of years, now, and I've been drawing them into Triloboat StudyPLANS. But if anyone's built one, I haven't heard... until now.
So here's a sneak preview of the as yet untried system, at the roughed-in stage. Stay tuned for trial and error to come!
Looking aft into to the portside Galley.
Head/Wet Locker aft.
Looking kitty-corner at Head/Wet Locker
Anke holding counter vertical...
will eventually have a barrel bolt into a small, partial wall outboard
(Mirror on the underside?)
Oh God!
Scrounged hinges...
installed 'upside down' to reduce gluteal hang-up
(the pronounced hinge curl could otherwise bite us in the A**
while sitting on counter)
Sitting Pretty
(and able to look out,, 360deg)


Tuesday, November 17, 2015
A Civilized Idea
We recently returned from a trip to the UK; while there we saw a bathroom fixture which was ubiquitous there but virtually unknown in the USA: the heated towel rack. Do you have any idea how wonderful it is to wrap yourself in a warm towel after a shower? Probably not, sadly. Oh, and the towels dry off much sooner hanging on a heated rack too. It's a very civilized idea.
Adam and Adrian recently installed one of these on nb Briar Rose. Theirs is hot water heated - a very common solution in the UK, where forced air heating systems are virtually unknown. If you have hot water heat in your boat, this would work for you too. (Electrically heated models are also available and only draw 75 watts or so).
Adam and Adrian recently installed one of these on nb Briar Rose. Theirs is hot water heated - a very common solution in the UK, where forced air heating systems are virtually unknown. If you have hot water heat in your boat, this would work for you too. (Electrically heated models are also available and only draw 75 watts or so).
I have to work all weekend, but Adrian went up to the boat today -- taking much much longer than usual because of all the bank holiday traffic. While Briar Rose has been at Calcutt, the leaking radiator in the shower room has been changed for a heated towel rail.

Tuesday, January 27, 2015
Winterizing A Marine Head
I know it is a little late for this year; this is the result of my policy of not putting up anything here that is less than 30 days old - i want to drive traffic to your site, not take it away. But then for next year...
Rick over on s/v Cay of Sea shows us how he decommissions his head for the winter. This process has the added benefit of making a thorough internal inspection a part of the process:
Rick over on s/v Cay of Sea shows us how he decommissions his head for the winter. This process has the added benefit of making a thorough internal inspection a part of the process:
Warning: Graphic dirty pictures featured in this article
There is no way to eliminate the “disgusting” quotient when talking about toilet disassembly, and the only way to illustrate the process without bringing in yucky images is to use squeaky clean new parts. Well, I don’t have those on hand right now, but I do want to write a timely post, so please bear with me. If yucky toilet parts make you queasy, perhaps you should skip this article.
Last summer, returning from the annual Watkins Rendezvous, we had an unexpected marine head failure (it was practically new) which is chronicled here (about 2/3 through the article). After that experience, I determined that the way to avoid any subsequent failures was to disassemble and rebuild the head yearly, and not leaving propylene glycol (antifreeze) in it. I’ve also stopped using strong cleaning chemicals in it, as these often deteriorate the rubber parts. A mild dish soap solution cleans it fine, and since we flush with fresh drain water from the lavatory, it doesn’t develop the characteristic marine head smell.
Upon disassembly last winter, I determined that the rubber interior parts were nearly new and did not need replacing. As I inspected them this year, I decided to replace them, as they are looking a little worse for wear. I think they are still serviceable and I’ll keep them as spares, but will replace the large flapper valve and the joker with new parts. Similarly, I’ll disassemble the pump and replace the valves and seals.
Today, I simply dismounted the pump assembly, drained the system, and plastic-bagged the old joker and flapper valve. As a bonus to do this in 35-degree weather, the screws that hold the assembly together were easy to remove – surrounding material (plastic) is slightly smaller in the cold, therefore the tension on the fasteners is less. First, I donned latex gloves, then soaked up any remaining water in the toilet with wads of paper towels, dropping them directly into a lined waste basket. Used nearly a roll of paper towels.
I removed the flush water outlet hose first, then disconnected the joker valve housing and removed the joker. Following that, I removed the four screws retaining the pump on the assembly, then drained any remaining water. Finally, I used my heat gun to warm and soften the white sanitation hose for the flush water inlet. This was probably the hardest part, as it was cold and took 5+ minutes to get it pliable enough to work off of the fitting. Here are few photos:
The whole process, including preparation (need to have your supplies and receptacles ready to minimize the mess you make) was about 45 minutes.
Reassembly will take slightly longer.


Wednesday, October 29, 2014
Fresh Water Flush--a Miniature Water Closet?
Over at Sail Delmarva Drew has had a wonderful idea! Why not flush with fresh water - if only while at the dock (and let's be realistic here - most boats are at the dock the majority of the time):
Seawater contains bacteria and sulfate. Flush with seawater, deprive the bacteria of oxygen for long, and facilitative (those that can go aerobic or anaerobic) start using sulfate (SO4-) as an electron source. The result is H2S (rotten eggs) and the head stinks. The cure? Either use the head every 8 hours (thus, smell is not a problem when living aboard or actively cruising) or flush with fresh water.
But you can just plug the freshwater pipe into a manual head; water will blow through, flooding the compartment, and bugs can swim up-stream. The water closet, introduced a century ago, prevents both by employing a float valve and creating an air gap (bacteria can't fly, as a rule).
What about a miniature water closet? $38 from McMaster Carr
Made for commercial ice machines, this unit holds enough to flush 3' of 1.5 inch line--not enough for most manual heads--and refills at 0.33 gpm, or about 1:20 seconds per full flush (12 strokes or so). Clearly, a larger size, holding about 60 cubic inches, is what is needed. It could also be expanded by mounting a 1-3' length of 3" pipe under it to serve as a reservoir (4' of hose can be flushed for every 1' of 3" pipe). Mount it to a bulkhead somewhere handy and you should be good to go. A pair of valves would allow switching from seawater and isolation.
But I haven't tried it. I'm happy enough with sea flush and a rinse with potable using the shower head before going home.

Tuesday, September 2, 2014
Plumbing in the Right Direction
Over on s/v Cay of Sea, Rick tackles his head plumbing. He faces a problem that I completely understand - when Eolian's holding tank was plumbed at the factory, the connections to the inlet and the outlet were reversed, making the deck pump-out fitting completely useless...
In my last post, I confirmed the notion that fluids under pressure always obey the laws of physics. Fluids will flow towards the low pressure outlet every time – the path of least resistance, as it were. With this in mind and my back on the mend, I carefully boarded Cay of Sea today and set about to understand how I could have plumbed the overboard holding tank circuit in the wrong direction. Regardless of what I intended the plumbing design to do, it nevertheless obeyed the laws of physics perfectly and moved seawater into the holding tank, not out.
There were several possibilities as to why: 1) I had the Y-valve hooked up wrong; 2) I had the inlet and outlet hoses reversed; or 3) the opposite/but same effect – I had assembled the pump with the valves reversed.
It was number 3, actually. I dimly remembered from two years ago (as I was tracking down hoses and confirming their connections) telling myself that I had to reverse the assembly of the pump so it would pump 180 degrees from its current configuration. I didn’t do that when I reassembled it last week, so it very naturally drew water from the seacock which is intended to be the exhaust. I had the hoses off and the pump disassembled/reassembled in about 45 minutes.
By the way, a heat gun is the required tool for managing white sanitation hose. It simply is not possible to work with it any other way. When warmed up, it’s nice and pliable.
I also removed the vented loop from the holding tank exhaust. Yeah, that was an important move, seeing that its not possible to inject air at the top of the loop without creating a corresponding leak. However, not many people I know want this sort of leak in their boat. No, not at all. These loops, of course, are “necessary” for breaking any syphon that can flood the boat. I had suspected, but wasn’t sure, that this would allow “material” to leak out of the pathway to overboard. I was right, of course, because that’s the way they are supposed to work. However, it’s one of those details that “experts” fail to tell you as you read up on the subject. The “experts” emphasize the importance of having a vented loop in any line that is connected to an overboard fitting. I know, I know – you would think I could have worked that out for myself without being told. Well, I did eventually – and I learned this fact while pulling in seawater, not pumping out waste, so I feel thankful that I was spared that misery. Also, there is no risk of a syphon my case, because I close the overboard valves when the operation is complete. I will never leave that seacock in the open position.
You may also remember that I used flexible bilge pump hose for one of the tight bends in the circuit. I think that is going to work fine for two reasons: 1) I got the hose to seal on to the fittings with no problems, and 2) there will be no waste standing in this hose, as the pump has enough power to push all the fluid out of the hose. Besides, anytime I will use this pump-out option, it will include a clean seawater rinse of the system. Nothing objectionable will be left in the hose.
I reconnected the hoses with the pump reconfigured, and successfully evacuated the holding tank in about 3 minutes. Pumped in a little more seawater from the toilet, evacuated the tank again. All’s well. No leaks, no problems. Here’s a rough diagram detailing the overboard circuit:

Thursday, June 19, 2014
New teak grate for shower
Mike of s/v Chalice takes us thru the process he used to recreate the teak grate in his shower. Mike has all the tools... (yes, I'm jealous)
I needed to replace the shower grate as it was broken at the angle corner. I had tried to repair it, but because of the design it really was a design flaw. So I needed a new one of a different design.
What I did was lay the old grate face down (upside down), then nailed a perimeter around it real tight. This gave me the shape I needed. I would have to build the new one upside down, but as you will see, this was the easiest way.
From update _10_1_2012
I had to angle the ends of the new teak pieces so they would fit the fiberglass liner. A later picture will show this up close.
From update _10_1_2012
Initial cut and fit done. Now I just have to add the reinforcing that holds it all together.
From update _10_1_2012
Now it's done. Built completly in the jig.
From update _10_1_2012
Hard to see but I used spacer blocks to space everything out. Very easy.
From update _10_1_2012
Old Vs New
From update _10_1_2012
Oil finish so it will not be slippery.
From update _10_1_2012
The angle on the ends.
From update _10_1_2012
From update _10_1_2012
Now you can do it.


Tuesday, June 17, 2014
Gettin' Heady with it!
John continues spiffing up his Catalina 30, s/v Dulcinea. Today, his project is a complete refurbishing of the head compartment. I think his changes made a great improvement - don't you?
I had a few goals to accomplish in the Head... or bathroom... replace the ugly counter top, Put in a new Faucet/shower, hide the ugly holding tank pump out and vent hoses, and brighten the head up a bit. In the process I wanted to move the sink slightly, as I always felt it looked awkward where it was.
The ugly Head... Some sort of non-functional kitchen sprayer for a faucet, no shower, weird teak things, and head hoses... After removing the counter top, The first step was cutting out a new one, by tracing the old one, and using my Jigsaw. Then I had to figure out where I wanted the sink to be, by placing a Template I had cut out of paper, an moving it around until I was happy with where it was. Next, cut the hole out, and take the counter to the boat for a dry fit, and to trace the new Sink location.
Now I had to cut out the fiberglass --- Crap! I left my Jigsaw at home! No matter, I have a Dremel on board... it wasn't pretty, and took 10 times longer, but I got the Job Done!
Finally! got it cut out!
Now it was time put the Formica on! If you have never worked with this stuff, let me tell you, it is challenging. It is fairly flexible, but will snap, after a certain point. Handling a full sheet of this by yourself without causing it to break is next to impossible.
The Dry fit is Successful!
I found a piece that was big enough... by big enough I mean that it needs to be at least a half an inch longer all the way around....
Then I placed the counter top, RIGHT SIDE UP, on top of the formica and traced around it, extending each side by about half an inch.
All Traced and ready to cut out!
Now it is time to cut it out. for this, I used a specialized tool called Laminate Shears. If you have ever used sheet metal shears, or tin snips, this will be familiar to you. It is an odd looking tool that has two cutting surfaces.
Looking at the shears from the side
The shears from the front... two cutting surface on either side of a middle piece.
Using these is like using 2 pairs of scissors placed an eighth of an inch apart at the same time...
Cutting on the outside of the line. Just like using scissors.
This is what the result of the cut looks like...
You have to be VERY careful when using these.... they ONLY cut straight lines, well, relatively straight, and are hard to keep on course. Allow yourself plenty of excess. Also, be careful to support the waste side, as it can snap... right into your usable piece! (don't ask me how I know this...)
one side done....
All cut out!!!!
Now for a dry fit. place the Formica upside down, and place the counter top on it upside down... make sure you have room to work on all of the sides. Notice in the picture below, I wrote the word "Bottom" in big bold letters... When I put Formica on the galley.... I initially put it on the wrong side... so I learned from my mistake...
The dry fit...
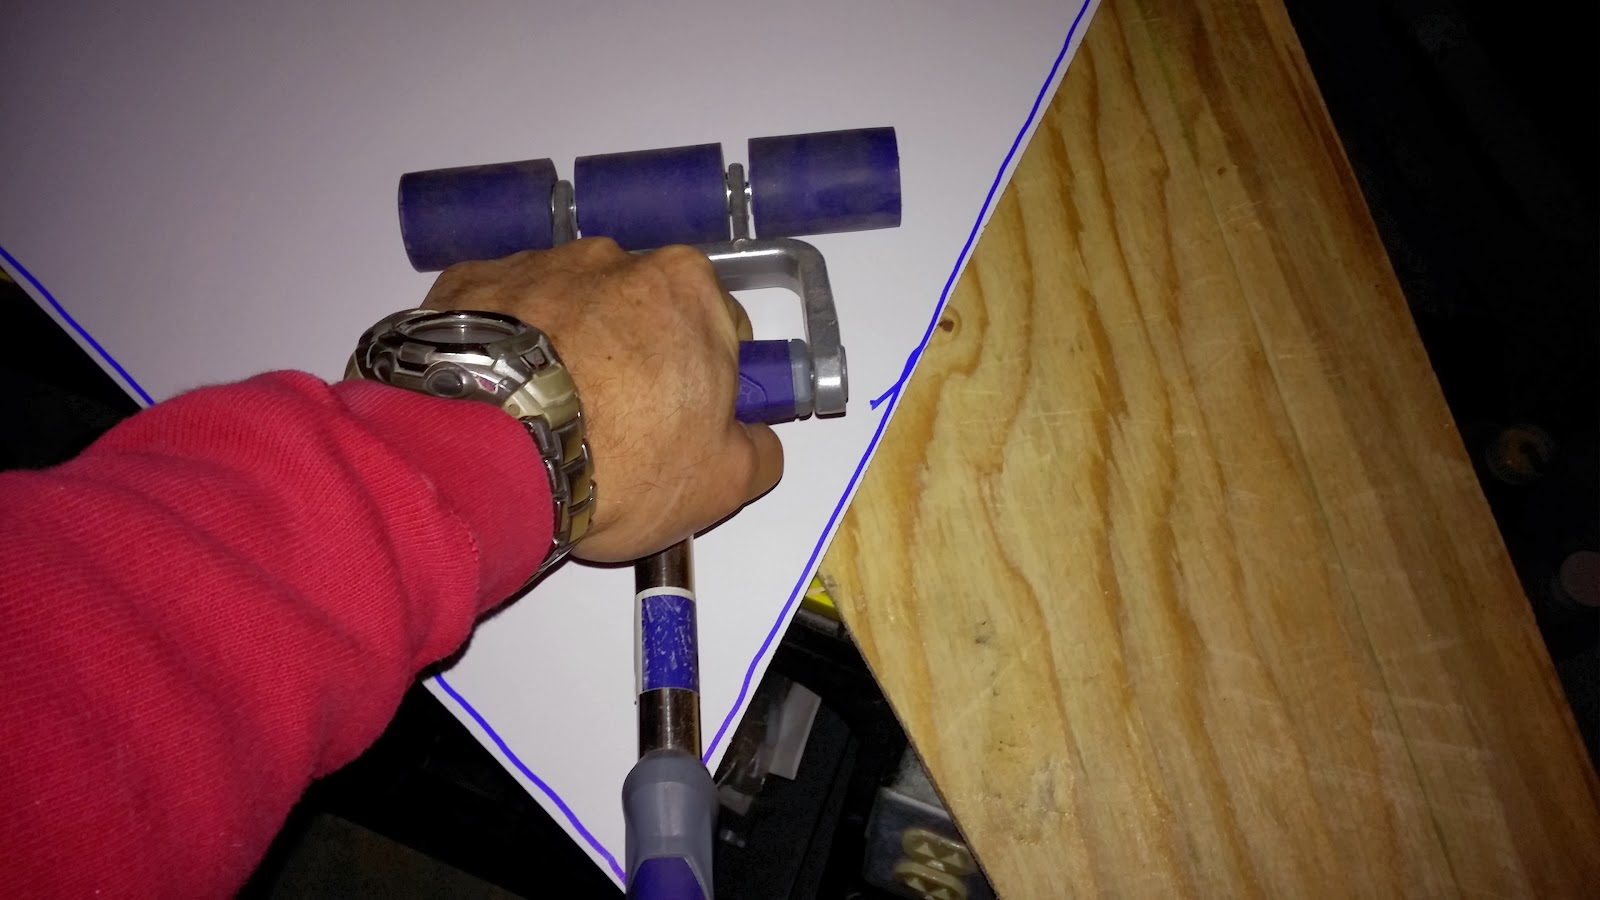
Now the time had come to adhere the Formica to the countertop. First, gotta assemble the tools...
The tools: Contact spray adhesive, scraps of wood, and a Laminate roller
The next step is to put the contact Cement both on the plywood and the bottom of the Formica...
After you can touch the Cement without it coming off on your finger, you put down the scrap wood spacers... DO NOT wait TOO long, or the cement won't work. The reason for the spacers is that once both contact cement coated surfaces touch, you are DONE and it is next to impossible to separate them. so you use the spacers so you can position the Formica properly so there is overlap on all sides.
I laid down 4 spacers here
Now I can position the Formica Just right...
Now I am ready to go. I pulled out 1 spacer (the one on the right) and use the roller to work out any air bubble that are underneath, working from the center toward the sides. then I pull out the next spacer, and do the same for the next section, and so on.
Using the Laminate roller (Sometimes called a J-roller, because some of them are shaped like a "J"
Press down HARD and work toward the edges
2 of the spacers removed, 2 to go...
Don't roll over the edge of the plywood or this will happen... fortunately, I think this will be OK.
All adhered, ready for trimming off the excess.
To do the trimming, I use a router with a Flush Cutting bit. In the picture below you see the router (upside down) and the bit. on Top, there is a screw that holds the Bearing, which is the shiny part below the screw, and then the cutting bit which is yellow. The way this works is, the bearing rides against the plywood edge, and since the bearing and the bit are the same diameter, the bit will cut the Formica flush with the plywood.
Then it is just a matter of going around the edge to trim the Formica. There are smaller routers, Aptly named, Finishing Routers, that do this job a little easier...
Now I just needed to cut out the hole for the Sink. To do this, I need a starting hole. So I used a Forstner Bit...
Then it was a matter of putting the router in the hole, and going around the inside of the hole.
The Starting hole...
almost cut out
All trimmed, ready for the Fiddles!
Now I needed a Faucet, after all, what is a sink with out a faucet? Useless! I wanted to have a Single hole faucet, as I had very little room to install it. I decided to use this one from Scandvik. It was a little expensive, but I think it will be worth it in the long run, and will look and work a LOT better than that kitchen sink sprayer that was in there before!
First you have to position it, and it helps to have a Brother in law to point out that unless you had it off center a bit, you wouldn't be able to operate the cold water tap.... Thanks Bro!
Then cut out the hole with a hole saw....
Cut the Hole
Then install the Faucet using the manufacturer's Directions...
Install the water supply....
Install the Sink.....
And Voila! a New Head! Kinda....
Then Just install the mounting bracket for the Shower head, and it looks like this!
Now, tell me true, Which head to YOU prefer?
Before
After!
Nice, bright and no ugly hoses Visible! Note the cover I made for them on the left... That will be a topic for another post....


Subscribe to:
Posts (Atom)


