Showing posts with label s/v Siempre Sabado. Show all posts

Tuesday, July 1, 2014

Wiring

Getting electrons to go where you want them to go (without any leakage!) is always a problem on a boat.  And you want the wiring to be neat and concealed as much as possible.  Steve deals with several wiring issues aboard s/v Siempre Sabado...
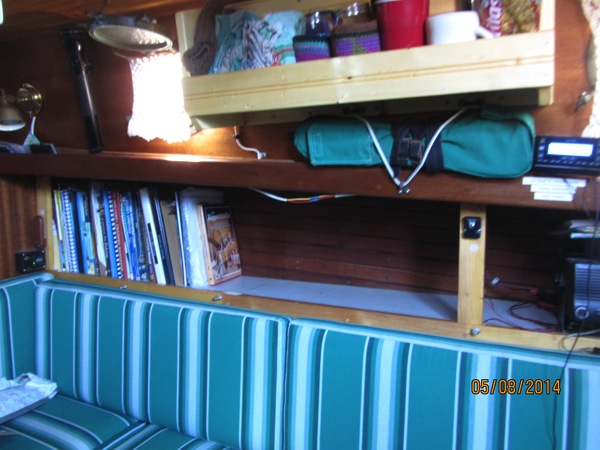
Since the last blog, I’ve run the wires for the outside stereo speakers.  I haven’t actually mounted the speakers because I can’t seem to find the stainless steel u-bolts I brought back from the States.  They’ve got to be here somewhere but I don’t know where.  I’m also missing a couple of other small items.  They’re probably all in the same bag somewhere.  Wish I knew where.  But, no matter because I’d no sooner get the speakers mounted than I’d have to remove them when we store the boat.
Mounting the speakers consisted of
  1. figuring out where to put them,
  2. figuring out how to run the wire inconspicuously,
  3. running the wire.

First, where to put them.  The W28 companionway is not centered on the cabin making symmetrical mounting problematic.

IMG_2428
Sorry this is so dark. I must have accidentally shifted the camera from AUTO to MANUAL and then didn’t make any manual adjustments.
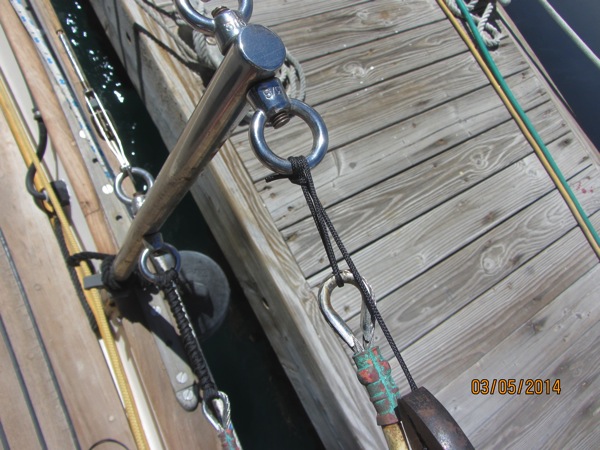
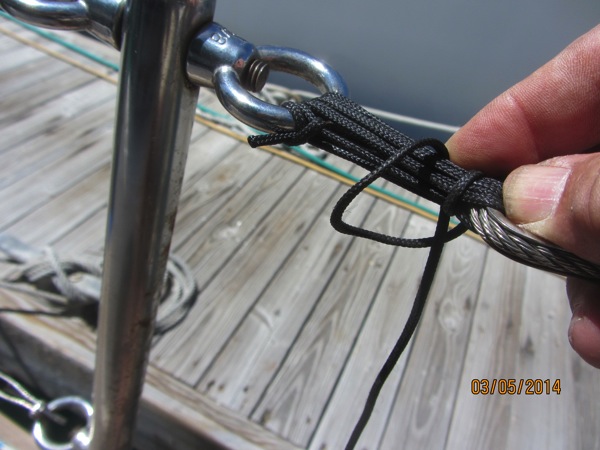
If things were symmetric I could just mount the speakers on the cabin top on either side of the companionway.  Be a piece of cake to run the wires then, just drill a hole under each speaker, run the wire out and seal the hole.  But, on the port side there is almost no room outboard of the companionway at all so that idea is out.  My next thought, and the one I went with, was to mount them on the forward dodger supports (thus the need for u-bolts).  The speakers are kind of big but they’ll go there just fine.  So, how to get the wire to them.  The easiest way would be to run it along the dodger frame and just zip-tie the wire to the frame.  But this goes contrary to Lulu’s wish to “make it pretty”.  I could maybe run the wire inside the tubing, which is what I ended up doing.  I pulled the dodger off and took the forward bow off the frame so I could set it down on deck for drilling.  I drilled a hole near where the bow meets the aft bow.  This would be the entry point for both wires.  Then I drilled exit holes where the speakers were to be mounted.  I tried pushing a piece of speaker wire through from the exit hole to the entrance hole but it inevitably ran into something inside that stopped it.  Other than the nice smooth curve of the tube, I can’t imagine what there is inside that would stop the wire’s progress.  Well, no matter, I just fed a piece of stiff wire through from the entry hole and then fished it out the exit hole where I twisted and taped it to the speaker wire.  Then it as a simple thing to just pull the stiff wire back, pulling the speaker wire with it.

IMG_2429

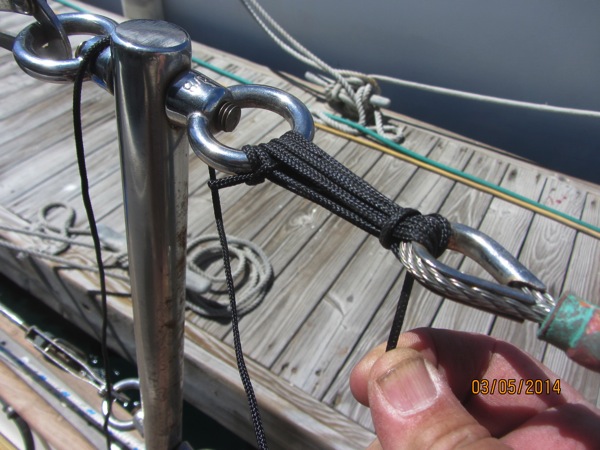
Then I put some anti-chafe gear (aka electrical tape) around the wire to protect it and tied a knot in it to keep it from getting pulled inside.  Hopefully that knot won’t slow the music down and make it sound like a 33-1/3 RPM record playing at 30 RPM.

IMG_2430

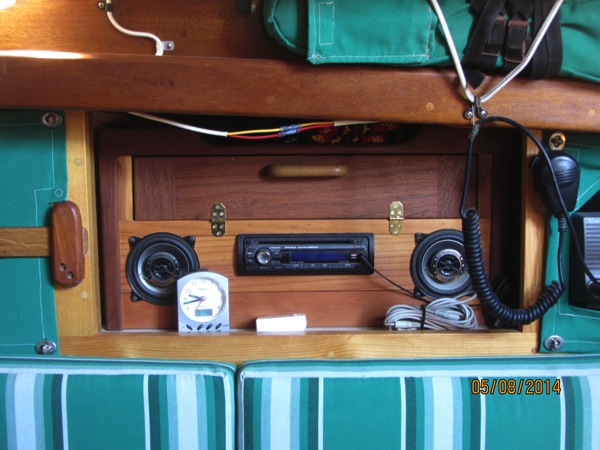
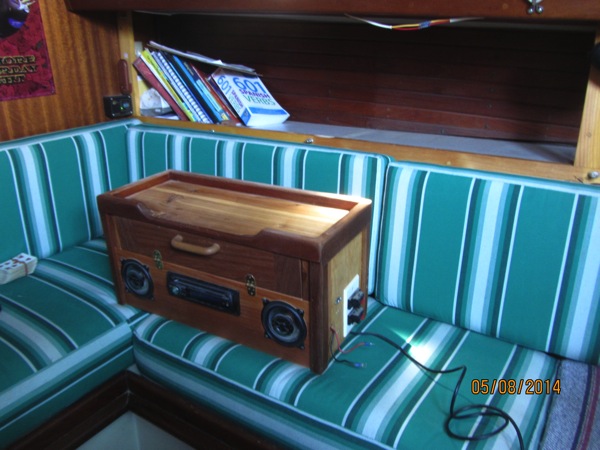
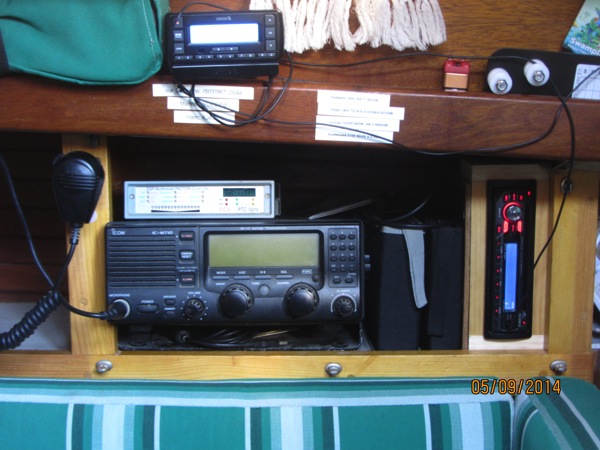
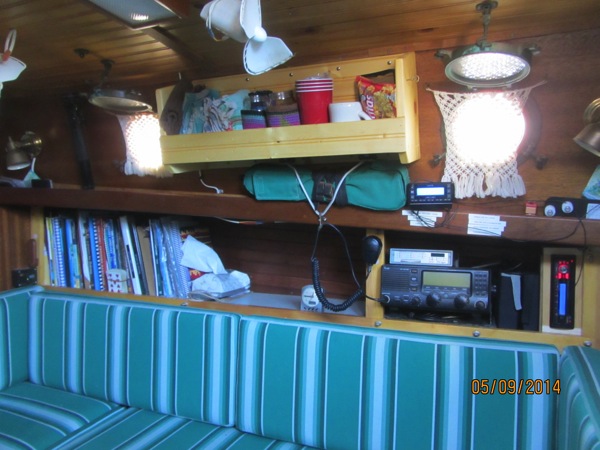
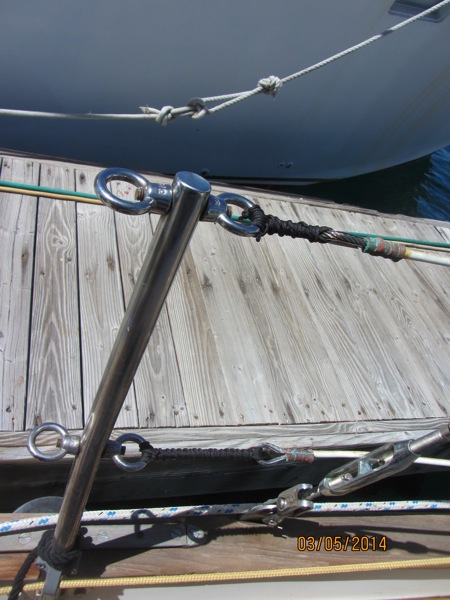
And, the final product, minus the speakers:

That's a reasonably neat installation, isn't it?
That’s a reasonably neat installation, isn’t it?

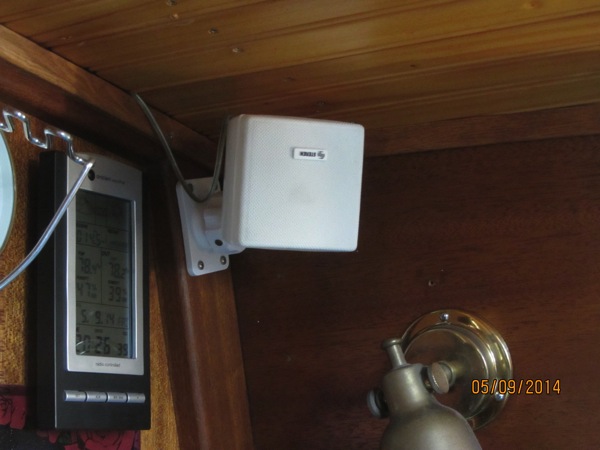
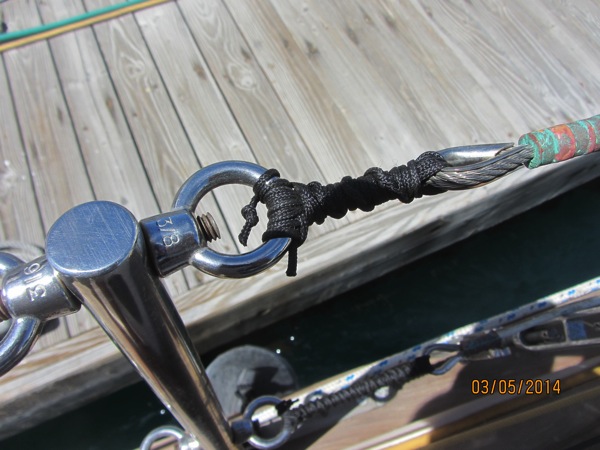
A close-up of the wire exiting the cabin.  I used butyl tape to seal the hole:

IMG_2433
Man! These are all so dark. Wish I’d discovered the camera setting sooner.

The next project I tackled was changing the light in the engine room.  The old light had three problems:
  1. It was just a standard ceiling dome fixture with an incandescent bulb which didn’t shed light on all the places it needed to,  
  2. Its switch was on the fixture itself which was in the engine room (duh).   On several occasions, I’ve closed up the engine room with the light still on and didn’t know it.  This happened recently when we were anchoring a lot. I was watching the meter panel and noticed that it seemed like we’d be using a significant amount of amps when nothing seemed to be on.  This went on for a couple of days before I decided to check the engine room.  Sure enough, the light was on.  This speaks well of our new solar panels as they managed to keep up anyway.  and  
  3. The bulb in the existing light fixture is burned out.  After reading this episode of Cunning Little Plan, I decided that I NEEDED lights like Mike bought.  I bought three and have now installed one. 

Maybe now I'll be able to actually see my dipstick.
Maybe now I’ll be able to actually see my dipstick.
I even went so far as to mount the switch in the cabin right next to the engine room door so we can tell at a glance if the light is on or off.  Pretty sure it’s going to make things down below much easier.

IMG_2439
Add some ribbon lights above to send light into the shadowed areas and I could probably perform surgery in the engine room.

The final thing I accomplished since last time is that I moved the stern navigation light.  It’s always been on a little platform that was built as part of the stainless steel hoop that anchors the backstay.  That was ok until we added our Cape Horn windvane.  Now the bright LED sternlight reflects off the stainless steel of the windvane and ruins one’s night vision when looking aft.  I decided to move the light up to the boom gallows.

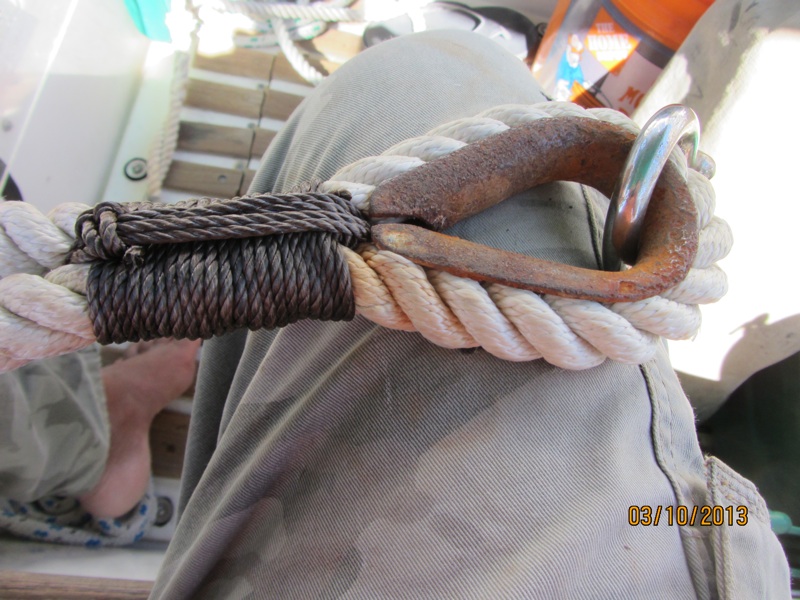
I started by removing the light and fishing out the wire that fed it.  Looked like there would be enough wire to run to the new location.  I would have liked to have made this run without any breaks but that would make the job MUCH harder.  First, I’d need one of these for running the wire through the inside of the bulwarks.  Even if I’d had one, if I ran the wire through it and then it turned out that it wasn’t quite long enough, I’d have to make a splice in an area prone to getting very wet.  What I did have on board were a couple of these, albeit 2-pronged ones:
AA11539
So, I drilled a hole in the bulwark and then ran the old wire to the female end and mounted it on the inside of the bulwark just aft of the boom gallows.

IMG_2440

As it turned out, the wire wasn’t quite long enough to make it to the light but, I really wanted to use it as it was much better wire than anything else I had onboard.  So, I just moved the stern light a wee bit to starboard.

IMG_2441

Once again, the toughest part of the job was getting the wire down through the boom gallows stanchion.  I drilled an entry hole to feed it in but, naturally, it wouldn’t go. Tried using the stiffer wire and it kept getting hung up as well.  Ended up removing the gallows so I could see feed the stiff wire straight down the pipe.  It still got hung up a few times. On what, I do not know.  But, eventually I got it through and could then use it to pull the electrical wires down to where they would feed out the open bottom of the stanchion.

That’s about my last pre-haulout job.  I do think I’ll remove the dodger so I can see better when I motor over to the haulout dock but that’s about all.  Don’t want to start stashing stuff below until I’m sure I won’t have to access the space underneath and I won’t know that until I’m in the yard doing all the jobs necessary before storing the old girl for a year or more.

All in all, the jobs have gone smoother than I had anticipated.  Better that than the reverse.   Now, if the yard jobs will just go as smoothly.

Tuesday, May 20, 2014

Rethinking space

Steve and Lulu who live aboard s/v Siempre Sabado have been doing so for long enough that they are having the opportunity to rethink some of their earlier decisions about interior space utilization...
When we first got our Westsail 28, there was no stereo onboard. Matter of fact, there was pretty much nothing on board that wasn’t there when she shipped out of Costa mesa,  California, back in 1977.  Actually, there were a couple of major items like a relatively new Westerbeke diesel and a Webasto furnace but not much that you could see.  Obviously, being music lovers, we needed a stereo.  A car stereo was just the ticket although it became a little problematic where to mount speakers.  Speakers tend to be a couple inches deep and the walls on the boat tend to be the thickness of one sheet of plywood, sometimes 1/4″, sometimes, 3/4″ but never more than that.  So, the back side of the speaker would protrude into the space on the other side of the wall.  Not knowing for sure where I wanted to put holes in walls, I decided to just build a custom cabinet and set it on the bookshelf that ran the length of the starboard side of the saloon.

IMG 2416

It’s worked out pretty well so far.  The little cabinet on top holds various chargers, disc cleaners, patch cords, etc.  There’s a shelf on top where we stow the Netbook.  But, we’re hurting for space and looking at this cabinet, I see a lot of wasted space.  Something had to be done.

The first step was to rethink the speakers.  In the past few years, the sound from small speakers has gotten better and better.  Most of the surface mount speakers I found, however, were just too big for the cabin.  However, in La Paz I found these little beauties:

IMG 2424

You can turn them anywhichway and they’re small enough to not look out of place in our cabin.  OK, speakers solved.  Now it’s just a matter of finding a new home for the stereo.

I knew I was going to do this project someday.  I’ve been thinking and pondering on it for quite awhile.  Well, now it was time to either take care of business or vacate the head, as they say.  I entered into the project not really knowing how it was going to end.  But, I knew the first thing was to pull the cabinet:

IMG 2419

I was really pretty pleased with myself when I saw what a nice job I’d done on this cabinet.  Seemed a shame to toss it but space is more important in this case.  And look at how much room it frees up:

IMG 2420

Of course, it only frees up the room if I don’t have to turn right around and fill the new space with the stereo.  My original thought was that I’d build the stereo in, either on the shelf or hanging from the top of the opening.  Then books could go either above it or below it, depending on how I did it.  But, I wasn’t really liking this approach as much as I thought I would.  The space just aft of the SSB radio was used for housing mini hard drives, blank CDs, and blank DVDs.  The hard drives are currently in Flipper and will remain there until we finish our road trip.  And by then, who knows?  Maybe I’ll have consolidated everything I have onto a couple of 10 TB hard drives which are sure to be available by then.  I’ll worry about that when the time comes.

So, what did I do?  Well, I decided to use the former hard drive storage space for the stereo.  Trouble was, once I built an enclosure around the stereo, the space was no longer wide enough.  It would have been doable back when I had a shop that had a thickness planer in it.  I could just plane the wood down to the size I needed to make the enclosure fit.  But that’s not the case so I had to work with what I had which was 3/4″ thick wood.
I remember the first time I ever saw a car radio mounted vertically instead of horizontally.  It was on “Route 66″.  I don’t know which model year it was but I think it was around the time of the advent of the Corvette Stingray (what a cool name!) and there was a shot of either Buzz or Todd hitting a button on the radio.  The radio looked just like any radio except that it looked like it had been mounted sideways, except for the fact that all the letters and numbers were set up so that it was obviously supposed to be mounted that way.  Cool.  Different and therefore, cool.  Like the vertical headlights on the first Buick Riviera or the fastback on the first Plymouth Barracuda. Different, therefore cool.  Anyway, I decided that there was absolutely no reason I couldn’t mount my stereo “Stingray-style”.  Of course, the words on mine are all sideways but I can adjust.  We almost never play CDs but, if we do I’m sure they’ll play just fine.  If they wouldn’t, the Sony Discman never would have worked.  So, here it is, my Westsail Stingray:

IMG 2422

The carpentry is a little plain but it works and the system sounds great.  And look at the resulting space:

IMG 2423

BTW, the overhead (ceiling) I installed way back when proved its worth once again.  I needed to run speaker wires from the forward-starboard corner to the stereo, the length of the saloon.  I was able to hide the wire above the pine boards and only had to remove two boards to do it, not the entire overhead.  Made the job much quicker and MUCH easier.

Tomorrow I have to figure out how to run wires to the new outside speakers.  I mean I have to figure out how to run wires NEATLY to the outside speakers.  Hmm.  Wonder how I’m going to do it.

Tuesday, April 1, 2014

Who needs turnbuckles?

Steve and Lulu who live aboard s/v Siempre Sabado don't use turnbuckles on their lifelines - they use lashings...
As reported earlier, when we got back to Siempre Sabado from our trip to the U.S., something just didn’t look right.  Then I saw it:  the upper lifeline was no longer attached to the stanchion.  There were a few strands of nylon left on the stanchion ring but that was it.  Then, a couple days later we were visiting with some friends on the dock.  Lulu was sitting on the cabintop and put her feet up on the lower lifeline.  Guess what?  Yep, that was enough to break through what remained of the lashing on the lower lifeline.  I suspect that the degradation that led to the final failure probably happened in the last 6 months or so.  Last time we were out was when we were coming back to La Paz last May (Jeez! Has it been that long?).  During that trip we didn’t notice any issues with the lifelines in spite of abusing them with the dinghy every time we launched or retrieved it.  Nevertheless, I’ve added replace lifeline lashings to my annual to-do list.

It’s been almost exactly two years since I replaced our lifelines in Mazatlán.  At that time, I didn’t really document the lashing process itself so I thought I’d take care of that today.

This time, instead of white 1/8″ nylon braid, I used black 3/32″ nylon braid.  The main reason for the change was that I though black might be a little less susceptible to damaging UV rays, but mostly because we have a huge spool of it we bought at a commercial fishing outfit in Puerto Peñasco.  Not sure what the fishermen use it for but they must use a lot since the huge spool we bought was the smallest one they sold.

The first step is to tie the line to the ring on the stanchion.  I used a fisherman’s bend.

IMG 2235

Then just start wrapping line between the ring and the lifeline, pulling it as tight as you possibly can each time.

IMG 2236

I suggest using pliers to pull the line tight.  I figured this out a little too late.

IMG 2244

Once you have as many wraps as you think is appropriate (I used 6), pull it tight and tie it off with a half-hitch pulled mondo-tight with the pliers.

IMG 2239

 Now, just keep tying half-hitches, always in the same direction, until you reach the other end.

IMG 2240

When you reach the end, you can finish it a couple of ways.  Last time I just tied a last half-hitch and then tied an overhand knot up close in the end.  This time I decided to tie the end off with a clove hitch on the stanchion ring followed by the pulled-very-tight overhand knot.  I didn’t get this overhand knot as close to the ring as I would have liked but I suspect it’ll be just fine.  As soon as the wind dies down, I’ll apply some heat and fuse the overhand knot to itself so it’ll never ever come loose.

IMG 2243

Personally, I don’t think these look quite as nice as the white ones did but they look a LOT better than the parted ones laying on deck.

IMG 2234
IMG 2246

If you have a gate in your lifelines, be sure it’s closed before you start lashing.  You can put incredible force on the stanchions when you pull the lashings tight and you don’t want to bend a stanchion.  I didn’t put the slight bend in this stanchion, it was that way when we bought the boat.  Although it’s open now, I did have the gates closed while lashing.

So there you have it.  Change your lashings at least yearly.  It’s too easy and cheap to do to take a chance on the line lasting any longer than that.

Thursday, January 23, 2014

Rerigging

Normally, one would consider replacing the standing rigging on a boat to be a NOT small boat project. Yet, Steve and Lulu living aboard s/v Siempre Sabado show us that, tackled one stay at a time, it is not all that difficult. If you get nothing else from this post, look at the cracked eyes on the shrouds... and then go inspect yours.

My main big job on the to-do list for La Paz was to replace all the standing rigging on Siempre Sabado.  For those not in the know, “standing rigging” is the array of wire cables and fittings that hold the mast upright.  You may remember that when we were in Santa Rosalia last January, I was a bit taken aback when I found, not just one, but two stainless steel eyes on my shrouds with breaks all the way through them.

nice crack

Well, since it’s usually recommended that standing rigging be changed out every 10-15 years and, since I suspect the standing rigging on Siempre Sabado is original, making it 37 years old, and since there are probably other cracks just waiting to be discovered, now seemed like a fine time to change out the standing rigging.

Toward that end, I pulled out my factory drawings of the Westsail 28 to get lengths and wire sizes.  Following the advice of Shannon (s/v Tink),  a clever and thrifty sailor, I ordered all my wires a few feet longer than needed, with an eye machine-swaged to the upper end.  Then I ordered swageless fittings for the lower end.  I was lucky enough to be able to team up with Rick on s/v Calypso who was also ordering new standing rigging.  Seems Rick did a solid for a fellow cruiser in La Cruz last year.  The cruiser, Brook, owns a rigging shop in Portland, Oregon and offered Rick a discount on any rigging he needed.  Brook let me in on the deal and so, I got a discount in return for transporting Rick’s rigging back down to La Paz from Portland.

I bought 7 lengths of 1/4″ 1×19 wire for the upper and lower shrouds and the backstay (I had already replaced the forestay and inner forestay in Newport when I installed the roller furler), 2 lengths of 3/16″ 1×19 wire for the whisker stays, 2 lengths of 1/8″ wire to hold the spreaders up when you stand on them, and one length of 3/8″ 1×19 wire for the bobstay.  Each of these had an eye machine-swaged on one end.  This turned out to be a mistake but only because the whisker stays and the spreader-holder-uppers should have had a fork swaged on instead.  I also bought swageless studs for the turnbuckle end of the wires, new turnbuckles, swageless backstay insulators, and a few other odds and ends.  For the pieces that I mis-ordered, I went ahead and ordered new swageless forks from Rigging Only and had them ship it to La Paz.  There’s a story in itself.  Four pieces that fit in a 5×7 padded envelope.  A $155.66 (US) value.  It would have cost about $27.00 to ship them down via the postoffice.  But the Mexican postal service has a very bad reputation for getting things to people in a timely manner, if at all.  So I opted for UPS.  This was a good idea as the parts got here in about a week.  Here’s the cost breakdown:
  • Shipping:  $68.11 (US)
  • Import Fee: $425(MX) (~$34.00US)
  • Handling (UPS): $35(MX) (~$2.80US)
  • plus 16% IVA tax on the handling charge: $5.60(MX) (~$0.45US)
Total: $105.36(US) or 68% of the cost of the items ordered

Anyway, back to the rigging.

I started with the lower shrouds since I could reach their upper ends from the ratlines without climbing the mast.  On the first one, after loosening the turnbuckle, I went up, removed the old shroud, brought it down, laid it out on the dock as a gauge for the length of the new one, cut the new one, put the swageless stud on the lower end, climbed back up and attached the new shroud to the mast, climbed back down, installed the turnbuckle on the stud, attached the other end of the turnbuckle to the chainplate, and tightened the turnbuckle up to about what I thought it should be.

Then I got smart.

On all the subsequent shrouds, I climbed up the ratlines with the new shroud in hand.  Removed the old one, attached the new one, and then climbed back down.  Then I attached the new turnbuckle to the chainplate, held it upright with the new wire alongside, marked the place to cut it with a Sharpie, then cut it and put the swageless fitting on the end.  Much faster this way and I wouldn’t need to be tied to the dock to do it.

I used Hi-Mod swageless fittings but could just as easily have used Sta-Lock or Norseman.  I really like the Hi-Mods though.  Also, after I got everything cut and the fittings in place, I applied a light coat of Lewmar grease to the threaded fittings on the turnbuckles, ran the studs all the way in and then all the way out to distribute the grease and then wiped off the excess.  Hopefully this will help keep them from seizing up as some of my old ones had.

I learned that bolt cutters, or at least my bolt cutters, did a terrible job of trying to cut the cable.  I had much better luck with a thin cutting blade on my angle grinder.  It cut it fast and straight.

Here’s how the Hi-Mod swageless fittings are installed:

Assemble your tools.  Don't forget the instruction sheet, at least for the first one.
Assemble your tools. Don’t forget the instruction sheet, at least for the first one.

After cutting the cable to the right length, slip the ferrule over the cable.

Unlay the outer wires, leaving the twisted core intact.

Then put the cone, followed by the crown over the inner core.  The crown in particular is a tight fit.  You use the piece that's going to screw into the ferrule as a pusher.  The indent in the end assures that the crown is installed exactly as far down the wire as it's supposed to be.
Then put the cone, followed by the crown over the inner core. The crown in particular is a tight fit. You use the piece that’s going to screw into the ferrule as a pusher. The indent in the end assures that the crown is installed exactly as far down the wire as it’s supposed to be.  Sorry about the focus, or lack thereof.

Wrap the outside wires back around the core and the cone. One wire should end up in each groove in the crown.  This is probably the hardest part and it's not particularly hard at all.
Wrap the outside wires back around the core and the cone. One wire should end up in each groove in the crown. This is probably the hardest part and it’s not particularly hard at all.

Slide the ferrule back up to make sure things look copasetic.

Add a little bit of red thread-locking compound to the threads of whatever end piece you're using (this is a stud), and screw it into the ferrule.
Add a little bit of red thread-locking compound to the threads of whatever end piece you’re using (this is a stud), and screw it into the ferrule.

Hi-Mod stresses that the most likely cause of failure of one of these fittings is overtightening.  I used the end wrenches shown and tightened the fitting until it was "just up against" and then a skosh more.  Hopefully that was exactly the right amount.
Hi-Mod stresses that the most likely cause of failure of one of these fittings is overtightening. I used the end wrenches shown and tightened the fitting until it was “just up against” and then a skosh more. Hopefully that was exactly the right amount.

IMG_1879

IMG_1880


By the way, when I did the upper shrouds and the backstay, I rigged a halyard to act as a temporary stay to replace the one I was removing.

I still have to do the bobstay but that requires launching the dink so I’m waiting for the northers to die down first.  The next step will be to properly tension the wires. I’ve ordered a Loos tension gauge and will pick it up when we go up to Oregon for the holidays.  I’m sure our friend Jay on s/v Wind Raven would have loaned me his but I want to have one on board so I can periodically check and adjust the tension as-needed.

The one thing that bothers me a little bit about this rerigging job is that so many people seem to be so impressed that I would tackle it, having never done it before.  Unless I’m really missing something, I just don’t see what the big deal is, other than having to go up the mast a bunch of times.  If someone knows, please tell me before I put this rig to the test and find out the hard way.

Oh, by the way, almost every wire I removed had either a very obvious problem or an impending problem with the swaged fitting on at least one end.

One of the old fittings.  When under tension, this crack was open.
One of the old fittings. When under tension, this crack was open.

There you have it.  I probably should have changed the chainplates and mast tangs as well.  I did inspect them and found no apparent problems.  Let’s hope things stay that way.

Tuesday, December 17, 2013

It’s the little things

Steve and Lulu living aboard s/v Siempre Sabado have made some small changes that have big results. As Steve says, sometimes it is the little things that make all the difference...
We made a couple of minor changes as a result of our trip to the States that have resulted in an improved quality of life aboard Siempre Sabado.

Things have always been a wee bit dark and cave-like down below thanks to inadequate lighting.  The original lighting was all incandescent and used very inefficient automobile tail-light bulbs.  These were borderline bright enough but used way too much of our precious battery power.  I eventually changed most of the bulbs to LED but continued to use the original fixtures.  The brightness of the LEDs was largely dependent on when (meaning the year) we bought them.  The first ones seemed pretty bright but cost a ridiculous amount of money.  As time went by LEDs got brighter and cheaper but, since they’re designed to last just about forever, it was hard to replace the old ones that were still working.  However, the difficulty in seeing things down below finally got the better of my cheap-osity and we decided to spring for new fixtures.

I’d always read really good things about the Alpenglow line of lights but had always been put off by their price which seemed a wee bit dear to me.  However, if we were going to put out substantial money for lights it would be nice to be able to see when we were done and also to have lights with a good reputation rather than something cheaper that may end up breaking.  I was particularly attracted to their line of 9-watt LED dual-power lights with night vision.  The light has a low power and high power main light as well as a dual power red light for nighttime.  I bit down hard on the bullet and placed an order for three of them.

The pain of the initial purchase price has passed and we are now basking in the soft glow of our new lights that are actually bright enough that we seldom use the high power setting.

This one's over the table.  We have another over the stove/sink, about 4' away.  We can definitely see what we're doing now.
This one’s over the table. We have another over the stove/sink, about 4′ away. We can definitely see what we’re doing now.

Underway, it’s best to use red lights to maintain night vision when going below for something.  We had one red light over the nav desk before but it was pretty anemic. Now we have two dual-power red lights in the main cabin as well as another in the head.

31

The real magic has been in the head.  This has always been a dark cave.  Really hard to see anything.  Not anymore:
36
High beam red

37
Low beam red – Just right for those middle of the night visits when you just woke up.

35
On the downside, we can now clearly see all of our flaws.

Another minor improvement involves dishwashing or, more accurately, dish drying.  When we’re not underway, we tend to let dishes air-dry as they seem to end up a lot dryer than when we towel-dry them.  Hurting for counter space, we put a cutting board on top of the stove, spread out a towel and then get really creative about piling dishes up.  This works OK but it would be nice to be able to pile more dishes up and still maintain some free airflow around them.  We’ve seen and used various folding drying racks over the years, mostly in our campers but none of them really filled the bill.  They never seem to deliver the goods in that they don’t actually hold very many dishes.

Before we headed north this year, I scoured the internet looking for some sort of rack that might actually satisfy us.  I think we’ve found it although, sad to say, I don’t remember where I actually ordered it from.

It folds down small enough to stow behind the stove:
34

When unfolded, it presents a lot of drying/stacking space on a very stable platform.

33

And, you can really stack the stuff up.  In this photo we haven’t even begun to use all the space available.  For instance, all those fingers along the top can hold glasses and cups.

38

I realize that writing about items like lights and dish racks is pretty freakin’ mundane but these are the kinds of little things that make life on a tiny little boat bearable.

Thursday, April 18, 2013

Mind that windlass handle!

s/v Siempre Sabado has a manual windlass.  Keeping the handle to that windlass handy to the windlass and yet still keeping it aboard would seem to be conflicting goals.  Steve and Lulu show that they can both be met:
When we first got our boat, there was a mystery piece of canvas onboard.  It was about 2′ long,  only about 2″ wide, open at one end, and with a pair of sort of flanges along one of the long sides with snaps so the two flanges would snap together.  It was anyone’s guess what the heck this thing was.  We looked at all kinds of stuff on board to see if we could figure out what it was for.  The only thing that fit into it was the removable windlass handle.  But canvas covers on boats are usually to protect something from UV degradation, not something the galvanized steel handle was likely to suffer from.  So what was it for?

One day, I got the bright idea to try snapping the flange around a lifeline up forward and using the thing as a sort of horizontal holster for the windlass handle.  Well, it was a perfect fit.  I’m still not sure if that’s what it was originally intended for but if it wasn’t, it should have been.  Keeps the handle off the deck and out of danger of being kicked or washed overboard.

unsafe stowage
That’s the handle sitting between the teak deck
and the bulwark, the thing with the black hand grip.

The main problem with the “holster” was the snaps.  Even when they’re made for marine use, snaps eventually get corroded to the place that they no longer come apart, or, if apart, will not snap back together.  And, sure enough, that’s what happened.  At least I assume that’s what happened.  For some reason or another, we removed the holster some time ago and I can no longer remember for sure why or where the heck it is.  Since then, the rope tether that was on the windlass handle chafed through and for a long time now, the handle has just been riding loose on the foredeck.  And, although we’ve never had a problem, once you see the potential for a problem, if you don’t fix it, you’ll be kicking yourself mightily when the problem eventually happens.  I’ve always meant to have a second handle made but, so far, never have so I’d better take care of the one I have.

Lulu put a bunch of Sunbrella scraps together and sewed up a holster during our trip from Santispac to Punta Chivato last week.  Today, I installed the grommets and hung it from the lifelines.  I need to come up with a prettier way to attach it than with the “clothes stops” that I’m using now, but they’ll work until I come up with something better.

safe stowage


I also rigged up a tether so, even if I were to get all fumbly-fingered, the handle should stay attached to the boat.  The handle stows all the way in the holster and can be removed just by pulling on the tether.

handle holster


The tether is long enough allow the handle to be used while still attached to the lifelines.

handle safely tethered


I think I’ll still get another handle made anyway,  just in case.
(And those are some nice examples of marlinespike seamanship out there on the end of the bowsprit in that last picture!  Is that ocean plait?)

Thursday, March 28, 2013

Anchor snubber

Down in Mexico aboard s/v Siempe Sabado, Steve builds a new anchor snubber:
Decided it was time to refine my anchor snubber.  For those who don’t know, the snubber is a piece of line that is stretchier than chain, used to take the strain off the chain and the windlass.   The chain is let out, then one end of the snubber is either tied or hooked to the chain.  The other end is secured on deck to either a cleat or a kingpost.  Then the chain is let our further until the snubber is taut and the chain between the hook and the windlass is slack.  Now, if the boat gets to hobby-horsing or dancing at anchor, when it comes up to the end of its tether, it stops softly as the nylon snubber stretches some, rather than stopping hard as it would if it came to the end of the un-stretchy chain.  Much easier on equipment and nerves and lessens the chance of yanking the anchor out.

Anyway, my old snubber, while serviceable, was getting a little shabby looking.  It was made up of two separate lines with thimbled eyes on one end.  The thimbles were getting cock-eyed and the lines were different sizes.  The arrangement of shackles to get these two eyes connected to one chain hook was a downright embarrassment.  Time to straighten things up.

I started by finding a long enough piece of 3/4″ three-strand nylon in the lazarette.  I middled it around a rusty, but still serviceable, thimble and then put on a temporary seizing using a doubled constrictor knot.

temporary seizing


Next, I wrapped the eye using tarred nylon marline and removed the constrictor knot when I got close to the end of the wraps:

wrapped - seizing removed


Passed the working end through the eye and pulled the other end to bury the crossover.

finished wrapping


Made a few frapping turns to tighten the wraps and also protect them from chafe:

a few frapping turns


But, for real chafe protection, there’s nothing like old fire hose (Thank you, Silverton Volunteer Fire Department) which I sewed in place using waxed sail thread and also seized in place using a doubled constrictor knot backed up by a surgeon’s knot.  Nothing like the belt and suspenders approach for peace of mind.

anti-chafe


Add some more anti-chafe gear where the line will run through the hawse pipes and we’re good to go.

snubbing harness


Related Posts Plugin for WordPress, Blogger...