About a month after buying Rubigale, and with a boat full of crew, we were ready to leave the fuel dock after a day of sailing. After pumping out I went to start the engine, turned the key, and nothing. Not even a click. I knew nothing about engines-zero, zip. I could find the alternator and the dipstick. My knowledge of cars surpassed that of boats only because I knew where to put in windsheild wiper fluid. I didn’t know how I was going to get back to my slip and had a half dozen people that needed to go home. My boat mentor J had his own boat full of crew and couldn’t help at the moment. Fortunately, T lives aboard a few docks away, and after I fished out a mystery set of wires with clips that I had found in the bowels of weird boat storage (had this happened before?), he jumpstarted the boat by connecting the battery to the start switch.
Success!
I thought the crew would disappear as soon as we were back to the slip, but J and T started troubleshooting the starter and half of the people stayed, rapt with the process. I didn’t understand much of what I was hearing, but I was mesmerized by the problem solving. I photographed where to connect the wife to the starter just in case. Final diagnosis, probably a bad starter switch because there were loose connections and a little corrosion. J showed up with a new starter the next day and showed me how to put it in. It was much easier than I had expected and I photographed that as well. As a bonus, he connected a new engine hour meter to the switch so I could keep track of hours since the previous meter had died at just under 4000 hours at some unknown point in the past. Everything seemed to work great and I put it away in my mind as a solved issue.
Showing posts with label maintenance. Show all posts
Showing posts with label maintenance. Show all posts
Tuesday, June 20, 2017
Starting A Boat With A Paperclip
This isn't a project per se... well actually it is, but the most important part of this post is the successful trouble shooting of a problem. And yes, it does invoke MacGyver-ism. Read along with Dana on s/v Rubigale, as she deals with a motor that suddenly refuses to start...


Tuesday, January 24, 2017
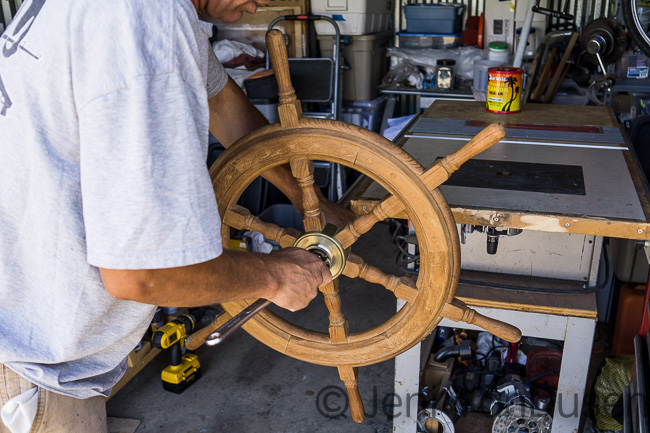
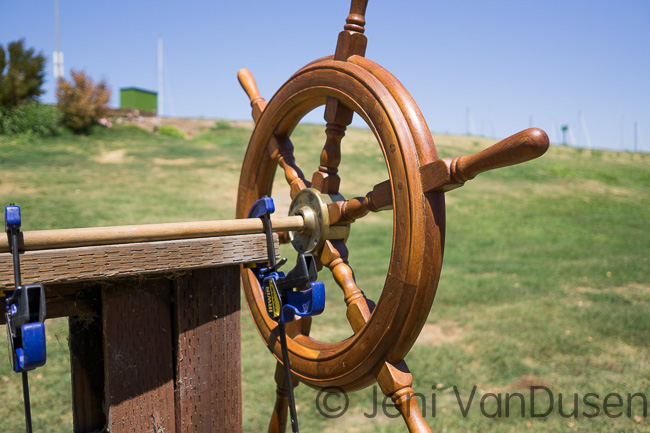
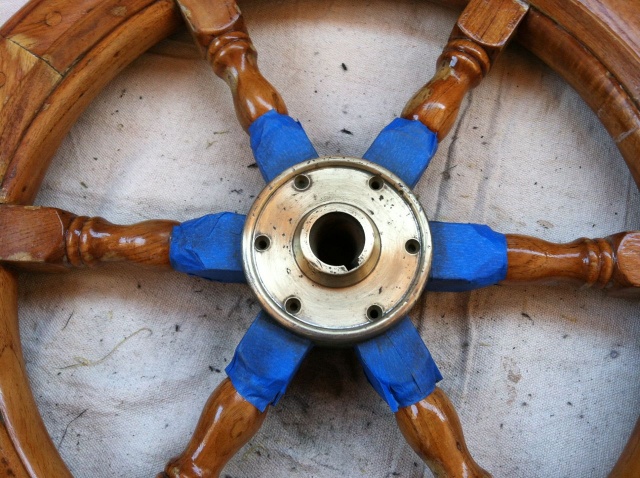
To Helm with It
Rich & Jeni continue the re-fit of their Tayana 37, s/v Ramble On. Here, the helm gets treated to a new finish. Note also the transformation of the house teak in the background between the first and last pictures - lotta work going on there...
In keeping with getting this beast ready to take out for a spin, we finally put the steering wheel (the boaty term is the helm) back on the boat. Way back in early 2013 we took a bunch of stuff off the boat, the wheel included, and it’s been in storage ever since. Some previous owner coated it with lovely Cetol over and over and water had gotten under the Cetol and it was peeling. Rich stripped off the Cetol a couple years ago and a few weekends ago we sanded it with 320 grit sandpaper and put two nice, clean coats of our favorite Star Brite teak oil and sealer on it. The post that the wheel attaches to has been a real leg-bruiser these past few years so it’s nice to get the wheel on, though I have banged my shin on it already. Rich also made new teak knobs for the throttle and shift levers (the old ones were cracked).
Little by little, one step closer…
Light sanding with 320 grit
Getting ready to apply teak oil and sealer
First coat drying
Finally back on the boat


Tuesday, January 12, 2016
Fender Washers--Basically Useless?
Drew has been at it again... Here he is testing fender washers as might be used instead of proper backing plates for items thru-bolted on deck. Drew made two posts; I have included both of them here.
In the process or researching an article on backing plates, it seemed worthwhile to actually test some washers. After all, it was the failure of fender washers that led to cracking of my deck and the need to remount the winches.
I used a 3/4" pine board as a surrogate for a cored deck and tightened a collection of 1/4" washers untill the first damage to the wood, and until failure. To no surprise, common washers, fender washers, and HDPE were glaring failures, and FRP and thicker metal washers were fine.
(click to enlarge table)
And then there is always the matter of what happens in wet places. Though I like aluminum for ease of fabrication, I also know its limitations.
As ramp-up for some Practical Sailor testing, I thought I would share a preview.
First, unable to secure scraps of deck material for which I could be sure of the pedigree, I laid up some of my own. The testing will based upon 1/2-inch balsa core with (1) 6-ounce cloth and (1) 17-ounce biaxial layers on the deck side and (1) 17-ounce biaxial layers on the under side.
I drill a 1/4-inch hole (no epoxy plug, block of wood on the back side) and tightened down a fender washer against it. At 10 in-pounds (about 675# load) the washer had distorted and the laminate was failing. for comparison, the bolt working load of a Lewmar 40 winch (1/4-inch bolts) with a strong grinder is about 500 pounds each. In other words, without an epoxy plug the bolt will fail under working load and standard ASME bolting load, with no safety factor for aging and fatigue. It is about 5x weaker than good design suggests. It also explains why I had a PO installed winch rip out.
By 18-in-pounds the fender washer was buckled and the nut was well into the core. For comparison, this is about 50% better than a plain pine board in each case.
I repeated the test with only lock washer. The same result! The fender washer resulted in no increase in strength. The point being, that the bolting washer provided better support in close, the end result being the same.
Testing for the actual project will involve proper epoxy plugs. However, since under the load the bolt will NOT be supported on the other side (the winch or cleat will be lifting) in the real world, the top side support will be supplied by a 4-inch diameter ring spacer, allowing the washer to pull through, if that is what it wants to do. I've tested this without the epoxy plug; not surprisingly, it lowers the failure load and creates top side damage much like I saw on my failed winches.
We'll see. But for now, the moral of the story is that fender washers are basically useless; they fail as soon as they are actually needed.


Tuesday, June 23, 2015
Roadmaps For Troubleshooting
Our boat, Eolian, came with a full set of factory prints covering wiring, plumbing, and rigging. And tho there had been changes (mostly to wiring) since she was new, the prints helped enormously in figuring out the actual in-place wiring and correcting several mistakes.
But what if you don't have those prints? Well if you've done any work on the boat, chances are that you have mapped out some portions of of the systems onboard. But the best way would be to make a project out of the discovery, and record the results to be used by your future self as roadmaps.
Please welcome new contributor Will, onboard s/v Chaika, a Westsail 32, who has done just that! And also please note that he has additionally documented the locations of all the thru hulls, perhaps the most important part of the exercise. Do you know where all yours are?


Tuesday, March 17, 2015
Out Damned Spot!
This is a mash-up of posts which originally appeared on Windborne in Puget Sound


Supposing that these are some form of lichen, I did some research - it is such a wonderful thing to have the bulk of Man's knowledge at your fingertips!
Guess what? Algae, moss and lichens suffer grave bodily harm when exposed to a particular class of chemicals. Well I guess that part is not a surprise. But this part is: that family of chemicals is relatively harmless to virtually everything else. In fact, it is the active ingredient in Bactine: benzalkonium chlorides.
Now here's the next surprise. No, you don't have to buy 100 bottles of Bactine and distill it to get the benzalkonium chloride - all you have to do is go to the pool/spa section of your local hardware store and buy a bottle of HTH Algae Guard:
This is a 30% solution, and yet a 2% solution is supposed to be adequate for killing algae/moss/lichen.
So, the first test is a kind Hippocratic one. Does this stuff harm the Sunbrella canvas on the boat? I uncapped the bottle and put some of the straight 30% solution directly on a scrap of our Sunbrella and left it to dry. After rinsing it out 24 hours later, there was no detectable effect on the canvas. At 30%, the solution has a blue tint - I suspect this is just a dye for appearances, given its intended use. Our canvas is green - if yours is white, you might want to repeat this test.
For the next test, I made up a 6:1 dilution (5%) solution in a hand spray bottle and applied it to a section of the deck with the lichen, and a portion of our canvas which has a liberal infestation of winter algae on the outside. I also applied it to the inside of the canvas directly over our galley vent where we get the most amazing colonies of... well, life I guess, apparently feeding on whatever the vent delivers to the canvas.
The benzalkonium chlorides definitely killed the lichen. But it did take a mild scrubbing with a brush to remove the corpses. Please note that previous scrubbing with the same brush and bleach had no effect on the spots. I apologize that I used a washer for the sizing comparison - I didn't have a dime in my pocket. The washer is a little bigger than a dime and a little smaller than a nickle.
I also applied the 5% benzalkonium chloride solution to a portion of our dodger canvas. Please note that this canvas is more than 10 years old, and has lost most of its water repellant qualities - that's why the mold/mildew can live in it.
The "After" photograph does not do the results justice. The mold, mildew and algae are all dead. A couple of rainstorms washed the bulk of the corpses away, except at the seams. But more rain is coming (of course).
On Eolian's decks hundreds of black spots have been slowly appearing, and have been doing so ever since we repainted the decks. They don't grow fast, but they do grow. Nothing seems to touch them - using straight bleach has no more effect than plain water.


Supposing that these are some form of lichen, I did some research - it is such a wonderful thing to have the bulk of Man's knowledge at your fingertips!
Guess what? Algae, moss and lichens suffer grave bodily harm when exposed to a particular class of chemicals. Well I guess that part is not a surprise. But this part is: that family of chemicals is relatively harmless to virtually everything else. In fact, it is the active ingredient in Bactine: benzalkonium chlorides.
Now here's the next surprise. No, you don't have to buy 100 bottles of Bactine and distill it to get the benzalkonium chloride - all you have to do is go to the pool/spa section of your local hardware store and buy a bottle of HTH Algae Guard:
 |
| And it was less than $10! |
This is a 30% solution, and yet a 2% solution is supposed to be adequate for killing algae/moss/lichen.
So, the first test is a kind Hippocratic one. Does this stuff harm the Sunbrella canvas on the boat? I uncapped the bottle and put some of the straight 30% solution directly on a scrap of our Sunbrella and left it to dry. After rinsing it out 24 hours later, there was no detectable effect on the canvas. At 30%, the solution has a blue tint - I suspect this is just a dye for appearances, given its intended use. Our canvas is green - if yours is white, you might want to repeat this test.
For the next test, I made up a 6:1 dilution (5%) solution in a hand spray bottle and applied it to a section of the deck with the lichen, and a portion of our canvas which has a liberal infestation of winter algae on the outside. I also applied it to the inside of the canvas directly over our galley vent where we get the most amazing colonies of... well, life I guess, apparently feeding on whatever the vent delivers to the canvas.
 |
| After |
The benzalkonium chlorides definitely killed the lichen. But it did take a mild scrubbing with a brush to remove the corpses. Please note that previous scrubbing with the same brush and bleach had no effect on the spots. I apologize that I used a washer for the sizing comparison - I didn't have a dime in my pocket. The washer is a little bigger than a dime and a little smaller than a nickle.
I also applied the 5% benzalkonium chloride solution to a portion of our dodger canvas. Please note that this canvas is more than 10 years old, and has lost most of its water repellant qualities - that's why the mold/mildew can live in it.
 |
| Untreated |
 |
| Treated |
Conclusion
This stuff works! And Jane tried it on the moss on our driveway at a 3% concentration, as another experiment. It worked there too - the moss is all dead. In fact, using a 5% solution was probably overkill - my next application on Eolian's canvas will be at 3%, but I think I'll retain the 5% level for the tough-to-kill lichen on the decks.Thursday, January 22, 2015
Rusty Hinge Replacement
This post originally appeared on Windborne in Puget Sound
You may remember that one of the early projects we did on Eolian was to rebuild the refrigerator, from the hull out. As a part of that project, I discarded the original door and replaced it with one that I got at the old Doc Freeman's for $10 because the decor panel was damaged. I replaced that panel with a sheet of black Plexiglas (thanks Clear Cut Plastics), and remounted it on the original hardware.
Perhaps that was a mistake - reusing the old hinges. But at that time I did not know the marine supply business in Seattle nearly as well as I do now. The reason that this was an issue is that the old hinges were very rusty. I cleaned them up as best as I could, but they were always ugly, even to this day.
The ugliness finally got to me, and I sought out new hinges. Well, it turns out that I almost waited too long. Tho the refrigerator is a complete custom built-in, the door (and hinges) were from a Norcold unit. I thought that all I would have to do is order new hinges from Norcold.
BZZZZT!
Not a chance. That door and those hinges have been out of production for a long long time, and nobody had any left in stock - not even Fisheries.
But, as it turns out, one of the businesses in Ballard sells Norcold: Sure Marine. Sure Marine is one of those great places, a little off the beaten path, at the very, very end of 28th street in Ballard. No, they had no hinges in stock, but Graham found a set of used ones in near-perfect condition in the back somewhere. Woo HOO!
One of the last remaining vestiges of Malolo is now gone.
You may remember that one of the early projects we did on Eolian was to rebuild the refrigerator, from the hull out. As a part of that project, I discarded the original door and replaced it with one that I got at the old Doc Freeman's for $10 because the decor panel was damaged. I replaced that panel with a sheet of black Plexiglas (thanks Clear Cut Plastics), and remounted it on the original hardware.
Perhaps that was a mistake - reusing the old hinges. But at that time I did not know the marine supply business in Seattle nearly as well as I do now. The reason that this was an issue is that the old hinges were very rusty. I cleaned them up as best as I could, but they were always ugly, even to this day.
 |
| Ewww... |
BZZZZT!
Not a chance. That door and those hinges have been out of production for a long long time, and nobody had any left in stock - not even Fisheries.
But, as it turns out, one of the businesses in Ballard sells Norcold: Sure Marine. Sure Marine is one of those great places, a little off the beaten path, at the very, very end of 28th street in Ballard. No, they had no hinges in stock, but Graham found a set of used ones in near-perfect condition in the back somewhere. Woo HOO!
 |
| (Almost) new and shiny! |
One of the last remaining vestiges of Malolo is now gone.
Tuesday, August 5, 2014
The New Brasso: Redux
This post originally appeared on Windborne in Puget Sound
Earlier I whined about the recent reformulation of Brasso. Wasn't the old stuff kind of pinkish in color? That would be the result of using rouge as the polishing agent. The new stuff is white. I suspect that the polishing agent is finely ground aluminum oxide - a much harder material than rouge. But is this good?
Here's the thing. With rouge (and tripoli, and several other polishing compounds), the polishing agent is designed to break down into finer and finer particles as you (or your machine) rub it. This means that at the end, the finish can be absolutely mirror-like. Of course, the polishing agent must be matched to the material. Rouge, which is quite soft, does a wonderful job of polishing gold, silver and brass. It takes much, much longer to polish stainless steel with rouge because that metal is so much harder.
But we were talking about brass, for which Brasso is specially formulated (with the inclusion of ammonia). For brass, the new Brasso's polishing agent is too coarse. And it is too hard - it doesn't break down.
So this morning I had an idea (probably a cosmic ray went thru my head): Why not try some of the fiberglass polish/wax that we use on the hull on the brass? It's polishing agent is designed for soft surfaces, and it does break down even when polishing very soft gel coat, giving a very shiny surface.
Here's the result:

Tho this doesn't photograph well, look at the difference between the top of the binacle, which has been polished with the cleaner/wax, and the bottom which has only been polished with Brasso. On the bottom, the scratches from the coarse polishing agent are clearly seen; they're gone on the top.
Here's the polish I used:

This is no wipe on/wipe off job. It takes more work than the Brasso because you get no help from the chemical action of the ammonia. It takes elbow grease to remove the metal to make a shiny surface and to break down the abrasive. If your rag is not turning black with the removed metal, then you're not working hard enough. A power buffer would help a lot.
Oh, and there's a bonus: the wax. I have no data yet, but I suspect that the shine will last longer because it is waxed.
Earlier I whined about the recent reformulation of Brasso. Wasn't the old stuff kind of pinkish in color? That would be the result of using rouge as the polishing agent. The new stuff is white. I suspect that the polishing agent is finely ground aluminum oxide - a much harder material than rouge. But is this good?
Here's the thing. With rouge (and tripoli, and several other polishing compounds), the polishing agent is designed to break down into finer and finer particles as you (or your machine) rub it. This means that at the end, the finish can be absolutely mirror-like. Of course, the polishing agent must be matched to the material. Rouge, which is quite soft, does a wonderful job of polishing gold, silver and brass. It takes much, much longer to polish stainless steel with rouge because that metal is so much harder.
But we were talking about brass, for which Brasso is specially formulated (with the inclusion of ammonia). For brass, the new Brasso's polishing agent is too coarse. And it is too hard - it doesn't break down.
So this morning I had an idea (probably a cosmic ray went thru my head): Why not try some of the fiberglass polish/wax that we use on the hull on the brass? It's polishing agent is designed for soft surfaces, and it does break down even when polishing very soft gel coat, giving a very shiny surface.
Here's the result:
Tho this doesn't photograph well, look at the difference between the top of the binacle, which has been polished with the cleaner/wax, and the bottom which has only been polished with Brasso. On the bottom, the scratches from the coarse polishing agent are clearly seen; they're gone on the top.
Here's the polish I used:
This is no wipe on/wipe off job. It takes more work than the Brasso because you get no help from the chemical action of the ammonia. It takes elbow grease to remove the metal to make a shiny surface and to break down the abrasive. If your rag is not turning black with the removed metal, then you're not working hard enough. A power buffer would help a lot.
Oh, and there's a bonus: the wax. I have no data yet, but I suspect that the shine will last longer because it is waxed.
Thursday, May 29, 2014
Rebuilding Whale MK IV Tiptoe Pump
Maintenance on a boat is a constant. Maintenance tasks are small boat projects that can provide a great deal of satisfaction. Rick aboard s/v Cay of Sea deals here with one which you might not yet have faced...
Several years ago I stripped all of the 12-volt pressure-water system out of Cay of Sea. I did this for several reasons: I wanted to reduce my dependance on battery power; I knew that having pressurized water on board was an invitation to use more water, making stops for refills more frequent; I wanted to reduce the complexity of the on-board systems; it was also time to service the ancient electric diaphragm pump that powered the pressure system, and I either needed to make some changes in the way it operated, or needed to get rid of it altogether.
I replaced the single-circuit pressure system with two separate, discreet systems: one for fresh water for washing and showering, and one for drinking. The fresh water clean-up/showering water source is drawn from our forward 40 gallon tank (under the V berth) by the Whale Mk IV Tiptoe pump. This pump is mounted in the cabin sole near the companionway, and just adjacent to the sink, as you would expect. Our expandable capacity drinking water system is based on two collapsible 5-gallon containers that rest below the quarter berth stowage bin. These are plumbed to the galley sink through the engine compartment, and the water is drawn up by a hand-operated Whale V Pump. I have space in this stowage bin to carry an additional 10 gallons in collapsible containers. So we can carry 20 gallons drinking water and 40 gallons for other purposes. At some point before we go long-term cruising, I will replace all of the fresh water lines from the forward tank. After a thorough tank wash, that reservoir will be approved for drinking as well. Until then, we’ll keep the status quo, as the forward tank isn’t drained often enough to keep the water really fresh enough for drinking on our short cruises about the middle Chesapeake. However, 10-20 gallons in portable containers is plenty for short-range use, and easy to keep fresh.
I noticed at the end of last sailing season that we were going through 40 gallons of fresh water fairly quickly. When I investigated, I learned that the floor pump was beginning to leak at a fairly rapid rate: 15-20 drops per minute adds up to a lot of water over several days. Late last fall I ordered the rebuild kit for this pump (about $15), intending to rebuild it all winter. Now it’s spring and I couldn’t put it off anymore, so today I got to work on it.
The rebuild kit comes with an exploded view of the mechanism, which is important in order to see what parts go where, but there are no instructions regarding the process. This was a bit frustrating, as I could not figure out how to access the internal parts. I had to gently experiment on the pump body to get it apart. It appeared to be joined at the middle, but how it was actually held together wasn’t apparent from outside observation. I finally discovered that the halves are simply threaded.
I gently flexed the pump body in my shop vice, then gently held it in place within the vice without tightening the jaws. I inserted a rod into the pump outlet and applied counter-clock-wise pressure. The threads turned readily, but I hadn’t had enough leverage with just my arthritic hands alone. With the halves separated, I was able to easily access the valves and seals. You don’t need specialized instructions for this portion – just replace with the kit what you removed from the pump. There are several rubber valves, O-ring-type gaskets, and cup gaskets which go in strategic places. One thing you should know about: There is a circlip serving as a safety for a fitting on the end of the plunger. There is no way to get this clip off without circlip pliers. Just go buy a tool for $5-10 and you will save yourself a lot of frustration removing and replacing the circlip.
Reassembly and reinstallation was fairly easy, notwithstanding the usual frustrations of dropped fasteners, re-attaching supply and outlet lines, etc. Here it is mounted into its original location in the sole:
Perhaps there isn’t much demand for rebuilding these things – maybe that explains why I couldn’t find any information on the web for taking the pump apart. At any rate, I hope this post can help someone else as they look for rebuild information on this pump.
So why did it begin to leak after three years? Seems like it should have gone longer than that, with the light use we give it. I’m pretty sure that RV antifreeze shortens the life of the rubber internal parts. That’s why I’ve stopped using it – now I use my shop vac to dewater my systems. Otherwise, these are good, convenient little pumps.


Thursday, May 15, 2014
Wire Cable vs. Stanchions
Over at Sail Delmarva Drew puts the test equipment he has built to work investigating the ability of various recommended lifeline materials to resist chafe thru the stanchions...
I've been investigating chafe protection and Amsteel as it relates to lifeline replacement. Certainly, wire cable is the gold standard. But now I'm not so sure....
After an hour of sawing back-and-forth through a 10mm hole in SS tubing, it had eaten a nice groove and built a corresponding burr on the inside:
After 1 hour.
And though the wire did not look very worn, when we flexed just a bit there was a different story....
Also 1 hour. The damage was not apparent until flexed. Most of the broken wires were inside.
How did Amsteel fare, in the same hole? Before the wire created the burr? Much better with very little wear in an hour. Afterwards, no as well, but still the damage was little more serious than that to the stainless cable. Given that I plan to use 1/4 Amsteel, which is nearly twice as strong as the cable to start with, I'm feeling OK. 1/4-inch it is sufficiently strong that even after 10 years in the Chesapeake sun (not so strong as the desert southwest or tropics) it should have equivalent strength, and with proper chafe guards, the strength loss in the holes should be less than wire. Protected from the sun, the pass-troughs may be the strongest part by then.
How does Amsteel like the new hole? Not so bad as you might think and about the same as it like the raw hole, just after I drilled it without deburring. By way of comparison, after the hole was deburred it showed ~ 1/3 this much wear, and if coated with Spinlock RP25, no wear after 2 hours (840 cycles).
After 1 hour on the wire cable gouged hole. About the same as a raw drilled hole, yet much worse than a polished hole.
Alternatively, I tried a dyneema anti-chafe sleeve floating for 3 hours. It could have run for 100 hours without showing wear.
A floating dyneema cover reduces wear to zero.
By way of comparison, this hole wore a polyester line through the cover in 20 seconds and in half in 5 minutes. Amsteel is tough stuff.


Thursday, December 12, 2013
Closet refurbishing
Out there aboard s/v Jana, Janna tackles refurbishing one of the closets. It's a bigger job than you might expect...
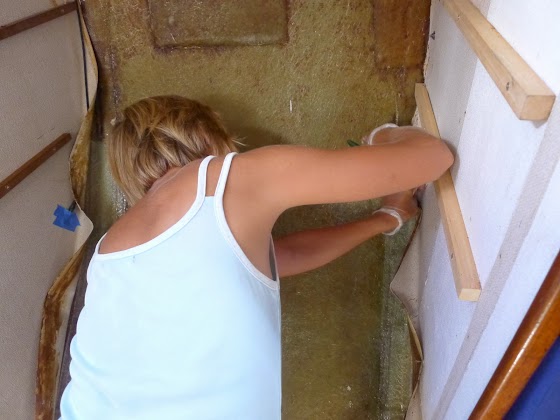
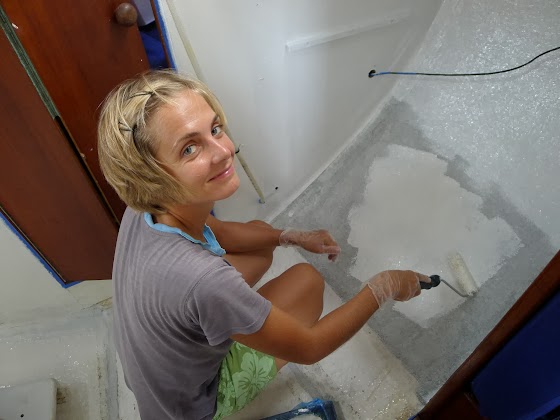
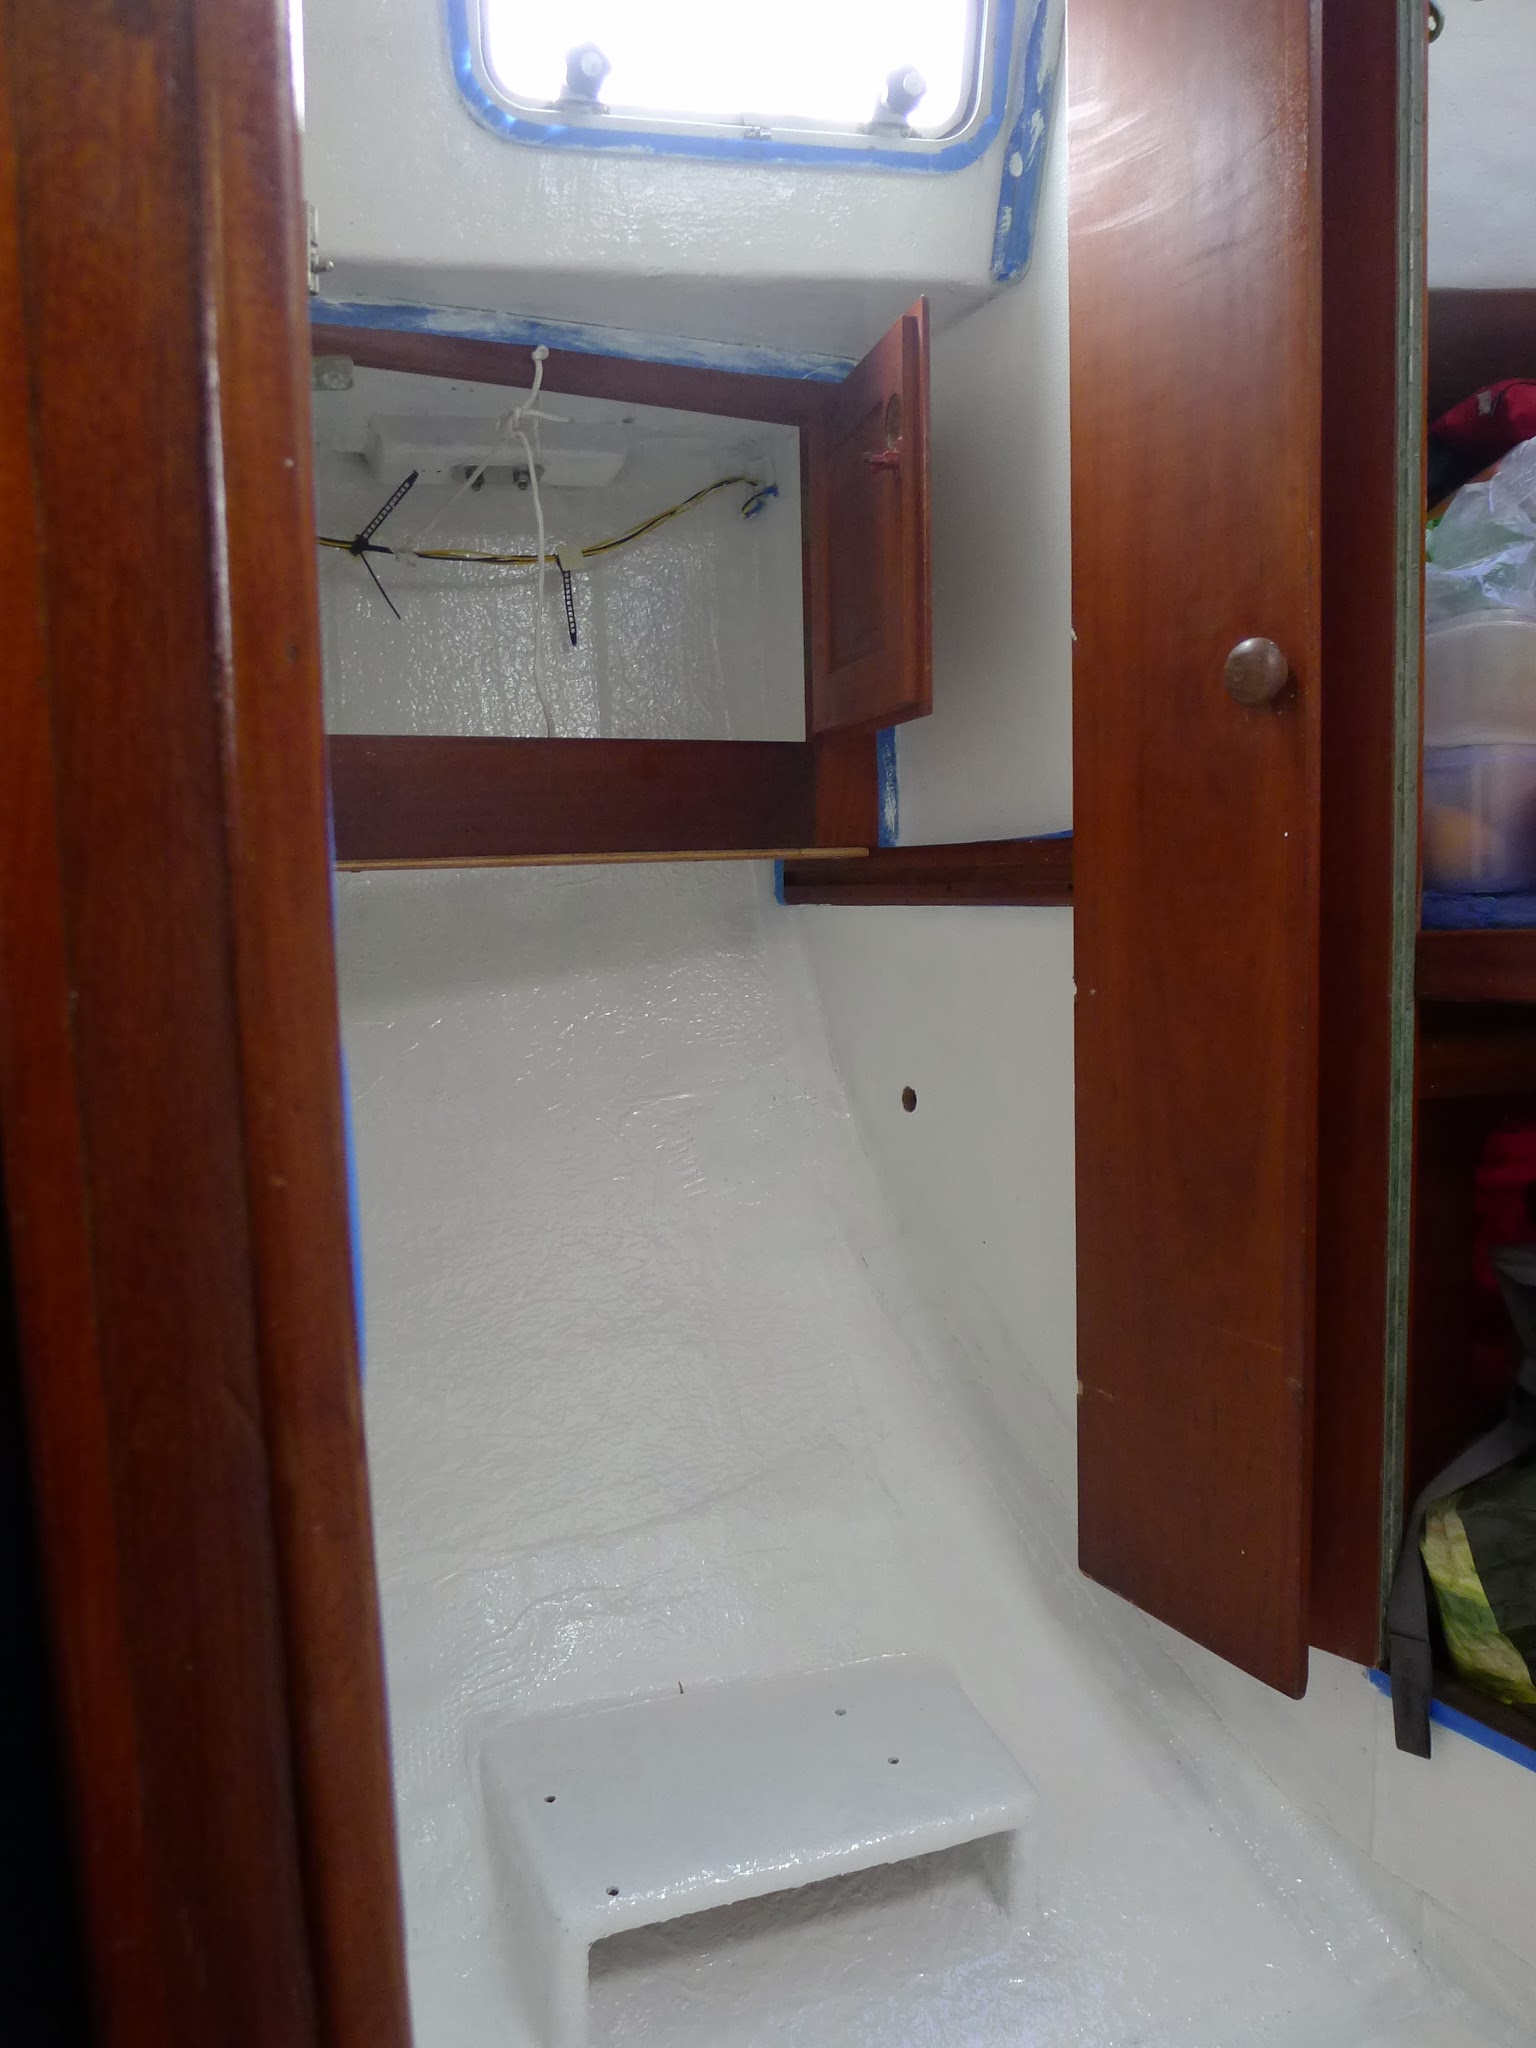
We are back in the working mode, getting up at dawn (round 6 am) and going to bed soon after 9 pm, exhausted but happy. We sleep so soundly these days, that often we don’t even hear the raindrops pounding on our deck. We sand, we glue, we paint and Janna slowly but surely undergoes a cosmetic metamorphosis. It’s amazing what a huge difference a paintbrush and a tin of paint can make.
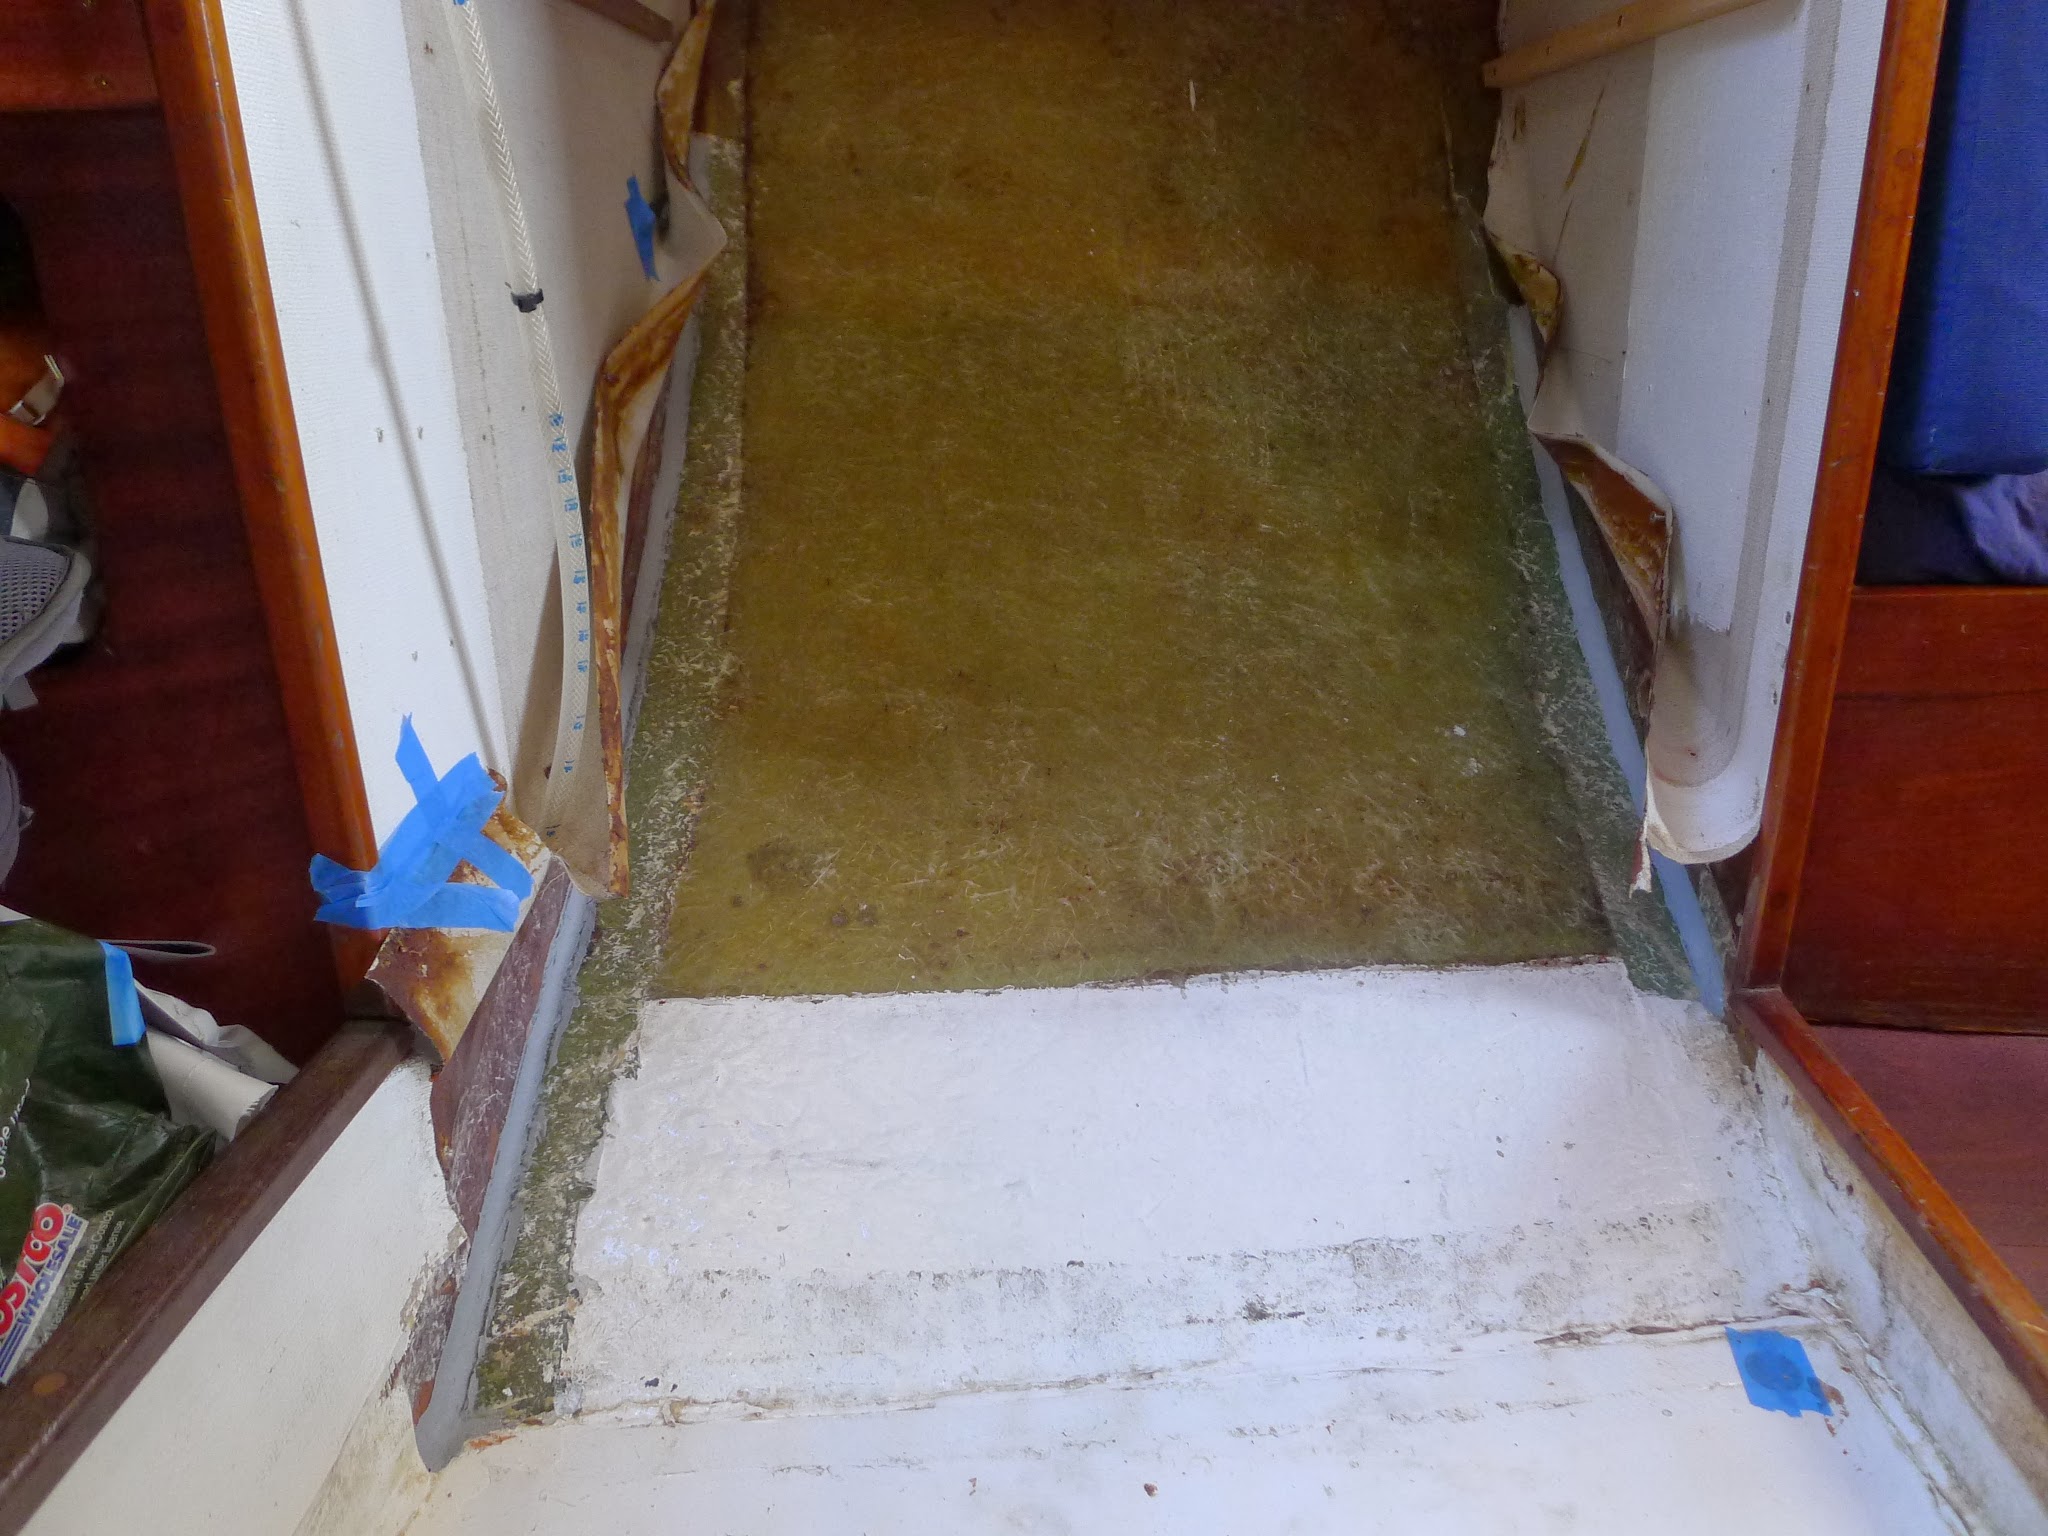
After the successful painting project in the V-berth area, we decided to continue with the “closet”. First of all we moved all our cloths and other stuff stored in the previous head area on the V-berth, disassembled the closet shelves and unscrewed all the other components like handrails, fire extinguisher etc. Sounds easy enough, but only this part took me the whole afternoon.
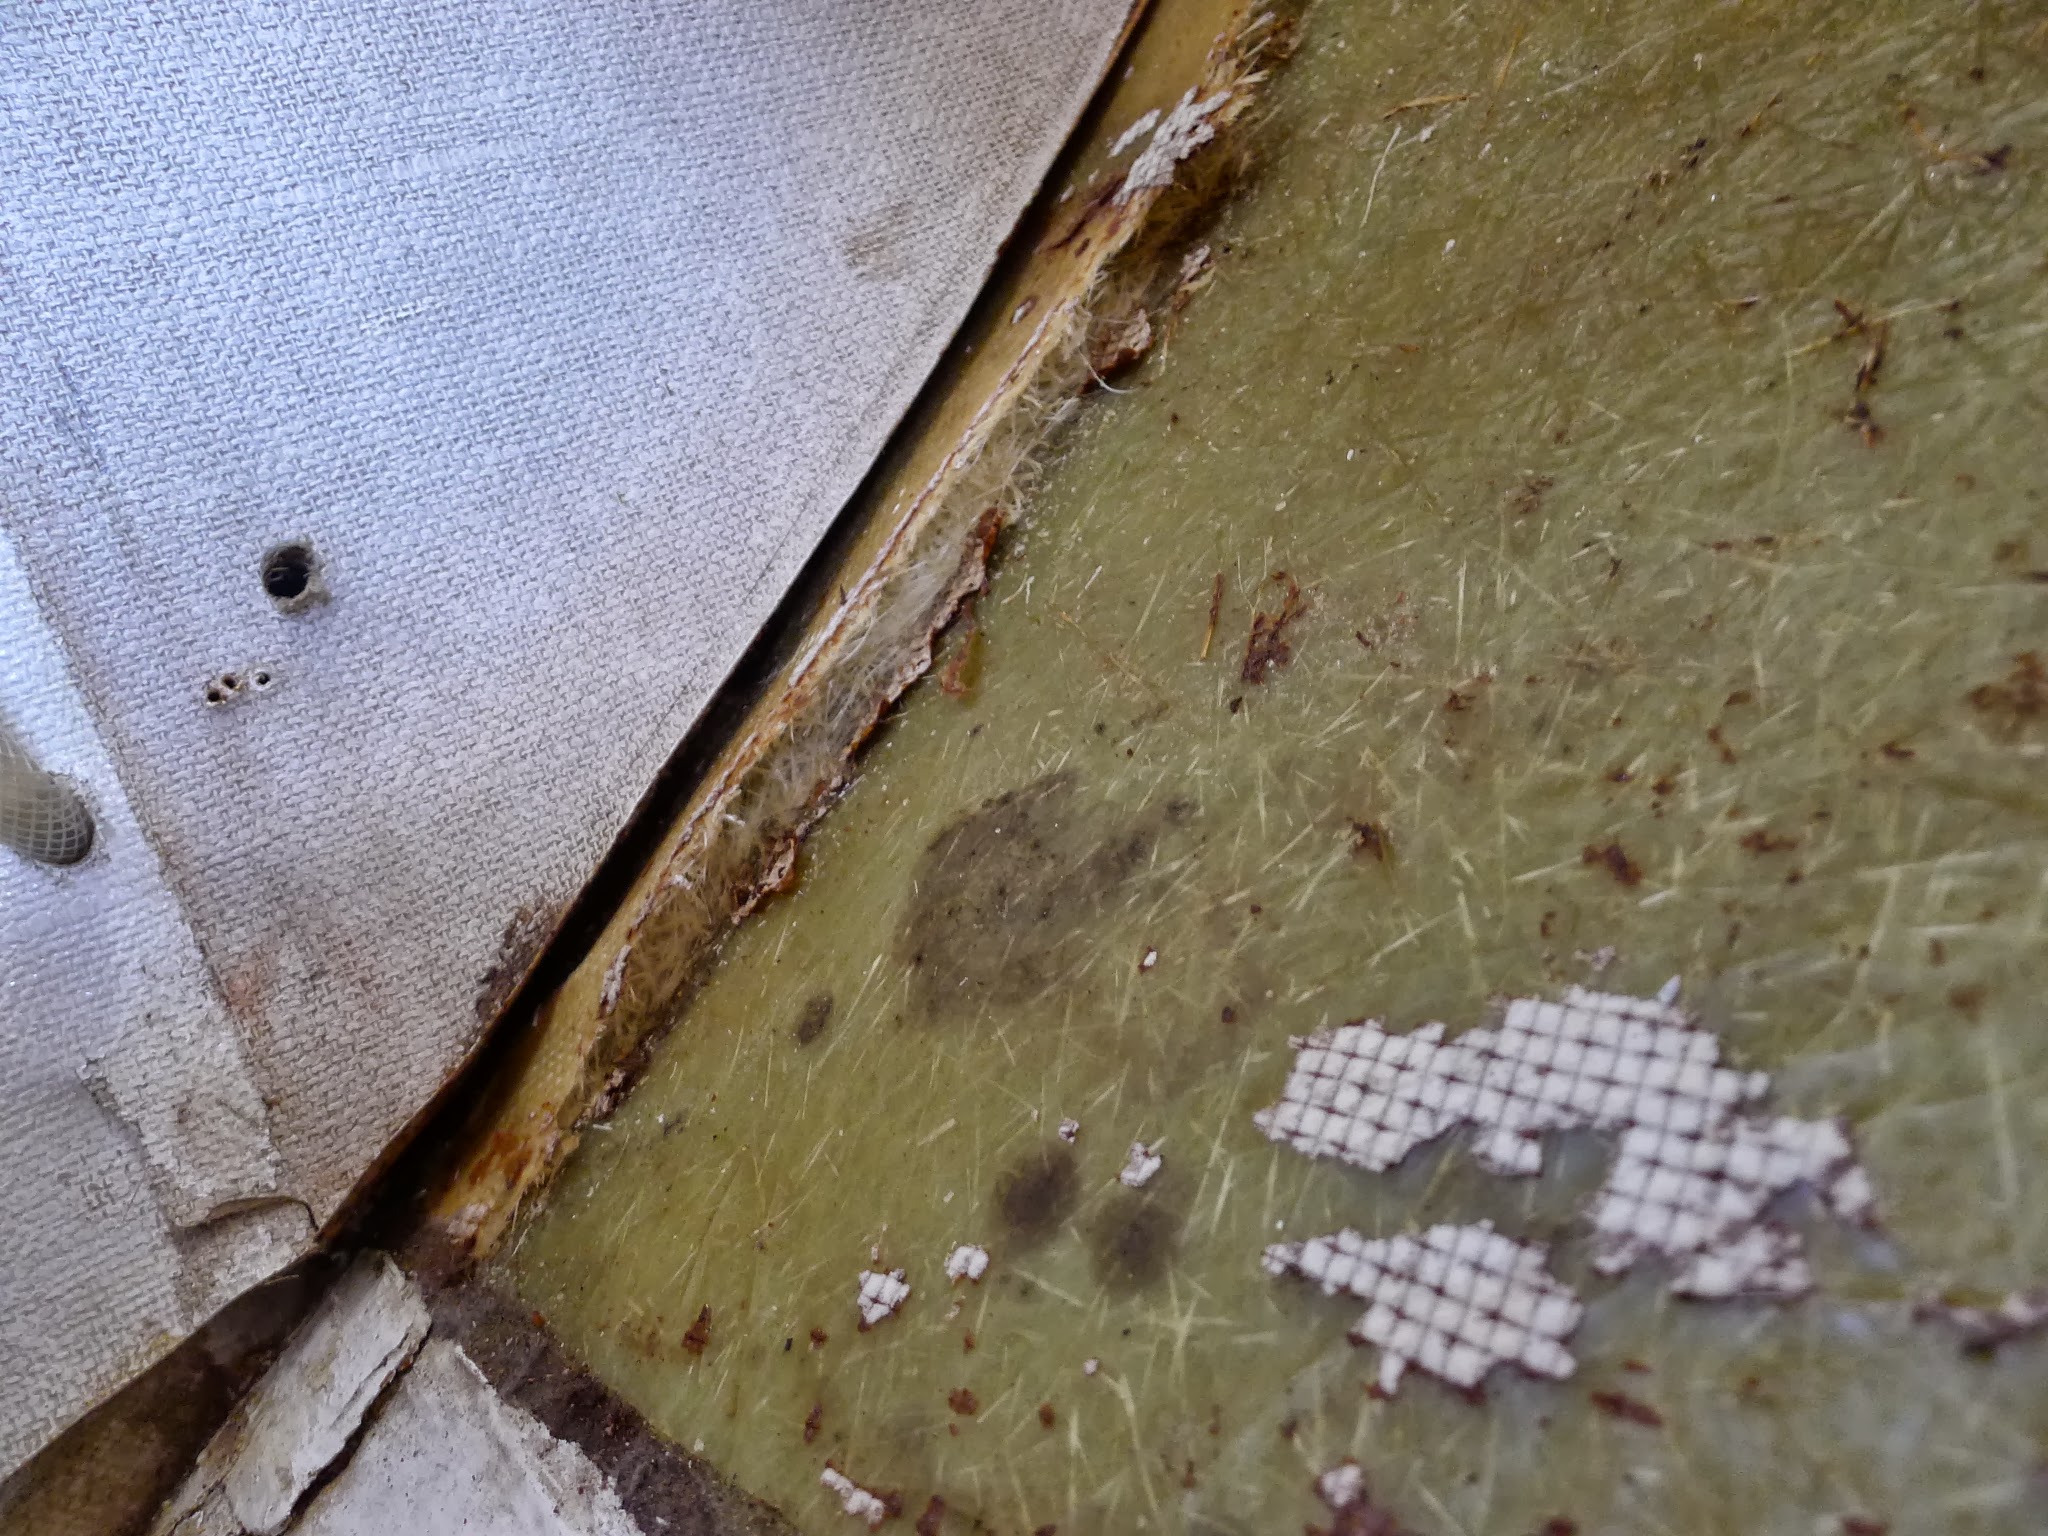
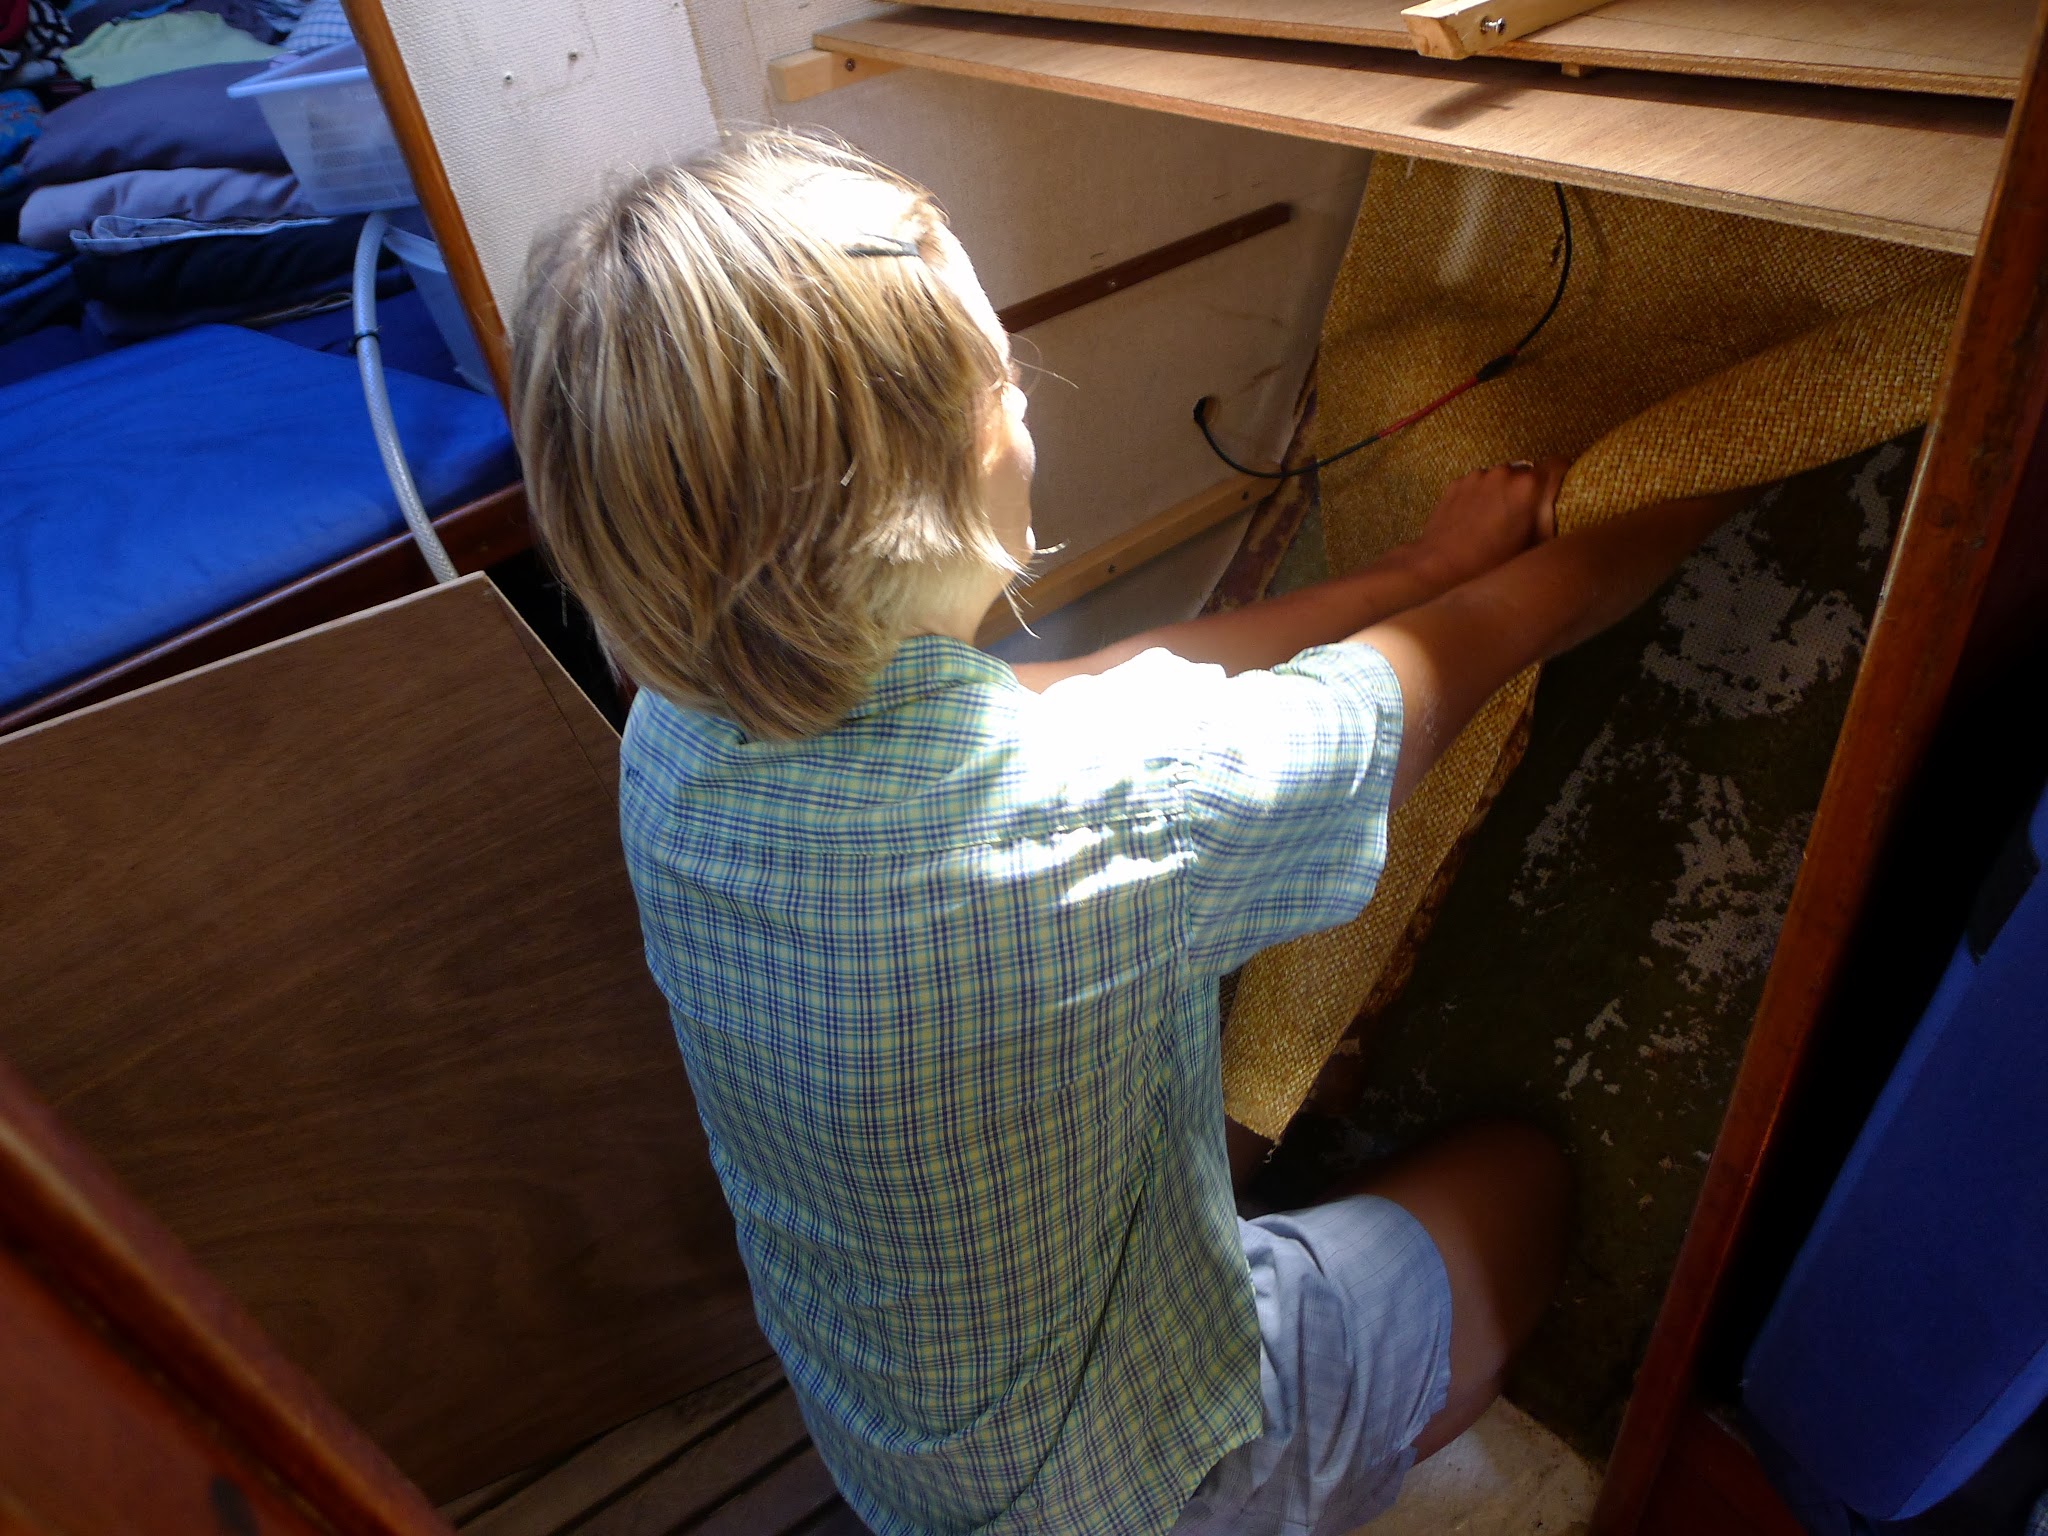
It’s been some time since we noticed that one of the tabbings (fiberglass joints) that bond the fiberglass hull with the wooden bulkheads came unstuck. Since we were about to paint the whole area, we decided now was the right time to repair it. Of course, once we removed all the stuff from the closet, we found out that out of the four tabbings in the closet, we had to replace not one but three of them! So once again out went the chisel and hammer, the old tabbings were removed, everything sanded and just before glassing in the new tabbings, we smoothed the sharp edges by making a fillet with epoxy filler.

A proper decorating job couldn’t be done without ripping off the rest of the old shabby vinyl wallpaper. As long as it was hidden deep inside the closet and behind the piles of our cloths, we could happily ignore its existence. Yet once we uncovered the filthy stuff, we couldn’t but wonder how on earth did we manage to live with something like this inside our boat for such a long time…

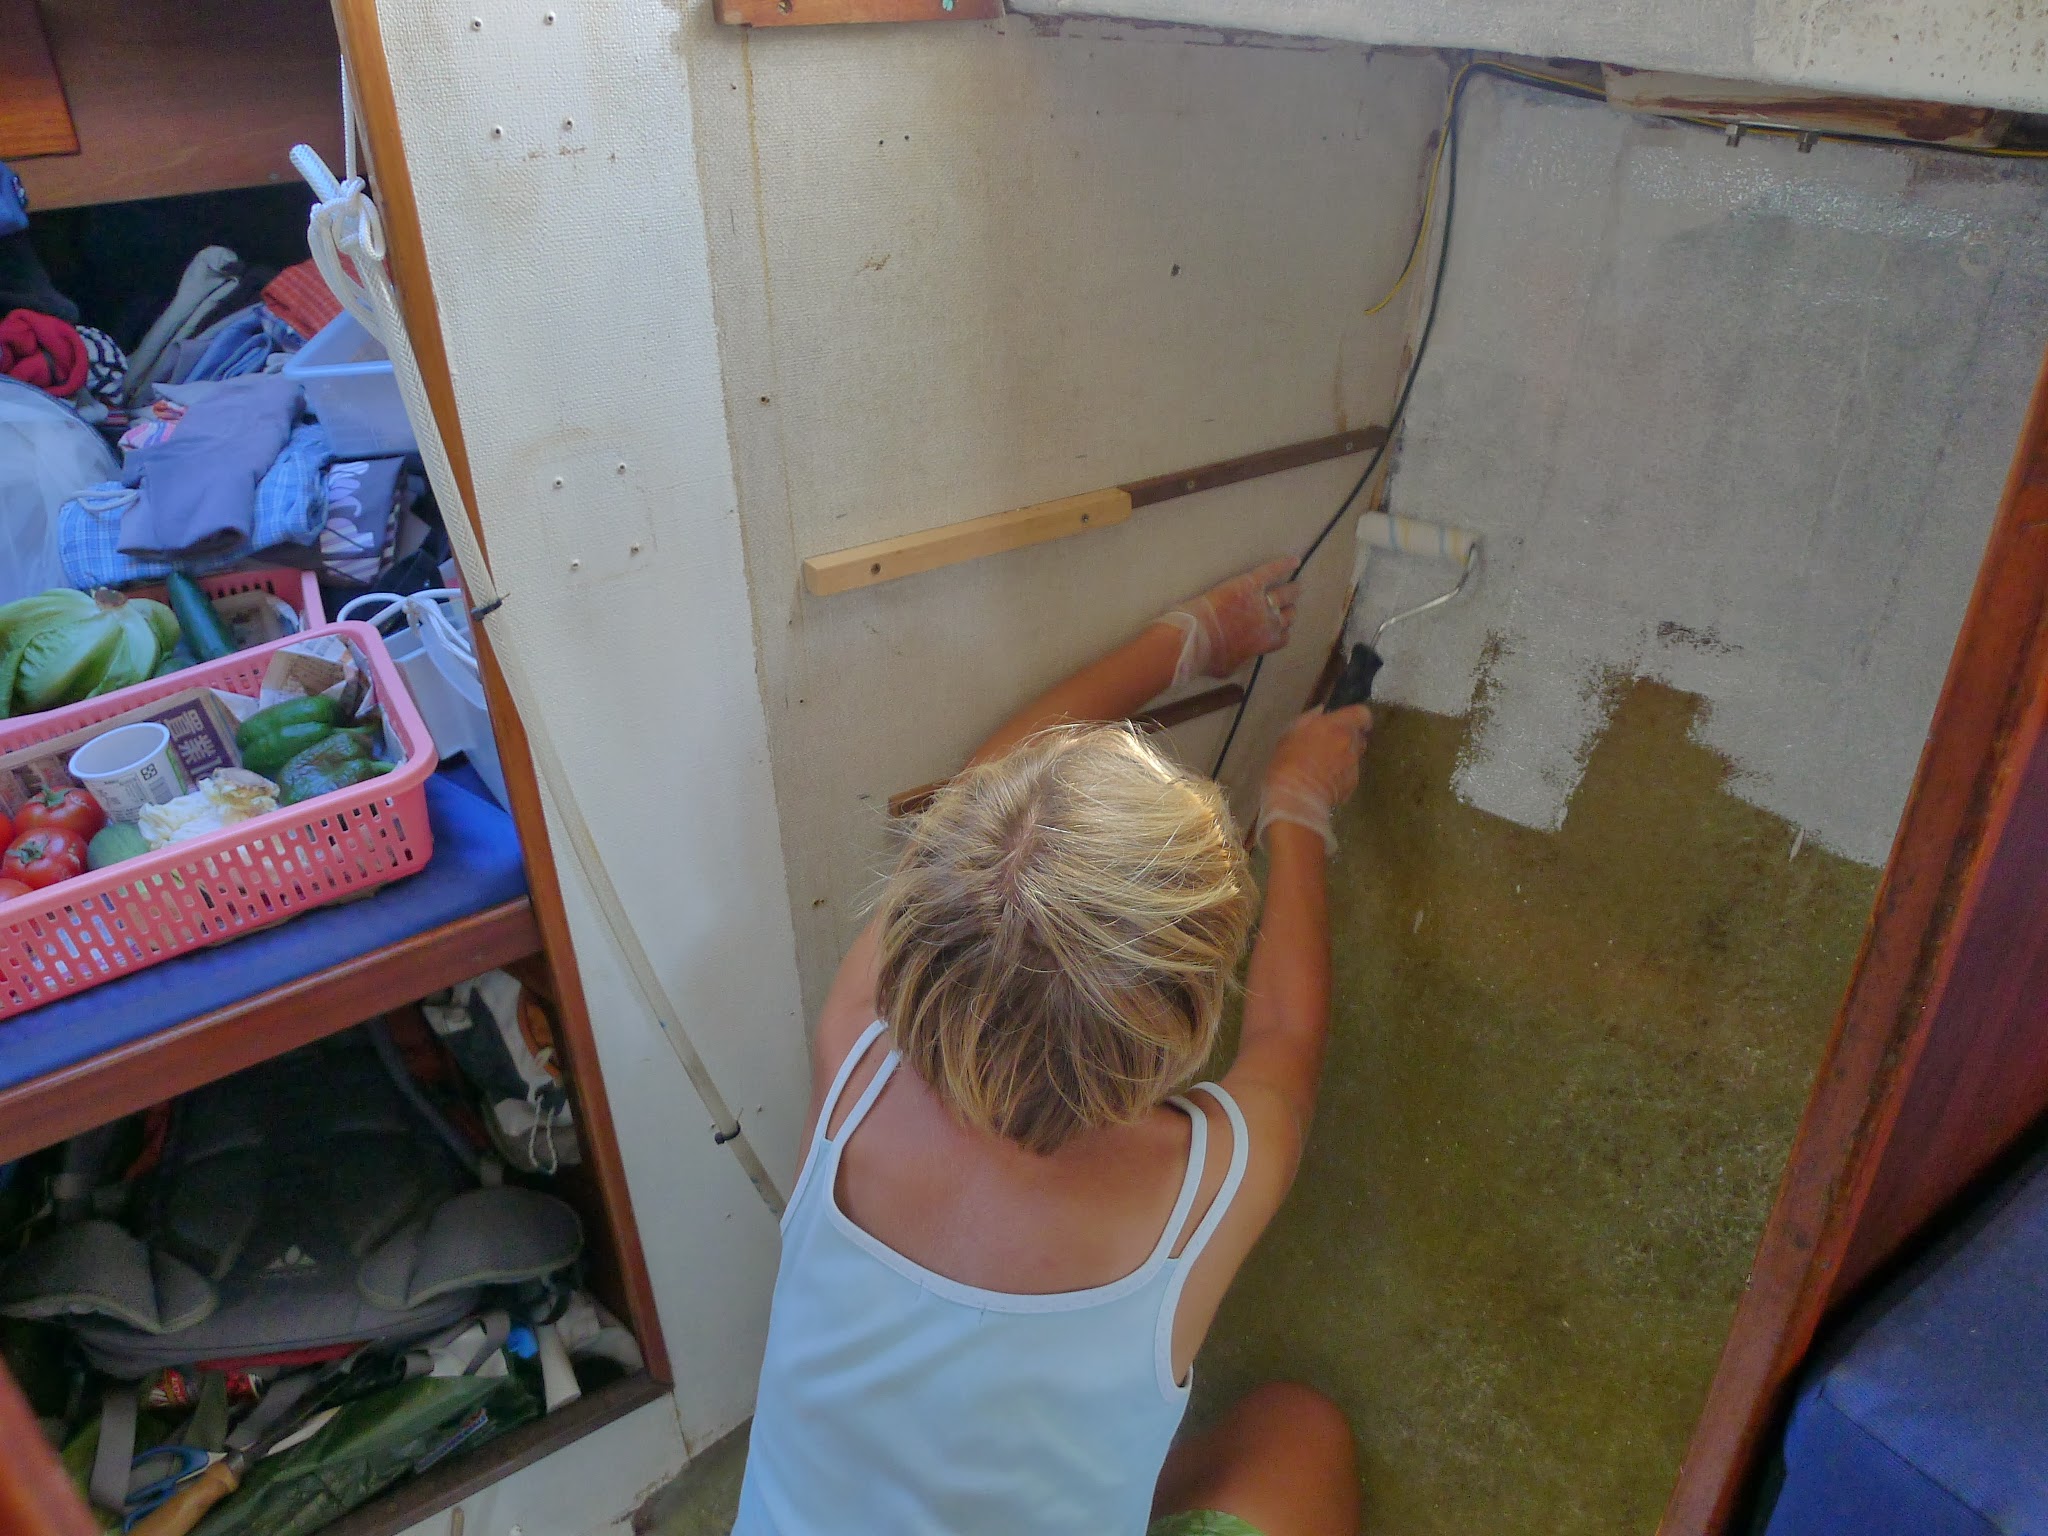
Once the retabbing was done – we used six layers of fiberglass cloth for each tabbing and ended up using almost one liter of epoxy glue – I glued back the wallpaper on the bulkheads that came unstuck or was removed because of the repairs and then I covered the rest of the furniture and wooden bits, wires, portlights etc. with masking tape. After five days of work we were finally ready for painting. Now we must wait till the paint is hard enough so that we can put everything back together.

Last but not least, a quick update regarding our engine mounts. Though it’s been at least three days since they arrived back in Malaysia, they’re still stuck on the peninsula somewhere near Kuala Lumpur. The latest update on the UPS website says: The address is in a remote area and deliveries are not made daily / Delivery rescheduled. We can only guess when exactly will the mounts arrive here…
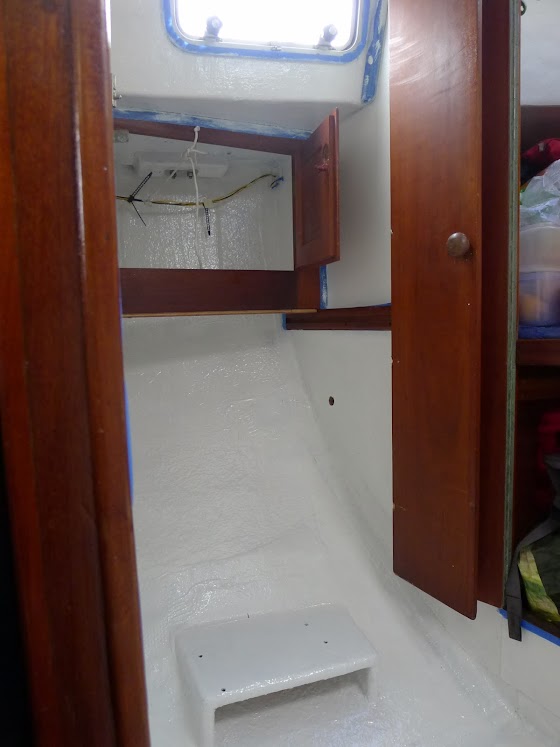
What a contrast! The above photo is actually a tiny part of the already painted ceiling in the closet and still unpainted one in the main saloon. Can’t wait to paint the rest of the boat!


Subscribe to:
Posts (Atom)


