As we upgrade and outfit SV Suppose for cruising, we have tried to keep things as simple and bulletproof as possible. In particular, we want to minimize the number of things that, if broken, would keep us from departing from one anchorage and moving on to the next one. So, we have given a lot of thought to the electronics, weighing functionality against complexity and reliability. In the end, we decided on the Garmin VHF100 radio, GPS820 chartplotter, and AIS600 transceiver. By buying all Garmin products, it was "relatively" easy to interconnect them so that we can see AIS targets on the chartplotter and provide gps data to the VHF radio so that it can transmit a distress call with our location at the press of a button. We don't have radar now but the GPS820 can support it if we decide to add it later. So far, we couldn't be happier with this combination.
As with every other addition or modification to SV Suppose, the challenge was finding the space for the new electronics.
The VHF radio was the easiest and first component to install. I simply replaced the old one which had been mounted against the cabin top, just inside the companionway on the starboard side. Mounted there, it is out of the weather and can be seen, operated and heard from the cabin, companionway steps, and the cockpit.
This is the chartplotter on the mahogany support that I built for it. Here it is in its "stowed" position where it is not in the way for normal activity in the galley.
The AIS transceiver, mounted below the chartplotter, is just visible in this picture.
We don't have a separate navigation station in SV Suppose. Instead, we use the removable counter-top that covers the stove when it is not in use. For operation from this "navigation station," the chartplotter rotates out approximately 30 degrees. The chartplotter support is mounted on an 8 inch, brass piano hinge attached to the side of the companionway frame. To get the support to rotate in a horizontal plane, I placed a wedge under the hinge and against the companionway. The 8 inch vertical portion of the support and the diagonal brace underneath provide a very solid and sturdy base.
The chartplotter and its support will rotate a full 180 degrees where it faces into the cockpit. The base under the chartplotter is shaped so that it rests against the vertical frame of the companionway and overlaps the threshold. This provides extra support in case we should fall against it. It is held in this position by a nylon "bump" on the bottom of the base that slides over the companionway threshold which is a little higher on the inside edge.
The chartplotter support is held in the stowed and 30 degree positions by this block that is mounted on the inside of the companionway bulkhead.
A toggle that rotates against the vertical portion of the support locks into two positions against the block. The dowel stub in the top of the toggle makes it easier to rotate the toggle with a fingertip.
And here is the base rotated to the 180 degree position. In this picture, it is easier to see how the shape of the base allows it to swing around the side of the companionway and overlap the threshold.
Showing posts with label s/v Suppose. Show all posts
Showing posts with label s/v Suppose. Show all posts
Thursday, March 12, 2015
Chartplotter Support
Aboard s/v Suppose, Walt has constructed a very clever swinging mount for his chart plotter:


Thursday, December 11, 2014
Tiller Conversion
Over on s/v Suppose, Walt & Kathy take an unusual step... And in the process demonstrate some nice prototyping skills:
Suppose, suppose... Suppose we had a tiller instead of a wheel in our boat. Wouldn't the cockpit be much more spacious, wouldn't the mechanical complexity be much less and the reliability much greater, wouldn't it be easier to feel the boat and balance the sails, and wouldn't a wind vane be much more effective. All good reasons but when we suggested the conversion to most of our sailing friends, they thought we were nuts.
pic 1
pic 2
pic 3
pic 4
pic 5
pic 6
pic 7
pic 8
pic 9
pic 10
pic 11
pic 12
pic 13
pic 14


Friday, November 21, 2014
Sail Struggles
Walt and Kathy of s/v Suppose put their Sailrite LSZ-1 to work making sail modifications. [Sailrite LSZ-1 - don't leave home without it! -Ed]
In January 2013, we made the decision to modify our sail plan and brought the main and genoa sails to Lubbock. We ripped and picked the seams that attached the sacrificial sunshade and the furling wire on the genoa. The main sail lost its battens.
In June, we purchased a new Sailrite LSZ-1 industrial sewing machine. This heavy-duty machine allows us to modify our sails, make protective covers and a large sun screen, and to reupholster seat cushions.
Because the genoa (140%) is our largest sail and had the most extensive modifications, we started with it. Oh, ambition! It has been a frustrating but satisfying exercise. Here are those modifications:
Triple stitch the broad seams. The broad seams are the ones that go across the body of the sail. Because the Sailrite does not do a true triple stitch (three small stitches to form each leg of the zigzag), we opted to reinforce the seams by adding another row of zigzag stitching. The greatest challenge of sewing on sails is the shear volume of cloth involved.
Replace furling tape with hanks. Many sailboats use furling systems to dowse their head sails. Our previous two boats had such systems, and we quickly became dissatisfied with them. On both boats, we had furler issues such as jamming that would be incredible issues at sea. For Suppose, we have opted to convert the genoa to an old school hank-on sail. To do this, we replaced the furling tape with a bolt rope on the leech edge of the sail. Then grommets were installed behind the bolt rope and the hanks were "seized" on the bolt rope.
This bolt rope bears all of the tension load when the sail is hoisted rather than the sailcloth. For this reason, Kathy created eyesplices around metal thimbles at both ends. The leather goes around the rope first to protect it from the chafing of the metal thimble. Then, the rope is spliced to hold the thimble in place.
Hand-sewn leathering prevents chafe while the webbing secures the thimbled eyesplice at head (top) of the genoa foresail. The contraption on my hand is a sailmaker's palm to prevent me from impaling my hand with the large needle needed to pierce the numerous layers.
One of three needles I broke or bent while hand sewing the leather chafe guards.


Tuesday, September 16, 2014
Dock Box Carpentry
Given Norm Abram's shop, getting really good results from wood working projects is relatively easy. But doing it on the dock, with a very limited set of tools that all have to go in the dock box when you are done... not so much. As promised, here is Walt on s/v Suppose's post on "Dock Box Carpentry". He makes it look easy:
There was a time when I had an oversized garage with a table saw and a long workbench with a drill press, belt sander, vise and rows of drawers filled with a variety of tools. Now, instead of a garage, we have a dock box and the trunk of our car. I thought that there might be some interest in the simplified set of tools that I am using, a cordless drill, circular saw and router.
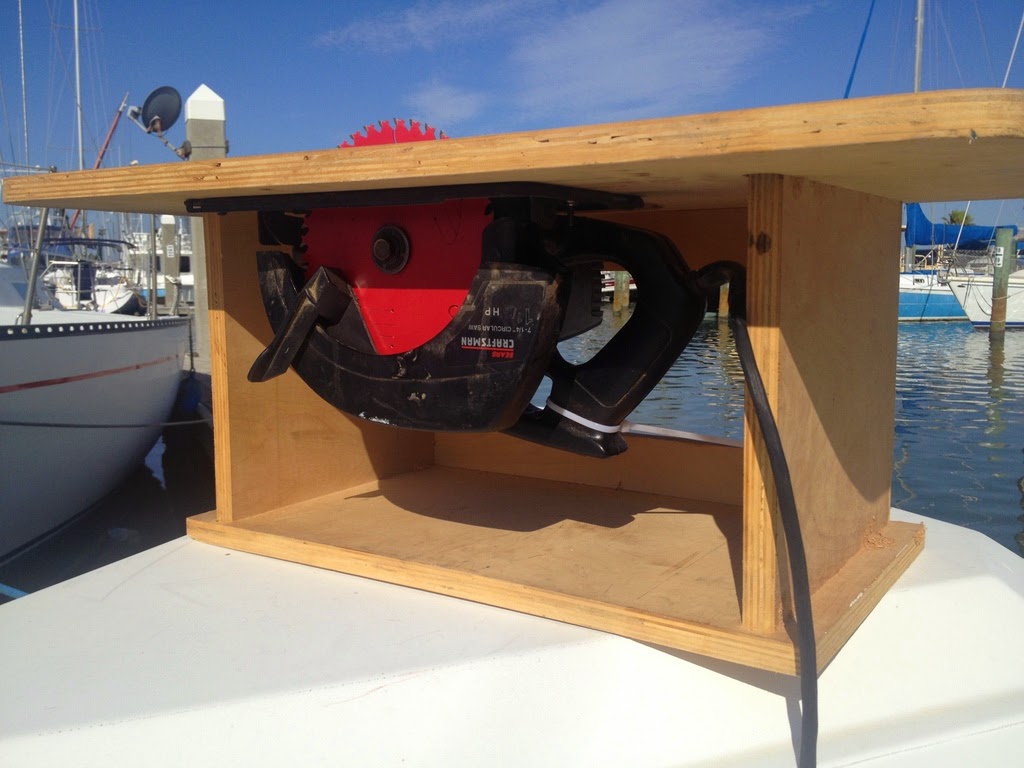
This is my combination table saw and router table. It is a simple plywood construction shown with the circular saw mounted underneath. The trigger on the saw is not easily accessible or lockable. So, I strapped it down with a tie wrap and the saw is turned on and off by plugging and unplugging the power cord. I know that this is unsafe on a variety of levels but knowing that is exactly what makes me doubly cautious. Plus, the circular saw is not nearly as powerful as a real table saw and not as likely to kick back violently. So far, I have had no accidents or even a close call.
I mounted the saw under the table such that the edge of the saw's base is parallel to the table edge. After making a plunge cut to bring the blade through the table top, I laid a guideline the full length of the table that is aligned with the side of the blade. I measure and make marks relative to the guideline at both ends of the table and clamp a board on the marks to serve as a rip fence. It's a little tedious but works very well.
A piece of half inch plywood screwed at a 90 degree angle to a 1x2 inch rail that rides against the edge of the table makes a usable mitre guide. I added a strip of wood to the top to clamp stop blocks for repeated cuts.
This the same table with the router mounted underneath. The clamped on fence and miter guide are useful with the router as well. With a 1/2x1 inch straight bit and 1/4 and 1/2 inch quarter-round bits, I can make all of the joints and decorative cuts that I need for boat projects.
This is my favorite new tool, a portable drill press. Our rigger let me use the real drill press in his shop to drill a variety of holes through a 3/4x2 inch strip of teak which I use as a drilling guide.
There is something about my "no line" glasses that makes it impossible for me to line the drill up for a hole perpendicular to a surface. The drilling guide is a huge help.
This is another indispensable tool that I use often. Many times, the most difficult part of a job is just getting the workpiece to stay put while you hammer, drill or file on it. A solid vice can be a life saver. This one is mounted a 1 1/2 inch ash board. The board has feet at both ends so that work can be clamped directly to the board as well as in the vice.
For me, the key to getting reasonably accurate work is to build a jig for everything. This a drilling jig that I used to locate the holes for hinge pins in a spice rack project.
With patience (the really hard part), you can finish projects that you can be happy with, even though the tools that you are using are limited.


Thursday, September 11, 2014
Spice Rack
One of the problems with building a spice rack is that spice packagers use all different sized bottles. Making the rack large enough to accommodate the biggest bottles means that the small bottles will escape. Walt on s/v Suppose solves this problem by purchasing a set of uniformly sized bottles and then building a clever rack to fit them...
When two people share a 31 foot sailboat, it's hard to keep secrets. But, when Kathy traveled to Colorado for a few days to visit her family, it gave me a chance to build a spice rack as a surprise for her return. She was pleased.
The spice rack holds 15 four inch tall spice bottles from Bed, Bath, and Beyond for $1 each. The rotating fiddles allow easy removal of one bottle without turning the other 4 on the shelf loose to fly out. A strip of 1/4 inch weather stripping on the back of the fiddles provides gentle pressure that prevents rattles.
The spice rack is built from mahogany that the lumber yard milled to 5/8 inch thickness for the sides and 1/2 inch for the two shelves and three fiddles. I used a simple box construction with rabbeted joints at the corners, dado joints for the shelves, and a 1/4 inch birch plywood back. After the box was constructed, I used a 1/4 inch, quarter round router bit to soften the corners. The 5/8 inch thickness was sufficient to rout the sides down for a facing trim.


Tuesday, December 24, 2013
Locker Storage Upgrade
Boat interior designers usually do a good job of making use of all the odd-shaped spaces inside the hull. But not all their ideas fit the way we live a boat... Walt on s/v Suppose applies his carpentry skills to cleverly reconfiguring one such space:
S/V Suppose has a variety of storage areas. However, to provide the maximum usefulness, some of those areas need to be reconfigured. One example is a small "hanging" locker that is not actually big enough to hang things like clothes and jackets. Its real purpose is to hide the anti-siphon loop for the discharge line from the head and the y-valve and thru-hull seacock in the bottom of the locker. The locker will work better for us as a storage cabinet with shelves.
The new shelves will have to be removable to provide access to the seacock and y-valve. I installed cleats on the cabinet sides to support two shelves and a false back. The three pieces are installed in a sequence that locks them in place so that no additional bolts and screws are required. Disassembly only takes a few moments.The shelves were cut to fit from 1/2 inch plywood, stained, varnished, and covered on one side with a light colored laminate that matches the rest of the trim in the cabin.
The bottom shelf drops in place first.
The false back goes in next. It rests on the bottom shelf and against cleats located behind it.
The top shelf has a fiddle on the front edge that is made from 1/2 inch teak. I used a router to round the top and to cut a rabbit-joint in the bottom to fit over the shelf edge. The bottom shelf lies below the front face of the cabinet so that a fiddle is not needed for it.
The top shelf drops in place next. The shelf rests on horizontal cleats and is wedged between the front face of the cabinet and the false back. This holds the back against the cleats behind it.
Here is the finished project. The shelves will be much more useful for us than the hanging locker and they can be quickly removed to access the anti-siphon loop and seacock.


Subscribe to:
Posts (Atom)


 Posts
Posts


