Showing posts with label clothing. Show all posts

Thursday, February 5, 2015

Dry Suit. The Ulimate in Foul Weather and Survival Gear?

Now here is a great idea from Drew over at Sail Delmarva - It might not keep you warm enough in the Bering Sea, but then how many of us are sailing there? And as Drew points out, the safety gear you are wearing beats the heck out of the best safety gear in the world stored in a locker...
Better than a Survival suit? That is the question Practical Sailor Blog asked this month. Conventional survival suits are so ungainly that sailing is impossible and they are not donned until the boat is headed down, often too late. A dry suit, on the other hand, offers the same or better agility and livability than conventional foul weather gear, with complete cold water protection (except for the head and hands). Since it can be worn while sailing, it offers protection you are more likely to have on.

But that isn't why I bought mine. Kayaking is one of my favorite activities, and once the water temperature drops below 60F, it become more and more difficult to dress safely. While I have never capsized (other than white water) on open water, there is always a hypothermia risk. Additionally, I think the dry suit will make reboarding from the water easier, because you avoid heavy, soaked clothing. Instead, you gain significant all-over buoyancy.

Not me. I'm much better looking. Demonstrating the conversion from stand-by mode to fully sealed.

A favorite feature, and one that makes this suit (Ocean Rodeo Ignite) particularly suitable for sailors, is the standby mode. The pants are supported by suspenders and fit well, with attached socks. As shown in the above photo, the pants can be pulled up and the jacket zipped without put the head through the neck seal and zipping in, giving great ventilation. Converting to full seal takes only moments.

There are wrist seal, lotsa pockets, and a fly. The fabric is like a heavy duty 3-ply Gore Tex and seem very durable. The entry zipper is across the shoulders and doable alone (many drysuits require help). They are cut for athletic builds; if you've been hitting the pasta a bit too much, have very large shoulders, or shoulder mobility problems, go up a size; I am near the upper limit of height and weight for the medium (5'8" x 165#) and the fit was spot-on with my typical cool weather dress (long johns, fleece pants, shirt plus fleece sweater). With 2 thin fleece layers, 32F water is pretty tolerable (but the fit through the shoulders is more snug), and I've even done a little bottom cleaning like that. However, I strongly recommend trying the suit with the layers you intend to wear. Fortunately, getting out is easier than getting in, so you won't get stuck!

Note on trimming seals: the wrist and neck seals on dry suits tend to be one-size-fits-all, which is to say they are probably too tight unless you are built like a stick. In fact, over tight neck seals can inhibit blood flow to the head, which is bad.  I found the wrist seals fine, but the neck seal was miserable. Trim one ring at a time with very sharp scissors, leaving no jagged areas that could stat tears, until the seal is snug but acceptable, your adam's apple can move, and blood flow seems normal. Divers keep them tighter than kayakers and sailors should. Seals are replaceable, but with care last a long time.

And when you peel it off... You're dry!

Thursday, October 9, 2014

Warm Boots

The time of year is coming when this idea will be very welcome indeed. Warm dry sea boots? What a luxury! As usual, Drew at Sail Delmarva shows us how to have them for a very minimal investment:
A few days ago I was following a thread on a sailing forum regarding how to best dry a pair of high-dollar leather and Goretex seaboots. Suggestions from experts ranged all over, but missed that most obvious answer; a boot drier. Perhaps this won't resonate with warm climate folk, but it should; I've seen enough mold and mildew in Florida to make it the state plant... if it were a plant.

I built this one15 years ago in an evening, for the specific purpose of drying wet snow gear, but it has certainly been used far more for rain soaked gear.


Even the most sodden boots, shoes, or gloves are dry, warm, and fresh in a few hours. Odor is eliminated, as there is no chance for anything to grow. Wet gear has a proper place, and space is conserved since less gear is needed. The materials came entirely from the might-need bin, but I suppose it could be built for $30 if everything were purchased. It could be made longer, for a larger family, with very little change in cost.

The fan provides just enough flow. A bit of flashing creates an internal baffle, directing all of the air flow over the bulb before it goes to the pipe outlets. A 60W bulb seems to provide just enough warmth, but a larger bulb or lamp-base heater could adapt the design to larger sizes. Hardware cloth keeps small fingers and trash out. Pipes could be made longer for sea boots. The unused pipes are plugged by dropping a large bolt in the hole, focusing the heat on a reduced number of holes. The weight is sufficient to keep it from tipping over.

  • 110v computer fan
  • ceramic socket with 60W bulb 
  • box and switch
  • a salvaged cord
  • 3/4" lumber and some screws
  • 3/4" PVC pipe stubs
  • a bit of flashing and some hardware cloth
  • paint
What would I change? I should have built it for 8 pipes (4 boots + 4 gloves) to better serve 2 people. I should have made the pipes just a little longer (no so much that it could tip over) and drilled a cross-wise hole near the end (so that they cannot be blocked if the boot is sitting on the end). But Jessica is off to college, so it's really just me playing outside, and it works quite well as it is.

I've been tempted to build something similar into the boat--it's really sweet to have warm, dry shoes in the winter--and perhaps I will if I start cruising more in the off season, now that school schedules don't matter.  Perhaps something that diverts warm, dry air from the mini-dehumidifier.

Tuesday, July 15, 2014

Tilley hats

Real customer service seems to be a rarity these days.  When it is found, I like to highlight it.

Please welcome new contributor Adam, aboard nb Briar Rose!* Adam sings the praises of a company which I suspect has many customers among the readers of this blog:
My Tilley hat has become something of a trademark -- and I often get people saying they recognised me because of it.  But lately it's been looking a bit worse for wear, and when it came out of the wash a week or so ago,the front was full of little holes.  It's maybe not surprising, given how much I wear it, that it gets regularly soaked (as I like to have it on under the hood of my waterproof when it's raining), operates as a sun hat, and once had to be rescued from the canal when the wind took it (they're designed to float).


So I emailed Tilley in Cornwall, who said the hat was covered under their lifetime guarantee never to wear out.  After a few checks, they've sent a replacement.  All I had to pay was a fiver for postage.  It's only when you see the old and the new next to each other that you realise how battered and faded the old one is.  Anyway, well done Tilley; a guarantee that really does mean something.
* For those of you to whom it may be unfamiliar, the abbreviation "nb" stands for "narrow boat", a class of boats plying the canal network in England.  The boats are constrained in size by the canals and locks they navigate,  up to 70' LOA with a maximum beam of 7'.

Thursday, May 23, 2013

Small Clothes Drying

Paul on s/v Solace has an easy answer for drying small clothing items - made from items you probably already have on board:

Some years ago, we were in the Pacific islands and my wife bought at a market, a round plastic hanger with multiple clothes pegs hanging off it. She used this to hang her underwear and socks from, both outside and inside the boat. Well, eventually the plastic thing broke and she lamented the loss of her "never, never holder". She says, "underwear should never be seen hanging off life lines or even a clothes line".

So I set about one evening to duplicate what she had before. I used two garden irrigation "T's and some reinforced hose to make the basic shape. I drilled through the plastic hose and placed short sections of about 3mm line through; held from slipping through, with just an overhand knot on top. Next I drilled the pegs and did a similar knot to hold the pegs. Finally I made a bridle in the middle cross piece and placed a cheap small carabiner at the center of the bridle by which to hang the contraption.


About 1 hour to make and less than $10

Thursday, April 11, 2013

You have got to be kidding

Does your boat have solid tubing all the way from the bow to the stern? Then perhaps this post is not for you.  But if instead you have actual lifelines, then you need to hear what Mike & Rebecca on s/v Zero to Cruising have to say:
Yesterday, Rebecca and I were walking the beach and as we navigated along the sometimes slippery rocks, we kept our eyes open for any bits of treasure that may have washed up on shore. The other day we found a good fishing Yo Yo (hand real) while yesterday, I spied a bright pink clothes pin (clothes peg). I mean no offense to anyone who might have purchased such an item but at 4 for $14.99, I think these seriously belong in the “more money than brains” category.

The pink pin is stupid expensive, not to mention the fact that
it only works on rails and not on lifelines.
 
Clothes pins are one of those items that would-be cruisers sometimes agonize over, assuming they spend too much time on internet forums and not enough time sailing. Rest assured, marine chandleries will be all too happy to trade you your money for marinized versions. We, fortunately, never fell prey to this. We have used several dollar store varieties over the last few years and have come to find that the basic wooden version that your Mom used to use fit the bill just perfectly. They are cheap, they don’t fail due to UV exposure like their plastic cousins do and, they’re cheap. Did I mention that already? Of course, they aren’t quite as pretty as the 4 for 15 buck variety so, if that’s a concern of yours when displaying your underwear for your boat neighbors to inspect, you might want to try the big buck versions instead.

Monday, April 26, 2010

Shelving It

Project from s/v Estrellita 5.10b, April, 2010.
We had three sets of hanging lockers in our boat: one in the v-berth (master bedroom), a big one in the main living area across from the head, and one in the aft cabin.

For us, they are a waste of space. This is the large hanging locker in the main living area which I painstakingly lined with rFoil using double-sided contractor-strength rug taped with insulating tape on top to the hull.

Hanging locker pre-shelves

The rFoil has helped with condensation a little - not enough for me to recommend it to anyone. Thankfully we only have one more (planned) winter up here and the condensation will go away when we get South...until we end up somewhere with chilly water again.

But I digress.

I measured, cut and installed shelves for two of the hanging lockers before running out of good weather. Over two other good weather windows, Carol cut the remaining shelves and I painted everything.

Then we realized we needed to cut finger/ventilation holes in them which we did and I repainted the holes.

Removing wood chips

Repainting after holes

We bought a bunch of Mountainsmith Travel Cubes which we use to organize our clothing and to keep it from getting "boat smell".

Mountainsmith Cubes

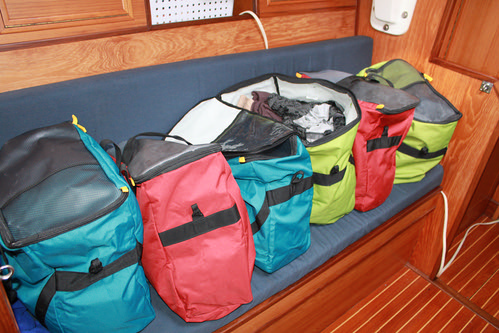
We can fit 6 cubes on the two shelves with room for a big bag of less regularly needed goods beneath the bottom shelf. Right now we have a big bag of paper goods in there but that will probably be changed to spares because it is a good, low center of gravity and central storage place.

Mountainsmith Cubes

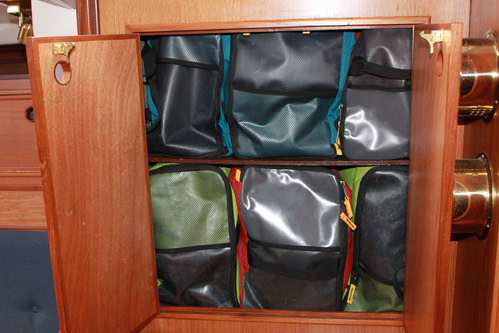
This creature comfort addition has made a big change in our daily lives, removing one more layer of stress from living on a boat. I can find my clothes. I have room for plenty. They don't get damp and they smell like laundry detergent when they come out of the cube. When we need to access the items below, the cubes are much easier to unload and reload than stacks of clothing.

I (heart) our cubes.

This post originally appeared at s/v Estrellita 5.10b. This post copyright s/v Estrellita 5.10b.
Related Posts Plugin for WordPress, Blogger...