Tuesday, September 30, 2014

Pledge Drive

I hope you have been enjoying the ongoing series of projects posted here.

This is your site.    For this to work out for all of us, everybody needs to contribute - think of this as a pot luck dock party.

Come on now.  All of you have a small project of one kind or another that others would be interested in seeing. Contribute to the feast:
  • Write it up and send it to SmallBoatProjects at gmail dot com
- or -
  • If you have already written it up on a blog somewhere and are willing to share, just tell me where in the wide world of the Internet to find it, and I'll come and get it.
- or -
  • Give me permission to "mine" your blog for projects. Anybody who is writing a blog about boating has numerous small projects buried in there. I'll ferret them out, if you let me.  No, I won't put your content on here without your permission.
- or -
  • Send me what you have, and I'll do the write-up, with full credit going to you as your project, of course.

Every posting will feature a link to your article (if there is one) and a link to your blog (if you have one).  In addition, all contributors will permanently have a link in the "Contributors" box on the right side of the blog. This ought to drive some of the traffic that this site is seeing back to your site.  I will not take any recent posts (unless you tell me otherwise) - that way this site will not be in competition with yours. Instead, it will hopefully serve to "reactivate" some of your older posts.

But the most important benefit you'll get is the warm feeling of having helped someone thru a problem - one that you have solved. And we will all be the richer for it.

Pitch in!

Thursday, September 25, 2014

New Deck & Bilge Pump Drain Manifold

What Jeff and Anne have been doing to s/v Pilgrim is not a re-fit, but for all intents and purposes a complete rebuild of the yacht. Much of their work is too big to include in this blog, but some portions are self-contained and fit well with our format. This is one of them...
The Ted Brewer designed Morgan 382, 383, & 384 series has a unique, and I believe very well designed, system of deck & cockpit drains.  A 4“diameter tube with exits above the water line transverses the beam under the cockpit sole.  From the exterior of the boat it is possible to look through the tube and out the other side.  Morgan owners refer to this drain as the “torpedo tube“.

Two,  2” id cockpit drains feed vertically directly into the tube.  Port and starboard deck scuppers feed into the tube via a manifold located in the engine compartment.   Pilgrim’s manifold was a tired, poorly constructed mess that grew new limbs to address additional plumbing needs.

Pilgrim's dubious drain manifold

A single strategic hack saw cut excised the manifold. 

All the remains is the 2" id tube that feeds directly into the "torpedo tube".

Armed with a sketch of my vision for a new manifold, I headed into the hardware store.  Amazingly the Beaufort Ace Hardware had everything I needed to fabricate the new manifold.
Dry fitting the new manifold.

The primary body of the manifold is 2” id schedule 40 PVC.  The 1 ¼” id deck drain hoses attach at either end.  The manifold also includes a ¾” id inlet for the small volume, primary bilge pump and a 1 ½” id inlet for the manual bilge pump.

To decrease the likelihood of down flooding and to maximize space in the engine compartment I elevated the new manifold 4” above the torpedo tube.

The new manifold is elevated 4" above the torpedo tube and supported to two eye straps 

No bilge pumps are currently installed in Pilgrim – stay tuned  - so  temporary plugs are currently screwed into those inlets.

Bilge pump inlets are temporarily plugged.

We plan to reroute and replace the deck scupper hoses, but at present the existing deck scupper drain lines are feeding the new manifold.

Future projects will include replacing and rerouting the deck drain hoses.

Tuesday, September 23, 2014

Better Toy Storage

Aboard s/v Astraea Nate and Natalie found a great way to stow their son's toys.  Not only is this a good solution for parents sailing with kids, but this would be sure to find other uses aboard as well.  Read on...
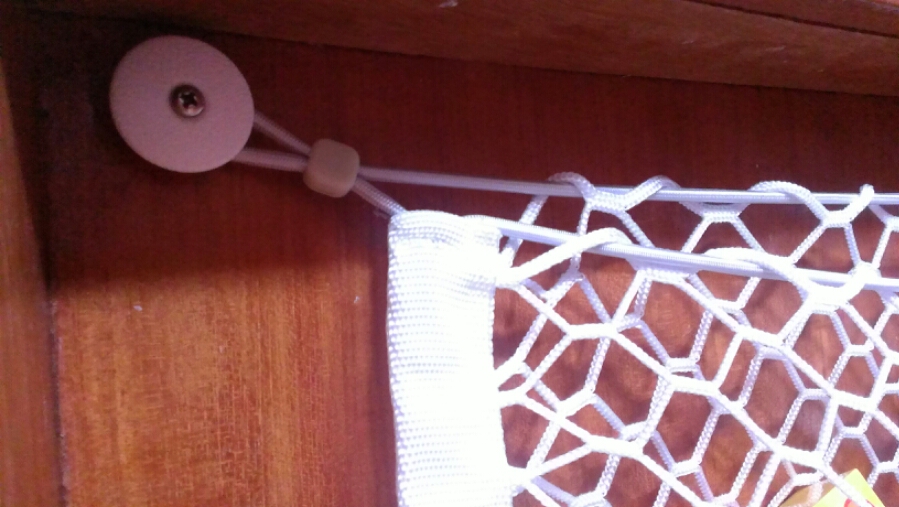
We changed the way we store Sully’s toys board. They were held in boxes that would slide when the boat heeled and got in the way. Now we have two elastic nets full of toys. They’re called EZNets and are 15″ x 28″ and we bought them on amazon.com.

image
Sully likes his easy to access toys

image
Close up view of how the nets attach

Friday, September 19, 2014

Why Does My Anchor Come up Backwards?

Does yours do this? Over at Sail Delmarva, Drew asks the question, and then shows why and how to fix it:
After fixing this on 3 boats (mine was the first) I thought I would share something so obvious it is commonly overlooked.

 There are many things that can bring the anchor up backwards, not the least of which is a shift in the wind. The easy solution is a swivel, but failures are not unusual; my SS swivel had a nice interior crack that I noticed only when taking it apart to replace the anchor. Many sailors have abandoned swivels for this reason, and then wondered if they made a mistake when the anchor came up reversed most of the time. Never fear.

Notice the nice straight chain. No twist.

When connecting the anchor, observe that there are 4 rotation options. Unless you considered this at the time, you had only 1 chance in 4 of getting it right.
  • If you are 180 degrees out of alignment, reattach inverted.
  • If you are 90 degrees out of alignment, either add/subtract a shackle or clip one link.
The chain cannot rotate in the gypsy, thus, getting the twist right significantly improves the odds of the anchor coming up right way round, more so if the windlass is near the roller. Not 100% certain, but improved odds. For me, >95%.

Tuesday, September 16, 2014

Dock Box Carpentry

Given Norm Abram's shop, getting really good results from wood working projects is relatively easy.  But doing it on the dock, with a very limited set of tools that all have to go in the dock box when you are done...  not so much.  As promised, here is Walt on s/v Suppose's post on "Dock Box Carpentry".  He makes it look easy:
There was a time when I had an oversized garage with a table saw and a long workbench with a drill press, belt sander, vise and rows of drawers filled with a variety of tools. Now, instead of a garage, we have a dock box and the trunk of our car. I thought that there might be some interest in the simplified set of tools that I am using, a cordless drill, circular saw and router.


This is my combination table saw and router table. It is a simple plywood construction shown with the circular saw mounted underneath. The trigger on the saw is not easily accessible or lockable. So, I strapped it down with a tie wrap and the saw is turned on and off by plugging and unplugging the power cord. I know that this is unsafe on a variety of levels but knowing that is exactly what makes me doubly cautious. Plus, the circular saw is not nearly as powerful as a real table saw and not as likely to kick back violently. So far, I have had no accidents or even a close call.


I mounted the saw under the table such that the edge of the saw's base is parallel to the table edge. After making a plunge cut to bring the blade through the table top, I laid a guideline the full length of the table that is aligned with the side of the blade. I measure and make marks relative to the guideline at both ends of the table and clamp a board on the marks to serve as a rip fence. It's a little tedious but works very well.


A piece of half inch plywood screwed at a 90 degree angle to a 1x2 inch rail that rides against the edge of the table makes a usable mitre guide. I added a strip of wood to the top to clamp stop blocks for repeated cuts.


This the same table with the router mounted underneath. The clamped on fence and miter guide are useful with the router as well. With a 1/2x1 inch straight bit and 1/4 and 1/2 inch quarter-round bits, I can make all of the joints and decorative cuts that I need for boat projects.


This is my favorite new tool, a portable drill press. Our rigger let me use the real drill press in his shop to drill a variety of holes through a 3/4x2 inch strip of teak which I use as a drilling guide.


There is something about my "no line" glasses that makes it impossible for me to line the drill up for a hole perpendicular to a surface. The drilling guide is a huge help.


This is another indispensable tool that I use often. Many times, the most difficult part of a job is just getting the workpiece to stay put while you hammer, drill or file on it. A solid vice can be a life saver. This one is mounted a 1 1/2 inch ash board. The board has feet at both ends so that work can be clamped directly to the board as well as in the vice.


For me, the key to getting reasonably accurate work is to build a jig for everything. This a drilling jig that I used to locate the holes for hinge pins in a spice rack project.


With patience (the really hard part), you can finish projects that you can be happy with, even though the tools that you are using are limited.

Thursday, September 11, 2014

Spice Rack

One of the problems with building a spice rack is that spice packagers use all different sized bottles. Making the rack large enough to accommodate the biggest bottles means that the small bottles will escape. Walt on s/v Suppose solves this problem by purchasing a set of uniformly sized bottles and then building a clever rack to fit them...
When two people share a 31 foot sailboat, it's hard to keep secrets.  But, when Kathy traveled to Colorado for a few days to visit her family, it gave me a chance to build a spice rack as a surprise for her return.  She was pleased.

The spice rack holds 15 four inch tall spice bottles from Bed, Bath, and Beyond for $1 each.  The rotating fiddles allow easy removal of one bottle without turning the other 4 on the shelf loose to fly out.   A strip of 1/4 inch weather stripping on the back of the fiddles  provides gentle pressure that prevents rattles.


The spice rack is built from mahogany that the lumber yard milled to 5/8 inch thickness for the sides and 1/2 inch for the two shelves and three fiddles. I used a simple box construction with rabbeted joints at the corners, dado joints for the shelves, and a 1/4 inch birch plywood back.  After the box was constructed, I used a 1/4 inch, quarter round router bit to soften the corners.  The 5/8 inch thickness was sufficient to rout the sides down for a facing trim.

Tuesday, September 9, 2014

Got Milk?

This post originally appeared on Windborne in Puget Sound

I got skunked the other day.

I was at one of the big box home remodeling stores and picked up a gallon of paint thinner, since I was almost out on the boat.  Instead of a metal can or a translucent polypropylene container, it was in a white container.  I didn't give that any thought at all.

Big mistake.

On the boat ready to clean a brush just used for varnishing,  I pulled the DOT seal  and saw...  not at all what I expected.  This was a gallon of milk.  No, seriously - it was an emulsion of paint thinner in water, looking exactly like milk.

Looking more closely at the label (which I should have done in the store), I saw that this was being marketed as "safe" paint thinner.   We Americans will go to any length, to any ridiculous length, to remove any trace of risk, won't we?  But this?  I think this is an EPA-designed thinner, being marketed as "safe".  Of course it is cheaper to manufacture too, since water is less expensive than actual paint thinner.

But tho it is "safe", and has very low VOC, what is it good for?  There is no way I or anyone else would dump this milk into a $60 quart of varnish.  And I wouldn't trust it even to clean my least expensive varnish brush.  I cannot even imagine it being useful as a thinner for water-based varnish, since that stuff is already as runny as milk. 

Kicking myself for my stupidity, I set the container by the marina dumpster.

Maybe someone can use it to make a latte.


Yes, that is 9 gallons of the good stuff. A local TruValue hardware store was selling off their old stock of the "environmentally irresponsible" thinner for $7.89/gallon. I bought all their stock.

I should be fixed for life.

Or perhaps I'll be like the lady who is selling off cans of pre-EPA formula Brasso on eBay, one by one.


Tuesday, September 2, 2014

Plumbing in the Right Direction

Over on s/v Cay of Sea, Rick tackles his head plumbing. He faces a problem that I completely understand - when Eolian's holding tank was plumbed at the factory, the connections to the inlet and the outlet were reversed, making the deck pump-out fitting completely useless...

In my last post, I confirmed the notion that fluids under pressure always obey the laws of physics. Fluids will flow towards the low pressure outlet every time – the path of least resistance, as it were. With this in mind and my back on the mend, I carefully boarded Cay of Sea today and set about to understand how I could have plumbed the overboard holding tank circuit in the wrong direction. Regardless of what I intended the plumbing design to do, it nevertheless obeyed the laws of physics perfectly and moved seawater into the holding tank, not out.

There were several possibilities as to why:  1) I had the Y-valve hooked up wrong; 2) I had the inlet and outlet hoses reversed; or 3) the opposite/but same effect – I had assembled the pump with the valves reversed.

It was number 3, actually.  I dimly remembered from two years ago (as I was tracking down hoses and confirming their connections) telling myself that I had to reverse the assembly of the pump so it would pump 180 degrees from its current configuration.  I didn’t do that when I reassembled it last week, so it very naturally drew water from the seacock which is intended to be the exhaust.  I had the hoses off and the pump disassembled/reassembled in about 45 minutes.

By the way, a heat gun is the required tool for managing white sanitation hose.  It simply is not possible to work with it any other way.  When warmed up, it’s nice and pliable.

I also removed the vented loop from the holding tank exhaust.  Yeah, that was an important move, seeing that its not possible to inject air at the top of the loop without creating a corresponding leak. However, not many people I know want this sort of leak in their boat.  No, not at all.  These loops, of course, are “necessary” for breaking any syphon that can flood the boat.  I had suspected, but wasn’t sure, that this would allow “material” to leak out of the pathway to overboard.  I was right, of course, because that’s the way they are supposed to work. However, it’s one of those details that “experts” fail to tell you as you read up on the subject.  The “experts” emphasize the importance of having a vented loop in any line that is connected to an overboard fitting.  I know, I know – you would think I could have worked that out for myself without being told. Well, I did eventually – and I learned this fact while pulling in seawater, not pumping out waste, so I feel thankful that I was spared that misery. Also, there is no risk of a syphon my case, because I close the overboard valves when the operation is complete.  I will never leave that seacock in the open position.

You may also remember that I used flexible bilge pump hose for one of the tight bends in the circuit.  I think that is going to work fine for two reasons: 1) I got the hose to seal on to the fittings with no problems, and 2) there will be no waste standing in this hose, as the pump has enough power to push all the fluid out of the hose.  Besides, anytime I will use this pump-out option, it will include a clean seawater rinse of the system.  Nothing objectionable will be left in the hose.

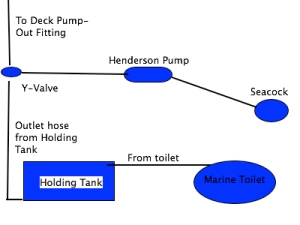
I reconnected the hoses with the pump reconfigured, and successfully evacuated the holding tank in about 3 minutes.  Pumped in a little more seawater from the toilet, evacuated the tank again.  All’s well.  No leaks, no problems.  Here’s a rough diagram detailing the overboard circuit:

This isn't the complete system  - just the overboard circuit.
This isn’t the complete system – just the overboard circuit.


Related Posts Plugin for WordPress, Blogger...