Thursday, December 26, 2013

Not for profit

I run the Small Boat Projects blog as a service to all of you out there.  I get nothing from it, financially or otherwise, other than a feeling of having helped the boating community.

But apparently what we do here has value, real financial value. 

I recently received an email from a promoter in Florida that said in part,
"I've learned real quick that putting together articles is detracting from getting the site where I want it to be prior to launch and am reaching out to boating sites for reprint and link back permission."  
I interpret this statement as, "Creating actual content is getting in the way of my making money.  Please do it for me."

I want you, the voluntary contributors to Small Boat Projects, to know that I formally and explicitly denied this request.  First, because I disagree with it, and second, because it is not my work that is published here, and therefore it is not my permission to give.

Bob
s/v Eolian
Seattle


Tuesday, December 24, 2013

Locker Storage Upgrade

Boat interior designers usually do a good job of making use of all the odd-shaped spaces inside the hull. But not all their ideas fit the way we live a boat... Walt on s/v Suppose applies his carpentry skills to cleverly reconfiguring one such space:
S/V Suppose has a variety of storage areas.  However, to provide the maximum usefulness, some of those areas need to be reconfigured.  One example is a small "hanging" locker that is not actually big enough to hang things like clothes and jackets.  Its real purpose is to hide the anti-siphon loop for the discharge line from the head and the y-valve and thru-hull seacock in the bottom of the locker.  The locker will work better for us as a storage cabinet with shelves.


The new shelves will have to be removable to provide access to the seacock and y-valve.  I installed cleats on the cabinet sides to support two shelves and a false back.  The three pieces are installed in a sequence that locks them in place so that no additional bolts and screws are required.  Disassembly only takes a few moments.


The shelves were cut to fit from 1/2 inch plywood, stained, varnished, and covered on one side with a light colored laminate that matches the rest of the trim in the cabin.


The bottom shelf drops in place first.


The false back goes in next. It rests on the bottom shelf and against cleats located behind it.


The top shelf has a fiddle on the front edge that is made from 1/2 inch teak.  I used a router to round the top and to cut a rabbit-joint in the bottom to fit over the shelf edge.  The bottom shelf lies below the front face of the cabinet so that a fiddle is not needed for it.


The top shelf drops in place next. The shelf rests on horizontal cleats and is wedged between the front face of the cabinet and the false back.  This holds the back against the cleats behind it.


Here is the finished project.  The shelves will be much more useful for us than the hanging locker and they can be quickly removed to access the anti-siphon loop and seacock. 

Thursday, December 19, 2013

Electrical system upgrade

Please welcome new contributors TC & Kelly aboard their Dragonfly 1000 trimaran s/v Wind Strider!  For their first contribution to Small Boat Projects, TC gives us a detailed description of his upgrade of the Dragonfly's electrical system. 

Most interesting to your correspondent is the use of LiFePO4 batteries - this is the first time these have appeared on Small Boat Projects.  I think we are seeing the future here. 
The biggest project during the winter 2011/spring 2012, and therefore subject to its own entry, was the electrical system upgrade.  As indicated by overnight anchorages in 2011, one of the two Optima Yellow Top house batteries had failed.  Further, the two, at least 10yr old, 60watt solar panels weren't doing anything.

With any change, one must ask to what end - what is the change to achieve?  The goal for the electrical system upgrades was to get at least 4 days on the hook without needing to recharge the batteries via engine or shore power.  Why 4 days?  4 days are probably how long Strider's fresh water supply will hold out!

Major Component Overview:

4 CALB 180Ah LiFePO4 Batteries with mini BMS
6 Aurinco solar panels:  2x Compact 100; 2x Bluewater 25; 2x Compact 25
2 Genasun GV-10 MPPT controllers
LED Lighting Throughout
MasterVolt ChargeMaster 12-25-3, MasterVolt MasterViewEasyMkII, MasterVolt MasterShunt, MasterVolt MasterDistro 500, MasterVolt MasterBus USB

What is the consumption?

To design an electrical system properly, one must first know the consumption, or what one uses. Every electrical item aboard must be taken into account:  Refrigerator, lights, radio, pumps (anchor wash down, bilge, galley, shower and head faucets), navigation instruments, hair dryer, fans, stove, windlasses, bow thruster.  Everything.  When Strider's systems were examined, stem to stern, I erred on the side of caution and rounded everything up, overestimating the consumption:  Summer worst case of 40Ah per day.  Winter, using the furnace and probably the stove more, would increase consumption. 

Second, one has to know how long they want to go between charging.  Since 4 days between charging was the goal, 40Ah x 4 days = 160Ah, the working number.  Batteries able to handle 160Ah loss need to be purchased.

LiFePO4

My mentor Steve, of the Dragonfly 1000 Flexible Flyer, turned me on to LiFePO4 batteries.   'Standard' batteries, gel, AGM, wet and 6volt deep cycle golf cart, had been looked into.  All had several drawbacks, weight and discharge capability were foremost.  'Standard' batteries are able to discharge a maximum of 50% without damage for a maximum of 500 cycles.  Going by the goal of 4 days on the hook and 160Ah consumed, batteries of at least 320Ah were required.

Looking at the 6volt batteries available, two 370Ah would do the trick.  However, while the could fit in the engine bay, they weigh 113lbs and cost $420 each!  Alternately, assuming the solar panels could keep up with consumption, the next size down 6volt is 215Ah (107Ah, not 160Ah available), weighs 63.5lbs and costs $238.  A little more reasonable, but still heavy.

Gels fitting into the original space under the step are the group 31s.  Each has 97Ah, weighs 72lbs and costs $410.  Two would be required for just 97Ah usable.  To get to the goal's 160Ah, 4 group 31s would be required (3 would fit under the step) or move up to the 4D.  The 4D has 183Ah but weighs 130lbs and costs $645.  Once again, two would be required and they would have to be fitted into the engine bay.

Then Steve mentioned he was replacing his 6volt golf cart batteries with LiFePO4, a single set for both house and engine start.  There are several lithium ion technologies and manufactures, from very expensive, all included, plug and play MasterVolt all the way to less expensive more basic build your own with components.  LiFePO4 are stable and a great amount of power available vs cycles:  70% discharge 3000 times or 80% discharge 2000 times!  Then there is the size and weight:  Small and very light compared to 'standard' batteries.

CALB 180s were selected because they offered a bit more Ah vs size.  Though a 400Ah version were available, 4 would not fit into the space under the stair.  Further, with the solar panels selected (see below), I began to feel the 160Ah requirement was something to be flexible on.  Though rated at 180Ah, they can provide 200Ah (charged above the rated 3.4 volts each).  Their rated power (180Ah) available vs cycles:  126Ah @ 70% discharge or 144Ah @ 80% discharge, close to the 160Ah requirement.  At 11x7x2.8in and 12.5lbs each, they total 50lbs and fit under the stair!  With these, barring something catastrophic, Strider will never see another set of batteries.

BMS

A word about the Battery Management System.  There are BMSs available which will do everything, protect and keep the batteries balanced.  I purchased a 'mini-BMS' which has 5 components, 1 monitor/battery and an overall control board wired to a solid state relay controlling the shore power charger.  The BMS does no balancing, this must be done by hand (not difficult).  To date, this set up works fine by shunting power across a battery when it is full and prevents the shore power charger from over charging the batteries.  I'm not sure it is required for this set up, but it is an insurance policy.

Steve provided a simple circuit to tie the BMS into the refrigerator t-stat so should the BMS cut off the shore power charger, all will be reset when the refrigerator turns on.  Now, how to keep them charged?

Solar

Wind was briefly considered, but dismissed as not practical for a Dragonfly 1000.  The solar setup was based on information gleaned through the Cruisers and Sailing Forums.  In particular:  The rule of thumb for peak solar is 4hrs/day year around in the southern latitudes, 5hrs/day summer-time north and (inferred) 3hrs/day winter-time north.

Again, worst case is winter sunshine is 3hrs/day peak.  To keep up with 40Ah/day, with zero loss, the panels needed to provide 13Ah for each of the 3hrs.  13Ah is about 180watts of panels (13Ah x 14volts = 182watts), round up and call it 200watts.

However, this is under ideal conditions:  All the panels oriented in the same direction and constantly oriented to the sun.  Aboard Strider, there is always shading, from lines, from sails, from the nets.  For instance, if under sail and the starboard is in full sun, the port side is shaded by the sail.  Further, the panels need to mounted on flat surfaces of the boat and none of them are oriented to the sun.  So, while 200watts would suffice in ideal conditions, there are no ideal conditions aboard Strider.  What then is required?  300watts?  400?

Aurinco panels were desired because they had a good reputation.  They did not need blocking diodes to prevent electrical flow from a producing panel to a shaded panel.  They are thin and light with a non-skid surface.  And being somewhat flexible, they are able to bend to mount on the boat's surface.  Further, they are local (Anacortes, WA).

Aurinco's panel styles helped to decide what and where to be mounted.  Strider came with two, 10yr old, 60watt panels and they needed replacing.  Aurinco's 100watt panels were the same size!  So, two of those, one for each ama.  Their location however, is covered when the amas are folded.  When the amas are folded, locations left exposed included the tops of the akas and the aft end of the amas.  Conveniently, Aurinco has a 25watt panel that would fit on top of the aka and a second 25watt that would fit on the aft end of the ama.  With this set up, I'd have 100watts exposed folded (7Ah max ideal) and 300watts extended (21Ah max ideal).  Remember:  There is no ideal aboard Strider, but I thought all in all, 300watts could cover our consumption.

To date, I've been very happy with the panels.  One needed to be replaced as water intruded via the output wires and caused corrosion/delamination.  Aurinco was very accommodating.  For further discussion, there is a results section below.

Solar Panel Arrangement.
The large 100 watt panels on the ama are covered when Strider is folded.
The small panel on the ama sterns are 25 watt.
25 watt panels are on the aft akas.

MPPT

A controller is required to regulate the nominal 18-21volt solar panel output to something the batteries can handle.  The latest technology is Maximum Power Point Tracking (MPPT), a technology some claim to increase useful solar output 20-30%.  Practical experiments at Aurinco showed a more modest 10% increase.

The entire system was split into port and starboard, two systems of 150watts each, for redundancy.  A no bells or whistles MPPT by Genasun was selected for each side.  Genasun GV-10 can handle 10.5amps and claim a 98.3% efficiency with .9mA night time consumption.  Because CALB LiFePO4 batteries had been selected (see above), the GV-10s were programed for a 13.8volt charge to protect the batteries from a potential overcharge.  Later, I found out the GV-10 came with a 13.8volt float voltage, this alone woulda/coulda protected the batteries.

Why 13.8volt charge?  Though a Battery Management System was purchased with the batteries, I was unsure the BMS did anything except shunt power across a battery once it is charged and shut off a shore power charger to prevent an overcharge.  So, 13.8 is derived from the CALB charge chart showing each battery is charged to maximum capacity at 3.4volts.  3.4v/battery x 4 batteries = 13.6volts.  .05volts/battery is required to overcome internal resistance.  .05 x 4 = .2volts.  13.6 + .2 = 13.8volts.  Unknown to me, there was a conversation between my supplier and Genasun at my 'unusual' voltage request of 13.8.  According to Genasun, CALB normally requires 14.2volts.  Would this have changed anything?  Not likely, I wanted to protect the batteries...period.  For results, see below.


LED Lighting

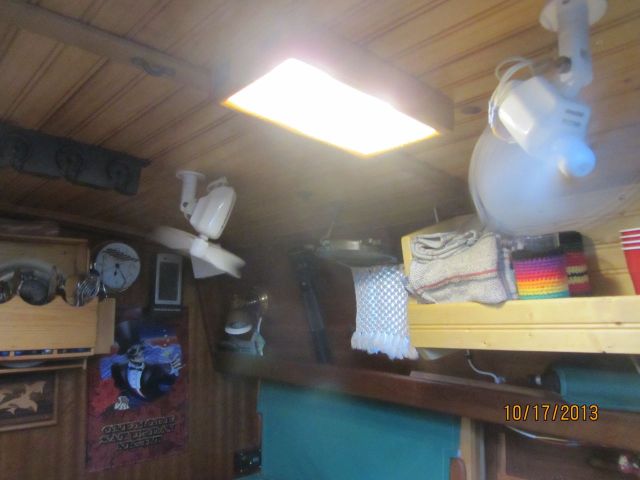
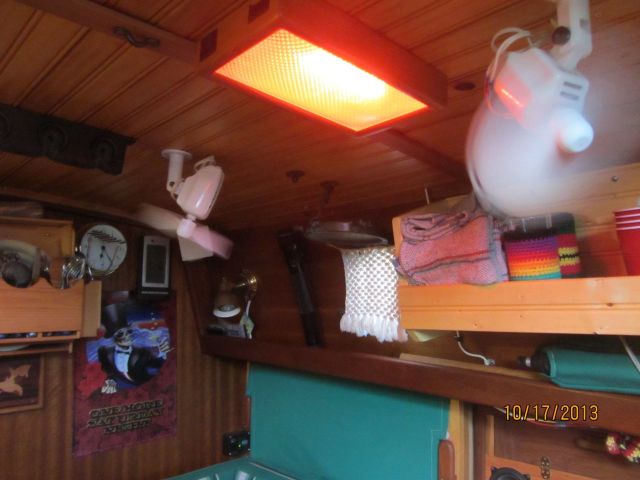
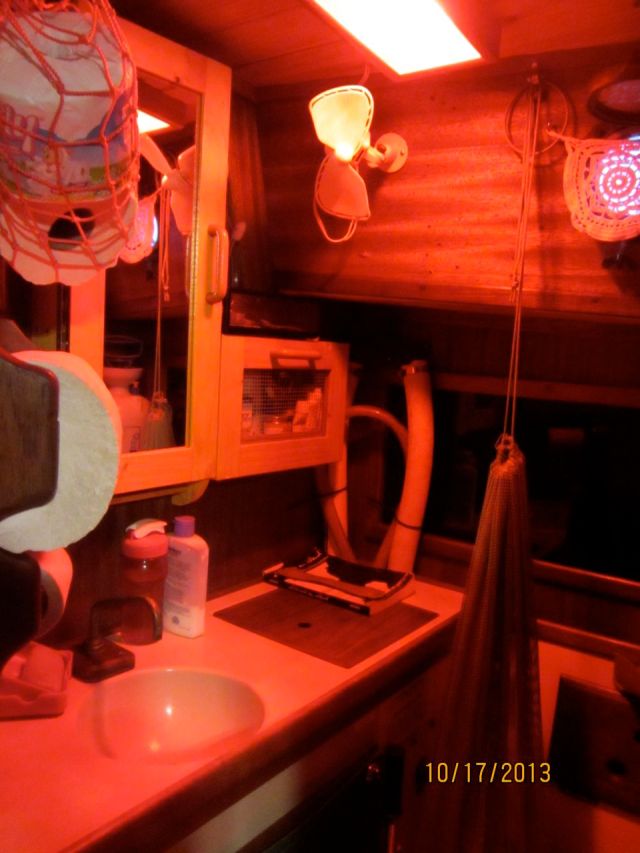
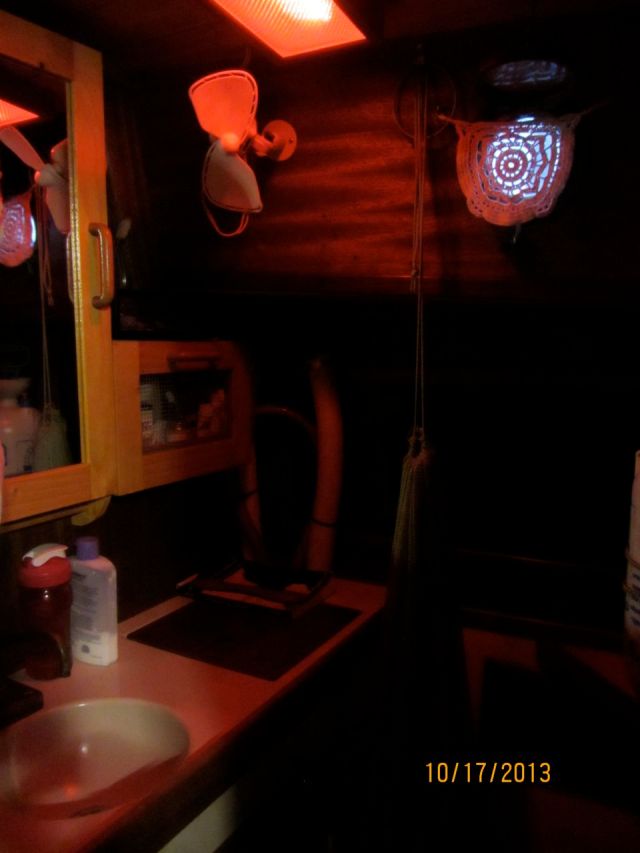
LEDs were not a part of the original consumption calculation, the original halogen and incandescent were.  But opportunity presented itself and with the exception of 1 light in a small cupboard, all Strider's lighting was converted to LED, including the navigation lights.  As a result, Strider hardly uses any electricity for lighting.  Navigation lights are Dr LED via West Marine.  Internal lights are Phillips 12volt LED garden lights via Home Depot.  The galley overhead light was replaced with a red/white LED light fixture.  The white side of the light was wired to the stock overhead light above the cook top, increasing light in the galley.  The light in the head was replaced with the same fixture as the galley.  The goose neck map light behind the dashboard in the cockpit was replaced with a red/white light also.  Now, red light is available from the V-berth all the way to the companionway and into the cockpit making night egress easier without sacrificing night vision. 

I have no direct Strider data, but an efficiency example is:  Summer 2012, a buddy was having problems with his boat's electrical system and the masthead incandescent alone was using 16Ah per night.  An LED was loaned and the consumption went to near zero.  This same buddy said Strider's masthead light was very visible (rated at 2nm).


Monitoring

Strider came with only a single output, conventional battery charger and a rudimentary monitoring system (volts only).  Though there are less expensive components available, MasterVolt was selected because each component is compatible with all the others - they communicate and are programmable.

MasterVolt ChargeMaster 12-25-3.  Fully programmable.
MasterVolt MasterViewEasyMkII.  Monitors and allows some system programming.
MasterVolt MasterDistro 500 distributes the power to the boat systems and has 4 ports.  One is connected to the stock, 65-amp alternator, one to shore charger, one to port solar and one to starboard solar.  The type of fuses used in the shunt were readily available for the alternator and charger, but there were none small enough for the solar so I had to create my own.
MasterVolt MasterShunt measures and monitors flow in and out of the batteries.
MasterVolt MasterBus USB connects the system to a small notebook computer carried aboard and via the MasterVolt software, components can be programed.


Settings

The ChargeMaster is set at 14 volts (could not go lower) and floats at 14.  However, it is used only occasionally, mostly during the winter when shore power is connected and an electric heater is running on board.  To date, the batteries have had no problem with this setting.  When the batteries are down, the stock alternator outputs 45amps @ 14.2 but throttles back to 2amps @ 13.8 as the bank charges.  Originally, the GV-10s were set at 13.8 volts (turns out this is also their float voltage).  After a summer of use, the GV-10s were sent back to Genesun and reprogrammed to 14.2volts in an attempt to increase charge rate.  A neutral result (see below).


Results

So, after thousands of dollars and millions of lives, how well does this system work?  In a word:  Fantastic!  Spring, summer and fall, with the amas folded and only 100watts of solar panels showing, the refrigerator on, the batteries are kept charged to 100% during the day, even during overcast days.  Winter in this configuration, with thick overcast and rain, the 100watts solar cannot keep up with fridge.  So the fridge is shut if off and the batteries stay at 100%.

Once aboard, with amas out, there is excess power and a freezer was added.  Once the freezer was dialed in, Strider uses 12-15 Ah between sun charges, including using the diesel cook top and furnace in the morning.  Generally, Strider is fully charged around 11am.  If there was a water maker, Strider could be on the hook forever.

The worst consumption/charging experience was before the freezer had been dialed in (originally set too cold and running too much) and anchored in a bay surrounded by trees.  The panels received the morning sun around 8am but were shaded by 4pm.  Additionally, due to angles and shading, the panels were not getting much exposure at all.  Further, these days were hot, about 85 degrees interior temperature, so the freezer and fridge were working hard.  In these conditions, the system was loosing between 10 and 15Ah per day.  Still, after 4 days, Strider was only down about 45Ah.  Not bad!  Winter, the original worst case scenario, has not yet been fully tested.

Improvements?

What would improve the system?  Steve's Flexible Flyer has 320 watts solar, 240 Ah LiFePO4 batteries (different brand), super-insulated, water-cooled fridge, a water maker and has enough excess power to heat his hot water to 170 degrees via the inverter.  His panels are set up more optimally and Strider will never be able to match his output without the addition of an aft arch (dinghy davit/radar/panel structure) like Flexible Flyer.  Still, he has achieved up to 19amps output.  The best seen aboard Strider has been 7amps...not even 50% of the solar panel potential.  As mentioned the GV-10s were sent back for reprogramming from 13.8volts to 14.2volts.  I'd hoped this increased voltage would increase the amp flow, but it doesn't seem to have made a difference.  Next step is to move the 100watt panels to a better location, forward on the ama, just behind the hatch and less shaded by the nets.  The configuration is working great as is, improving output is just something nagging.

What else?  Perhaps add an inverter.  But at this point, everything aboard is 12v or hand crank (blender and coffee grinder), which is fine!  However, my wife goes without a hair drier (but it would be nice).  Doing the hot water system like Steve does would also be nice.  We've a 'bucket head' vacuum cleaner for in port, else a small broom and dust pan is used.  Another addition would be a watermaker.

But all the additions mentioned are improvements to creature comforts, not system improvements.

Conclusion

The goal was at least 4 days on the hook:  Achieved!  The worst case to date was in Tenedos Bay in BC's Desolation Sound.  Even in these conditions, 4 days was easily achieved and Strider probably could have gone 2 weeks.  Anchored in wide open False Creek (Vancouver), Strider was fully charged by 11AM.   So:  Was consumption grossly overestimated?  Perhaps, but the LEDs were not a part of the original calculation and made a huge consumption improvement.

Too much solar?  Even with the niggling improvement mentioned above, the solar panels have been great also.  Probably could have gone with 200watts in the normal spring/summer/fall conditions.  However, the excess does allow for expansion.  Winter conditions have yet to be tested.

The LiFePO4 batteries have been a huge success - maintenance and trouble free!  The other systems have also been maintenance and trouble free.

Best yet, Strider never hooks up to shore power in marinas spring/summer/fall nor ever run a generator.  Quiet!

Tuesday, December 17, 2013

It’s the little things

Steve and Lulu living aboard s/v Siempre Sabado have made some small changes that have big results. As Steve says, sometimes it is the little things that make all the difference...
We made a couple of minor changes as a result of our trip to the States that have resulted in an improved quality of life aboard Siempre Sabado.

Things have always been a wee bit dark and cave-like down below thanks to inadequate lighting.  The original lighting was all incandescent and used very inefficient automobile tail-light bulbs.  These were borderline bright enough but used way too much of our precious battery power.  I eventually changed most of the bulbs to LED but continued to use the original fixtures.  The brightness of the LEDs was largely dependent on when (meaning the year) we bought them.  The first ones seemed pretty bright but cost a ridiculous amount of money.  As time went by LEDs got brighter and cheaper but, since they’re designed to last just about forever, it was hard to replace the old ones that were still working.  However, the difficulty in seeing things down below finally got the better of my cheap-osity and we decided to spring for new fixtures.

I’d always read really good things about the Alpenglow line of lights but had always been put off by their price which seemed a wee bit dear to me.  However, if we were going to put out substantial money for lights it would be nice to be able to see when we were done and also to have lights with a good reputation rather than something cheaper that may end up breaking.  I was particularly attracted to their line of 9-watt LED dual-power lights with night vision.  The light has a low power and high power main light as well as a dual power red light for nighttime.  I bit down hard on the bullet and placed an order for three of them.

The pain of the initial purchase price has passed and we are now basking in the soft glow of our new lights that are actually bright enough that we seldom use the high power setting.

This one's over the table.  We have another over the stove/sink, about 4' away.  We can definitely see what we're doing now.
This one’s over the table. We have another over the stove/sink, about 4′ away. We can definitely see what we’re doing now.

Underway, it’s best to use red lights to maintain night vision when going below for something.  We had one red light over the nav desk before but it was pretty anemic. Now we have two dual-power red lights in the main cabin as well as another in the head.

31

The real magic has been in the head.  This has always been a dark cave.  Really hard to see anything.  Not anymore:
36
High beam red

37
Low beam red – Just right for those middle of the night visits when you just woke up.

35
On the downside, we can now clearly see all of our flaws.

Another minor improvement involves dishwashing or, more accurately, dish drying.  When we’re not underway, we tend to let dishes air-dry as they seem to end up a lot dryer than when we towel-dry them.  Hurting for counter space, we put a cutting board on top of the stove, spread out a towel and then get really creative about piling dishes up.  This works OK but it would be nice to be able to pile more dishes up and still maintain some free airflow around them.  We’ve seen and used various folding drying racks over the years, mostly in our campers but none of them really filled the bill.  They never seem to deliver the goods in that they don’t actually hold very many dishes.

Before we headed north this year, I scoured the internet looking for some sort of rack that might actually satisfy us.  I think we’ve found it although, sad to say, I don’t remember where I actually ordered it from.

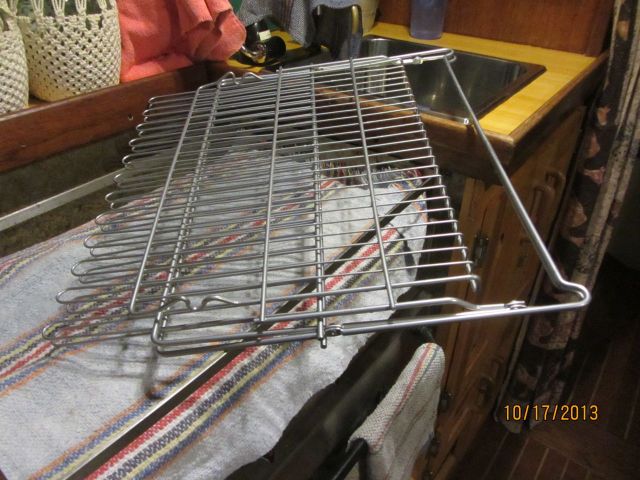
It folds down small enough to stow behind the stove:
34

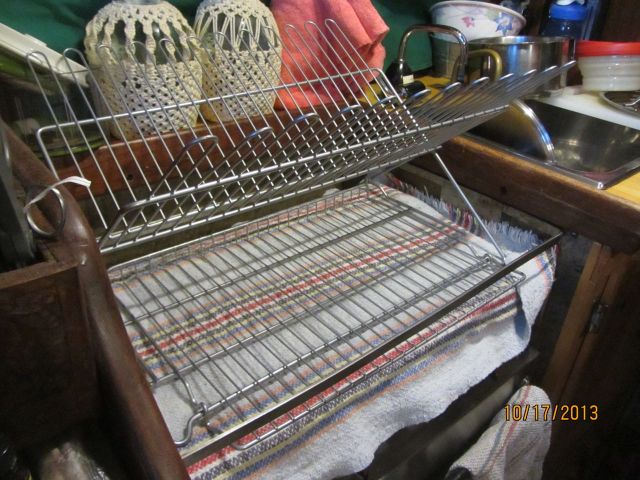
When unfolded, it presents a lot of drying/stacking space on a very stable platform.

33

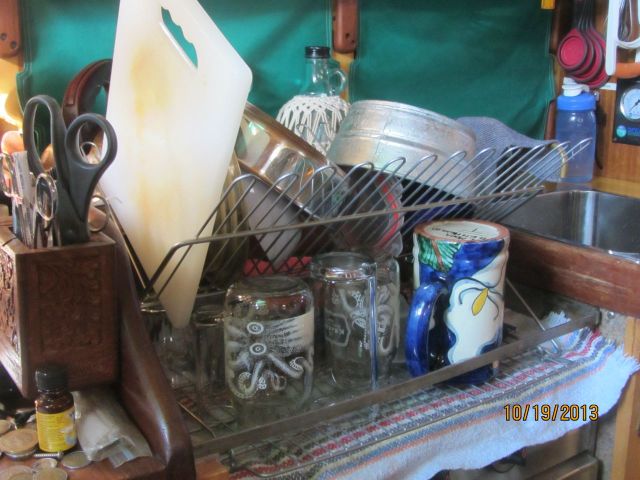
And, you can really stack the stuff up.  In this photo we haven’t even begun to use all the space available.  For instance, all those fingers along the top can hold glasses and cups.

38

I realize that writing about items like lights and dish racks is pretty freakin’ mundane but these are the kinds of little things that make life on a tiny little boat bearable.

Thursday, December 12, 2013

Closet refurbishing

Out there aboard s/v Jana, Janna tackles refurbishing one of the closets.  It's a bigger job than you might expect...
We are back in the working mode, getting up at dawn (round 6 am) and going to bed soon after 9 pm, exhausted but happy. We sleep so soundly these days, that often we don’t even hear the raindrops pounding on our deck. We sand, we glue, we paint and Janna slowly but surely undergoes a cosmetic metamorphosis. It’s amazing what a huge difference a paintbrush and a tin of paint can make.

satnik1
satnik2


After the successful painting project in the V-berth area, we decided to continue with the “closet”. First of all we moved all our cloths and other stuff stored in the previous head area on the V-berth, disassembled the closet shelves and unscrewed all the other components like handrails, fire extinguisher etc. Sounds easy enough, but only this part took me the whole afternoon.

It’s been some time since we noticed that one of the tabbings (fiberglass joints) that bond the fiberglass hull with the wooden bulkheads came unstuck. Since we were about to paint the whole area, we decided now was the right time to repair it. Of course, once we removed all the stuff from the closet, we found out that out of the four tabbings in the closet, we had to replace not one but three of them! So once again out went the chisel and hammer, the old tabbings were removed, everything sanded and just before glassing in the new tabbings, we smoothed the sharp edges by making a fillet with epoxy filler.

P1030742.JPG P1030744.JPG P1030745.JPG P1030762.JPG
A proper decorating job couldn’t be done without ripping off the rest of the old shabby vinyl wallpaper. As long as it was hidden deep inside the closet and behind the piles of our cloths, we could happily ignore its existence. Yet once we uncovered the filthy stuff, we couldn’t but wonder how on earth did we manage to live with something like this inside our boat for such a long time…

P1030736.JPG P1030738.JPG
Once the retabbing was done – we used six layers of fiberglass cloth for each tabbing and ended up using almost one liter of epoxy glue – I glued back the wallpaper on the bulkheads that came unstuck or was removed because of the repairs and then I covered the rest of the furniture and wooden bits, wires, portlights etc. with masking tape. After five days of work we were finally ready for painting. Now we must wait till the paint is hard enough so that we can put everything back together.

P1030776.JPG P1030780.JPG P1030799.JPG P1030805.JPG
Last but not least, a quick update regarding our engine mounts. Though it’s been at least three days since they arrived back in Malaysia, they’re still stuck on the peninsula somewhere near Kuala Lumpur. The latest update on the UPS website says: The address is in a remote area and deliveries are not made daily / Delivery rescheduled. We can only guess when exactly will the mounts arrive here…

P1030803.JPG

What a contrast! The above photo is actually a tiny part of the already painted ceiling in the closet and still unpainted one in the main saloon. Can’t wait to paint the rest of the boat!

Relocating Jacklines

Although some of this is pretty specific to Drew's PDQ 32, this tip on Sail Delmarva could apply to any boat:  Tripping hazards are what send people overboard - they should be eliminated if possible...

Formerly the jack lines terminated at the forward beam; simple and strong, but cause a tripping hazard. After far to long a wait, after a suggestion by my daughter, we relocated them to the edge of the tram, where combined with a small back-up plate and the natural strength of the hull flange and trampoline track, there is a natural strong point.

The aft end is still anchored to the hard top railings, the spliced end of the dockline cow-hitched around a center point attachment, spreading the load.

The forward end is lashed (many passes of parachute cord adding up to a 5500-pound line) to a 316 SS bolt hanger. The chafe gear is for UV protection.

Less of a trip problem, equal access, easy to re-tension.

--------------

Why rope instead of webbing, as is the conventional wisdom? Though I've discussed this before...
  • UV. We leave them rigged 365 because we believe night comes every day, the water is cold in the winter, single-handers need to stay on the boat, and thunderstorms give little warning.
  • Under foot? We don't worry about stepping on them because they do not run on the deck.
  • Stretch. We like the stretch of nylon dock line because we have a cat and used long tethers. If we were a mono-hull we would use something lower (but not zero) stretch.
And we use 2-arm tethers. One about 72" and the other about 30". Fit them to YOUR boat.

Tuesday, December 10, 2013

Extra insulation over the fridge

Scott aboard s/v Valkier has a quick and easy way to put some more thermal efficiency in your refrigerator:
Using Reflectix and vinyl we created a cover for the top of the fridge. This is a super easy and cheap project that improves fridge efficiency significantly.  Eventually  we will do the same thing behind the kitchen utensil holder on the front of the fridge.  If you slide your hand between the Reflectix and the top of the fridge it feels very cold.  However on top of the vinyl covered Reflectix it is room temperature.

image

This is a link to the the insulation. We have used it to make ducting for our window ac unit to vent it down through a top hatch into the salon. We are gradually insulating the cabin walls and overhead with it as we do projects that expose those areas as well as the above project.
Reflectix BP24025 24-Inch by 25-Feet Bubble Pack Insulation
We used hvac tape to secure the vinyl to it.

image

Thursday, December 5, 2013

An end to chopsticks


Chopsticks are Jane's go-to tools, whatever the problem.  This frequently has me looking all over for them when I make a Thai curry for dinner.

One of the most frequent problems she solves with chopsticks is the escape of our wine glasses from the wine glass rack attached to the underside of the cabinet above the galley sinks.  She jams a chopstick diagonally into each "track" to keep the glasses from jumping ship in a seaway.

In January of 2012,  I shamelessly asked you Small Boat Projects readers for ideas on how to remedy the escaping wine glass problem, sadly having drawn a blank myself (I am embarrassed to admit).

That was nearly two years ago.  The many  50  3 of you who read this blog probably thought that I had forgotten the whole thing.  Not so.

A lot of great ideas came in - thank you for lending me your creativity!  What I ended up with is a combination of a couple of the ideas you let me have...

First, I bought a package of small neodymium magnets; they are 1/4" in diameter and perhaps 1/16" thick.  I got them at a local hardware store (Hardwicks) that is still in the old mold - it is a jam-packed building with stuff stuck everywhere in every nook and cranny.  All the regular things you'd expect to see in any hardware store, but also unusual stuff that somehow crept in and hid itself in odd places.

Next, I cut a teak strip sized to close off the exits of the wine glass tracks in the rack.  It is the same thickness as the bottom strap of the rack so that it will lay flush with that bottom strip when it is in the open position, thus not providing an edge for a glass to catch on when it is being removed from the rack.


Then I used a 1/4" forstner  bit to bore holes just deep enough to accommodate the magnets - two in the teak strip, and two at the matching points in the rack.  I then epoxied the magnets into the holes.

Finally, I applied a pair of tiny hinges to the teak retainer strip, located in such a way that when the strip is folded up, it closes off the exit tracks and ends up flush with the edges of the track pieces.

And then, finally, a few coats of varnish and mounting.

Retainer open
Retainer closed
I had originally planned to let a couple of the magnets into the bottom of the cabinet to hold the retainer strip in the open position.  At the moment, the hinges are stiff enough that this is not required (I probably got some varnish in there). 

One thing that made the job a little tricky...  the magnets are unmarked as to N or S poles.  And they are tiny little things.  With my big clumsy fingers it was all too easy to flip them over unintentionally, and more important, unknowingly.  It would have been a disaster if I got one of them glued into position upside down...  I tested (and retested...) with a spare magnet to make sure that I had the polarity correct.

Finally, a tip of the hat to you readers who contributed suggestions!  Thanks - I couldn't have done this without you!

(And a rhetorical question:  Why don't the manufacturers of the wine glass racks do this themselves?)

Tuesday, December 3, 2013

New Stove and New Storage

Please welcome new contributors Walt and Kathy of s/v Suppose, a Cape Dory 31 berthed in Corpus Christi, Texas!  Their first project on Small Boat Projects is installation of a new stove and creation of a beautifully executed storage area beside it.  Read on...
S/V Suppose came with a stove and oven that operated on compressed natural gas (CNG).  CNG is an excellent fuel for heating capacity and since it is lighter than air, it can't accumulate in the bilge so it is very safe.  The downside is that it is not commonly or conveniently available at most marinas.   For that reason we decided to replace the stove with one that operates on denatured alcohol.  The new stove works great.  Two nights ago, Kathy fixed black-eyed peas that cooked for eight minutes in a pressure cooker and cornbread muffins in the oven.


Both the CNG and alcohol stoves are mounted on gimbals at the top. This allows a stove to swing to stay level when the boat heels to port or starboard.  The alcohol stove is 2 3/4 inches narrower than the CNG stove that it replaced. As a temporary fix, I made a wooden spacer to support the gimbal on the right side.  But, that is 2 3/4 inches of useful space that shouldn't be wasted on a boat the size of Suppose.


This is the new spacer box with a lower drawer that I made from teak and plywood.  The box at the top supports the stove and has a tray built into it that is handy for setting aside a spoon or spice bottle.


The drawer is mounted on slides against the side wall.  Although it is less than 3 inches wide, it is perfect for storing silverware and kitchen (galley) knives.  Small improvements like this on a small boat are very satisfying and give a lot of pleasure.
And that's what this blog is all about ;^)
Related Posts Plugin for WordPress, Blogger...