Showing posts with label s/v Zero To Cruising. Show all posts

Tuesday, February 9, 2016

A positive outcome and new skills!

Mike and Rebecca, living aboard s/v Zero to Cruising... No wait!  ZTC is for sale! And Mike and Rebecca now live and cruise on s/v Frost, an Amel 53!  Well, because it is a new boat for them, there will inevitably be new projects.  Here is one - replacing a rusted out hawsepipe...  and like the best of projects, completing it gives not only a feeling of satisfaction, but a new skill set...
There are not too many jobs on a boat that end up being easier or quicker than you initially estimate. In almost every case, it’s the exact opposite, and so it was with the project we’ve been working on for just over a week.

It all began with a bit of a rust stain on the exterior of our starboard bow. Inspecting the stain led us to the source, the old rusty hawsepipe in the starboard bow locker. The pipe, which the anchor chain passes through between the windlass and the chain locker, had pretty much reached the end of its lifespan. The exterior fiberglass was cracked in numerous places, and further inspection led me to find that the pipe that was inside it, made of iron I believe, was rusted and crumbling to pieces.

The old hawsepipe was the source of the rust on our hull.

Where as I had initially hoped that I could simply patch over the fiberglass, it now seemed obvious that the only proper way to fix it would be to cut the old pipe out and begin anew. Our friend Ken, who came over to offer his opinion on the job, assured me that he’d be available to help me through the steps. As the days went on, oh, how I bet he regretted that offer!

Of course, while we were at it, why not reinforce the anchor windlass to better deal with our new big Mantus anchor? It’s just a bit more work, right?
First using hammers, chisels and brute force, I removed as much of the old pipe as I could. Later, having borrowed Ken’s angle grinder, I was able to cut the remainder of the pipe and fiberglass out.

We puzzled over what to use to replace the old pipe. Stainless would be awesome but way too costly for such a job. I had read of one Amel owner who used PVC. As it turns out, some friends of friends had on hand a 3 foot length of 3″ diameter fiberglass tube that they no longer had a use for, perfect for our application! Huge thanks to s/v Virtue and Vice for passing that along to us!!!

The photos below illustrate the steps that we went through. The mahogany backing blocks for the windlass, donated and shaped by Ken, were first attached to the top of the lockers using thickened epoxy. The pipe was cut to length and then also fastened in with epoxy, both from inside the locker, and from the underside, accessible from the chain locker. Later, the entire thing was glassed over. I also took the time to add a couple of extra layers of fiberglass cloth to the pipe, adding to its thickness to hopefully give it a few more years of wear.
On that note, will the pipe wear out? Undoubtedly. I’m confident it won’t happen quickly though, and when it does, it will be easy to repair. I’m pretty happy with how the job turned out, and even better, I learned a lot about this type of work from our friend. A positive outcome and some new skills… you can’t beat that.


Waiting for the paint to dry so that we can add a second coat.


Tuesday, February 17, 2015

Dual Purpose

On any boat, even one as large as a Lagoon 46 catamaran, space is a limited and valuable commodity.  Wherever it is possible to make one thing serve two purposes is a big win because the same storage/volume/space is used for two different things.  Here, Mike and Rebecca on s/v One Love turn a single-use piece of furniture into dual-use:
The list of things that we don’t like about the Leopard 4600 is very short, and we just made the list one item shorter. The large stock salon, while perhaps good for inside dining, got very little use by us, at least for that particular application. In the warm Caribbean, almost all dining on One Love, and on our friends’ charter boats, is done outside. The table is so large that it makes it difficult to access the under-seat storage that is so important for us. It also requires someone to kind of scoot around if they want to sit on the rear side. All in all, it was an undesirable thing for us, and one that we wanted to get rid of.


Many of our friends with 4600s had already done away with the table, replacing it with a store-bought coffee table or ottoman. While they all look great, we wanted something a bit more custom to work with our Engel cooler that, up till this point, we kept under the dining table. Enter Puerto Rican Danny, a local wood worker. Over the past couple of months, Danny took our suggestions and crafted for us the table that you see in the photos below. It fits perfectly over our cooler and as you can see, the top lifts up to give us easy access to it. He also did a great job of matching the wood and design to One Love’s interior.

Ventilation for the cooler is obviously important so he left spaces at the bottom and below the table top to allow air to flow in and out. If we determine that more air is necessary, we’ll cut a vent in the rear. At this point though, it does not seem to be warm inside the box. Another thing I had him do was have the fiddles, the raised edges around the table top, not go all the way to the corners. If you’ve ever had to get crumbs off of a table with fiddles before, you’ll understand why I had it built this way.


Thursday, January 29, 2015

Dry Bilge

Mike and Rebecca on s/v One Love really want a dry bilge.  And air conditioning a boat in the tropics was working against that goal.  I am also an advocate of the incremental test/installation process that Mike used.  Here's what he did:
Remember my post about wanting to have a dry bilge? Well, we ultimately decided to go the route of installing a couple of sump boxes to deal with the air-conditioners’ condensation. We selected this one and Michael brought two of them with him when he arrived on the 15th.

I am 80% of the way through installing the first of the two. Here are the steps I have taken thus far:
  1. Before getting started, we dried and cleaned the bilges.
  2. I then ran a line from the AC unit’s drip tray outlet down into the bilge to see if it would gravity feed the water where I wanted it to. I put a short length of hose into a plastic container. We ran the air conditioner and it fed the water as I had hoped. I was surprised at how quickly it filled the container!


  3. Before doing any actual plumbing and electrical connections, I wanted to test the unit to ensure that it worked, and also to ensure that it would pump the water high enough to exit where I planned to dispose of it. We tested this by taking the sump box out into the cockpit, connecting a hose to the outlet and filling the box with water. While Rebecca held the hose in the air, I applied temporary power to the pump using a 12V plug and alligator clips. It worked as we had hoped.
  4. The next step was to attach the inlet and outlet hoses. We had already made one trip to the chandlery to purchase parts for this (hose, clamps, fittings). This particular box has multiple inlets of various sizes. The strange thing (to me) is that you need to saw off the end of the inlet that you want to use! It seems to me there could be a better solution but it is what it is, I cut it off.


  5. I temporarily positioned the box in the bilge, a location which is at a lower level than the AC unit. This allows the condensation water to gravity feed into the box, as tested earlier. I connected the sump pump’s power leads to a bus bar in a nearby junction box which supplies 12V to the electric bilge pumps. The outlet hose I simply ran into a nearby sink. We tested the operation of the unit in this configuration and it worked perfectly. The AC unit ran for some time and the bilge remained dry as we had hoped.


The next step is to permanently connect the outlet hose. My plan is to T it into the sink drain hose. In order to do that properly, I’ll need to place a non-return valve (check valve) in the outlet hose, just before the T. This will prevent any water draining out of the sink from finding its way into the sump box’s outlet hose*. Unfortunately, the chandlery will not have the check valve I need until some time tomorrow. Until then, we’ll be living with a hose zip tied to our sink.

*Alternatively, I guess I could route the sump box outlet hose so that it feeds down into the drain hose. Gravity should then prevent the sink water from making its way into that hose.

Notes: I also want to plumb our refrigerator’s drain into this sump box. The sump box that I’ll be installing on the starboard side will have to deal with the condensation from both the salon AC unit, and the starboard hull’s AC unit.
[Tho not clean enough to drink, the condensate from the air conditioner would be an ideal source of ion-free water for battery maintenance. -Ed]

Tuesday, October 7, 2014

No more searching for the hidden hot sauce

Does your boat have deep shelving which makes the things in the back all-but inaccessible? Ours does, and I will assume yours does too. Mike and Rebecca, currently living and working aboard s/v One Love address this issue with a neat product:
Much of yesterday was spent making what we consider to be a huge improvement to our galley, installing slide-out drawers for the cabinets. After noting that one of our friends had made a similar upgrade, Michael sourced the drawers and flew down to St. Thomas with them last month. While time consuming, the installation was not that tough. We managed to get two of them up and running yesterday and we have 4 more yet to install. We think this is going to be a huge time saver for us!

[There is a link to source these in the comments on the original article. -Ed]

Tuesday, October 1, 2013

Not all projects have to be huge to be worthwhile

If you have been following Mike and Rebecca's blog, you will know that they have moved aboard s/v One Love, a Leopard 4600 catamaran, which they are getting ready for charter service.  This is one of the small, but important, projects that getting the boat ready required:
Not all projects have to be huge. Take for example the new switches that we added for One Love’s shower sump pumps. Some readers may not realize the difference between a household shower and one on a boat. Whereas, in a house, the water simply drains away via gravity, in most cases on a boat the grey water from the shower needs to be pumped overboard (or into a tank) by an electric pump. It just so happens that the shower sump pumps on this Leopard were activated by a pushbutton momentary-on switch. This means that, while standing in the shower, you would need to push and hold the button to make the pump run. As the evacuation process can take over a minute, a period of time which seems exponentially longer when one is standing naked and dripping wet, I knew that there would be no way a guest would ever do it properly. 

Old switch, push and hold to turn on.
 
Sourcing new switches was as easy as making a trip to Island Water World. In order to cover the large hole left by the other switches, I did have to use large stainless steel fender washers. Unfortunately, they only had three switches in stock so I was only able to fix the showers in the guest cabins, not our own. We have been using the other showers though and I can say that the new pull-on, push-off switch is a huge improvement over the originally installed ones.

New switch, pull to turn on, push back in to turn off.
 
  • Time required to complete the change: approximately 20 minutes each.
  • Cost: less than $20.00 each.

Thursday, July 25, 2013

The King of Knots

Do you know how to tie a bowline?

Good. How many ways? Oh, there is more than one way? Yes indeedy, and Mike on s/v Zero to Cruising (aka s/v ZTC) shows us several ways. One that you should definitely learn is how to tie one around your body - you never know when you might have to do this while being drug astern...
“The first lesson a yachtsman should learn is to join the ropes together, sailor fashion.” Vanderdecken
The classic bowline a must-know knot for all mariners. The following video demonstrates both the basic version and multiple others. We find that we use the slipknot version shown in the video much more often than we do the basic one. How many of these variations were you familiar with and even more importantly, will you take it upon yourself to grab a piece of line and work through the ones that you didn’t know?


Notes:
  1. Rabbit and Tree: How most people are taught the bowline. Make sure you can do it around an object and also both facing towards you and away from you. Many people get mixed up with that.
  2. Slipknot. Very fast. Experience will tell you how long you need to leave the tail. This is a good method to use when you want to have it ready to go to make fast to something that will be under load (a sail, a mooring ball pennant, etc.).
  3. Enhanced, Double and Water: These three versions all add additional friction. A bowline is a good knot but if unloaded, it can come loose, especially when in the water. These versions lessen the chance of that happening.
  4. Bowline on a Bight and Portuguese Bowline: Both of these create double loops which could be improvised as a bosun’s seat. Note that the loops in the Portuguese version are not fixed. If you pull on one it will slide making the other loop smaller. This will not occur on the Bight version.
  5. Around your body: Good if someone throws you a line when you’re in the water. Better practice it on land first though!

Friday, July 12, 2013

The right dipstick?

Mike and Rebecca of s/v Zero to Cruising are soon to move aboard a much larger boat - a Leopard 4600. This boat has a pair of diesel engines equipped with SD50 saildrives...
I’m sure it can be said that all engines have their own issues. Our last few years have been spent learning the ins and outs of outboard engines. While that info is still important as we will have a Yamaha outboard powering our tender, the Leopard that we’ll be living and working on has an entirely different setup for its auxiliary engines.

In the stern of each hull of the 4600 lies a 54HP Yanmar diesel engine. Unlike some of this boat’s Leopard predecessors, the engine is not connected directly to the propellor via a straight shaft. On the contrary, it transfers power through a couple of right angles via a system called a saildrive. On the 4600, the particular model of saildrive is a SD50, a piece of gear not unknown to have issues.

A SD50 saildrive

I have had the good fortune to be exposed to some of these issues because our friends Kirk and Donna have the exact same engines and saildrives on their Lagoon catamaran, Ainulindale. I have witnessed first hand some of their woes and the steps that they have had to take to rectify them. One particular issue relates to leaking seals on the saildrive, quite possibly the result of overfilling the gear oil chamber. How could that possibly happen? Quite easily actually.

It seems that most of the SD50s out there have a dipstick with incorrect markings for the high and low gear oil levels. While this info was made known to the dealers via a service bulletin, I’m not so sure it has filtered down to all of the users. Fortunately for us, Kirk did find out about this. The photo below is of the new, properly-marked gear oil dipsticks. Each one costs less than $10.00 and having them can help to avoid seriously costly engine drama. Big thanks to our buddy Kirk for sharing this info and for picking us up two of the dipsticks for the new boat.

The new properly-marked dipsticks.

 If you have an SD50, you might want to look into this. I have been told that the new dipsticks are all marked with a dot on the top made by a back sharpie marker. If your dipsticks are missing that dot, you might want to follow up on this.

Thursday, April 25, 2013

Don’t drop that nut!

Over on s/v Zero to Cruising, Mike has a new take on an old mechanic's trick - how to keep a fastener attached (temporarily!) to a tool for one-handed use...
Yesterday we had plans to make a quick run in to Basseterre, the main city here, to stock up on groceries. Alas, quick was not meant to be. When I went to fire up the engines prior to raising anchor, I found that our port engine was on vacation. Sigh. A fair amount of troubleshooting went on following that discovery. Perhaps I’ll write about that later. What I will say is that, at one point, I removed the carburetor and the most difficult part of that job was trying to get the two main nuts back onto the bolts when I went to reinstall it. I really didn’t want to drop the nuts in the water. Seriously!

4-stroke carbs are definitely more complicated
than 2-stroke carbs!

After a few tense moments fiddling with the nuts, trying to squeeze my fingers into a space too small for them to fit, I remembered a tip that our friend Kirk shared with me, illustrated in the following pics. Of course, when he described the trick, he suggested using grease. As I didn’t have any immediately handy yesterday, I improvised with toothpaste. Guess what? It worked perfectly! I would recommend that, if you decide to use toothpaste too, you wash all of it off your tools and parts when you’re done. I have no idea what the long term effect of toothpaste is on metals.


Thursday, April 11, 2013

You have got to be kidding

Does your boat have solid tubing all the way from the bow to the stern? Then perhaps this post is not for you.  But if instead you have actual lifelines, then you need to hear what Mike & Rebecca on s/v Zero to Cruising have to say:
Yesterday, Rebecca and I were walking the beach and as we navigated along the sometimes slippery rocks, we kept our eyes open for any bits of treasure that may have washed up on shore. The other day we found a good fishing Yo Yo (hand real) while yesterday, I spied a bright pink clothes pin (clothes peg). I mean no offense to anyone who might have purchased such an item but at 4 for $14.99, I think these seriously belong in the “more money than brains” category.

The pink pin is stupid expensive, not to mention the fact that
it only works on rails and not on lifelines.
 
Clothes pins are one of those items that would-be cruisers sometimes agonize over, assuming they spend too much time on internet forums and not enough time sailing. Rest assured, marine chandleries will be all too happy to trade you your money for marinized versions. We, fortunately, never fell prey to this. We have used several dollar store varieties over the last few years and have come to find that the basic wooden version that your Mom used to use fit the bill just perfectly. They are cheap, they don’t fail due to UV exposure like their plastic cousins do and, they’re cheap. Did I mention that already? Of course, they aren’t quite as pretty as the 4 for 15 buck variety so, if that’s a concern of yours when displaying your underwear for your boat neighbors to inspect, you might want to try the big buck versions instead.

Thursday, February 14, 2013

A valuable tool on a boat

Mike and Rebecca on s/v Zero To Cruising (aka ZTC) have a recommendation for a tool you should have onboard.  This is a significant improvement over the little plastic slip-ons that go over the jaws of a pair of Vice Grips:
I mentioned yesterday that, along with the autopilot belts, we had several other packages shipped to California for us to pick up when we visited there. Among those other items was a Pres-N-Snap tool from Sailrite. While not inexpensive, this is a valuable tool on a boat as almost all vessels have at least some canvas work or cushions which are kept secure by snap fittings. These snaps do not last forever and this tool is the best way that we have found to replace them.

Up until this point we were able to borrow our friends’ Pres-N-Snap tool to fix snaps which had broken off. Now that they’re no longer traveling with us, we figured that we’d better get our own. We were fortunate in that, when we ordered ours just before Christmas, the tool was on sale. It still wasn’t cheap but it was a lot better than paying full price.
The black case under the tool, which fits it perfectly,
is actually an old CD case that we happened to have on board.
No one uses CDs anymore, do they?
 
Editor's note: See also this new set of dies from Sailrite that allows you to set snaps using a standard rivet gun. One advantage is that there is no limitation as to how far from the edge a snap can be installed...

Tuesday, December 4, 2012

A better spice solution?

Mike and Rebecca on s/v Zero to Cruising have a suggestion for spice stowage that just might catch on...
Even though I have already devoted a couple of blog posts (1 and 2) to the subject of spice organization in the galley, you’d read here that neither of those ideas worked out so well for us. The solution illustrated below struck me as genius though. The plastic boxes originally contained Tic Tac candies and, in my opinion, are the perfect size for a boat. Maybe we should look for some of those when we head to downtown Port of Spain today?


By the way, relating to yesterday’s post, our vote for the island in the Windwards and Leewards with the largest number of good anchorages goes to… drum rollAntigua! We’re definitely looking forward to visiting there again on our trip back north.
It's a great idea!  The only thing I'd add is an additional label on the top of the containers, so they can be identified when they are packed in that too-small space you have reserved for spices...

Tuesday, November 20, 2012

Battling clutter

Mike and Rebecca aboard s/v Zero to Cruising tackle clutter in a way that puts reading materials that are needed to hand out of the way, and yet keeps them easily accessible:
I live in a small boat and I hate clutter. Those two statements together almost guarantee that I will forever be stressed out because, with a small boat, there is not a ton of space to hide the misc. bits of stuff that we need to live with, aka clutter. For example, at this very moment, within arms reach of where I’m typing this post, there are five books and two Kindles, and that’s just reading material! No wonder we’re always looking for creative storage solutions.

Not too long ago I came up with a storage idea that I thought would work but because it involved sewing, we put it onto the list of tasks to do when we next broke out the sewing machine. Getting the sewing machine all set up for just one little job is a PITA. Yesterday, and the day prior, was such a time though. After describing to Rebecca what I wanted, and sketching it out on a piece of paper along with some rough dimensions, she set to work. Fortunately, we still have quite a bit of Sunbrella remaining from the supply we purchased when we were back in Annapolis.

As with many boat projects, the original design ended up being modified a few times over the course of construction but we’re pretty happy with the finished product. While I had originally intended to fasten the top edge with screws, down inside the lockers underneath the seat cushions, I determined that if a block of wood was sewn into the top (we actually used a chunk of plastic material that we had on board), it would act as a stopper so that when the locker’s lid was closed overtop of it, it would remain in place. In my mind this is a big improvement as, while it is still secure, it can be removed easily and didn’t require any more holes to be drilled in the boat. Perfect!


Tuesday, September 18, 2012

Folding draining

Isn't this a cool idea?  If your galley is arranged such that it would work, how about a folding dish draining station?  Mike and Rebecca on s/v Zero to Cruising bring us this neat product:

We have continued to play our version of space invaders, which basically involves us trying to find space where there was none. Our most recent conquest took place in the galley where we replaced the dish-drying rack with a cool folding one from IKEA. I got the idea from a former PDQ owner who posted earlier on our blog. Thanks Cindy. It works great!

Thursday, July 19, 2012

Dual dinghy tips

For full-time cruisers, the dinghy is the family car.   Mike and Rebecca, living full-time aboard s/v Zero to Cruising in the Caribbean have a couple of tips for us on dinghies... learn from their experience:
Given just how important the dinghy is to a cruising sailor, whenever you tie yours to your boat or to a dock, use two separate lines. This tip was shared with us by a long-term cruiser who adopted the practice himself after observing just how many dinghies have a tendency to go astray. The basic idea is that while one line may work itself loose, the chance of 2 separate lines doing the same is next to nil. We know multiple people who have had their dinghies drift away and in fact, without naming names, we know someone whose dinghy went walkabout just yesterday! The strange thing is that this particular sailor subscribes to the two-line suggestion that I just mentioned. He always ties his tender to the boat with 2 lines, except just that one time! Fortunately we were on the trampoline when it went walkabout and thus noticed it drifting away. We were able to retrieve it for him before it went too far.

Which brings me to my second tip. After several rescues of people in dinghies that had run out of gas or had engine troubles, and towing misc. tenders, I installed a small cleat on the back of our dinghy. I picked up the cleat for a few bucks at a chandlery and after drilling a couple of holes in the fiberglass, through-bolted it to the transom. The entire job took about 10 minutes. Although I don’t think I’d rely upon it to pull a water skier, I have used that cleat to pull a 40+ foot sailboat sideways in Cumberland Bay when they were having difficulty getting a stern line to shore. It makes the act of towing something a lot easier, especially if you are alone in the tender. We also use that cleat whenever we set a stern anchor out to keep our dinghy away from a not-so-good dock.


Thursday, May 17, 2012

How do you know that it’s full?

On s/v Zero to Cruising, Mike talks about a way to know if your propane vendor has been giving you full measure...
Do you know how to tell if a propane tank is full? As in COMPLETELY full? We didn’t, so of course we did what anyone with internet access would do, we consulted The Oracle to find out the answer. What I learned is that, stamped onto the side of a propane tank, should be the Tare Weight (TW), the weight of the tank unfilled. A 20 lb. tank should then weigh 20 lbs. more than the labeled Tare Weight after it has been topped up.


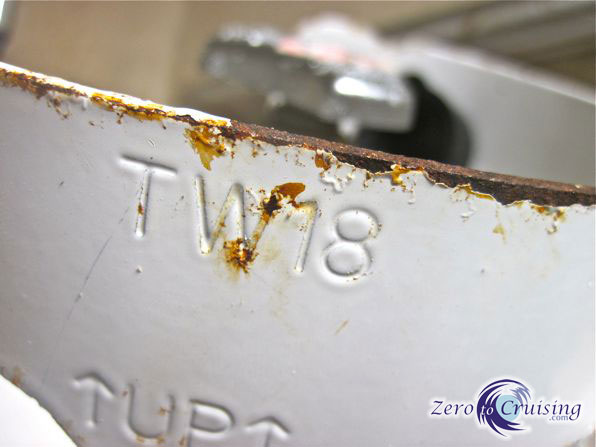
The Tare Weight of our 20 lb. steel tank is 18 lbs.
Why bring this up? Because our tank also has a fancy little gauge on it that, like an automobile fuel gauge, can tell us visually how much propane is in it. When we came to pick up our main propane tank on Wednesday after dropping it off the day prior to have it filled, our gauge did not read full. In fact, it was down what we would consider a fair bit, enough propane to last us quite some time.
Note: We had our propane tank filled shortly before leaving Grenada in November 2011. It only just the other day ran out. You can tell we don’t use all that much propane!


The gauge now reads full, as it should.
Anyway, considering that we didn’t really need to get the tank back that day, and they’re charging a fair amount to fill the tanks ($90.00 EC which equates to $33.33 US for a 20 lb. tank), we wanted to have it FILLED. When I complained, the gentleman I spoke to kindly explained that although he didn’t have any way of checking it right there, if we would leave the tank with him, he’d make sure it was looked after.
When we ultimately picked up the tank yesterday we found that our trusty little gauge read full, as it should have. Unfortunately, I think paying for a full tank in these situations but only receiving a portion of what you pay for is pretty common. In fact, I think it happened to us in Grenada too but because of the inconvenience of leaving the tank with them again (we had planned to set sail the next day) we just accepted the fact that we were ripped off a bit. It may not be a lot of money but it is a PITA. Caveat Emptor.

Just for kicks I checked our 10 lb. aluminum tank. It has a Tare Weight of 9.32 lbs. It weighed approximately 15.5 lbs. indicating that it is still about 60% full.
[Ed. Note:  I will also add that there is another set of numbers stamped into the tank that you need to pay attention to - the date of the last hydrostat test that the tank has seen.   In the USA anyway, the tank can be legally refilled for 12 years from that date. Later than that, the tank must be re-hydrostated.]

Wednesday, July 13, 2011

Night site

Mike and Rebecca on s/v Zero to Cruising have found a neat little LED nav light for your dinghy. Using this, or something like it, is a good thing to do, whether required, encouraged or ignored by the local gendarmerie...
South of the litigious United States, navigation lights on dinghies become much less common. Although areas with established cruising communities may suggest that they are used, it is still unlikely that one will be pulled over by an officious Coast Guard officer for failing to do so. With that said, there are very good reasons for using lights while running in the dinghy at night. Many of the locals zip around in their boats at high speed and at night, they do so without a single light on board. A high speed collision with a boat like this, or even between two inflatable dinghies, would really put a damper on an evening. And believe it or not, we have heard that each season at least one person around here gets seriously injured in an accident just such as this. For this reason, we knew that we needed a good light.

While back in Florida we jury rigged a light for next to no money, doing our best to keep the Coast Guard at bay. The idea was OK and it was even featured on the Small Boat Projects website as a way of avoiding the “marine tax.” Sadly, it ultimately broke and we stopped using it, running instead with just a hand-held flashlight. I’m a little bit embarrassed to say that we finally broke down and forked over some real cash for an actual marine light. This one is so cool though, it’s hard not to be impressed. Red, green and white LEDs shine very brightly from the unit which runs on 3 AAA batteries. The cool feature is that the light attaches to the engine by four very strong magnets (you first bolt the base onto the engine cowling by drilling a small hole in it). We have a little lanyard attached to the light just in case the magnets fail but they are so strong, I can’t see it happening. Why this is a good feature is that the light can be removed and thrown in your pocket when leaving the boat at the dinghy dock, thwarting any would-be “tiefs.”

I should point out though that even with our super-duper light illuminating our dinghy, we almost had a head on collision the other evening with a fast-moving, non-lit dink. I don’t know what that guy was thinking! It was only my fast reactions that kept us from plowing straight into the other boat. So, even if you are are well lit, keep a good watch while out on the water. In the dark things can come on you very quickly.


Here's a link to a vendor selling these lights: Budget Marine that Mike provided.  Can you find them cheaper in your locale?

Wednesday, April 13, 2011

Bridle elimination

Mike and Rebecca on s/v Zero to Cruising have found that eliminating the bridle at the dinghy stern allows it to be hoisted a lot higher (and that's a good thing):

I’m not sure if I have written on this topic specifically but ever since acquiring our new (to us) hard-bottomed dinghy back in Florida, we have had a devil of a time getting it to ride securely on the davits. With the slightly-smaller Walker Bay inflatable that we used to have, we had no problems. In fact, with that dinghy, we never even removed the outboard when carrying it on the davits. Then again, we never sailed in these conditions, or these long distances either. Anyway, with the new one, let’s just say we have had issues. I do think we’ve got them sorted though, thanks to Brio.

While anchored in Georgetown, we spotted another PDQ 32, s/v Brio, and took note of how they had their dinghy rigged. Coincidentally, they had exactly the same size and even the same brand of dinghy that we do. What we noted was that, instead of using one block and tackle attached to a bridle line to raise the stern, they used two individual block and tackles, each attached to the lifting points. With this arrangement, the dinghy can be lifted much higher allowing us to get it to sit up onto the edge of the stern. Now, because we only had two of these setups, we had to be a bit creative with some extra blocks we had on hand. It all worked out though and after testing it on the last few passages that we have been on, I rate it a complete success. We still do remove the outboard from the dinghy for passages though, storing it on the rail mount that I made. We also took Drew’s advice and use two dock lines to add extra security to the dinghy, pulling it in tight for passages. I now pronounce this challenge ’solved!’


Dual block and tackle setups allow us to get the dinghy nice and high


It’s always nice to have extra blocks on a boat.

Dock lines are used to pull it in tight.
Now, would it be possible to hoist the dinghy stern like this, but using only one line?  Something to contemplate over sundowners.

Wednesday, December 8, 2010

Caveat emptor

Everybody knows that application of label "Marine" to something seems to mean that you can double the price.  Now, there are items for which a higher price is appropriate.  An example: a marine alternator -  a specially manufactured version of an automotive alternator, made in limited quantities (by automotive standards anyway) to be able to safely run in an enclosed engine compartment which could contain gasoline vapors.  But how much more is justified?

Bob, over at Boat Bits has been decrying the cost of self-steering gear (we're all anxiously waiting to see your design, Bob).

And now Mike from Zero to Cruising brings us a couple of real-world examples where ingenuity trumps chandlery prices:

While shopping online and at the usual chain-store chandlery, we found:

* Tiller extension: $15.00 to $60.00!
* Portable stern light: $35.00 to $40.00!

* Our tiller extension: $5.00 (piece of schedule 40 PVC, end cap and rubber connector with clamp)
* Our portable stern light: $5.00 (solar patio light, rubber stopper thing, sticky-back velcro)
Mike's example of the dinghy running light brought to mind something I saw in a flyer I received recently from a large, nation-wide marine chandlery...

This "rail lite" was offered for $29.95.  Obviously this is nothing more than a typical "solar patio light" with the bottom spike replaced by a cap, and with a cheap plastic clamp.


Harbor Freight sells this set of 10 nearly identical copper-colored stainless lights for  $34.99.  Buy the set, take off the bottom spikes and find your own cheap plastic clamp, or just use zip ties.  And then give 9 of them away to your friends at your anchorage.


The bottom line is, that while some marine-oriented items are justifiably priced higher than their non-marine equivalents, many manufacturers seem to take advantage of this and mark up everything with a marine label.  Or even apply a marine label solely so that they can mark up the price.  They get to do this, of course.  Our response should be caveat emptor - the challenge to all of us is to apply critical thinking and ingenuity to avoid being taken in by the marketing.
Related Posts Plugin for WordPress, Blogger...