Friday, April 30, 2010

Cockpit Table Stowage

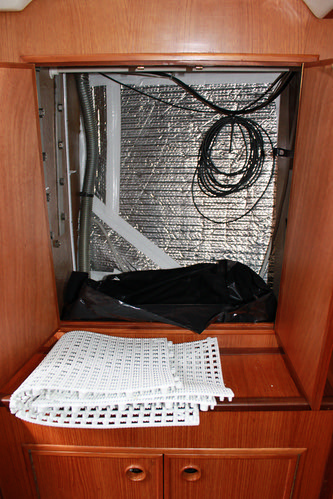
Eolian is set up for a table in the cockpit. But it is not one of those fancy folding ones. Instead, Eolian's table is a single piece of teak that installs over the compass binnacle.

But where to store this when it is not in use? That was a question that was not well answered by the Previous Owner, and one that this Small Project was chartered to address.

It really was a small project - it only required fabricating 4 tiny pieces of teak. But first, where to store the table? After some study, under the companionway stairs seemed to be the best location. There was room there; it was convenient to the cockpit; and it was currently unused space.

The table top is supported vertically against the bulkhead.

It sits on two small teak cleats, about 1½" x 3", routed out to accept the fiddle on the edge of the table top. The teak is varnished of course, and small pieces of non-skid foam serve as cushions.

The table is retained in position by an L-shaped upper cleat. One leg of the L holds it away from the bulkhead, and the other serves to keep it from jumping upwards in a seaway. A swinging toggle keeps it in place.

And that's it. Small indeed.

Thursday, April 29, 2010

Slight Course Correction

After just a short time, I have decided that I need to make a slight change to the approach I have been using here.

In cases where I have been given permission to "mine" others' sites for Small Boat Projects©, oftentimes, the best nuggets of information are not the subject of a posting, but rather are part of a post with a different subject altogether. So - I will change to a stronger editing role, making excerpts from the postings, adding editorial content if required to give context.

As always, every post will contain a link back to the original article and another to the blogs main site.

Hope that's OK.

bob

Wednesday, April 28, 2010

Easy and cheap storage

Project from s/v Katana, April, 2010.


The quest to find easy-to-access storage for the huge amount of live-aboard paraphernalia is never-ending. When you find a way to do it that is both good AND CHEAP it is like stumbling across the holy grail. And so it is with our dollar-store shoe racks. Last October I wrote about how we had used a cut down shoe rack in our galley to store produce. [And look at the arrangement used to hang the bananas! -Ed]

We used the other parts of that particular shoe rack in our berth.


The other day we purchased another shoe rack, for the grand total of 2 bucks (the Dollar Store rocks!). Half of it now lives in the head and the other resides just inside our main salon door. Cheap, easy to set up and effective.


Little L-brackets from Rona are what we used to fasten the racks to the walls.

Thanks to Drew for the inspiration for that last location and also to Terry for doing that bit of sewing for us. We ordered our own sewing machine yesterday so we won’t have to borrow his anymore!

This post originally appeared at Zero to Cruising. Copyright 2010 ZeroToCruising.com

Monday, April 26, 2010

Shelving It

Project from s/v Estrellita 5.10b, April, 2010.
We had three sets of hanging lockers in our boat: one in the v-berth (master bedroom), a big one in the main living area across from the head, and one in the aft cabin.

For us, they are a waste of space. This is the large hanging locker in the main living area which I painstakingly lined with rFoil using double-sided contractor-strength rug taped with insulating tape on top to the hull.

Hanging locker pre-shelves

The rFoil has helped with condensation a little - not enough for me to recommend it to anyone. Thankfully we only have one more (planned) winter up here and the condensation will go away when we get South...until we end up somewhere with chilly water again.

But I digress.

I measured, cut and installed shelves for two of the hanging lockers before running out of good weather. Over two other good weather windows, Carol cut the remaining shelves and I painted everything.

Then we realized we needed to cut finger/ventilation holes in them which we did and I repainted the holes.

Removing wood chips

Repainting after holes

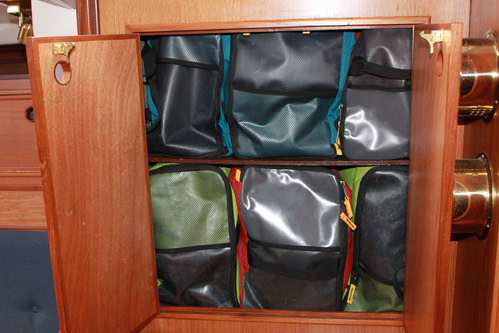
We bought a bunch of Mountainsmith Travel Cubes which we use to organize our clothing and to keep it from getting "boat smell".

Mountainsmith Cubes

We can fit 6 cubes on the two shelves with room for a big bag of less regularly needed goods beneath the bottom shelf. Right now we have a big bag of paper goods in there but that will probably be changed to spares because it is a good, low center of gravity and central storage place.

Mountainsmith Cubes

This creature comfort addition has made a big change in our daily lives, removing one more layer of stress from living on a boat. I can find my clothes. I have room for plenty. They don't get damp and they smell like laundry detergent when they come out of the cube. When we need to access the items below, the cubes are much easier to unload and reload than stacks of clothing.

I (heart) our cubes.

This post originally appeared at s/v Estrellita 5.10b. This post copyright s/v Estrellita 5.10b.

Friday, April 23, 2010

Polishing the ports

Project from s/v Eolian, April, 2010.

Every now and then, life presents you with an opportunity disguised as a problem. The best of these opportunities give you the chance to experiment, with essentially no cost for failure. This is one of them.

When we purchased Eolian, the four opening ports in the aft end had been replaced with Beckson "Rain Drain" ports. They looked pretty good, and far, far better than the original 20-year old ports still in the forward half of the boat (I replaced those in the first 6 months of ownership, also with Rain Drains). But they were showing some age.

And now after an additional 12 years, the molded Lexan opening parts had aged in the sun, as Lexan is wont to do: they had turned cloudy and were taking on a yellowish-brownish tint. In fact, from the inside all four looked like they had been purposely frosted for privacy, except for that yellowish/brownish tint... that part was just plain ugly.

Using a piece of logic that I seem to frequently employ, I decided that they were so bad that replacement was in order. Therefore I had nothing to lose by having a go at polishing them myself - a zero cost experiment! I love those!

Being male, my first idea always involves power tools. So I pulled off one of the Lexan molded windows and took it to my shop, where I applied it to a buffing wheel loaded with rouge. The results were mixed. The buffing wheel put too much energy into too small an area, causing local heating, which caused local surface crazing, if I was not very, very careful. Because of this it was difficult to get an even polish on the surface.

OK, so I was forced to fall back to manual methods. Next, I tried using Meguiar's products - these are specifically designed for polishing plastics. I had read that Lexan was not amenable to hand polishing, but once again, I had nothing to lose. So I started with the #17 cleaning compound (this is actually a polishing compound, containing a very fine abrasive) and a soft rag. The effect was nothing short of stunning. In less than a minute of polishing, all the discoloration and almost all of the frosting was gone! Then I applied the polish (which is an abrasive-free wax), and it got even better! The aft head port in this picture is closed - you are here looking thru what used to look like a frosted privacy window!

I spent perhaps an hour total, and totally changed the appearance of the aft cabin and head.

I must confess that not all my "zero cost experiments" turn out well, but this one succeeded beyond my wildest expectations. If you don't have these two Meguiar's products, you should. Go out and get some. I can't recommend them enough!

12V Power in the Office

Project from s/v Eolian, in July, 2000.


We have several hand-held devices that can use 12V power to recharge their batteries:
  • Our cell phones
  • The remote speaker/mic for the VHF. By the way, this is a wonderful invention. It allows me to have the "VHF" with me wherever I go on board, even tho the VHF is mounted inside at the top of the companionway. It beats a hand-held VHF, in that it uses the real thing, with it's full 25 watt power and antenna mounted on top of the mast. But most importantly, it allows me to turn down the volume on the main set so that it doesn't irritate Jane, and keep the mic beside me at the helm, thereby promoting bliss under way.
The most obvious place for setting up access to 12V for these devices would be in either the nav station, or the office. I chose the office, because nearby shelving was suitably equipped with fiddles to keep things in place under way. And because the nav station always seems to be crowded with other stuff.

First, where to get the power? I chose to tap into the port side lighting circuit, mainly because that is the only 12V wiring in the office. So, step one was to remove the paneling covering the hull liner (Eolian has a hull liner) and thereby expose the wiring.

Next (after opening the breaker to stop the sparks), I cut the lighting wire at the junction where the power for the overhead light was taken off.

I drilled a suitable-sized hole in the paneling down by the shelving, next to the existing 120V outlet.

Voila! After adding a new lead to the new outlet, splicing up the wire and replacing the paneling, the outlet is in place.

And we now have a charging station!

Is my engine sucking air?

Project from Eolian, in 2000.


After suffering several "unscheduled stoppages", as the Previous Owner termed them, early in our tenure aboard Eolian, Jane became paranoid (rightfully so, based on our experience) that the engine was going to fail. She frequently went down below and pulled up the floorboard over the Racor filters to check the vacuum gauge. The more critical the availability of the engine became, the more frequently she was down below pulling up the floorboard.

Rather than being a problem, this pointed out an important fact: One of our critical pieces of instrumentation was in an inaccessible location.

I procured another Racor vacuum gauge (one designed for panel mounting), and mounted it next to the engine hour meter on the panel adjacent to the companionway. I plumbed it direct to the inlet of the engine lift pump, by installing a tee.

Here it is with the engine running under way, showing that there is no impending fuel filter blockage.

Perhaps the most important thing that I have come to recognize as a result of this little project is that an annoyance is really an opportunity to improve, in disguise.

Introduction

Hello!

Whenever boaters gather, they are frequently proud to share those small additions and modifications to their boats which have made living aboard easier - sometimes far out of proportion to the size of the projects. Books have been published, filled with such ideas - the concept behind this site is similar, but hopefully much more responsive to the boating community, because of the immediacy of the blogosphere, and the ability to communicate with the author or others thru comments.

So, pay it forward: make a contribution that will help your fellow travelers out on the waves. To do that, send your contribution to SmallBoatProjects at gmail dot com. Your contribution will feature a link back to your blog, and contributors will permanently appear in the contributors listing over in the sidebar. If you'd like to make your contribution a "teaser", which provides enough information to interest the reader, but requires him/her to go to your site to get the whole story, please feel free to do just that. Only be sure to provide enough information to make the post here coherent.

If you do not want to take the trouble to do the work, just give me a hint where an old post of yours is, and permission to copy it, and I will do the work.

To get things going, I'll put a couple of my own up here. They have appeared elsewhere, but I don't see that as a detriment - this site should serve as a consolidator - one place to go for neat ideas invented by your fellow boaters. And for contributors, an additional way to drive traffic to your site.

Your turn. GO.
Related Posts Plugin for WordPress, Blogger...