We have added two new 1-1/2” thru-hulls above the water line. The port thru-hull will serve as the discharge for the upper, larger capacity bilge pump (3700 G/H).
The starboard side thru hull will act as a drain for the deck scupper. We did not like the long hose run from the starboard scupper to the torpedo tube drain manifold. We also wanted to rig a method for collecting water off the deck if necessary.
Prior to drilling any holes we assembled the new starboard deck drain plumbing.
Test fit of new plumbing for starboard deck drain. Note old drain hose at far right. Test fitting the new plumbing allowed us to accurately mark the location for the starboard thru hull. The port side fitting connects to a single flexible hose so identifying the exact location was less critical.
Since the location of the holes was marked on the inside of the hull, I began the drilling using a ¼” bit to drill a pilot hole from the inside out. The ¼” hole matches the diameter of the hole saw pilot bit. Next, I chucked a 1-7/8” hole saw into the drill and moved outside the hull. Drilling the larger hole from outside allows for properly aligning the hole perpendicular to the hull and creates less dust inside the boat.
We drilled two 1-7/8" holes in the hull. The Morgan 382, 383, & 384 hull’s have a foam core above the waterline. This is the first time we have drilled large diameter holes above the waterline and subsequently our first look at the coring material.
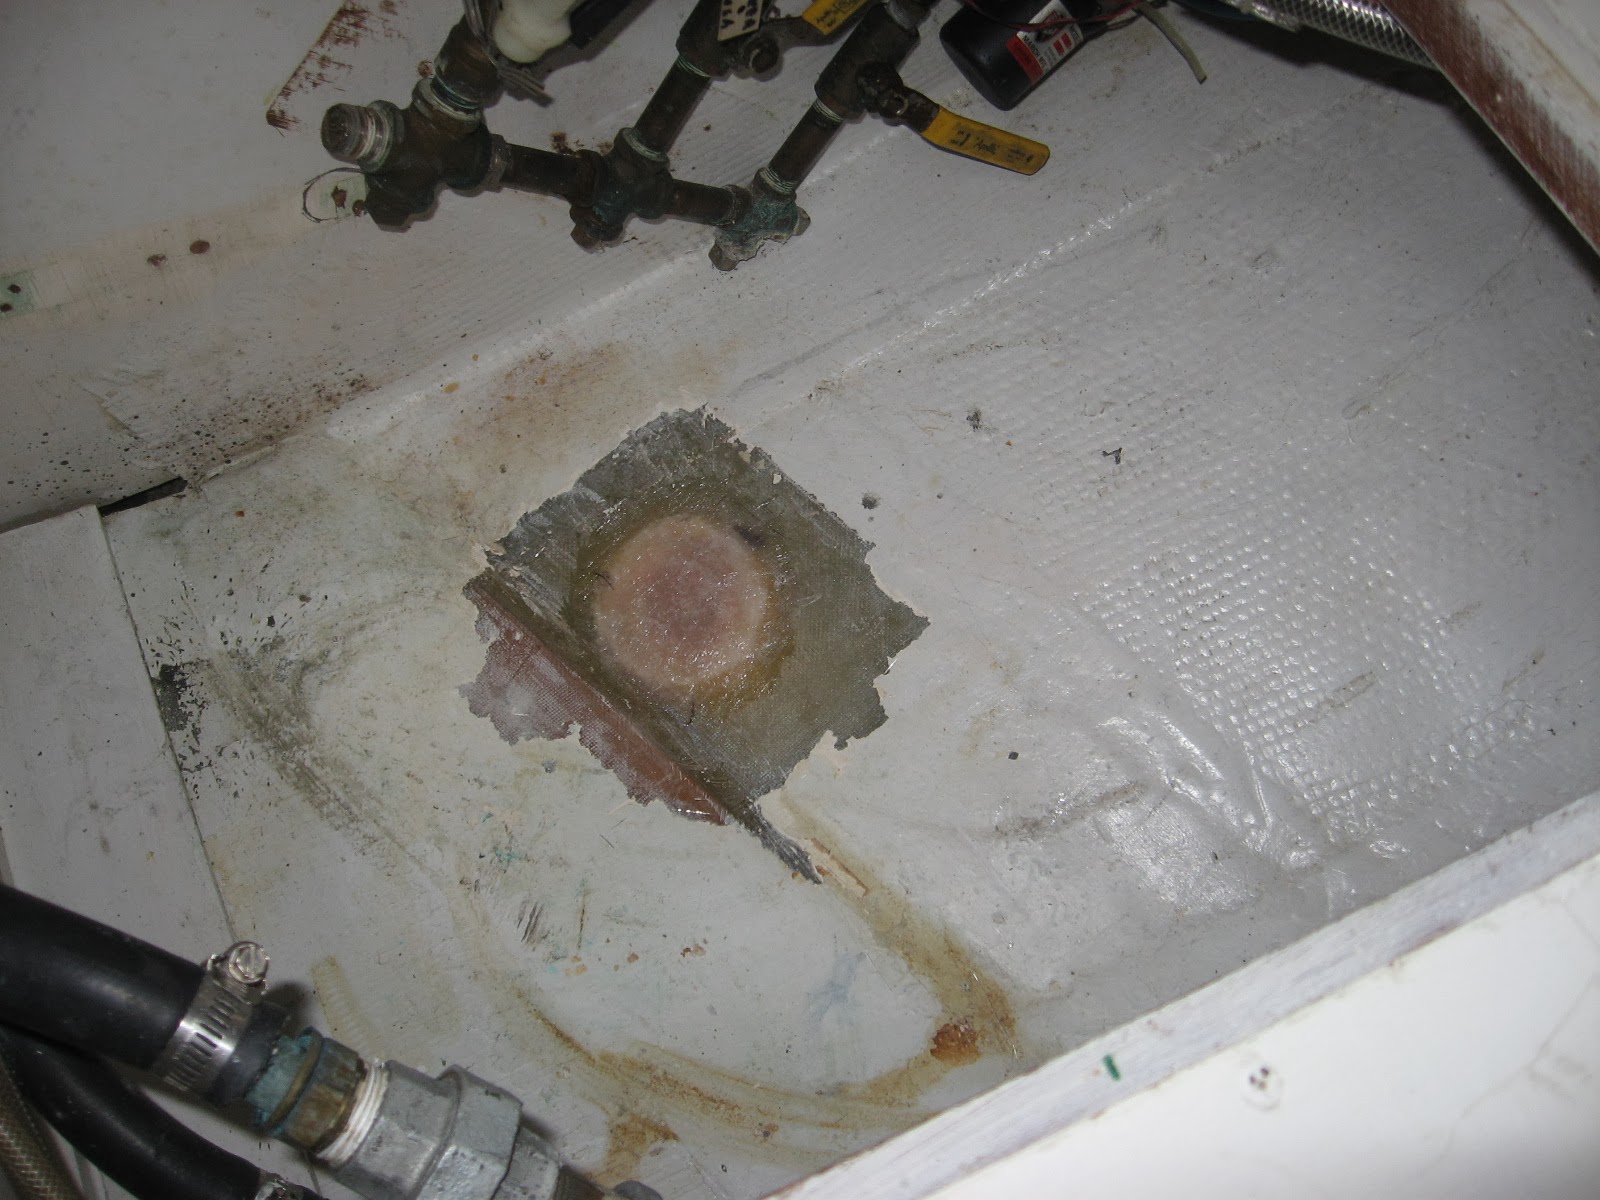
Close up of plug offers a glimpse of Morgan's construction techniques. The hull is slightly over one inch thick… the outer fiberglass layer is 5/16”; the foam 9/16”; and the inner fiberglass layer 1/8”Placing holes in cored hull’s or decks requires additional effort to ensure water never reaches the core material. In smaller, fastener sized, holes this can be achieved by over drilling the size of the hole and then filling it back with epoxy. Larger holes for plumbing fixtures require a different approach.
Using a small flat screw driver and a couple different styles of picks, we removed all the coring material within approximately ½” of the hole.
Foam core removed from the area around the hole. The plan is to fill the newly created void around the hole with thickened epoxy. So the next couple steps are the usual epoxy prep… 80 grit sanding, acetone wipe down, mask area... We used a syringe to apply the epoxy and a plastic spreader to achieve a nice clean finish.
Filling the area around the hole with thickened epoxy. After a couple days for the epoxy to fully cure, we returned to the project. Using a #49 cabinet rasp and some 80 grit sand paper, Anne cleaned up any excess epoxy from the holes. While I cut down the length of the threaded section of the thru-hull to properly fit the valve on the starboard side.
Prior to applying any sealant we dry fit the two thru-hulls and masked the surrounding area. For the final install we used 3M 5200 sealant. Anne worked the interior and I the exterior.
New thru hull fittings are just above the waterline and five feet forward of the torpedo tube drain on either side of the hull. We are still waiting on hose to connect the bilge pump to the new fitting on port, but we wasted no time installing the new starboard deck drain plumbing.
New deck drain w/ option for filling water jugs installed. Since the installation we have weathered a couple heavy rains. The starboard deck scupper is performing much better with the new system.
What was that you said?
Why yes that is a new battery selector and bilge pump switch panel in the image above. I’ll post more info on that project very soon.
Showing posts with label hull. Show all posts
Showing posts with label hull. Show all posts
Tuesday, October 13, 2015
How To Make Holes In Your Boat
Making a hole in your hull is serious business, even more so if your hull is foam-cored. Jeff and Anne aboard s/v Pilgrim and in the midst of a complete refit demonstrate how it should be done...


Tuesday, March 25, 2014
Filling Big Holes
Ken & Vicky, who live aboard s/v Painkiller show the technique they used to close off holes in the hull left when unneeded thru hulls are removed. It's a little bit of a departure from the normally advertised technique...
As those who have been following along know, I am replacing some thru-hulls and relocating others, so I am left with six holes through the hull that need to be filled/repaired well enough that I can sleep well knowing they will never pop out. I do not claim to be any kind of fiberglass master but after reading and examining multiple ways to make this repair.....this is how I am doing it.
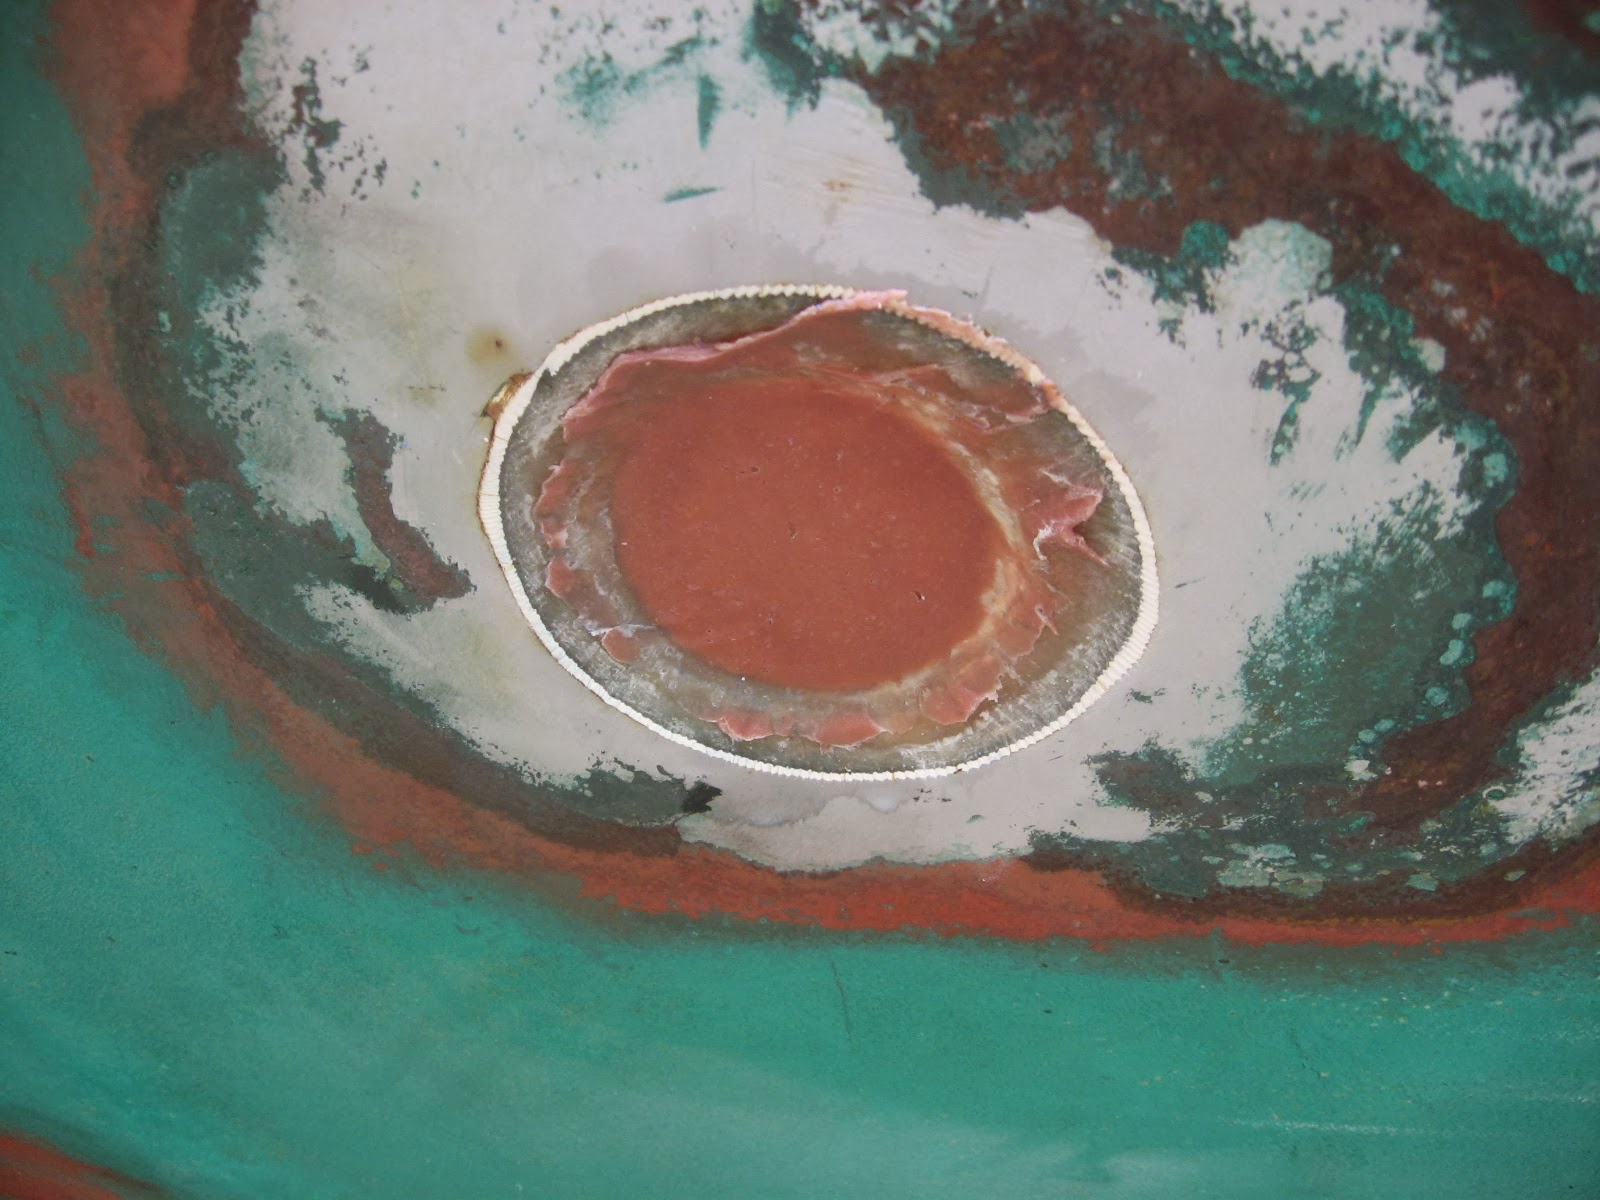
Here is a hole left from a 1 1/2" PERKO sea-cock, I have three of these and three from 3/4' sea-cock. I ground from the outside to within an 1/8" of breaking through. Then, what I have no pictures of is that on the inside of this hole I then ground another taper around the circumference although much smaller than what is on the outside.
Then with a wax paper covered disc of an appropriate size, I mushed some thickened epoxy up into the hole and then scraped the inside flush . Sorry the pictures are missing so many details here but....
...what is really left is a puck type plug being held from both sides of the hull. It can neither punch in or punch out. The hardened epoxy puck is kinda shaped like this...> <.....looking through the cross section of the hull. It just so happens that this inside picture of the plug is the worst looking of the bunch. Looks really don't count here, quality does.
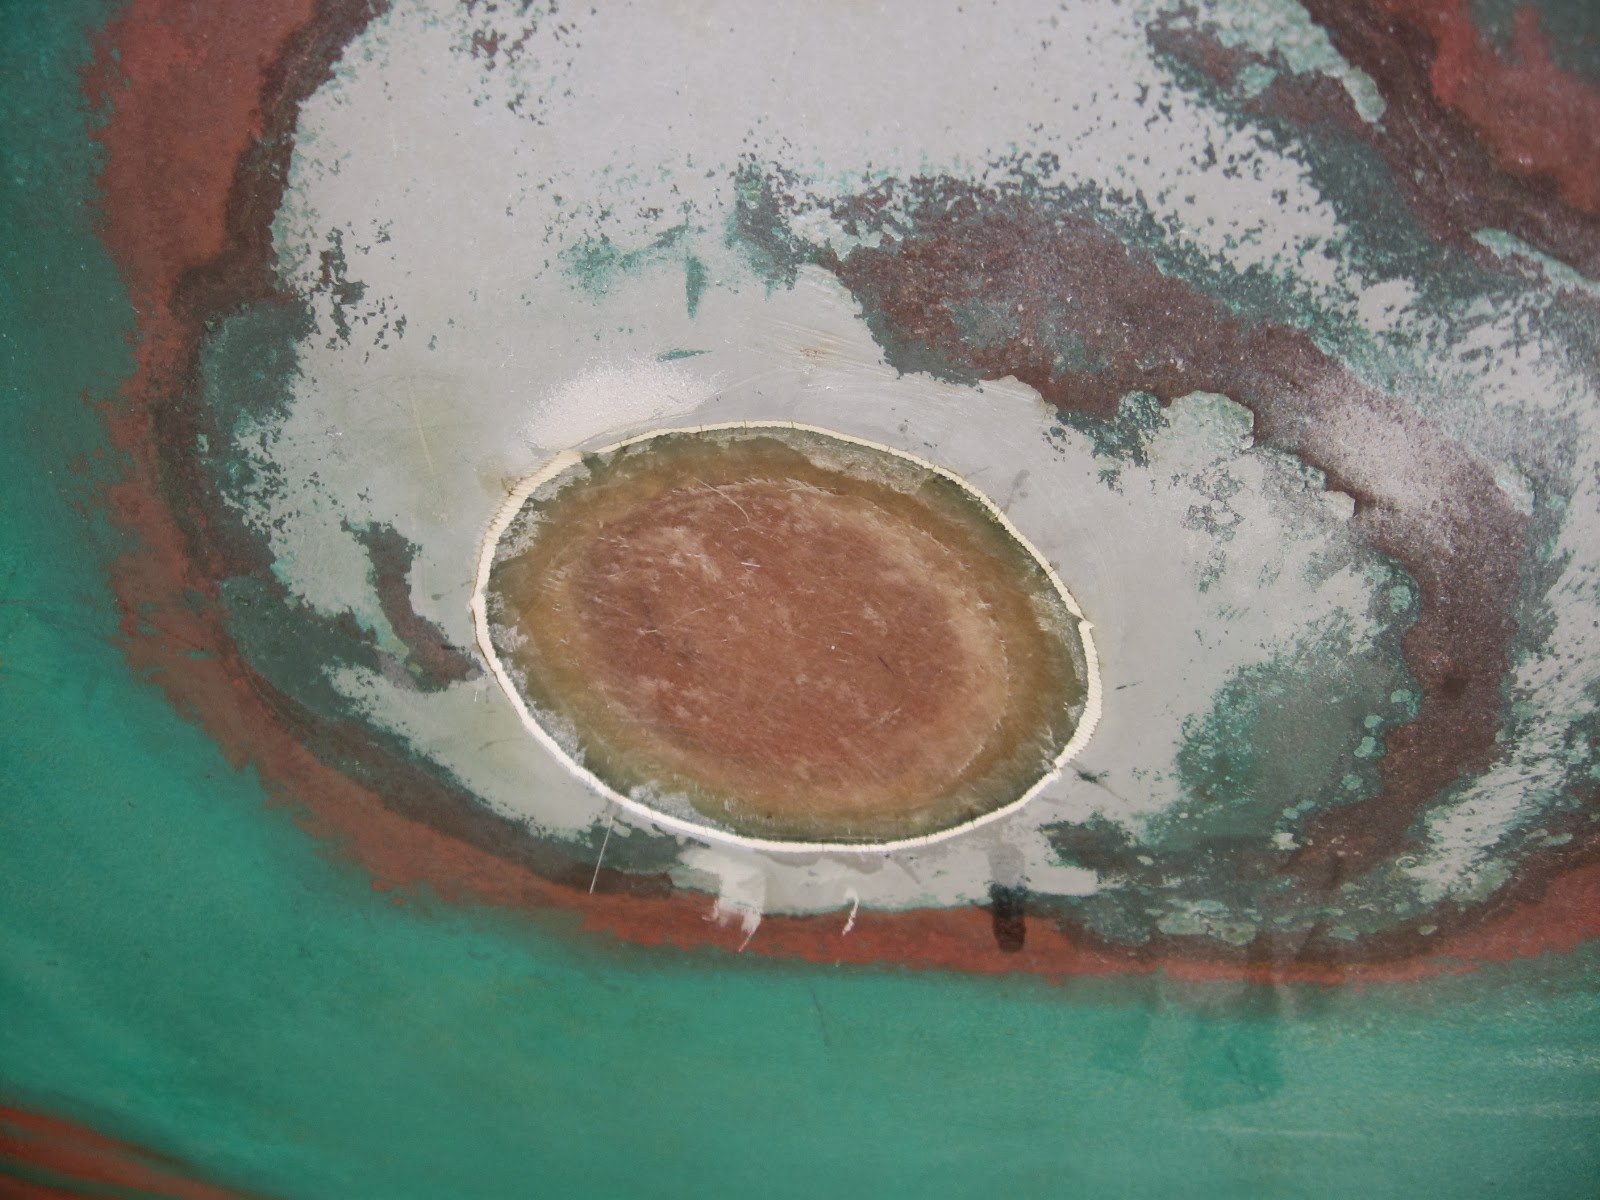
After it set , I ground and cleaned the inside and outside ready for the fiberglass matt to be used as filler.
I cut multiple size discs in about 1/2" increments to wet out and fill the exterior holes. Each overlapping the next getting bigger as it fills.
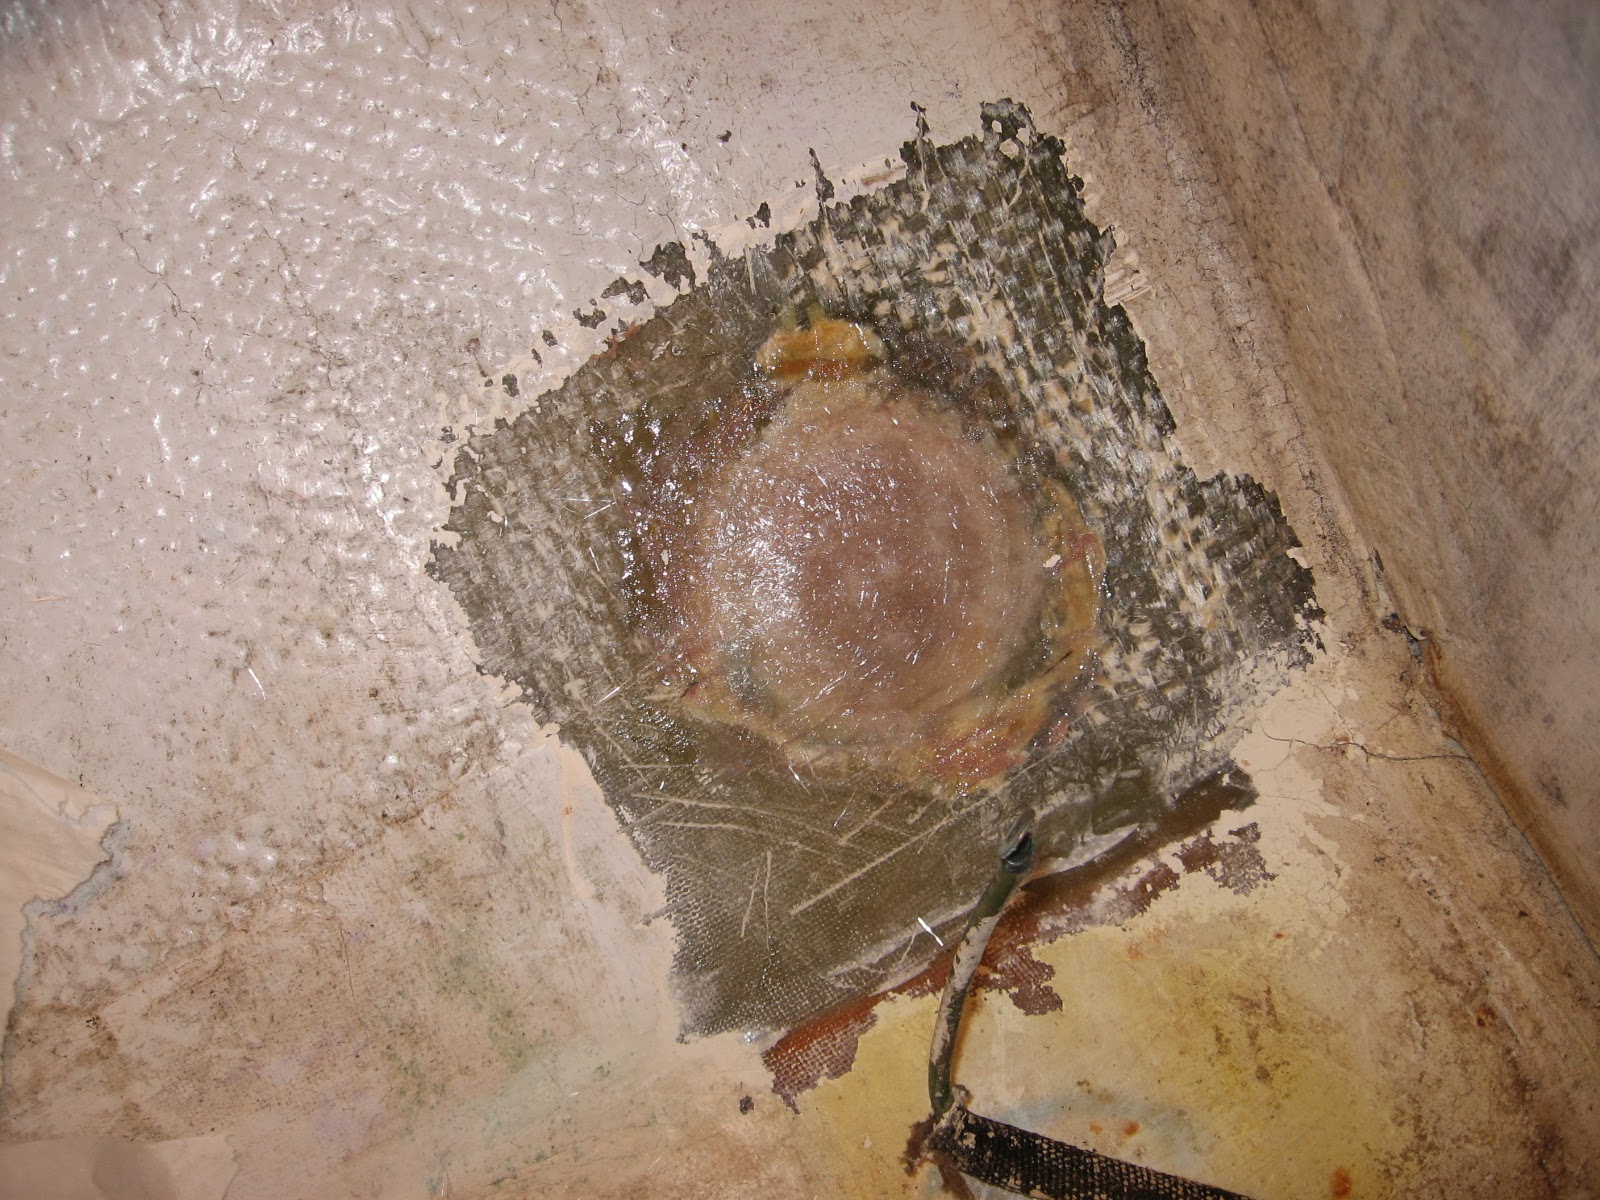
This shows three consecutive layers being filled into the exterior.
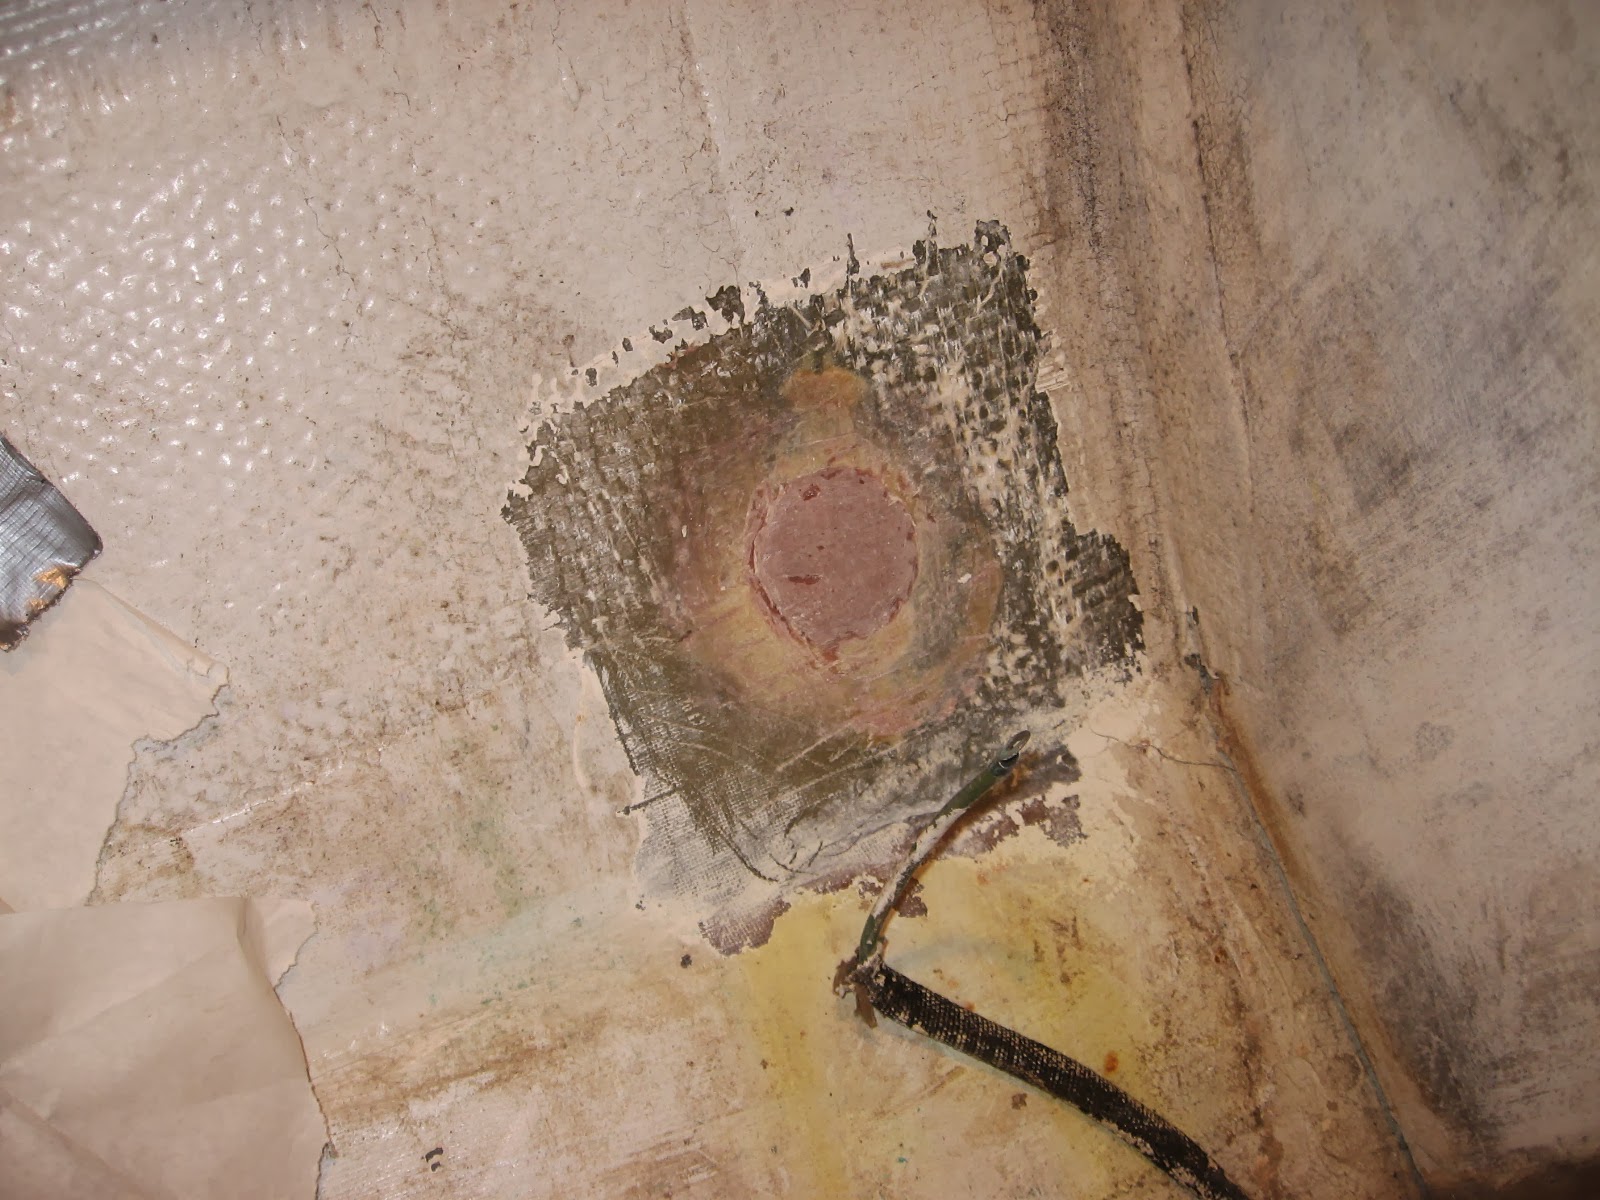
This shows the same size three layers layed directly over the plug from the inside. Th finish the inside next I will lay two or three more consecutive layers spread out to rectangular shape thoroughly cleaned to bare fiberglass. (note: I am using west epoxy for this repair)
These interior patches should without a doubt be enough even if the exterior somehow broke free. This might be way overkill of a patch or I might just have my head far up the nether regions of my backside in regards to a "proper" fiberglass repair. Either way....I'm going to be OK with this patch.
I'll have more pictures for the finishing up in due time.


Thursday, December 15, 2011
Heavy Duty Mounting on Cored Panels, Without Through-Bolts
The insides of boats are frequently not a friendly place to mount things to. Especially if the mount is to be structural, to take weight. Drew at Sail Delmarva shows us his answer to this problem:
One constant aboard performance cats and even semi-performance cruising cats is cored hulls. If there is anything serious to mount, it's a long and methodical process:
The previous owner added a winch without following these steps, and I managed to tear it out of the deck. Cored construction can be very strong, but point-loads need to be distributed.
- Drill through.
- Route-out the core.
- Fill with epoxy.
- Wait.
- Redrill.
- Add a backing plate. Yup, perhaps that should have been FRP and epoxied on before you drilled.
- Through bolt with washer and sealant.
Front of the mountWhat if the mount is on the inside of the hull and you don't want a bolt sticking out the side? A sump pump mount. Some hooks to hang weighty objects. Screws are possible, but the skins are thin and the space between the inner skin, which must fully engage the threads, and the outer skin, which cannot be touched, is less then 1/2-inch, sometimes only 1/4-inch. Since screws come in 1/4-inch increments, this can be a real problem. The answer is a thickened patch on the wall, and to mount real equipment, built-up glass is probably best. Of course, there need to be bolts or enough thickness to get some real screws in it, so glassed in wood is common. But wood rots. There is a simple, faster way, if the surface is close to flat:
Back of the mount
Piece of cake, easily pre-fabed in the shop, and will last as long as the boat. I'm sure solid glass hulls face the same problem; you still can't just tap a screw into the hull, not unless it is well over 1-inch thick. In some ways, the problem is more ticklish. But glued-on pre-laminated FRP still makes for a tidy solution.
- Mount the object to pre-laminated FRP about 1/4-inch thick. In this case I tapped-in threads, mounted the hooks with machine screws, and ground off the excess. T-nuts could be used for heavy duty mounts, or simply thicker glass; at 3/8-inch the threads are typically stronger than the bolts.
- Screw (very short screws only used to apply clamping pressure) and glue (3M 4200 if it's not too heavy and you might remove it, thickened epoxy if it is and you won't remove it).
Finished mount. This holds heavy mooring lines and spare rode, perhaps 20-30 pounds on each section. The coils hang well below the hooks, cow-hitched with slings. The hull is ~ 5/8-inch thick with 3/32-inch triaxial glass skins. Screws alone might hold... for awhile... assuming I don't step on the coil while wading through sails and fenders, which I will.The hooks are 1/8" x 3/4" aluminum flat bar bent around a double mandrel and ground smooth. I also store my chute in this locker, so I wanted a hook that would hold line but not snag sailcloth. When you can't find what you want, you make it.
I cheat. I get pre-laminated FRP as cast-offs from chemical plant projects. Free is nice. But I've gotten it other places--old signs, cut from old boats. The flat bar were electrician cast-offs. Scrounging 101.


Tuesday, November 8, 2011
A little structgural fiberglass repair
Livia and Carol on s/v Estrellita have been poking around down in their bilge.
We took a lot of time in San Francisco to work on boat projects because we were enjoying the town, had a lot of free places to stay, and resources through friends in the area. This is one of the projects we tackled.
We’re now certain that our gorgeous girl has been grounded hard at some point. There was the rudder shoe repair, the old bad keel repair that failed that we re-did and now we found a crack in the fiberglass in the stringer (I think technically called a “floor”) behind the mast step.
Our concern of course, was whether the crack was in the fiberglass or the underlying beam. We could tell the crack was old because of the mold (ew!). So we dug, and scraped, and ground, until we found dry, uncracked wood (phew!). Then we considered how best to deal with the big hole we had created.
")
")
")
")
West Systems has a great series of videos, articles, and use guides for using their epoxy resin to repair fiberglass. We used epoxy resin and glass cloth. This was our first experience actually doing our own fiberglass repair so we decided to tag team it “Team Giddyup” style. Carol ground and beveled and I applied the glass. We chose epoxy resin for its strength but an unintended side effect is that it smelled WAY better than the fiberglass resin that they guy who did the keel repair used. We are very thankful for that because we weren’t looking forward to getting a hotel while the stink cleared out.
So, while enjoying the hospitality at the Oakland Yacht Club, we applied about 10 layers of glass cloth with epoxy resin. Can you believe that this still did not build it up to the same thickness that the Wauquiez builders had left? It’s *crazy*. Part of that is because we had scraped some rotten wood from the surface and part because we underestimated how thick the layer would need to be in order to match the existing glass.
Of course, our boat was build back in the days when they had no idea how strong fiberglass was so they just kept adding more to make sure the boats would be strong enough.
We’ll watch the repair job and see how it does over time. Luckily, these stringers/floors simply stiffen the boat laterally and so, unless you ground the boat, don’t normally take a lot of fore-aft stress.
We also found old repair jobs in the corners of other stringers on the starboard side. Hopefully, those repair jobs, which were smaller, won’t fail like this one did.
")
")
")
")
")
")
Subscribe to:
Posts (Atom)


