Showing posts with label s/v Chalice. Show all posts

Tuesday, December 27, 2016

The making of a hard dodger

This is not an easy project.

It is well beyond the "small boat project" range. And yet, it is so well executed that I couldn't resist drawing your attention to it. Mike of s/v Chalice has tackled the creation of a hard dodger. And he has done it in yeoman fashion. Pay particular attention to the tools and tooling that he creates in order to do the actual project work:
  • A rib glue-up table
  • A buck for gluing up the roof panel
  • An adjustable jig to support the roof panel in place in the cockpit while supports are created
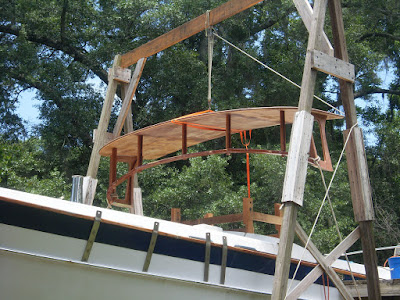
  • A rolling gantry (!)
Given Mike's proclivities, I'm sure that this is not an exhaustive list.  Tho creation of the tooling and tools took perhaps as much time as the project itself, the result shows that this time was well-invested.

Yeoman work indeed.

What follows is a combination of two of Mike's posts (I wish there was a third showing the completed dodger).

The Hard Top / Hard Dodger. *Part 1*

So here we go. This was spread over about a year. First I made the actual top piece, then the bottom rail was made right on the boat. Then I built the gantry crane to set the top piece up there and join the two together.

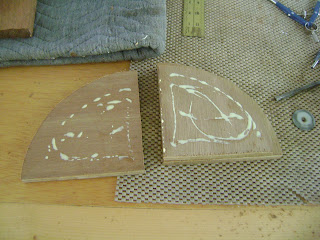
I started with a table to make the mahogany ribs that are internal to the top.

Made with OSB, filled with thickened epoxy, sanded, then clear coated with epoxy again to give a nice smooth surface then waxed about 8 times so the glue would not stick to the form.

From Update_July 20, 2016


From Update_July 20, 2016


From Update_July 20, 2016


From Update_July 20, 2016


From Update_July 20, 2016


Next a large form was made that matched the same curve as the ribs. I did not take pics of that part. I have a few of the actual glue up of the top piece.

From Update_July 20, 2016


From Update_July 20, 2016


There is a layer of 1/4" luan on top and bottom. Mahogany ribs with 1/2"foam panel between them with solid Mahogany about a foot around the edges.

I used plastic nails to nail the first layer to the form. This allowed easy removal and sanding. I used a cheap Harbor Freight 18Ga. nail gun. Worked great and saved about $300 from buying a Italian gun made for them.

Later I cut it to shape and glassed it top and bottom.


From July 21, 2016


From July 21, 2016


The Hard Top / Hard Dodger. *Part 2*


So now we have the top up on the boat. I built an adjustable jig to hold it so I could get the right height and location. Here are some pics with the process of fitting the top to the bottom rail I had made earlier.

By the way, this was the most difficult part.

From Update_July 20, 2016


From Update_July 20, 2016


Starting to look good. I think.

From Update_July 20, 2016


Looking lean and mean.
Dirty boat.

From Update_July 20, 2016


Ok now we have it together (barely). So let's lift it off and to the ground.

From Update_July 20, 2016


From Update_July 20, 2016

From Update_July 20, 2016


On the work horses for final assembly and finishing.

From Update_July 20, 2016


Tuesday, September 13, 2016

Adding a Wheel to the Dinghy

I know you've dragged your dinghy up onto the beach -  not easy is it?  And here in the Salish Sea, this task is even more difficult and harder on the dinghy because the beaches are all gravel - sometimes even barnacle covered gravel. Mike of s/v Chalice shows us a way to make the task into a one-man job, and one that protects the dinghy bottom to boot:
Wouldn't it be nice to just wheel your dinghy down to the beach or up the beach? I got the idea from Harry Bryan in Canada.
http://www.harrybryan.com/harrybryan/

Some Pics of what I did.

From Update_July 20, 2016


From Update_July 20, 2016


From Update_July 20, 2016


Installed. I had to cut a hole in the boat and build a well for it. Not hard and no maintenance issues with the 1" stainless tube and plastic parts.

From Update_July 20, 2016

Tuesday, July 22, 2014

How to bend shower track

Mike of s/v Chalice takes us thru the process.  With the right tools, jigs and with the secret ingredient, it is easy!

So just how do you do it with out it collapsing?

First I borrowed a Harbor Freight bender from a friend of mine to see if I could do it. Then I had to make a jig to work with the bender. Lastly, test on some scrap ( old piece).

 The Jig build.
From update _10_1_2012

From update _10_1_2012

From update _10_1_2012

With me so far? The half inch ply was a perfect fit. But if not I would have glued spacers in if needed.

From update _10_1_2012

On the bender.
From update _10_1_2012

Ok, so what is the secret ingredient? I actually found it on an Chinese industrial website for industrial benders. Dead simple when you know. It is a spacer/filler. Made from a piece of scrap plastic/Delrin.


Insert it in the track. It MUST be a tight fit.
Add captionFrom update _10_1_2012


From update _10_1_2012

Now bend it.
From update _10_1_2012

First test on scrap. Then buy some track. I got mine here: http://www.curtain-tracks.com/  My problem was I had to match my current track. If you don't have to do this, then you may want to go a different route.

From update _10_1_2012

More bending.
From update _10_1_2012

Finished piece.
From update _10_1_2012

I hope this helps anyone who needs to bend some track. It's not hard and can be done fairly inexpensively. If you have friend with a bender. I should say that of course this is not the only way to do it. It's just the way I did it.

Thursday, June 19, 2014

New teak grate for shower

Mike of s/v Chalice takes us thru the process he used to recreate the teak grate in his shower.  Mike has all the tools... (yes, I'm jealous)
I needed to replace the shower grate as it was broken at the angle corner. I had tried to repair it, but because of the design it really was a design flaw. So I needed a new one of a different design.

What I did was lay the old grate face down (upside down), then nailed a perimeter around it real tight. This gave me the shape I needed. I would have to build the new one upside down, but as you will see, this was the easiest way.


From update _10_1_2012


I had to angle the ends of the new teak pieces so they would fit the fiberglass liner. A later picture will show this up close.

From update _10_1_2012


Initial cut and fit done. Now I just have to add the reinforcing that holds it all together.

From update _10_1_2012


Now it's done. Built completly in the jig.

From update _10_1_2012


Hard to see but I used spacer blocks to space everything out. Very easy.

From update _10_1_2012


Old Vs New

From update _10_1_2012


Oil finish so it will not be slippery.

From update _10_1_2012

 The angle on the ends.

From update _10_1_2012


From update _10_1_2012


Now you can do it.

Tuesday, June 3, 2014

The Rack ... a lesson in measure first.

We haven't heard from him for a while, but Mike continues his refit of  s/v Chalice.  The rack he built here is a beautiful piece of work and would have looked wonderful aboard, but for one tiny detail...
My wife wanted a rack in the galley that would hold bottles of cleaner and a sponge. I thought " no problem". So i went into the galley to measure the LENGTH of the rack, but did not measure how far out it would stick. Sure it'll fit. So off to work I go. Hmmm.

First a drawing. I got carried away. I wanted it to look nice.

From update _10_1_2012


Now to build it. I wanted to try some different joints in it. Remember I wanted it to look nice.

From update _10_1_2012


From update _10_1_2012


From update _10_1_2012


From update _10_1_2012


From update _10_1_2012


The sponge holder.

From update _10_1_2012


Finished! Five coats of varnish. It is a knife rack, they fit in the top, then bottles and last a sponge on the side. I used brass rods so the sponge would dry quickly.
It was very condensed, unfortunately not enough.

From update _10_1_2012


No it did not fit. It stuck out too far and would interfere with using the sink.
Tried to find another spot, but no go. We both thought we had checked it would fit, neither one of us did.

So some really good friends of ours got to take it home and hang it in their kitchen.

Hopefully this will give someone an idea for them and their boat.

Thursday, July 26, 2012

The Lord of the Rings

Not long ago, Mike of s/v Chalice showed us how he made some new fiberglass trim rings.  Now we get to see how they worked out:

So I got the port light rings installed. Here are some before and after shots of the install.

The finished rings.
From update 6-9-2012

This how I initially installed the port lights. Just so I could get them in.
From update 6-9-2012

Fitting them.
From update 6-9-2012

And installed.
From update 6-9-2012
Related Posts Plugin for WordPress, Blogger...