Not too long ago on the Pearson 424 forum that I hang out, someone asked if there was any information or drawings, or possible "who" fabricated the anchor platform that was offered to Pearson owners when having a new boat built.
Nobody had any concrete answers, so I offered to the gentlemen inquiring that I would give him an accurate detailed drawing that he could have the exact piece reproduced from any competent fabricating shop.
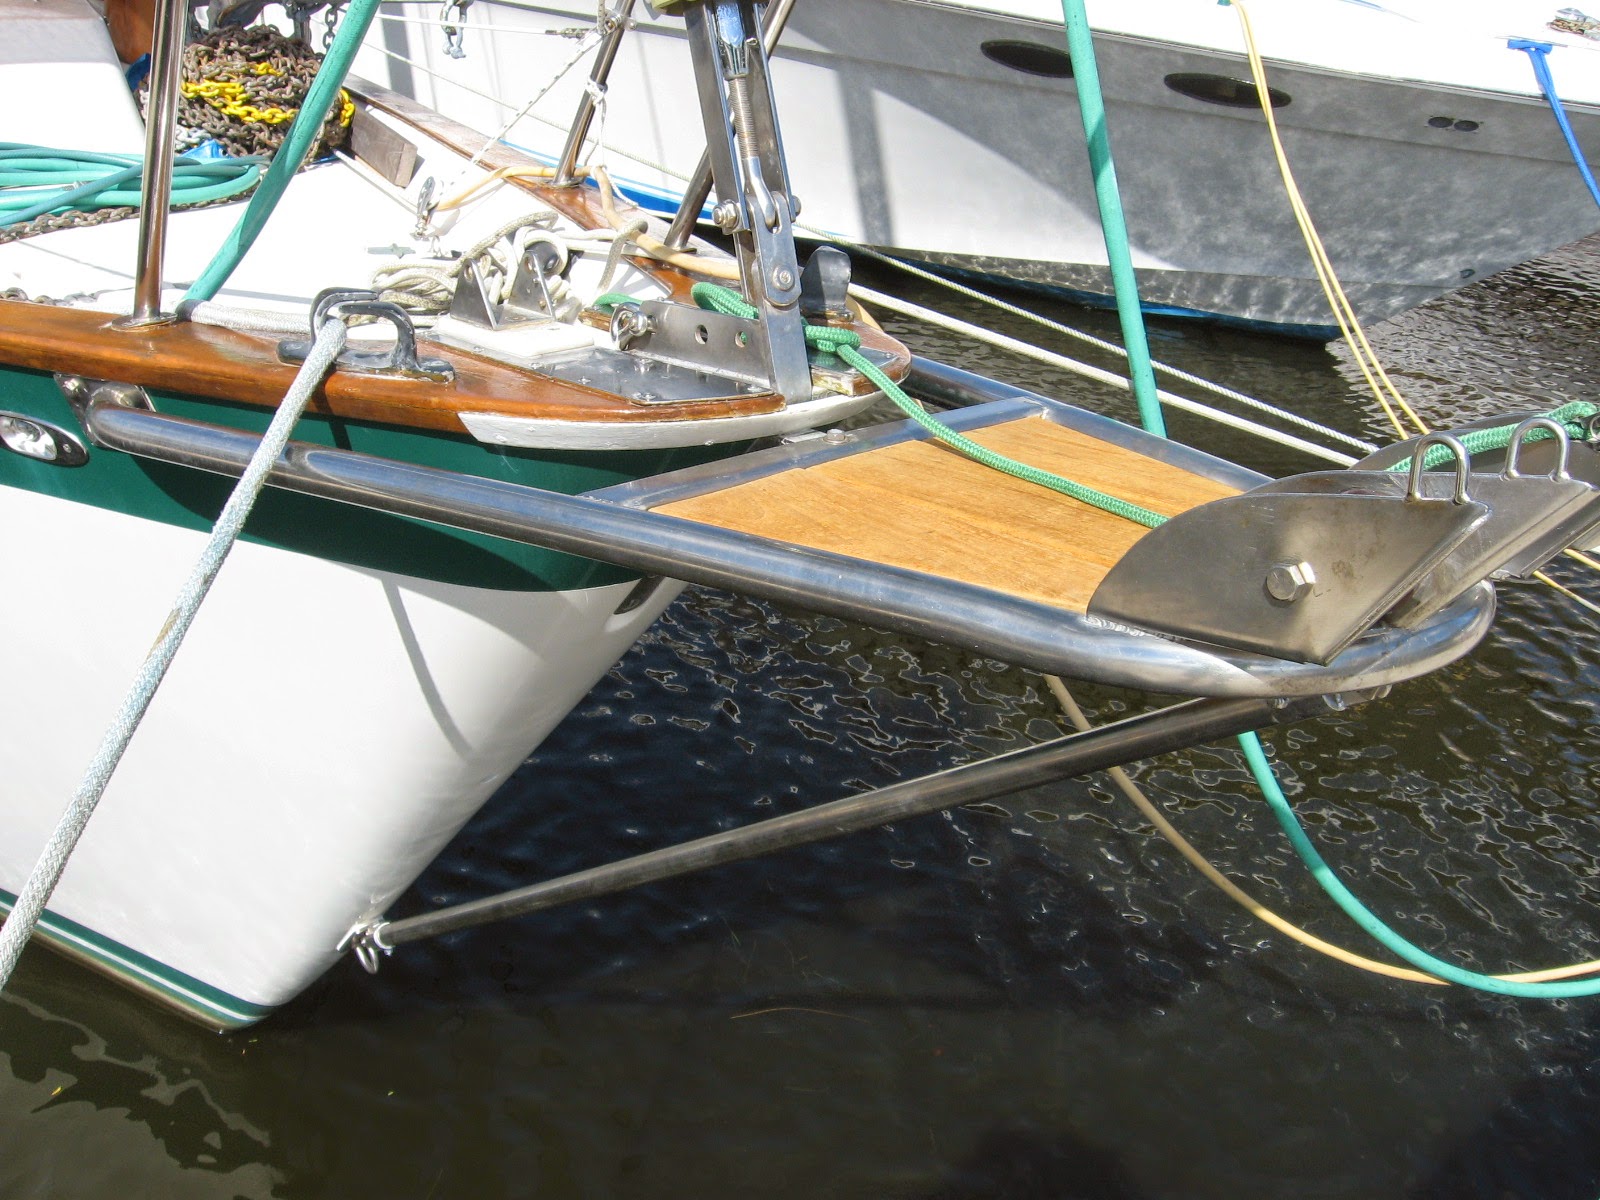
All I had to do was go forward with measuring tape, paper and and pencil. I noted in my drawings (I shared with the forum) that I would add a third or fourth point to stiffen the platform as it seemed to me it having a weak spot with potential heavy loads from getting a stuck anchor off the bottom. Not to mention that mine was bent at least 5 degrees....I never noticed it till I starting measuring for the drawings.
I had some ideas and traded some unwanted stuff at Sailors Exchange in St Augustine, FL for some various bits and pieces of stainless steel hardware that I could fabricate into something to help beef up the platform. A 1/2" U-Bolt was my starting point. The actual finished bracing point saw a few different ways before I settled on a robust 3/8" plate that supports the brace for the anchor platform and offers me a point near the waterline to lead a snubber line for anchoring. After coming up with a definitive plan, I removed the platform and brought it to a local shop to have straightened and weld up my various pieces.
I backed it all up with 12" x 5" shaped block epoxied into the forward stem. Not sure if I would tow my boat at sea in an emergency from this point, but for sure at anchor it will be fine.
I'm thinking this will take a load off my concerns of have an oversize anchor bury itself a little deep and need some persuasion to pop it free.
Showing posts with label stainless. Show all posts
Showing posts with label stainless. Show all posts
Tuesday, December 9, 2014
A Platform To Stand On
Metal fabrication is not a frequent topic here because of the specialized skills and tools it requires. Nevertheless, good communication skills can substitute for those, as Ken of s/v Painkiller demonstrates:


Tuesday, May 7, 2013
Chain Stripper Modification
Paul on s/v Solace makes a significant improvement in his windlass by redesigning the chain stripper. This is inspirational to me (since Eolian doesn't have a stripper on her windlass); perhaps it will be for you too:
Bent stripper compared to new stripper
Last year I had a guest on board who was trying to be helpful and undertake some of the chores on the boat. He was going through the anchoring process and while anchoring, I (he) found a deficiency in my capstan while easing out chain as one puts on the snubber.
Normally, when bringing in the chain with the capstan, a stripper is in place to ensure the chain comes off the capstan and goes down the Hawse pipe. Otherwise, it can get caught in the gypsy (wildcat in the USA) and wind up the chain around itself. Easing chain out, say when anchoring, the weight of the chain is usually sufficient to take the chain of the capstan gypsy. But in my case, my guest was not aware of the potential issue and as he eased the chain out while holding tension on the snubber line, the chain stayed in the gypsy and bent the chain stripper on the opposing side. You can see the bent stainless stripper above.
Plastic compared to SS
We were in the middle of "nowhere" and there was no way I could straighten that stainless. So what to do? I used one of my wife's "polyplastic" chopping boards and cut it up to make a plastic, but temporary chain stripper. While getting everything ready, including a cardboard template, I decided to design it so it was able to strip the chain whether it was coming in, or going out. I used both hacksaw and Dremel for fashioning the plastic stripper and the thing worked so well, it stayed on for the whole cruising season (6 months). I improved the cardboard cut out a little and had a piece of 6mm stainless laser cut when I went home.
Plastic stripper in place
New SS stripper to replace plastic in place


Tuesday, April 30, 2013
Boom gallows
Out on s/v Janna Petr and Jana tackle a project that probably shouldn't qualify as a small boat project, but it shows what you can do if you set your mind to it: Building a boom gallows. Read on...
We have a new, large roach mainsail, which significantly overlaps the topping lift and little bit the backstay too. After few trials, playing around with topping lift and pondering our options, we decided that we will make ourselves a boom-gallows. We wanted it for a long time anyway.
We were about to make a dodger, but the gallows idea got in the way and the dodger project was postponed. It didn’t take too long to convince ourselves that we are a tough bunch and that like the many other cruisers before us, also we will cross the oceans without the unsightly roof above the companionway.
Three hits were enough to make me
put up a signal flag for a day or two
before I learned to use our new space
While at Xingda fishing harbour we tied together both halves of our dinghy mast to the coach roof and put the dinghy boom between them to get some idea about the dimensions our boom-gallows must fit into. Trouble is that there are no right angles and the boat is far from being symmetrical. After an hour or so of jumping around with a tape measure and a protractor, we came up with a simple design, that we passed onto our SS man (as in stainless-steel), with whom we discussed couple of details.
When we got the supports and the teak timber, we were just in the middle of making a new non-skid on our deck.
When the day came, I was nervous. Drawing up the design was one thing, but now we actually needed to drill the boat and mount that thing so that it looks straight.
First of all, I have realized that the angle of the cockpit wall on starboard and port are about two degrees off. I did measure twice, what twice, I measure five times, but only on one side… Well, it won’t be as straight as intended.
In the end it turned out quite well. Only the forks that hold the teak timber are visually slightly off – yes they were supposed to be horizontal, but life ain’t always fair either, right?
Now it’s all done and I have even passed the initiation by thumping my head to the gallows couple of times when entering the companionway. Jana’s shorter so instead of the gallows themselves, she bumps her head into the boom on the side of the cockpit. But she has learned her ways now as well and we are both happy.
The handholds that the gallows provide are just marvelous. Boom sits calmly even in the constant waves that passing ferries, fishermen, harbour police and pilot boats create. We have also took our topping lift to the stern, where it goes through a block on the pull-pit and is tied to a cleat on the starboard. It can be easily worked with a sheeting winch and we will use it to hoist the dinghy.
Massive drill bit for massive bolts
First support at place
Cutting a bolt is always better then buying too short
This is what it's gonna look like
Cutting the notches for the boom
Cutting the notches for the boom


Tuesday, May 1, 2012
Bolt Hangers--A Strong Point For Small Dollars
In yet another crossover from the rock climbing world, Drew from Sail Delmarva introduces us to "bolt hangers", and how they can be useful on a boat:
Cheap hardware via cross pollination from the rock climbing world. In the mountains these are used in combination with wedge bolts to create strong anchor points. On a boat...
- 5,000-pound strength anywhere a single 3/8-inch bolt is handy. Of course, a good backing is required.
- 316 stainless steel.
- Cheap. About $2.95. (others brands may be 304 or other grades, some of which have been known to fail in marine environments.)
- Designed for clipping carabiners, they easily accommodate 2 carabiners.
- Obvious purpose avoids confusion over acceptable strong points. Strength rating and certifications are stamped on hanger.
Countless potential uses. A few of mine....
- Add an extra block to a sail track.
- Add an anchor point at the stern for diverting mooring lines or attaching a dingy.
- Tether anchors. Don't tie rope or webbing directly; though polished to eliminate sharp corners, the radius is really too short for acceptable strength.
- Anchors to secure bicycles.

Monday, April 18, 2011
Shop envy
Sure wish I had a shop with a TIG welder and a bunch of stainless scrap like Paul on s/v Solace...
Nice!Those pesky dive tanks are never easily stowed on a sailing vessel and so I decided to have a suitable bracket made up. This one clamps to the lower railing near the stern and secures both bottles with velcro. I used a couple of Bimini clamps and had them welded to the stainless bracket made from scraps of ss left over in the workshop. All welding done with a TIG welder and I did my best to polish the stainless. I'm still learning on that aspect. Neat and tidy. Cost $0.00 but 8hrs of labor. Many thanks to Tim for his help


Wednesday, January 19, 2011
Locked in position
Today, Paul of s/v Solace shows us how he constructed an adjustable solar panel mount that locks in position. Clever!
There are many ways of mounting solar panels. Here is one way to mount with a tidy way to raise and lower the panels.
In a storm north of New Zealand I lost a solar panel along with the temporary railing that I had it mounted on. I have since had the aft of the boat reworked with railing built so it looks like it was always there. Much stronger. Deciding that my previous attempts at methods to angle the solar panels were not that good, I have come up with the following idea for the rail mounted solar panels.
You will note the small vertical rail inserted half way along between stanchions. This was used to mount my actuator arm.
For the actuator arm, I used a stainless antenna mount and had made a stainless tube made with a thread at one end and closed off the other. This was screwed to the antenna mount.
This attached to the small vertical rail in the middle. The solar panel was mounted with white rail mount clamps which I had previously used to good effect. This time around though, I had to add spacers because the railing was curved to follow the lines of the boat.
At the bottom of the "solar panel actuator" the one inch stainless leg was placed in some pressure PVC pipe bought from a hardware store and this in-turn was secured to the bottom of the solar panel with leather on both sides of the pipe and the leather secured to the solar panel. This allows free movement of the stainless piece of the solar panel actuator as the panel is raised and lowered. I used two different types of antenna mounts. One with allen key and the other with a turning lever. The one with the lever, I cut off short because you only need thumb tight and the lever would interfere with my lee cloths.
After trying both, I prefer the lever arm rather than the allen key type.
The panel raises from full down to 30 degrees off the vertical. One could, if you don't have lee cloths, build the actuator arm with a curve in it near the mounted piece so that when raised it would allow the railing to not impinge on the actuator arm. I'm happy with 30 degrees off the vertical and lee cloths.
The lee cloths had small "U" shapes cut out and bound, so that the hinges and actuator arm could function. The lee cloths were secured to the railing and toe rail with cable ties. Lee cloths not shown here.


Friday, December 10, 2010
Accessing the Swim Ladder
Please welcome new contributor Joe, from s/v Assignment. Joe shows us how to improve access to the stern of a Catalina 25 from the water. It's a perfect small boat project!
When boarding after a swim on older Catalina 25s, you have to climb all the way up to the stern coaming, then swing your leg up and over the fixed rail. A little awkward, especially for geezer sailors.(Speaking as a geezer sailor, I'd appreciate this.)
A fix involves a hacksaw to remove the center portion of the rail and two 90-degree elbows. Then a short piece of lifeline with a pelican hook on one end and two fittings for the upright stanchions.
A discovery: Sawing through 1-in.-dia. stainless tubing isn't fun. That's when the trusty Dremel and its cutoff wheel comes in handy.
By the way, the pagoda-shaped solar lawn/walkway light has been mounted to the kickerpad for a couple of seasons now. It won't throw off enough lumens to qualify as a proper stern light nor anchor light, but it gives a little peace of mind when s/v Assignment is in its mooring field.


Subscribe to:
Posts (Atom)


