Wouldn't it be nice to just wheel your dinghy down to the beach or up the beach? I got the idea from Harry Bryan in Canada.
http://www.harrybryan.com/harrybryan/
Some Pics of what I did.
From Update_July 20, 2016
From Update_July 20, 2016
From Update_July 20, 2016
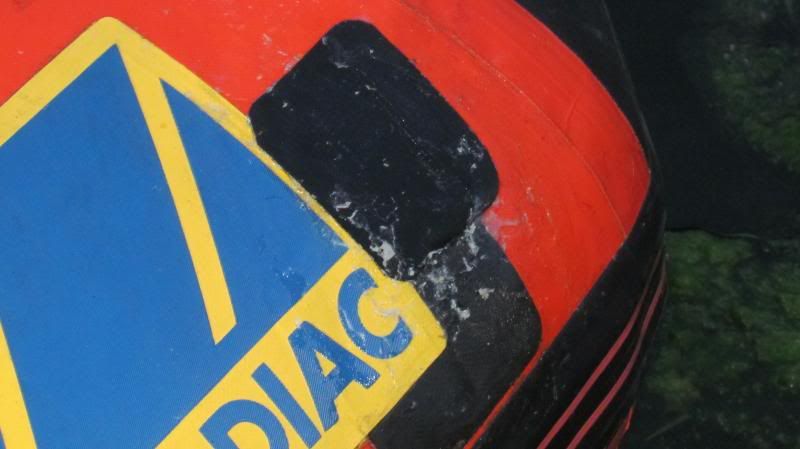
Installed. I had to cut a hole in the boat and build a well for it. Not hard and no maintenance issues with the 1" stainless tube and plastic parts.
From Update_July 20, 2016
Showing posts with label dinghy. Show all posts
Showing posts with label dinghy. Show all posts
Tuesday, September 13, 2016
Adding a Wheel to the Dinghy
I know you've dragged your dinghy up onto the beach - not easy is it? And here in the Salish Sea, this task is even more difficult and harder on the dinghy because the beaches are all gravel - sometimes even barnacle covered gravel. Mike of s/v Chalice shows us a way to make the task into a one-man job, and one that protects the dinghy bottom to boot:


Tuesday, September 8, 2015
Glass-Bottomed Dinghy
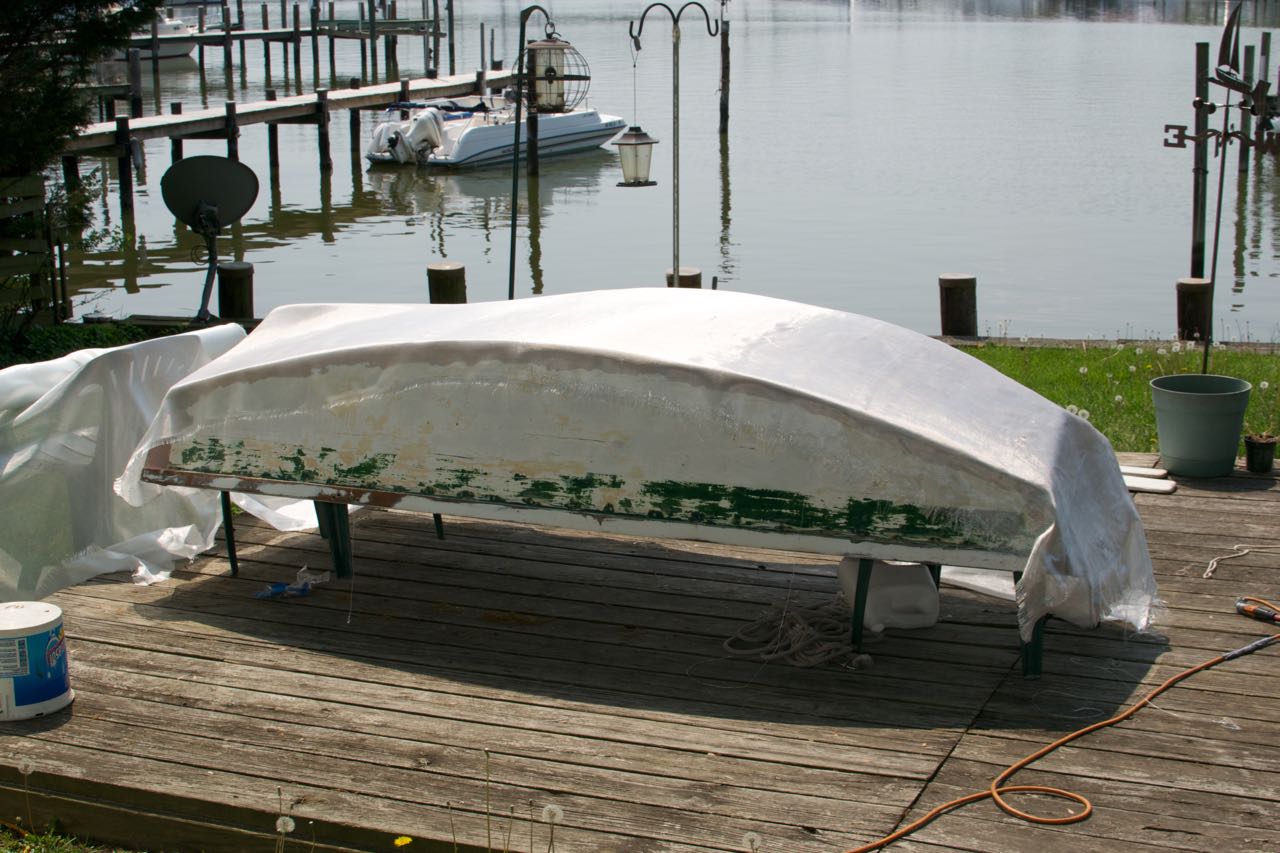
Over on s/v Cay of Sea, Rick and Ruth go to work sheathing their dinghy with fiberglass. Why do this? Well, it is a way to extend the life of a wood dinghy, and the fiberglass takes running up on sand and gravel much better than does wood.
[Editor's note: for those of you that have not worked with epoxy, as it cures a substance is pushed to the surface, called the "amine blush". If this is not removed before anything else is applied, it prevents a bond from being made.]I filled more small splits with peanut butter-consistency epoxy on the bottom today. These are super small splits – just narrow cracks – I forced epoxy into them with a putty knife, filling with cross-grain motion, then scraping up excess with the grain. Had I prepped the bottom for glass and resin, I could have gone directly to sheathing without waiting for resin cure. But I didn’t think it through, and needed to solvent wash the surface first and grind a few patches of cured epoxy. After letting the crack fills cure, I finished the prep.

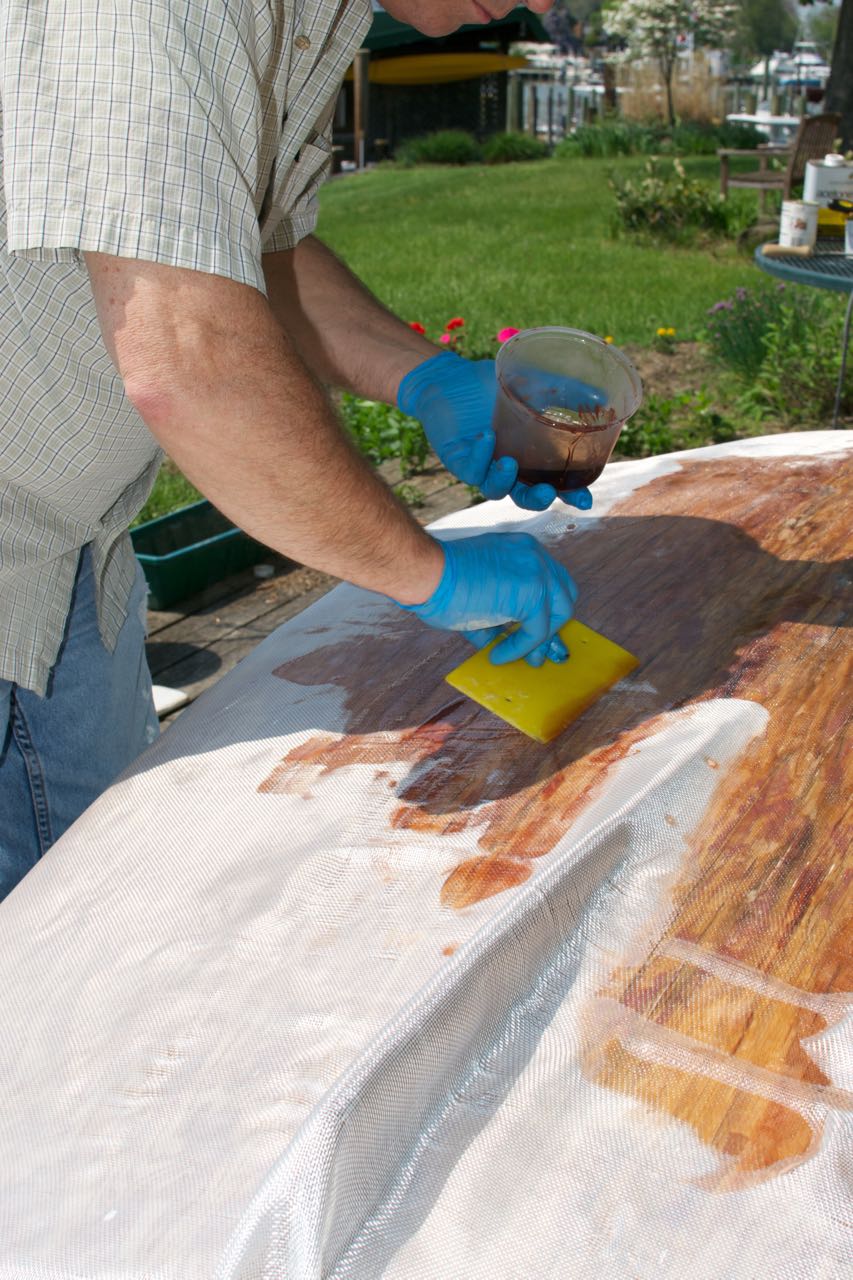
Draping the glass over the bottom showed me where to trim the excess, and where likely relief cuts were going to be needed: at the keel, in the corners, and a couple of places on the transoms I didn’t anticipate. It’s easy to push the weave of the fabric around while it’s wet, but care has be taken to keep pockets of void from pushing up as a result. Relief cuts are the best way to get the fabric to lay flat.
A large squeegee or putty knife/scraper is the best tool for wetting out on horizontal surfaces. It was a beautiful day – about 70 degrees – but the sun shining on dark surfaces made them warm, and consequently the resin set up pretty quickly. I had ample time to wet out each section, but I still had to move quickly. I spread out the resin and thoroughly saturated the weave, then quickly replenished my resin container. Three pumps each of resin and catalyst provided just the right amount to spread at one time. I used about 20 ounces of resin and catalyst to saturate the whole surface, including transoms.
I switched to a chip brush for the transoms and turn of the bilge, as pouring the resin wasn’t going to work on vertical surfaces. After an hour’s steady work, the entire surface was done and beginning to cure in the sun. I’ll do an additional coat tomorrow (or next time, depending on weather). One more coat will serve to completely fill in the weave pattern of the fabric, and provide a smooth surface. When I removed the boat from its elevated supports, I could readily feel the increased rigidity the glass and epoxy provides. The transoms will get even more rigid when I glass their inside surfaces.


Thursday, February 19, 2015
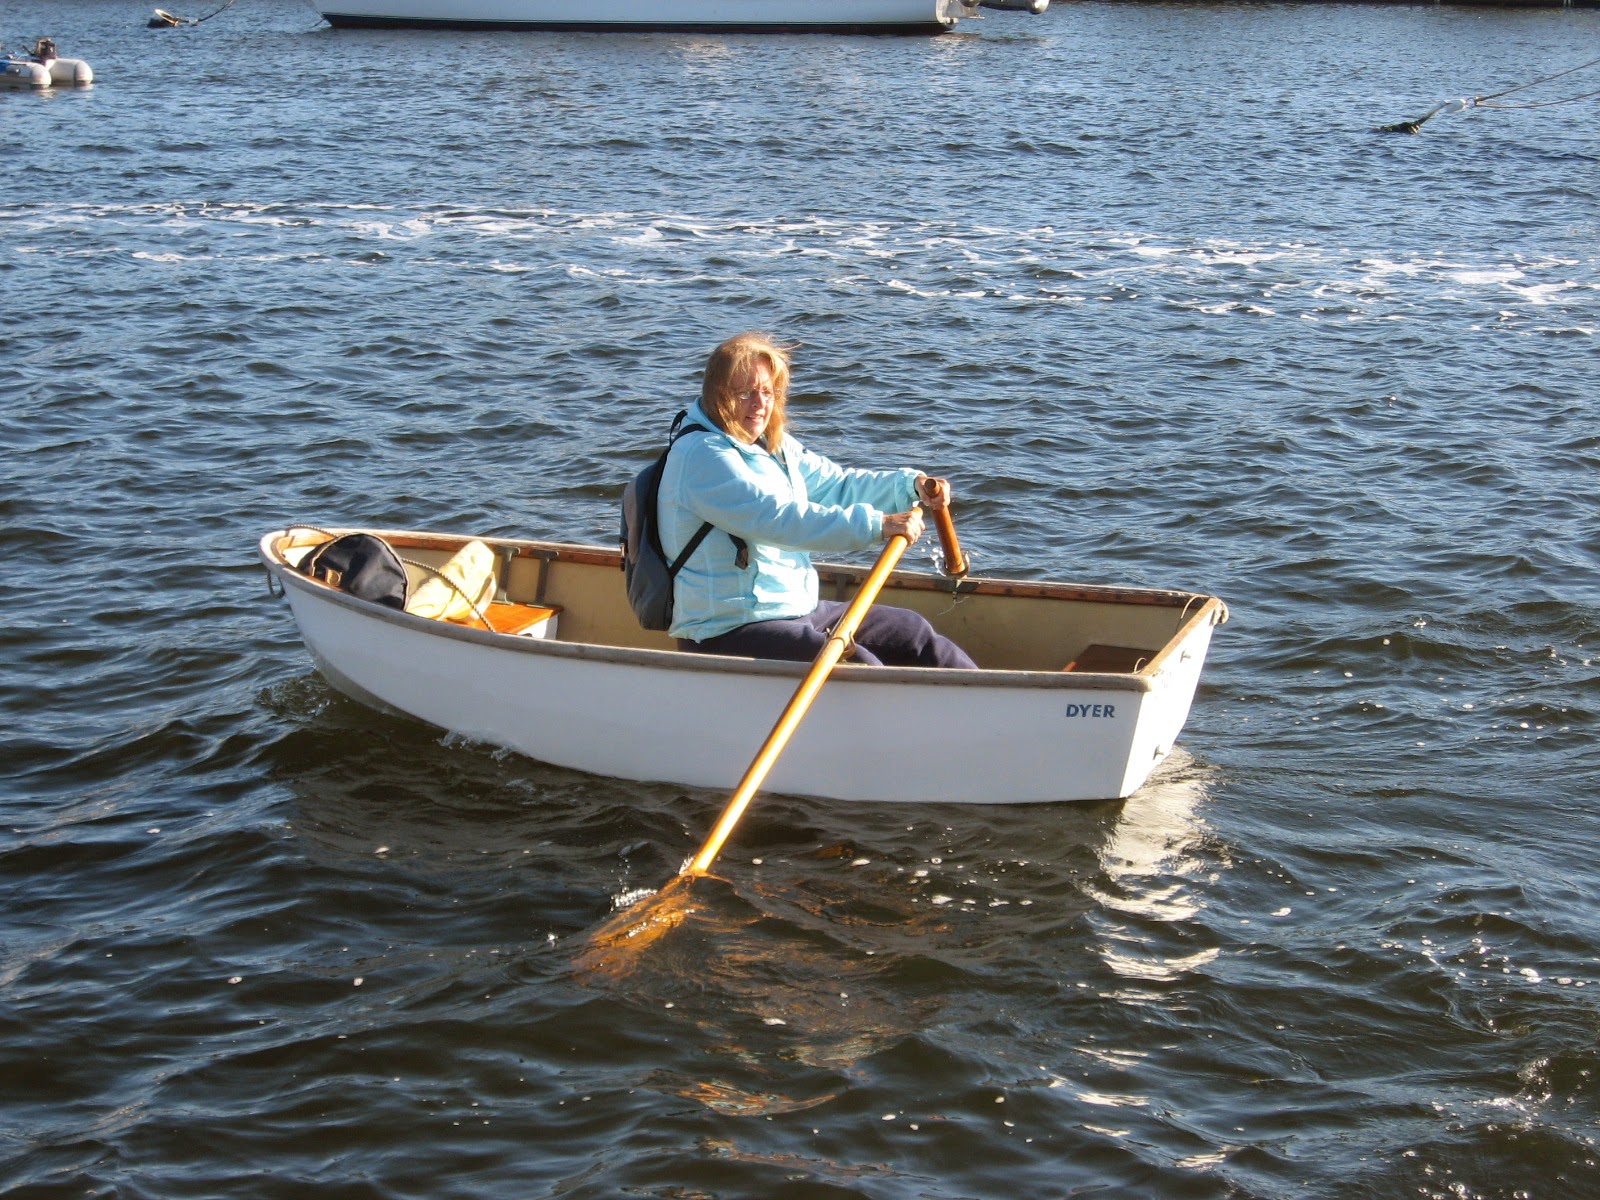
Boo Boo's Spars
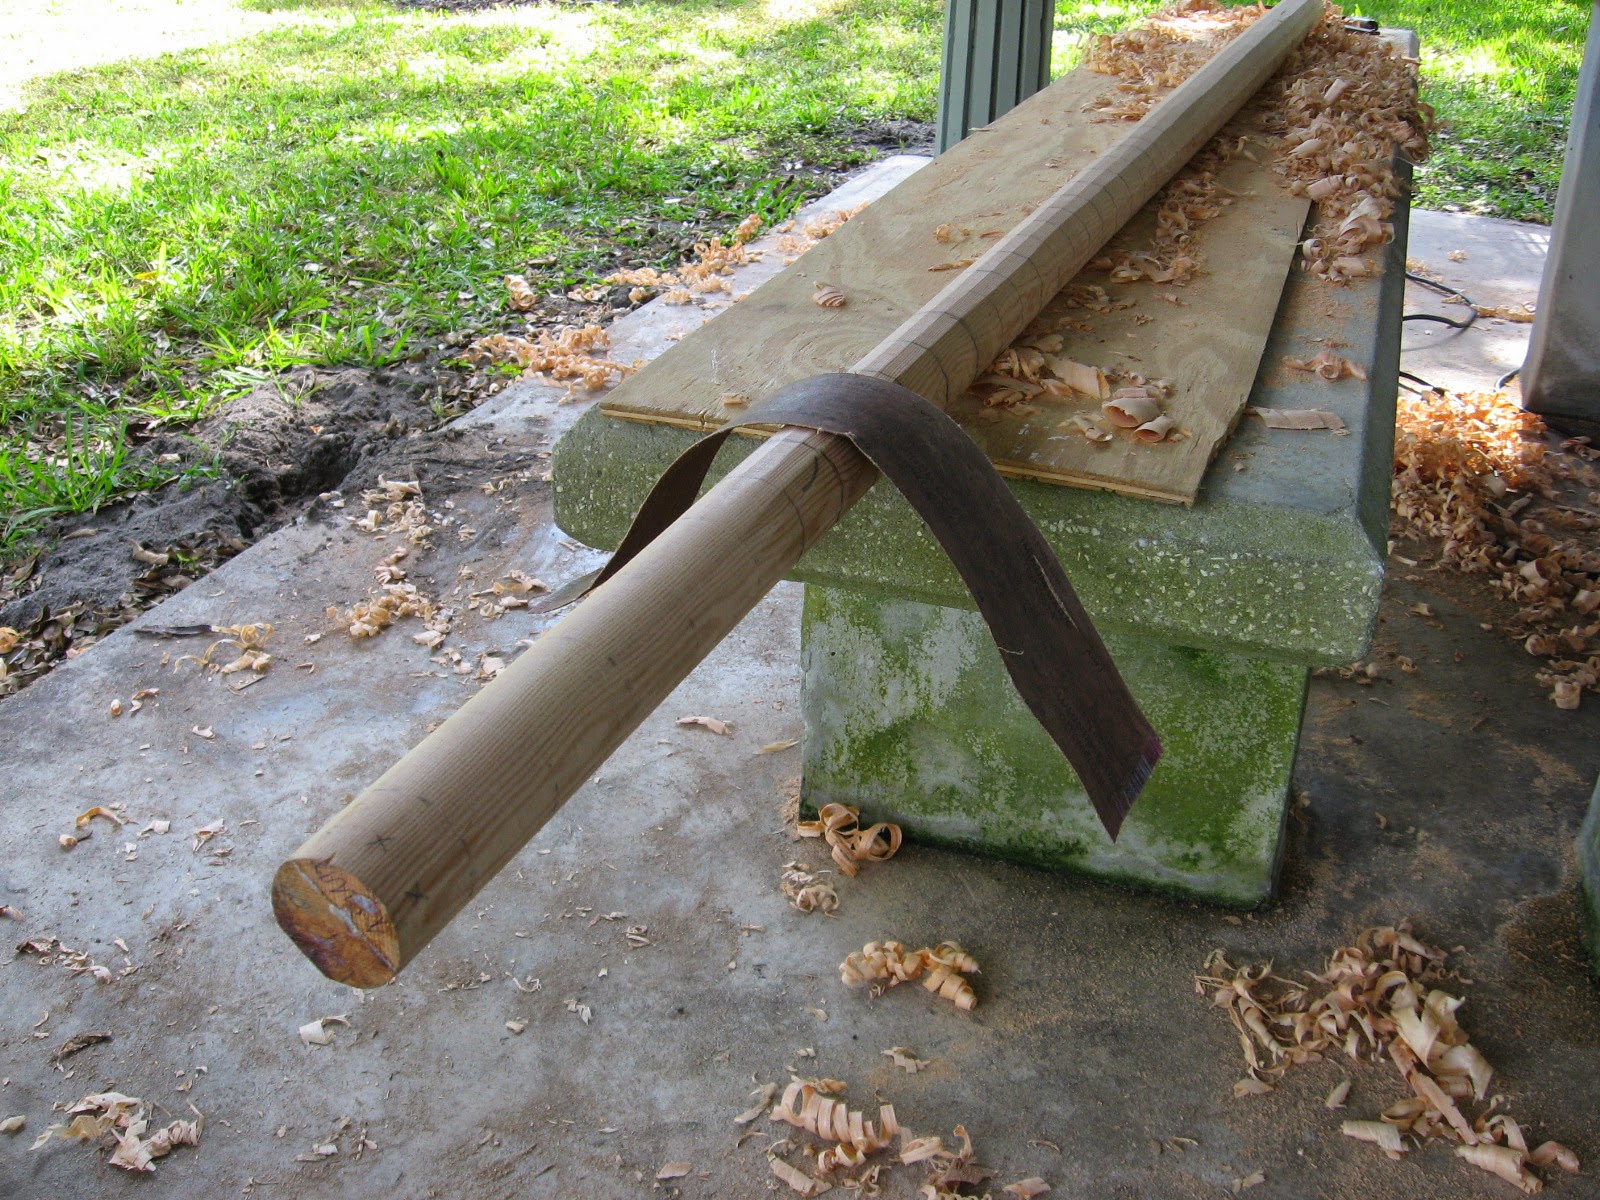
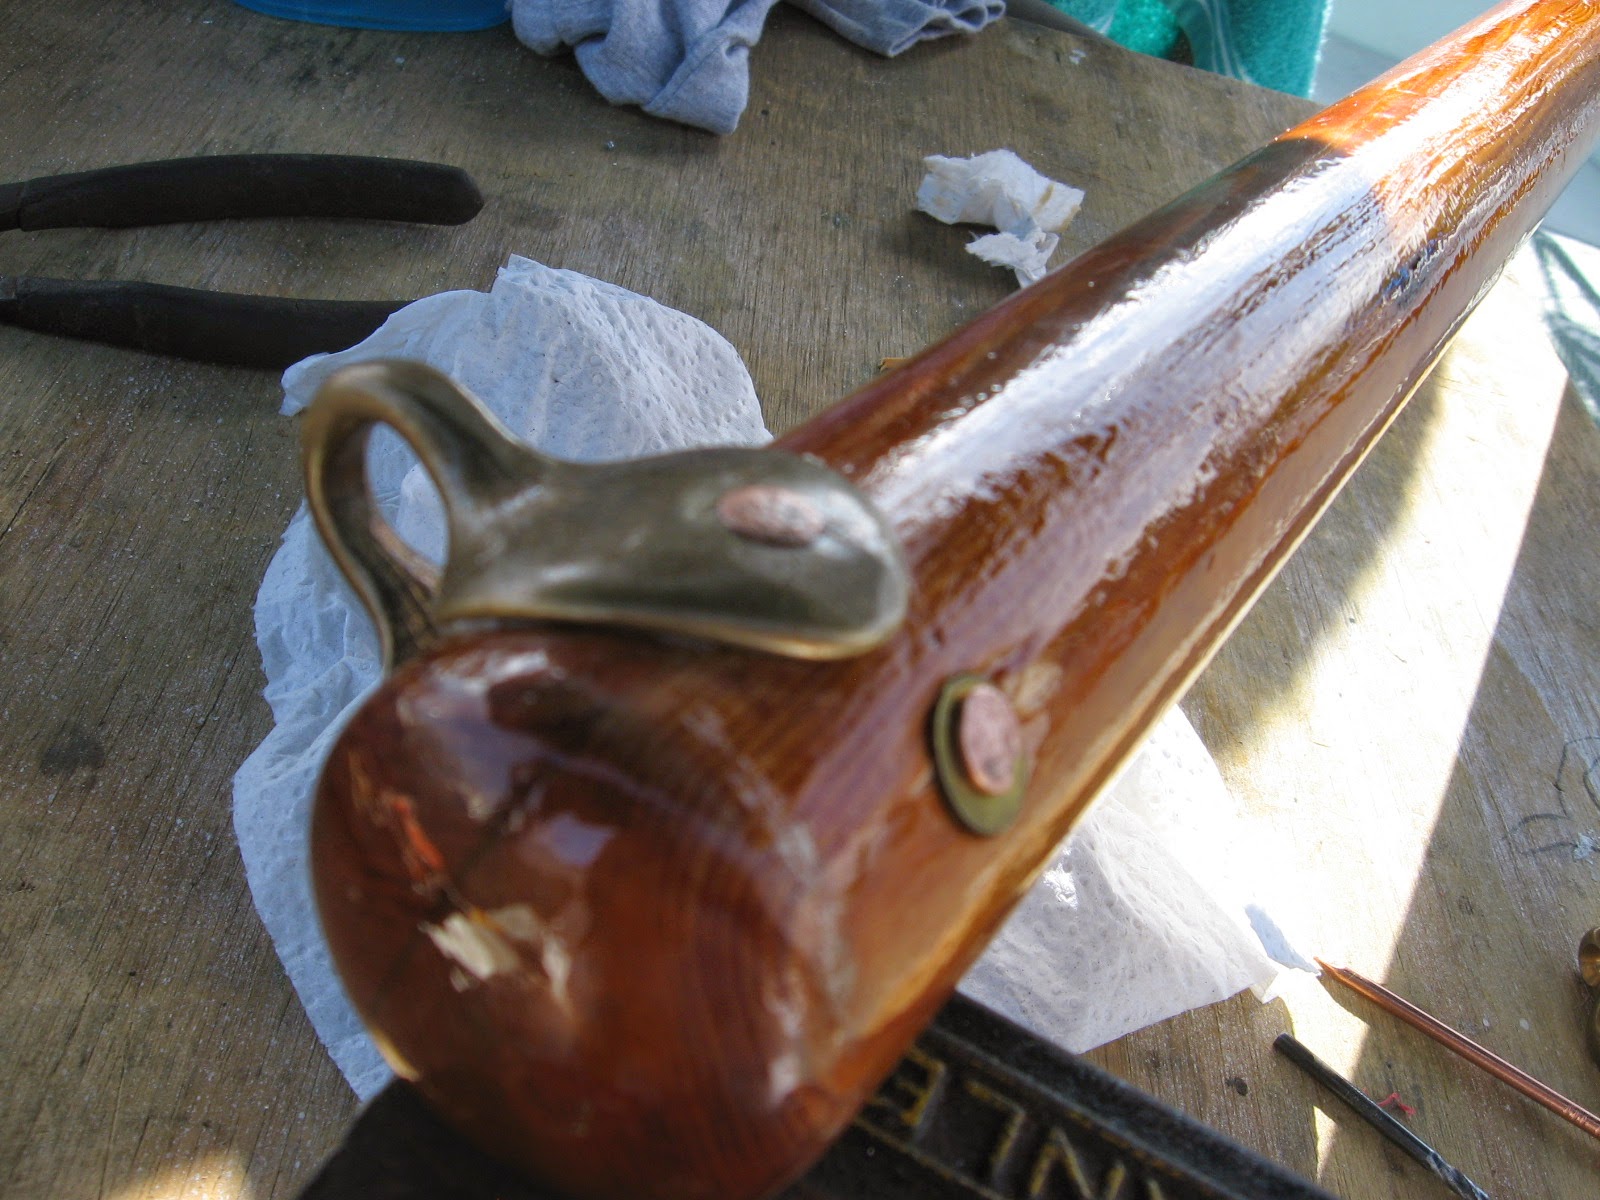
In which Ken of s/v Painkiller constructs spars for a Dyer dinghy on a park picnic table, using only hand tools...
All I want for Christmas is a Dyer sailing dingy, I said out loud half in jest to a friend at the marina, he got on his phone and I heard him say, "you still have that Dyer dingy for sale, how much? He looked at me and said $300 about 4 miles from here. I told Vicky and off we all went. A 1991 Dyer Midget sailing dingy minus the lower mast section, the boom and sail and oar locks. It came with the upper yard (to the mast), the complete rudder, daggerboard and a set of oars. I snatched it.
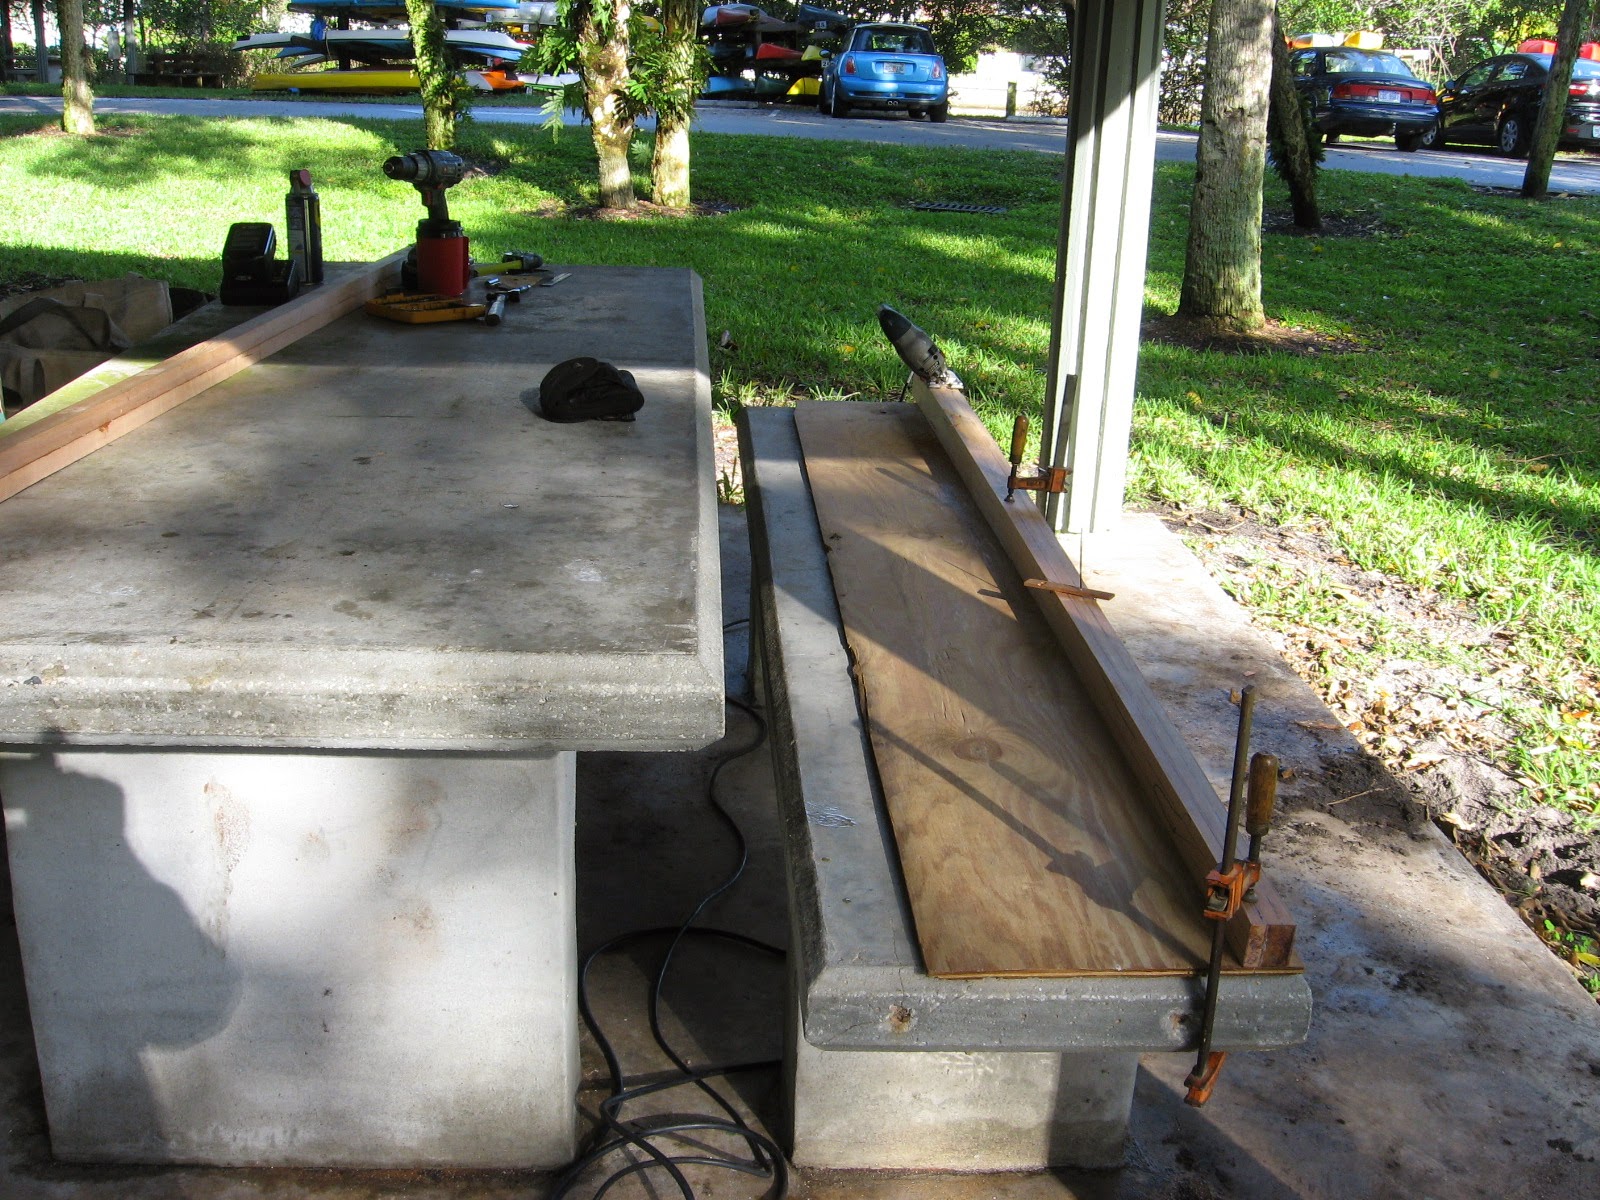
Once I glued up some straight grained fir that I bought at the local lumber store I brought it to shore to my makeshift shop, the concert picnic table behind the cruisers lounge and laundry. After squaring up the stock for the round mast with hand planes I drew out a taper for the upper two thirds of the mast.
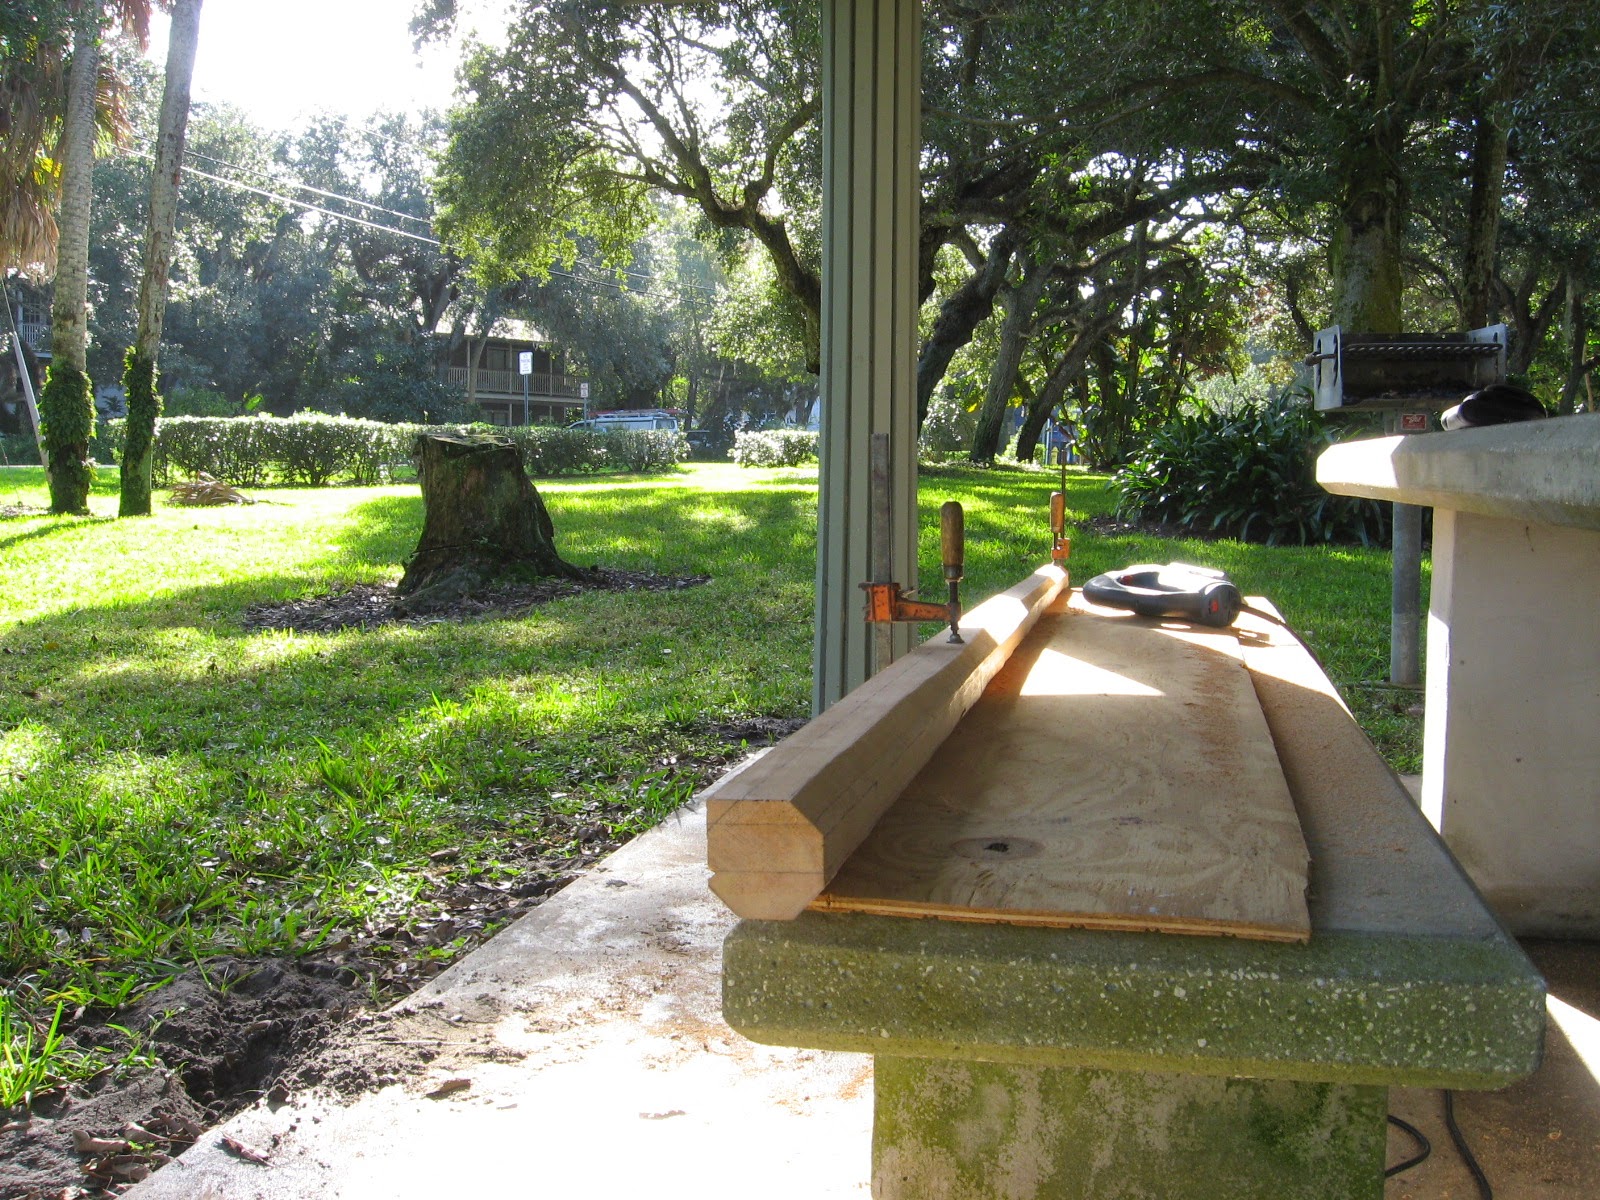
With this very crude but simple jig I was able to draw lines that tapered the "square" to the desired top dimension, 1 3/4". The base is 2 1/2"
Next is to cut the corners off, making 8 sides to the spar staying away from the lines. It was very tough using a jig saw for this operation, but a man's got to use as best he can what a man "has" to use.
Certainly not the greatest bench, but enough. The scenery was excellent and the distractions from cruisers were many, but I got by.
I then carefully planed all eight sides to an even width right to the lines. This gave me the taper I wanted and much closer to the "round" I wanted. I'm sure I could have come up with a way to draw lines on all eight sides again for a perfect 16 sided spar but I chose to knock down the 8 high spots by eyeball with the hand plane.
It was definitely close enough with 16 sides to dig right in with the truly grunt hand work, sanding against the grain with a cut opened belt sander pad. I think it was 50 grit.
Then of course some proper sanding down with the grain to bring to finish.
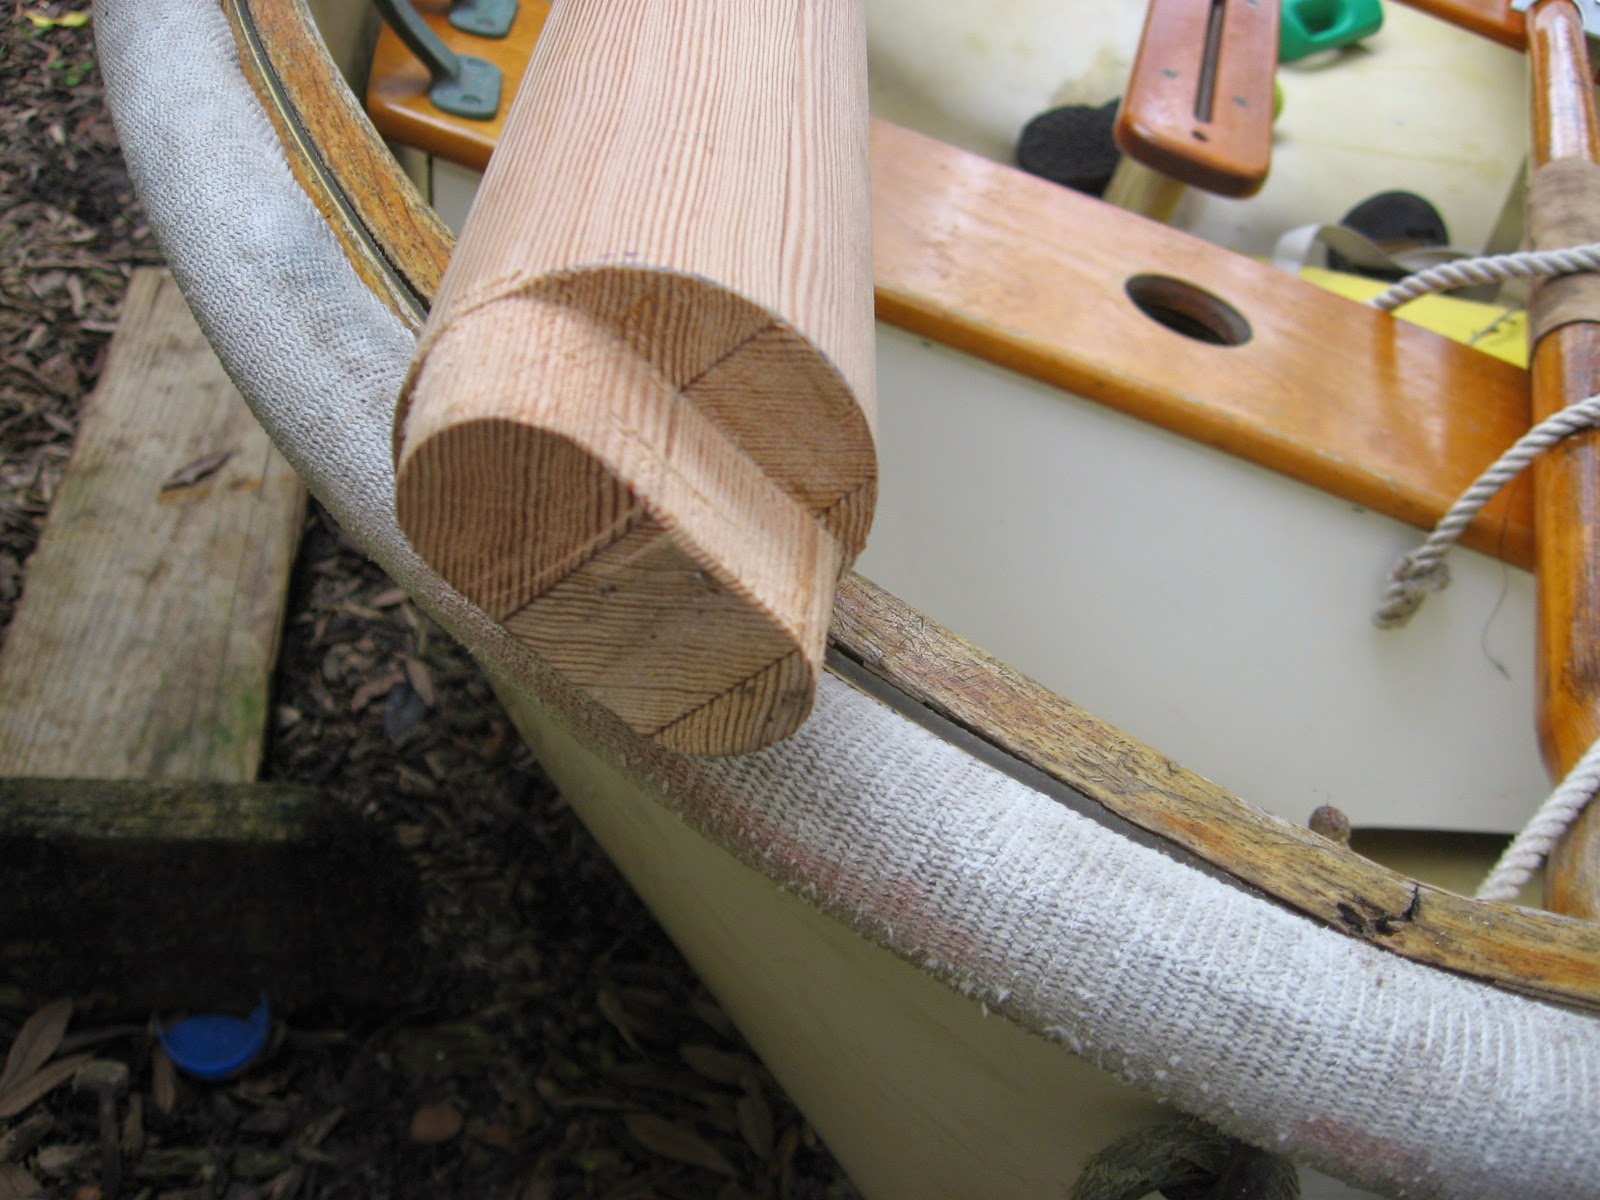
With the fitting and shaping of the mast step I was ready to move onto the rectangular boom.
My crude but effective set up to use a round-over bit for the boom and an evening beverage for a good day work.
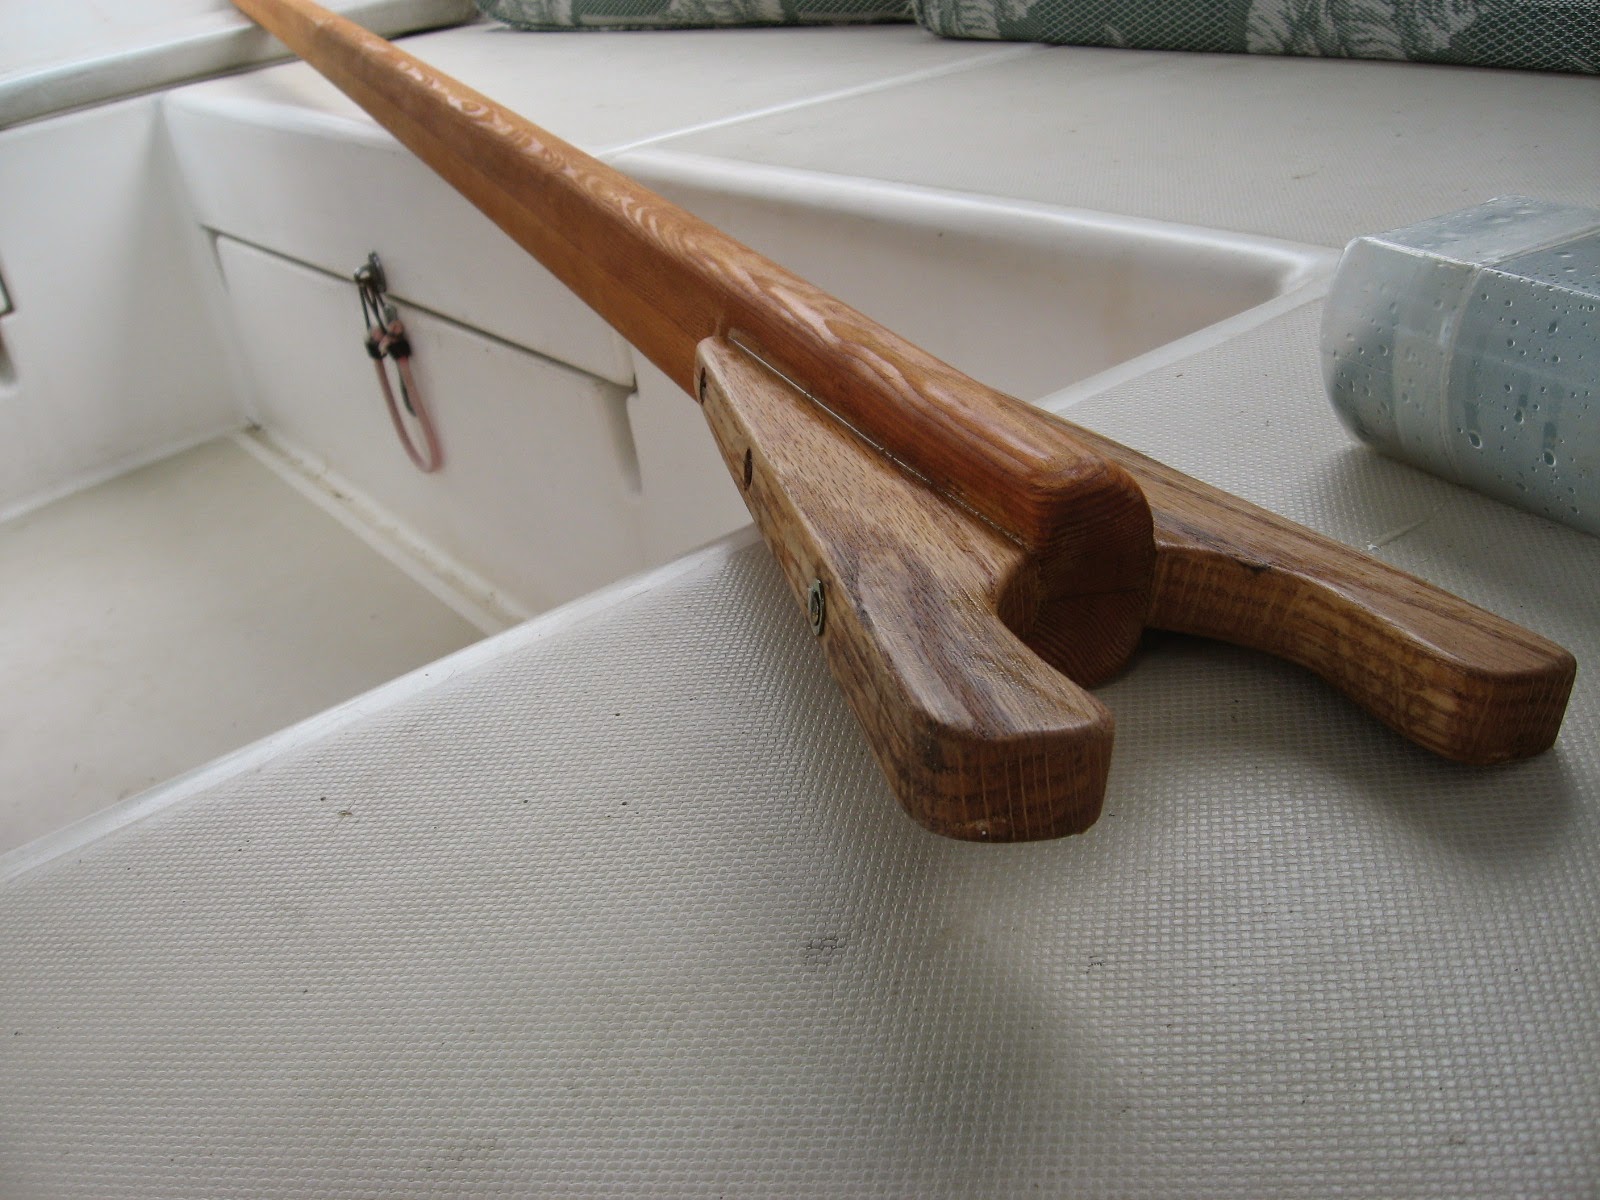
The oak jaws on the boom were pretty straight forward other than I had riveted the end prior to getting the bronze fitting, which is held in place with nothing "but" the rivet, so I had to re-rivet twice.
Prettying it up with the leather work and we are just about done. I also made a couple of teak cleats for the mast and boom, threw on a few coats of varnish ...
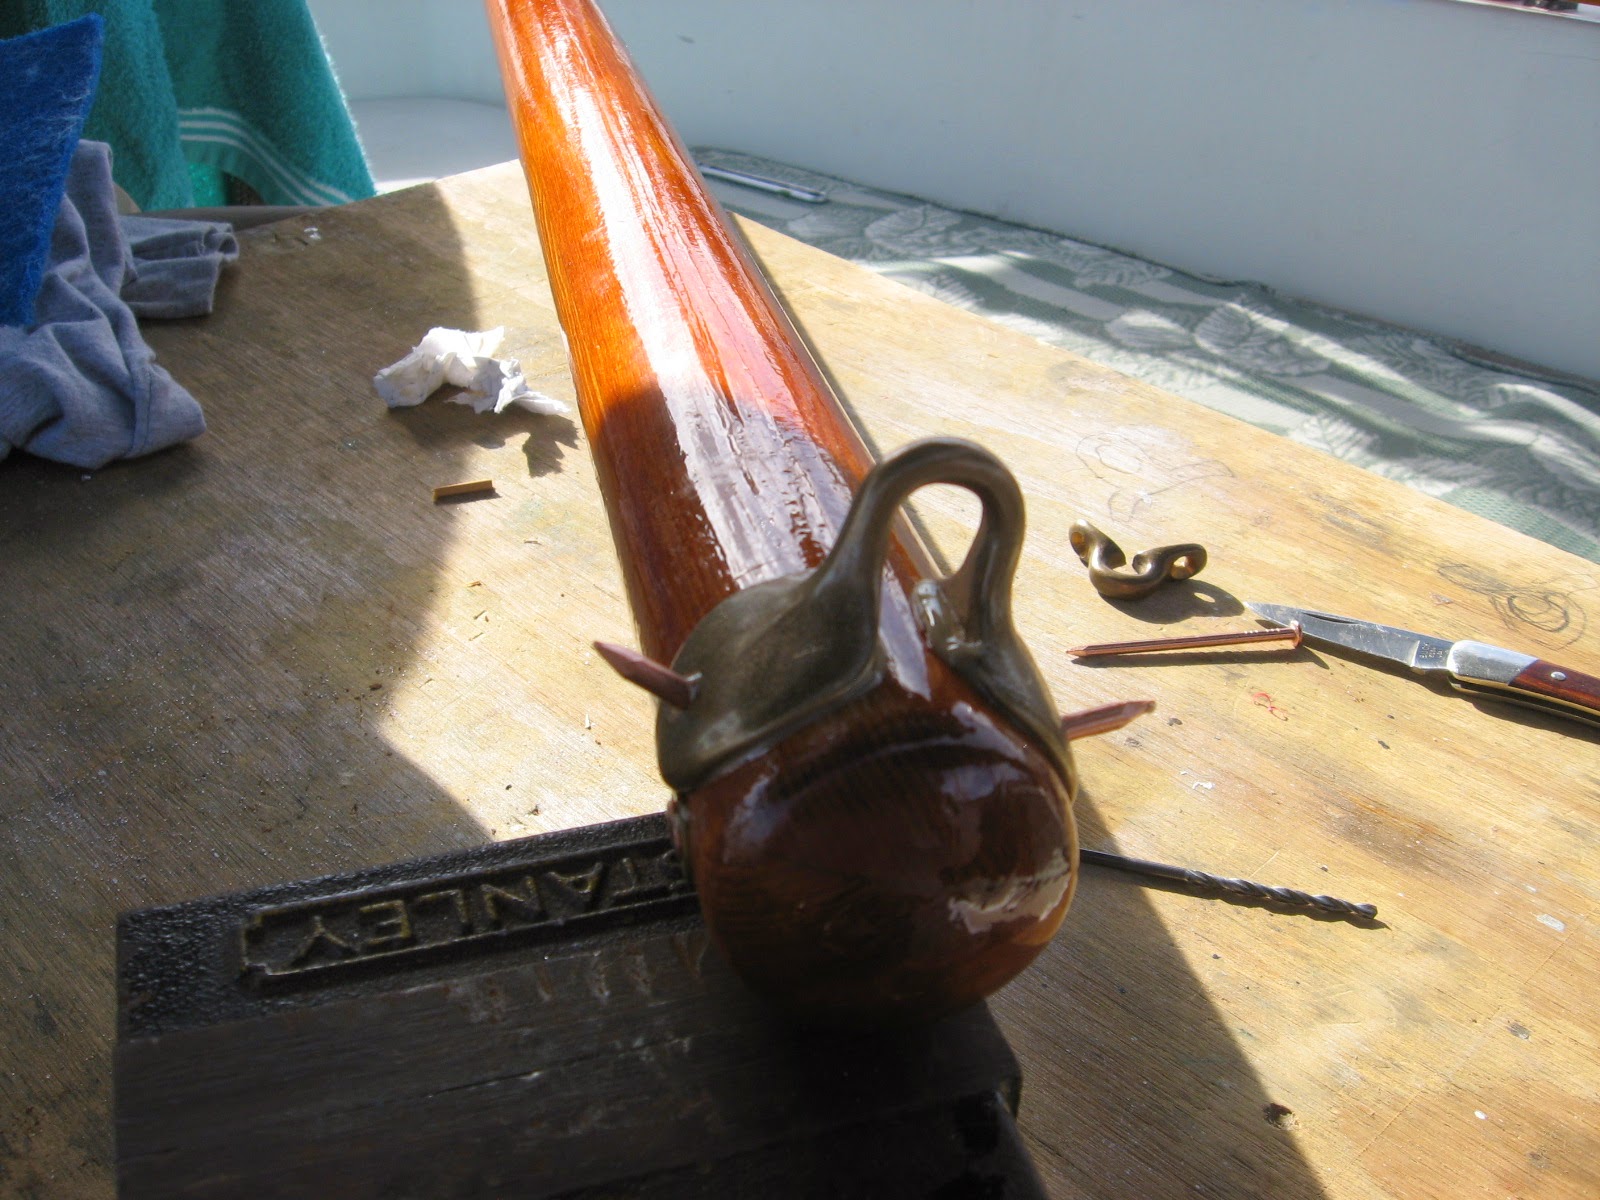
... spliced some rope work to complete the running rigging. I had bought a new sail from Dyer along with the proper bronze fittings I was missing, but they sent me the wrong part which caused a very long delay leaving me frustrated not being able to set the sail.
The parts finally came in and I hurried to rivet on the yard hook strap eye with the two inch copper nails.
Christmas came very late for me this past year but worth every minute I had to build the missing parts.


Tuesday, January 20, 2015
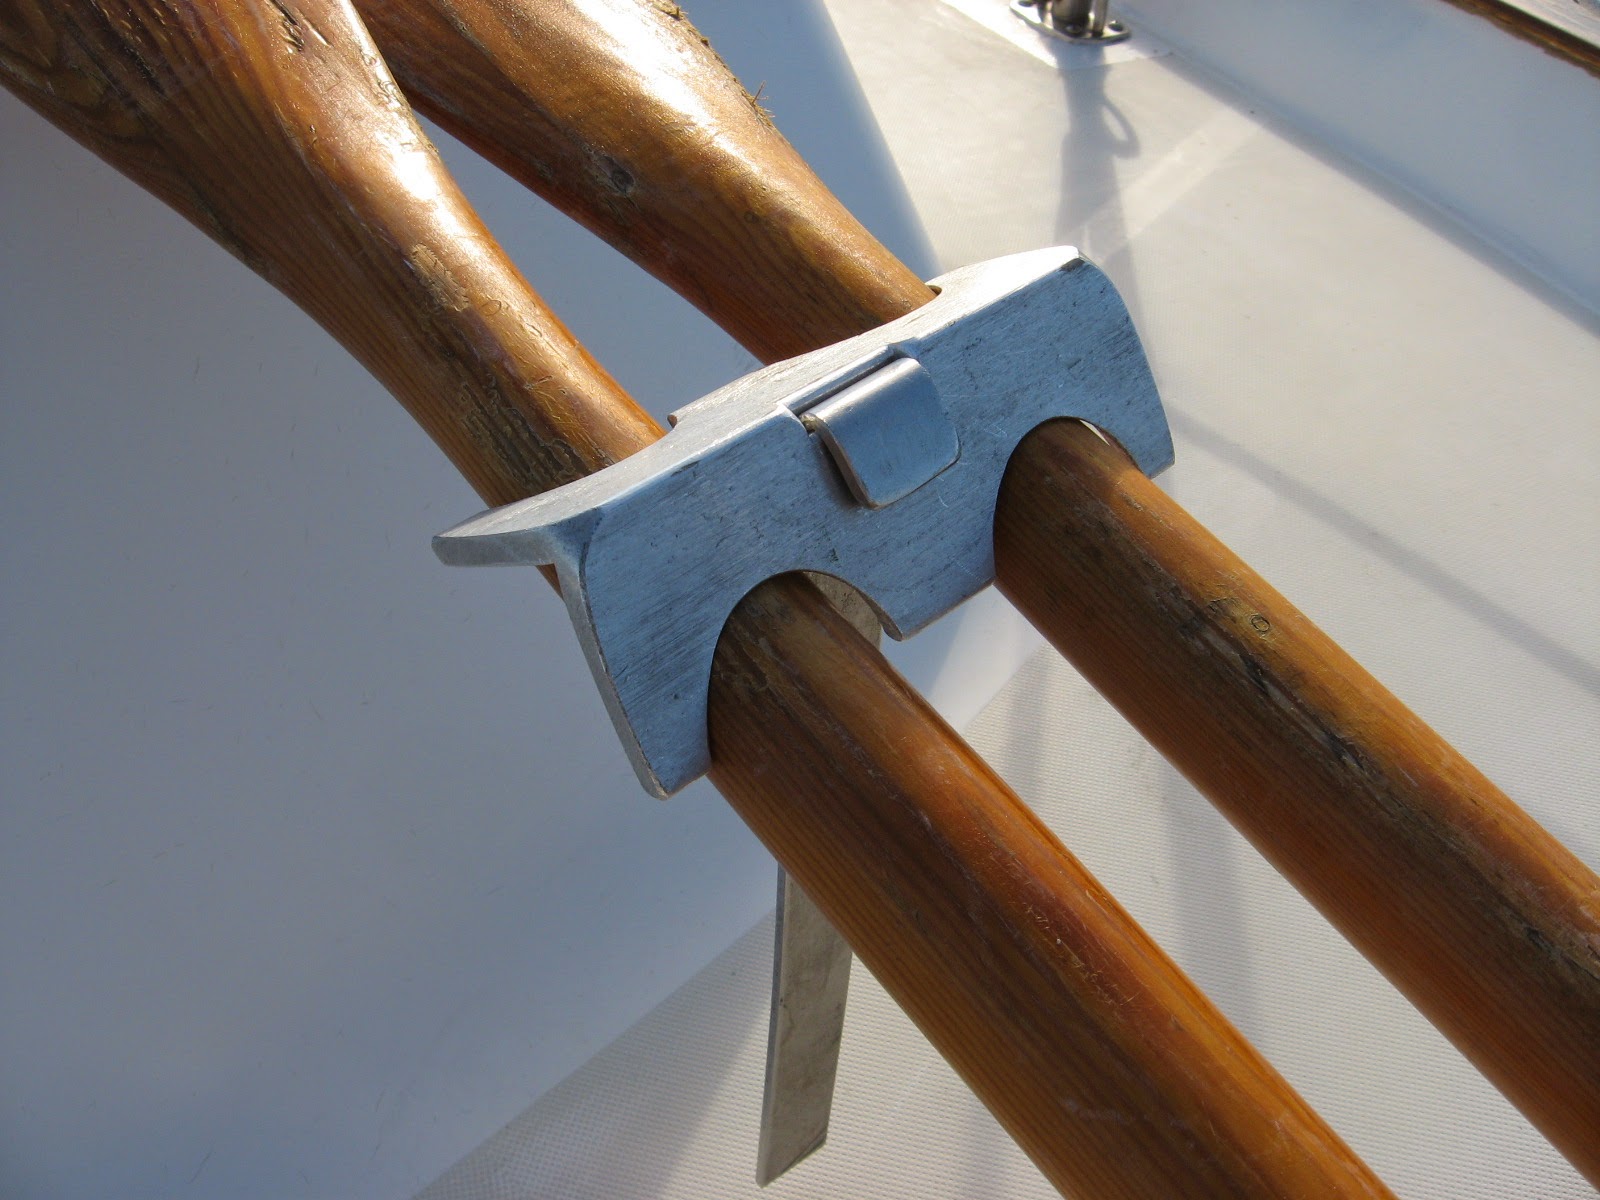
Oar locks
No, not the bronze things that the oars rest in on the thwarts... Over on s/v Painkiller Ken has been very busy. What I've included here is only part of his original post - you should go see it. Here Ken makes a device to ensure that his oars do not go astray while he is away...
Need to secure the oars from theft so I went on to build a home made version of Edsons oar clamps that cost a wee too much money.
I think this lock is going to be down right pretty when it's set on the thwart of that Dyer. Below is the the new future mast and boom to said Dyer dingy because .....I have a few things in the kettle these days.


Tuesday, December 16, 2014
Chap Chap Dinghy Chap
Dinghies in the tropics are subjected to the full force of the sun's destructive UV in a way that those of us up north can barely comprehend. Even the most expensive Hypalon is corrupted by the sun. What to do?
Valerie & Laurent, aboard s/v Letitgo (currently enroute from Ecuador to the Marquesas), addressed the issue by making "chaps" of sunbrella that cover the dinghy's tubes... not an easy task, but well worthwhile!
Valerie & Laurent, aboard s/v Letitgo (currently enroute from Ecuador to the Marquesas), addressed the issue by making "chaps" of sunbrella that cover the dinghy's tubes... not an easy task, but well worthwhile!
The last four days have kept us pretty busy; a dinghy chap is not an easy sewing project and was on our list for a while. Indeed, the shape is complex with all the curves add to that the handles it definitely needs a minimum of precision to achieve something that looks half descent. The pattern had been done while we were in Panama, along with the purchase of the fabric, so we were ready. In the end, we are still talking to each other, I (Valerie) have gained even more confidence in my sewing machine and learnt a few tricks of the trade and that’s all thanks to Mum who gave me many memories to cherish and new knowledge. As for the guys they kept clear at all times from the working area and provided us with delicious and nutritious lunches every day! Thank you for that too.
We won’t be the ugliest dinghy on the dock or surfing the wave anymore!


Tuesday, September 24, 2013
Dinghy Dalliance Digest
Today, in his inimitable style, Brian talks to us about dinghies and philosophy from Dock Six...
"Everybody's got a story..."
-Amanda Marshall
If you can click past the endless played-out cat memes, genealogy sites, facebook, and you don't get sucked into YouTube for hours on end, you discover that there are actually some interesting places to visit out there in the WorldWideWeb. Like one I stumbled over recently, Humans of New York .
The concept is genius. It's nothing more, and nothing less, than stripped-down photojournalism: One man, one city, one camera, one subject, one interview, one question, one story, repeat. Every day.
One interview struck home with me last week.
"I’m a philosophy professor."
"If you could give one piece of advice to a large group of people, what would it be?"
"Never make an exception of yourself."
"What does that mean?"
"People like to make exceptions of themselves. They hold other people to moral codes that they aren’t willing to follow themselves. For example, people tend to think that if they tell a lie, it’s because it was absolutely necessary. But if someone else tells a lie, it means they’re dishonest. So never make an exception of yourself. If you're a thief, don't complain about being robbed.
Guilty.
I have made an exception of myself.
Boat projects, even small boat projects, are usually labour-intensive. Because I have done a bunch of them, and because I am more than happy to share my opinion (solicited or otherwise), fellow boaters occasionally ask how to do something...
...before I am able to tell them how to do it anyway.
Usually, halfway through explaining, for example, that the only way to finish brightwork is a multi-coat repeatedly sanded varnish schedule, the enquirer interjects, "Isn't there an easier, cheaper, quicker way to do it?"
Which earns my standard response, "If you haven't got the time or money to do it right, when will you have the time and money to do it again?"
My inflatable adventures over the last couple of seasons demonstrate how I have made myself an exception.
Last year, Quack needed a floor. So, I quickly laminated some ply, slapped some epoxy on the exposed on all the surfaces, sloshed some varnish over it, screwed it in place, and, as the french say, Vwuh-Lah, I had me a new floor.
Five months later, I needed another new floor:
So, I spent the time and the money to do it...again.
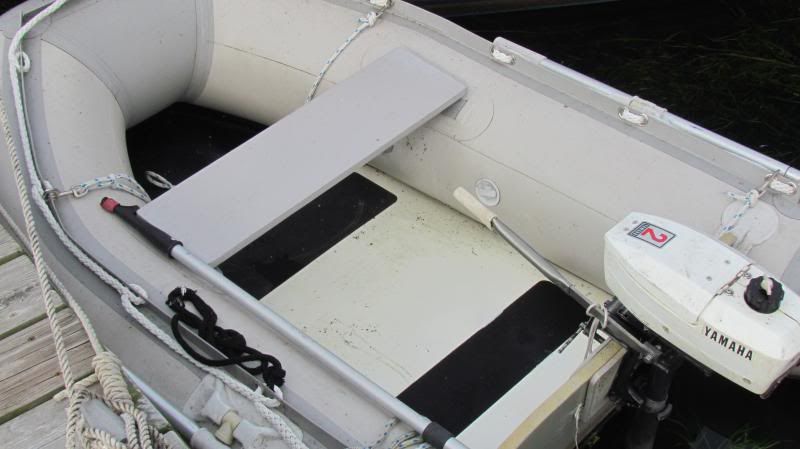
I figured out that part of the issue was that the floor was screwed into place, an issue created because I was determined to work with scraps on hand. For Floor 2.0, I decided to make a full floor that would be freefloating, heldp in place by the tubes. So I measured, and cut, and sheathed it in fiberglass cloth and wetted it out and filled it...
.....and sealed the edges with thickened epoxy and sanded it, and then painted it and painted it and painted it again, applied a couple of big swaths of grip-tape and I had...
...a durable and practical floor.
Next item on the punchlist was a tiller extension for Quack's doughty little outboard.
I repurposed a piece of scrap aluminum tube, formed the ends to fit the flat stock tiller, drilled and riveted the new extension into place, and ...
It works great, and allows stand-up piloting, very nice when one has a load of dogs and water jugs.
So, one dinghy, two projects, two successes. What of the newest member of the growing fleet?
This demonic deflating dinghy is proving to be my Moriarty.
Look at her up there! Plump. Firm. Ready for action, no?
Hours later:
Not Honk's fault, really. I have no one and no boat to blame for my making an exception of myself.
See, I found the leak.
And I patched it.
With a patch that was too small.
Unable to withstand the pressure, the patch leaked.
So, I patched the patch.
The patched patch leaked.
So I slathered it in sealant and covered it in duct tape for a few hours and pulled off the tape and...
...It leaked.
So I tore off the patch over the patch and then tore off the original patch and sanded and cleaned and repatched...
...and instead of waiting the necessary 24 hours for the patch to fully cure and harden, I reinflated to full pressure after 6 hours.
And it leaked.
So I deflated the offending chamber, slathered sealant on, covered it in duct tape, let it cure for 24 hours, uncovered it, reinflated and ...
It looks like hell and it leaks, albeit more slowly.
The patch is still too small, and the adhesive area inadequate.
(Small and inadequate- welcome to the story of my life.)
Tomorrow I will have to make the time and find the money to do it again.
This time, it is obvious I need to pull the "Zodiac" label off the tube, as the leak is actually a previously patched puncture just off the lower right corner of the label that was inadequately patched originally. With a bigger patch, a properly prepared surface, the patch firmly affixed to the tube with no air bubbles, longer cure time for the adhesive, and no inflation until fully cured, I expect that I will have an inflatable that remains inflated.
Hopefully.
So, have I learned anything from being exceptional?
Yep.
I am not special. I don't get any luckier than anyone else. If there aren't shortcuts for anyone else, I don't have a Thruway either.
And I guarandamntee I will be tempted, repeatedly, in the future to make an exception of myself.
Once in a while, I will likely give in.
You'll probably hear about it.


Tuesday, August 27, 2013
New "Low-Buck" Project Boat
Over at Dock Six, Brian acquires yet another project, which he describes in his typically hilarious fashion:
I wasn't looking for another project.
We didn't need another dinghy.
We are, however, sailors, and that means that rationality and logic go out the window when opportunity beckons.
Rod, occasional crew, company and keeper of the Dock Six Upriver Annex:
Mentioned in passing that he had an old Zodiac that he wanted to get gone.
8' ish. Inflatable. Old.
"It leaks."
Not unheard of.
Inflatable dinghies are great boats- they are light, stable, and carry a big payload.
They are, however, as the name implies, full of air, and are only usable when inflated, and will only remain effective as long as aforementioned state of inflation lasts.
At some point in the boat's life it will develop an annoying habit of refusing to stay all full of air, preferring instead to slowly exhale it's contents, often from difficult to detect defects.
Which was, apparently the state in which Rod's red ride now reposed.
Making it the perfect candidate for another quixotic Dockside quest.
Meet the latest "Low-Buck" project, dubbed Honk:
Mostly complete, needing only a threaded air valve (the valve from our unused-in-two-seasons Airhead tube fit just fine) and a good cleaning.
It breaks down, rolls up and stuffs into it's own bag in a package small enough to stow in Whiskeyjack's quarterberth, and, with a total weight under 50 lbs., it is relatively easy to lug down the Dock and on the deck.
Right, then- let's see if this boat will float.
I opened the bag, unrolled the boat, slid in the floor slats, blew up the cocktail weenie seat and two flotation chambers, and in less than ten minutes had a floating boat.
After a quick scrub...
She looks good and smells good...
...with no easily detected sssssssssssssssssssssssssssssssssssssss sounds or bubble visuals to locate the latent leak.
Well, okay, no one said this was going to be easy.
As luck would have it a crew of crash test dummies was on hand to assist in testing. Hilary's daughter Sarah and her friends were enjoying the sun on the Dock, and happily agreed to seatest Honk.
I probably should have mentioned the "it leaks" part.
With Hilary towing Honk behind his C&C and I following behind as a photoboat we headed to the beach.
The test crew clambered aboard Honk and set out. I would occasionally yell for progress reports.
In retrospect, radio communication might have been more effective...
Me: "How's it going?"
The crew of Honk: "Yes, I am rowing!"
Me: "No!!! Is it leaking a lot?!!?"
TCoH: "Yeah, we know it's freakin' hot!!"
Me (to myself): " This is an exercise in frustration."
TCoH (to each other): "Can anybody figure out what the short fat guy is saying?"
Me: "Any hissing, or bubbles? Anything to see or hear?"
TCoH: "Sure, we'll row back for a beer!!!"
TCoH: "Hey, is this thing supposed to be getting softer?"
Okay, the bad news is, the leak remained undetected.
The good news is, we discovered that it tows fairly well, rows fairly badly, and can be deflated and stowed on the foredeck of Whiskeyjack while on the water.
Next episode of This Old Dinghy: Finding and sealing the leaks.
Stay tuned.


Subscribe to:
Posts (Atom)


