Showing posts with label s/v Janna. Show all posts

Thursday, December 12, 2013

Closet refurbishing

Out there aboard s/v Jana, Janna tackles refurbishing one of the closets.  It's a bigger job than you might expect...
We are back in the working mode, getting up at dawn (round 6 am) and going to bed soon after 9 pm, exhausted but happy. We sleep so soundly these days, that often we don’t even hear the raindrops pounding on our deck. We sand, we glue, we paint and Janna slowly but surely undergoes a cosmetic metamorphosis. It’s amazing what a huge difference a paintbrush and a tin of paint can make.

satnik1
satnik2


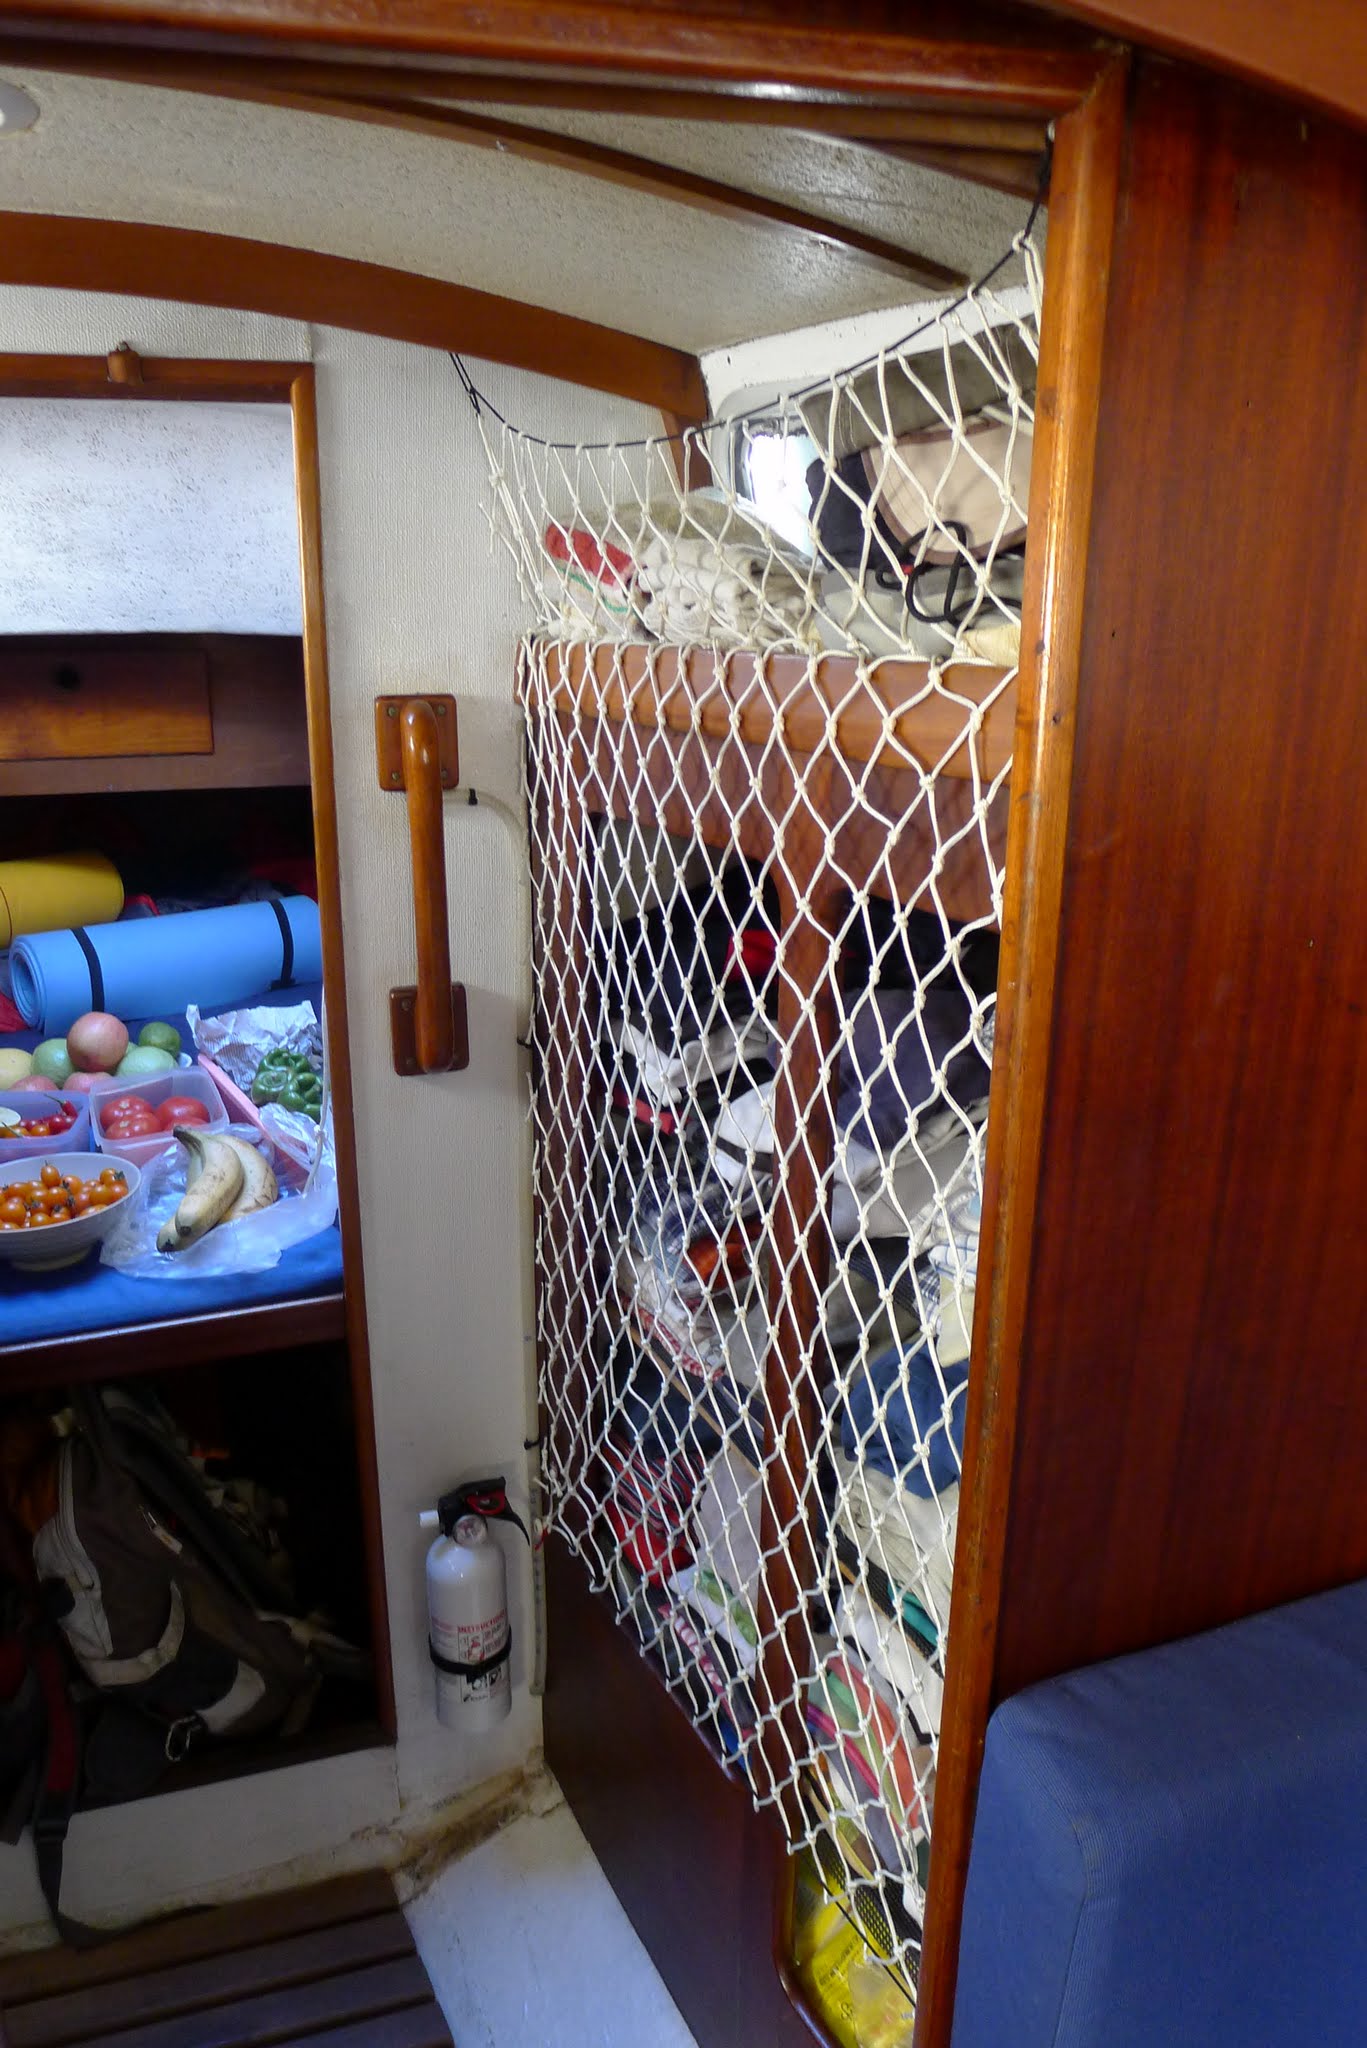
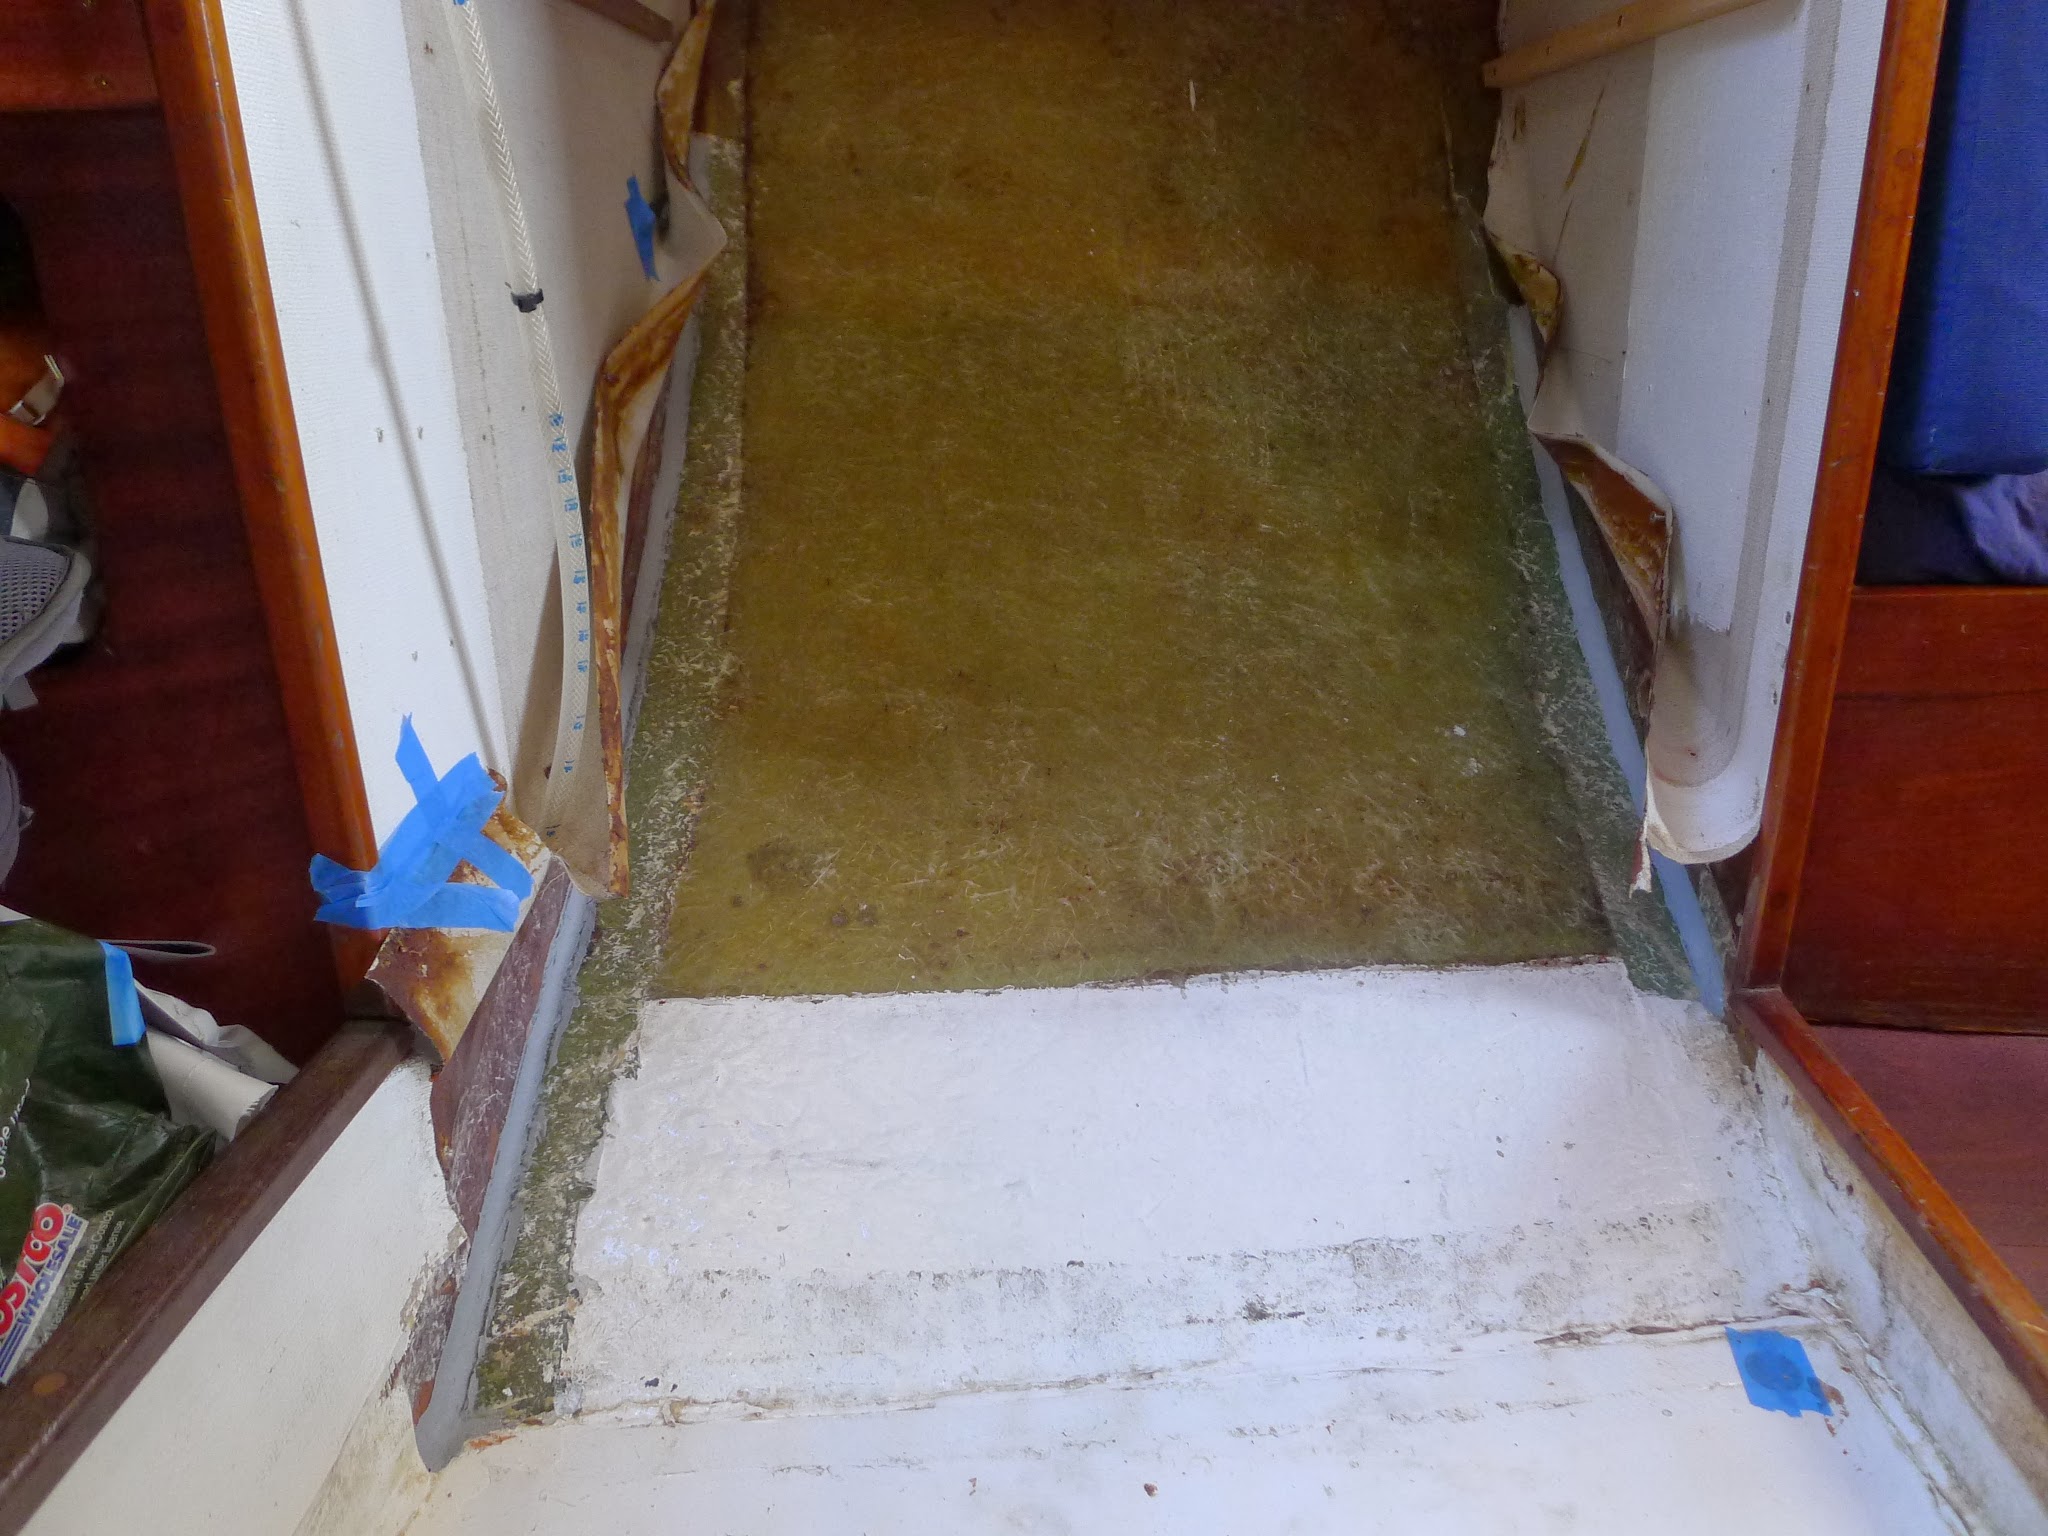
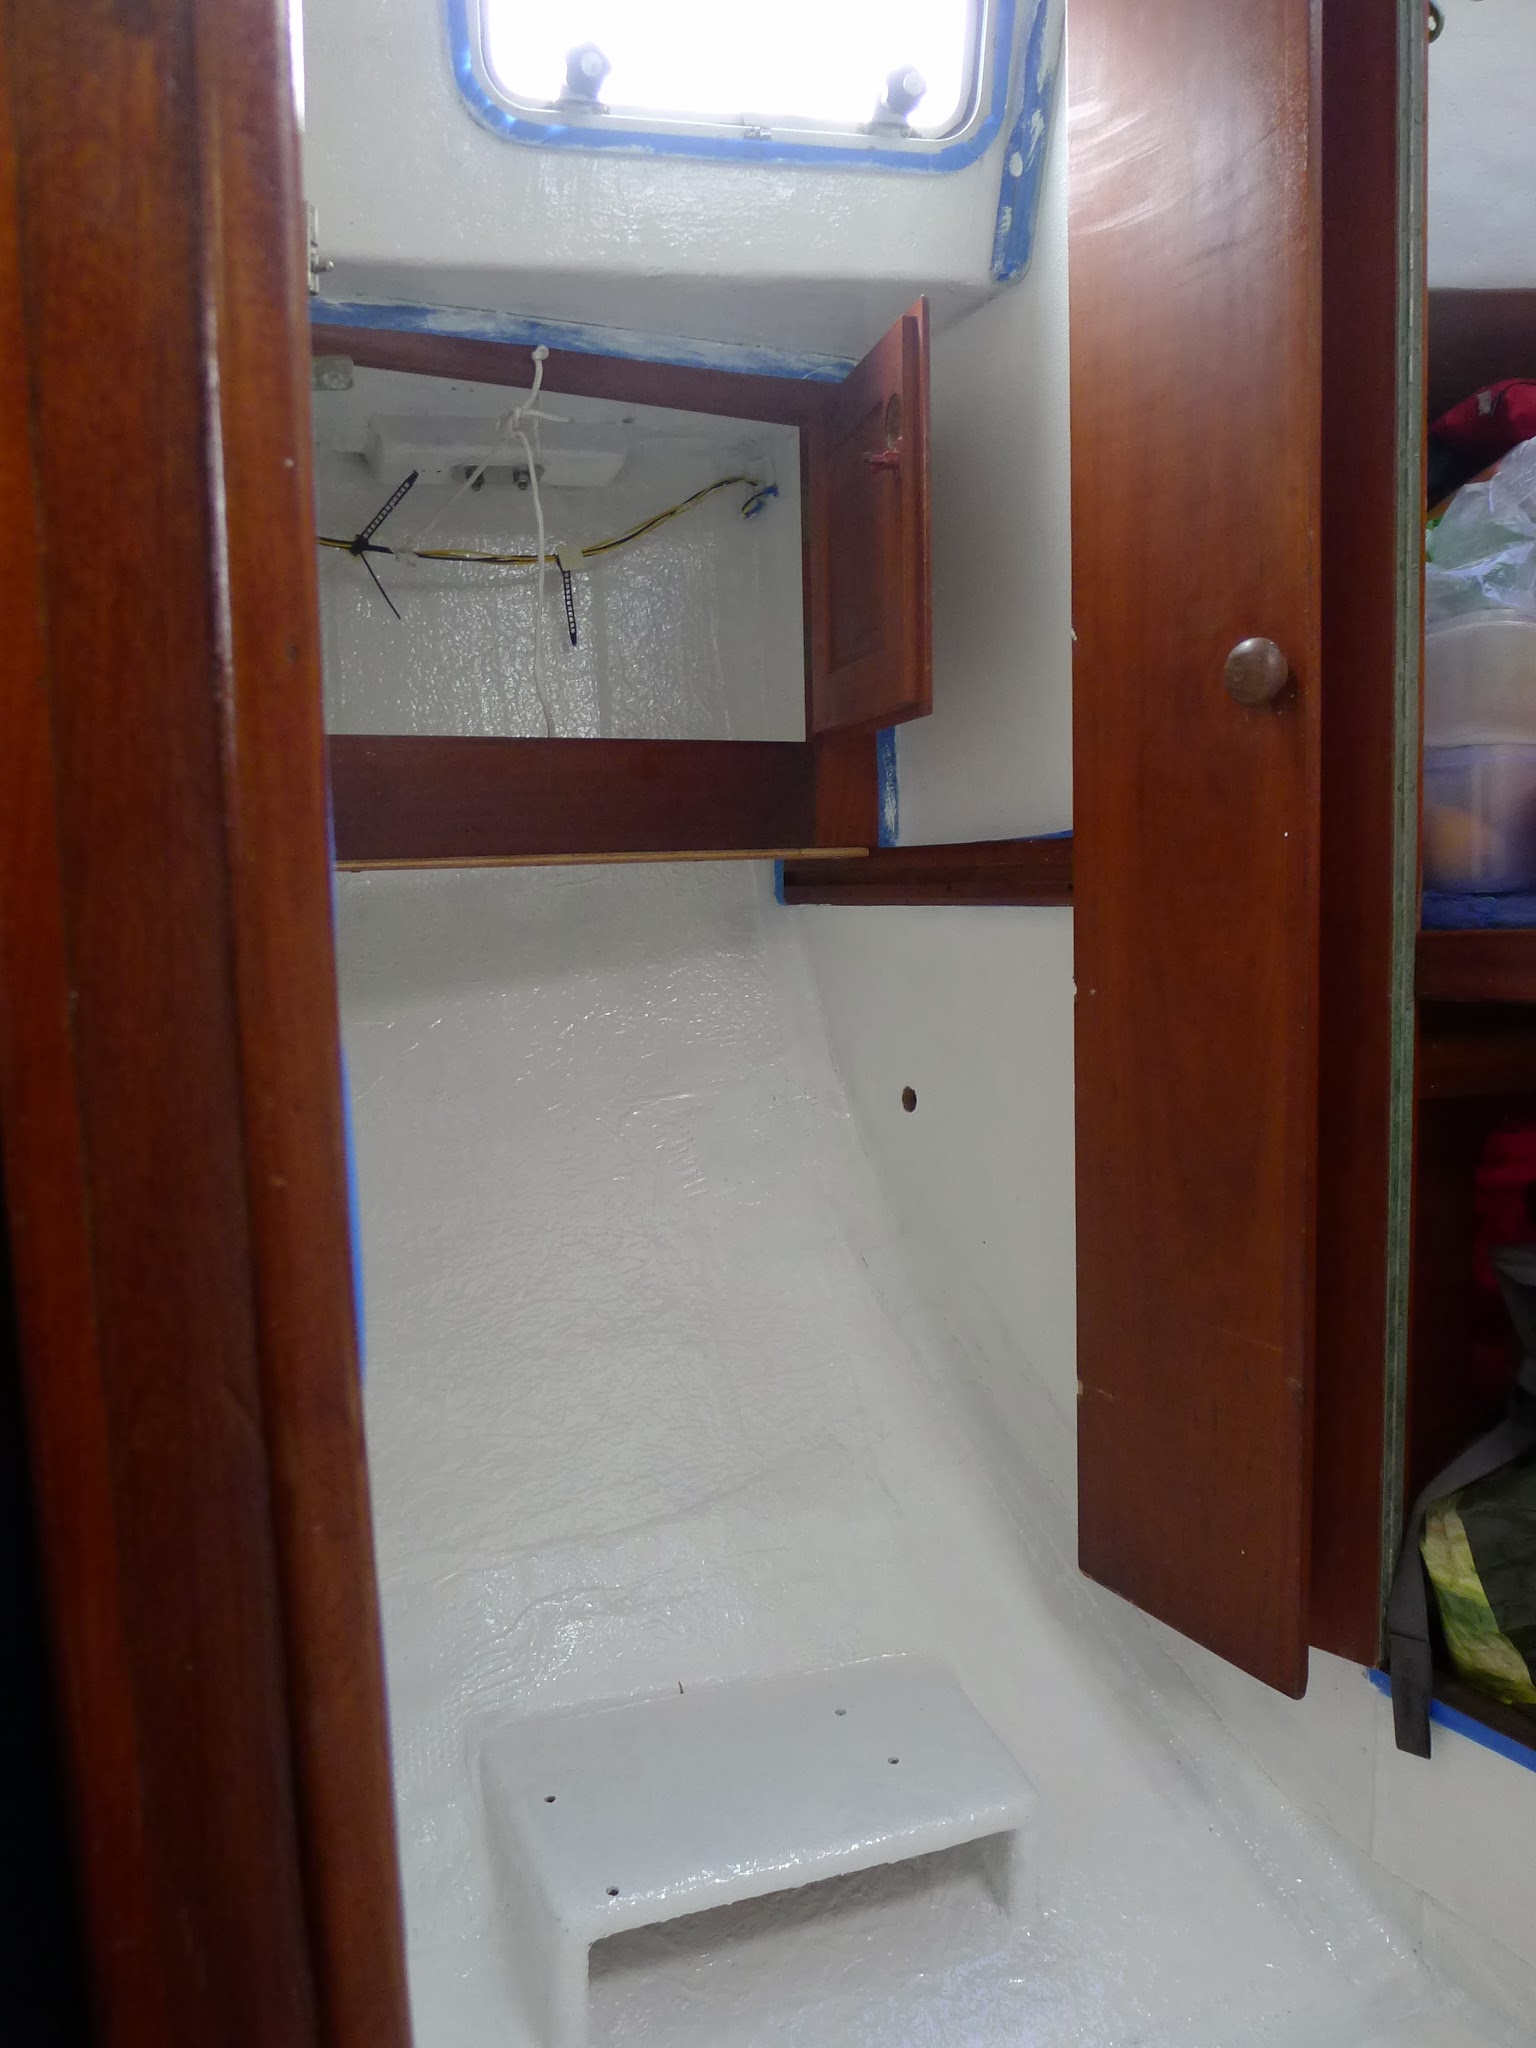
After the successful painting project in the V-berth area, we decided to continue with the “closet”. First of all we moved all our cloths and other stuff stored in the previous head area on the V-berth, disassembled the closet shelves and unscrewed all the other components like handrails, fire extinguisher etc. Sounds easy enough, but only this part took me the whole afternoon.

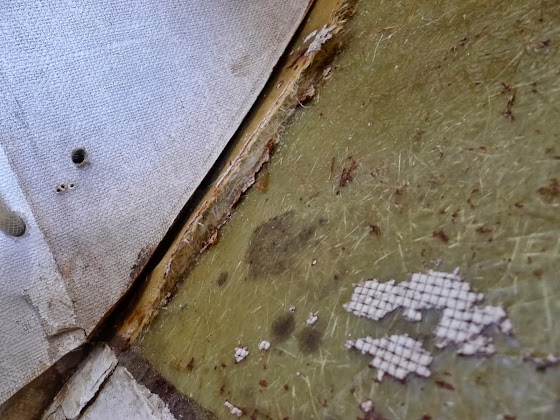
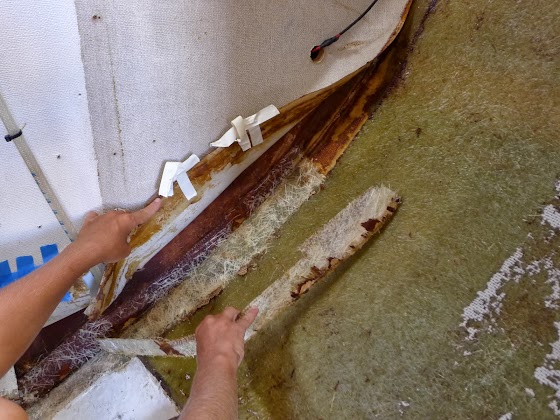
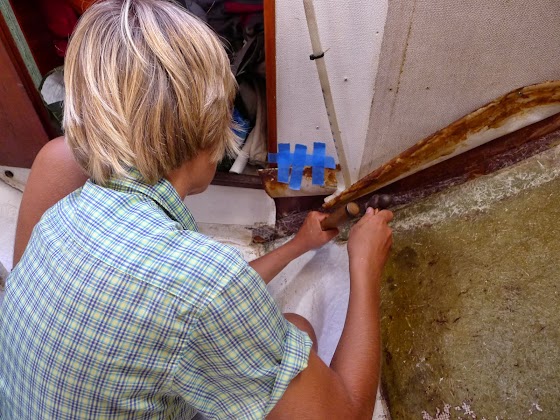
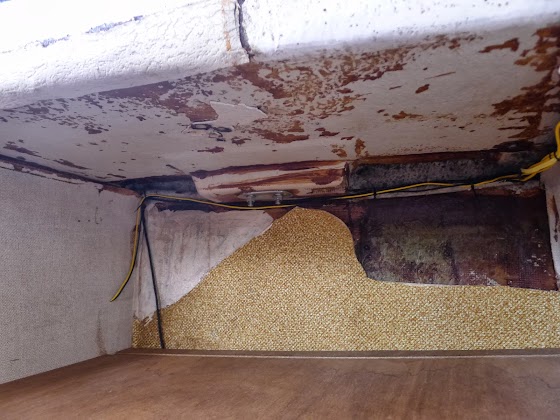
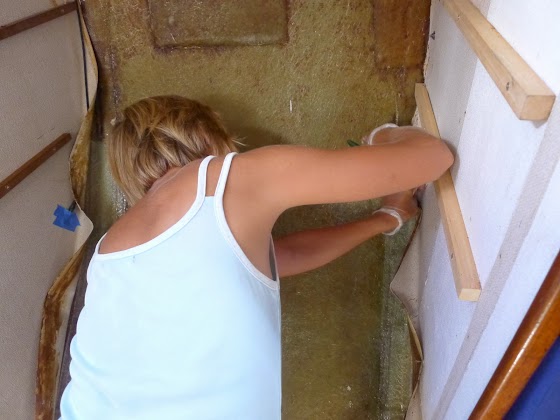
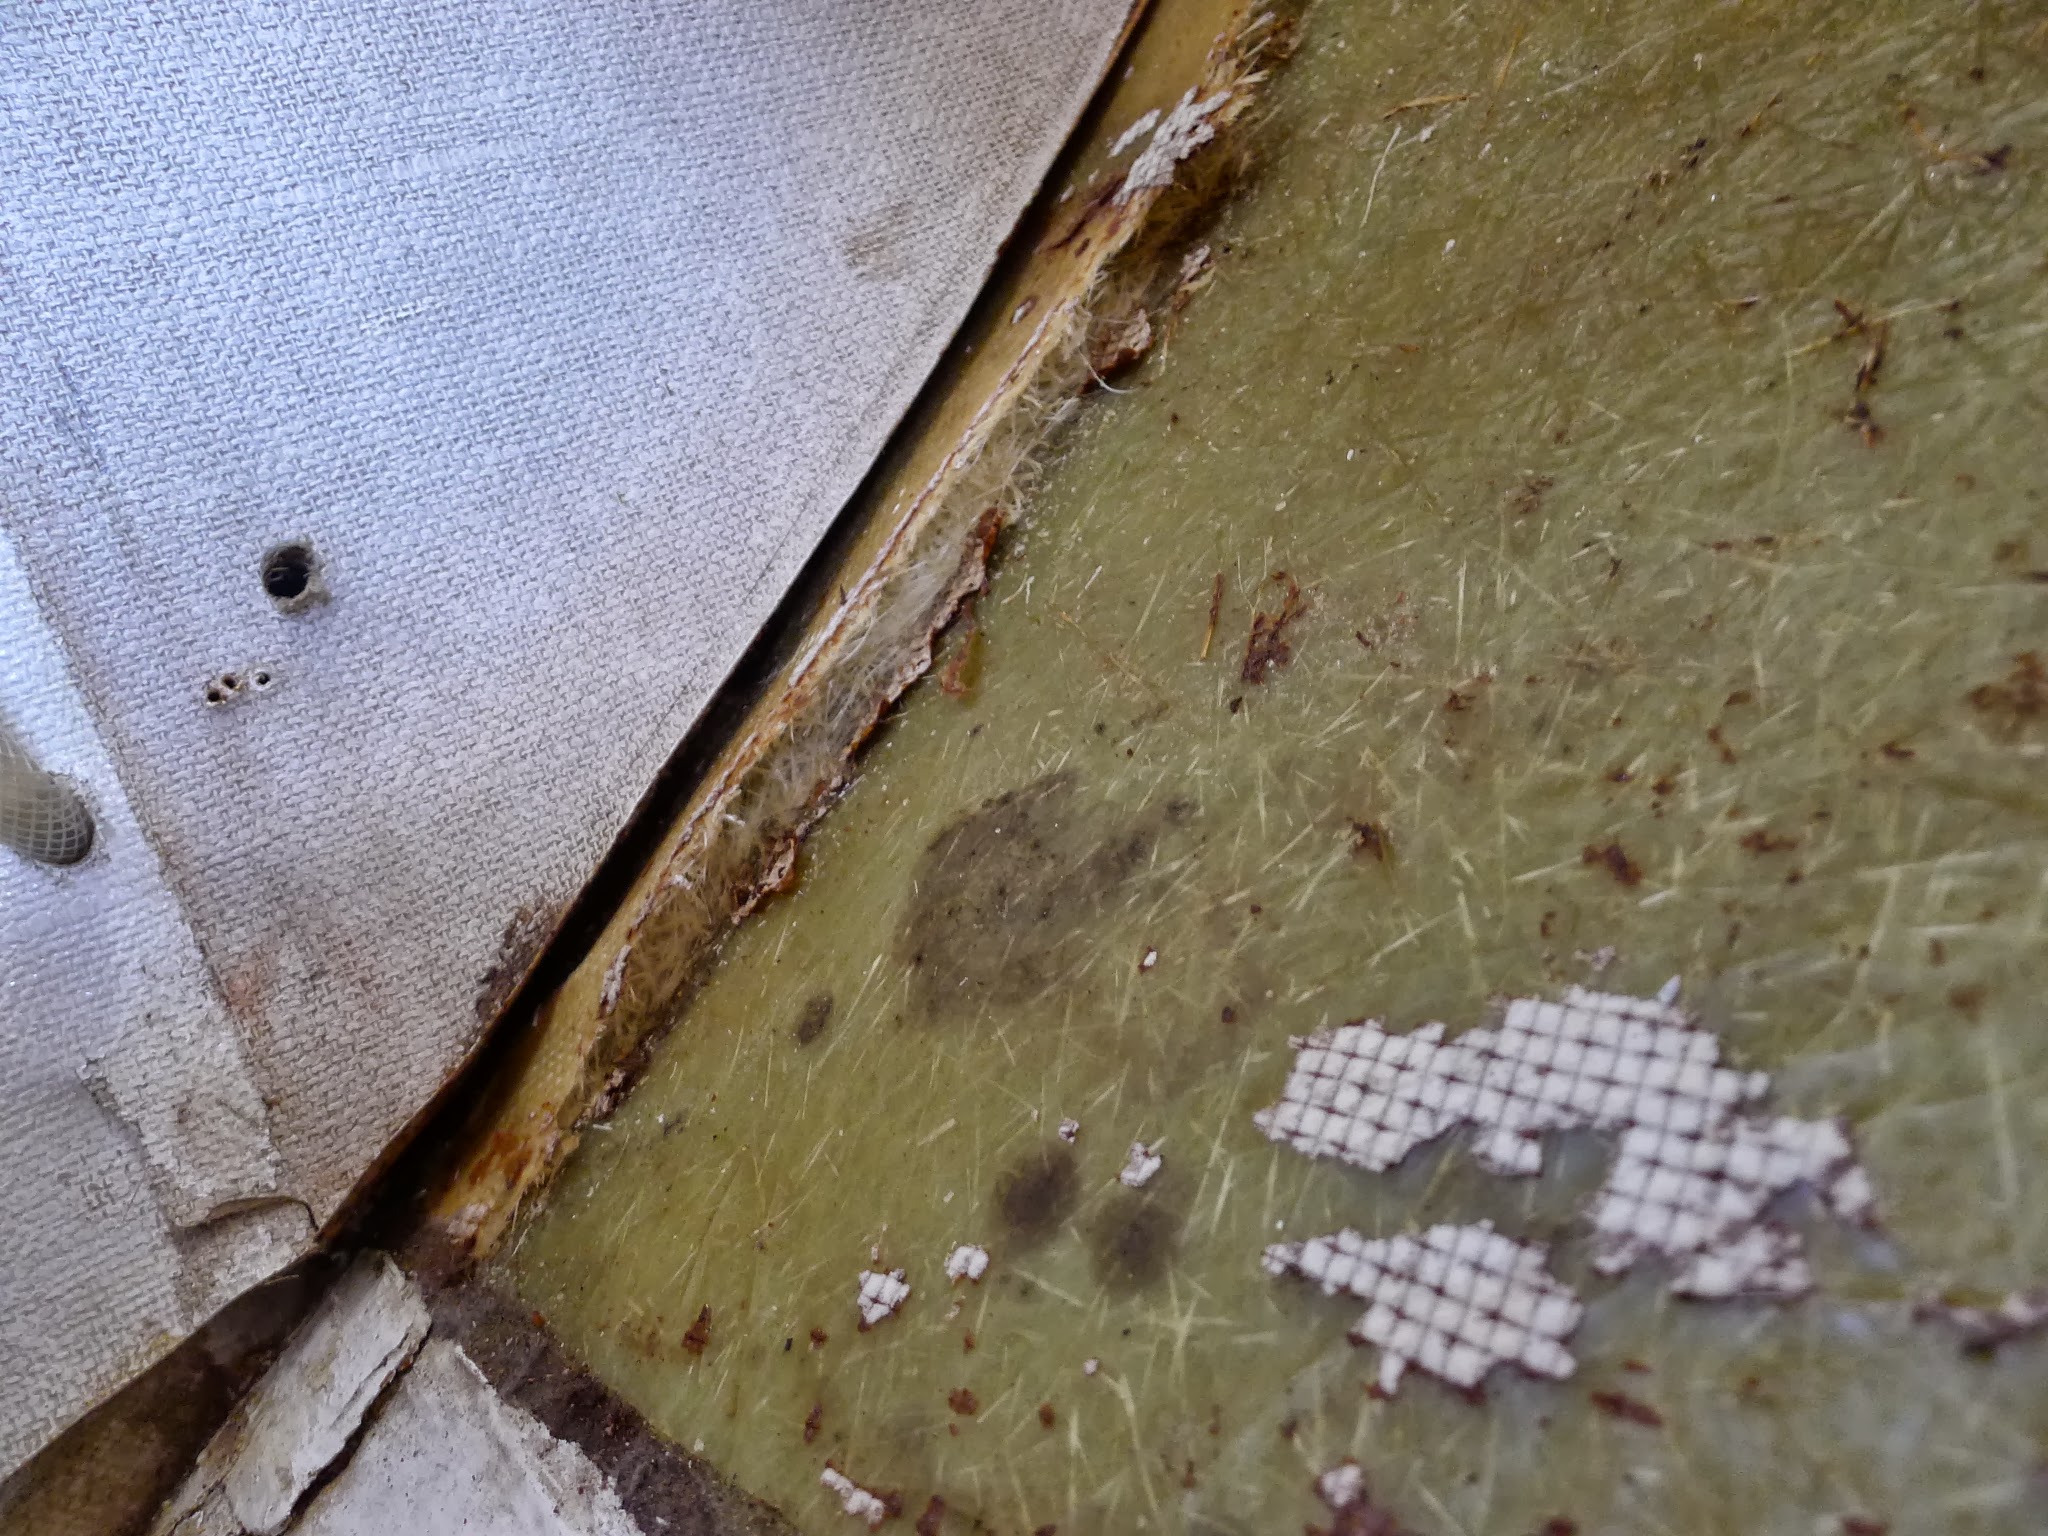
It’s been some time since we noticed that one of the tabbings (fiberglass joints) that bond the fiberglass hull with the wooden bulkheads came unstuck. Since we were about to paint the whole area, we decided now was the right time to repair it. Of course, once we removed all the stuff from the closet, we found out that out of the four tabbings in the closet, we had to replace not one but three of them! So once again out went the chisel and hammer, the old tabbings were removed, everything sanded and just before glassing in the new tabbings, we smoothed the sharp edges by making a fillet with epoxy filler.

P1030742.JPG P1030744.JPG P1030745.JPG P1030762.JPG
A proper decorating job couldn’t be done without ripping off the rest of the old shabby vinyl wallpaper. As long as it was hidden deep inside the closet and behind the piles of our cloths, we could happily ignore its existence. Yet once we uncovered the filthy stuff, we couldn’t but wonder how on earth did we manage to live with something like this inside our boat for such a long time…

P1030736.JPG P1030738.JPG
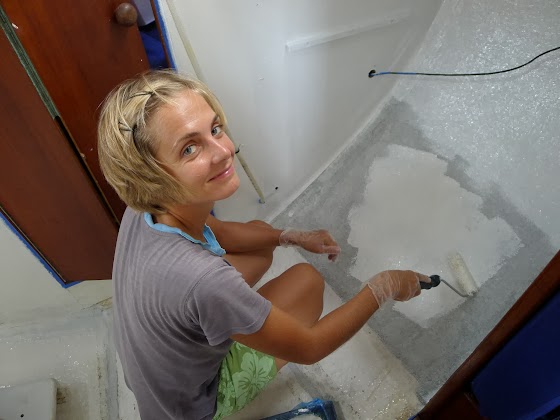
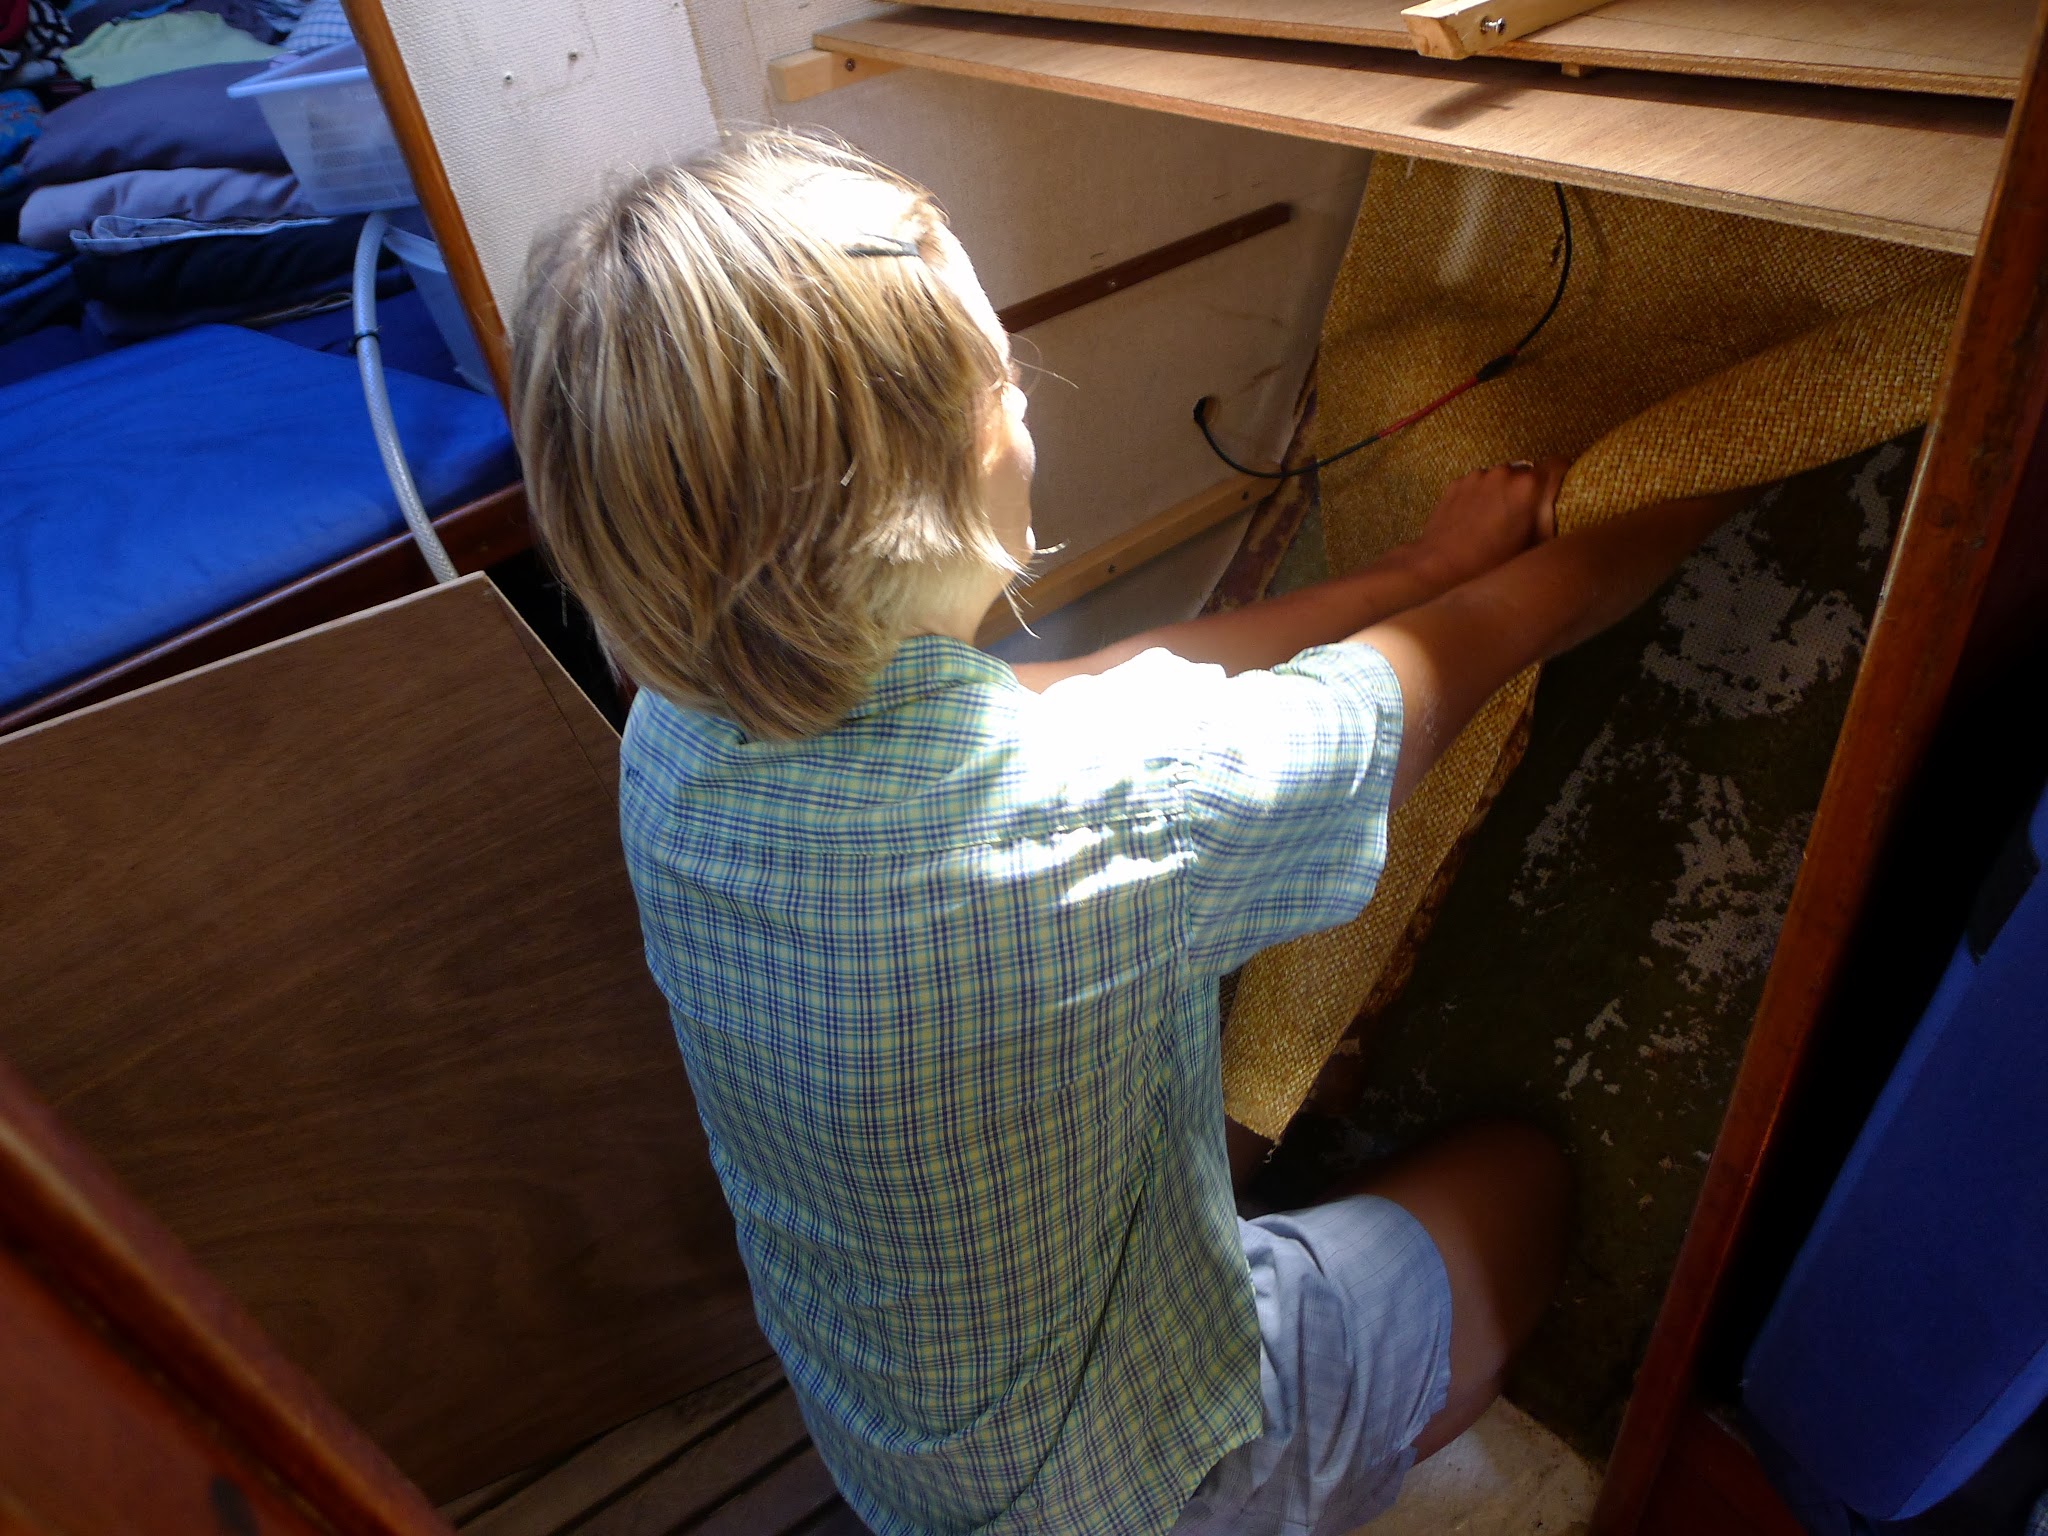
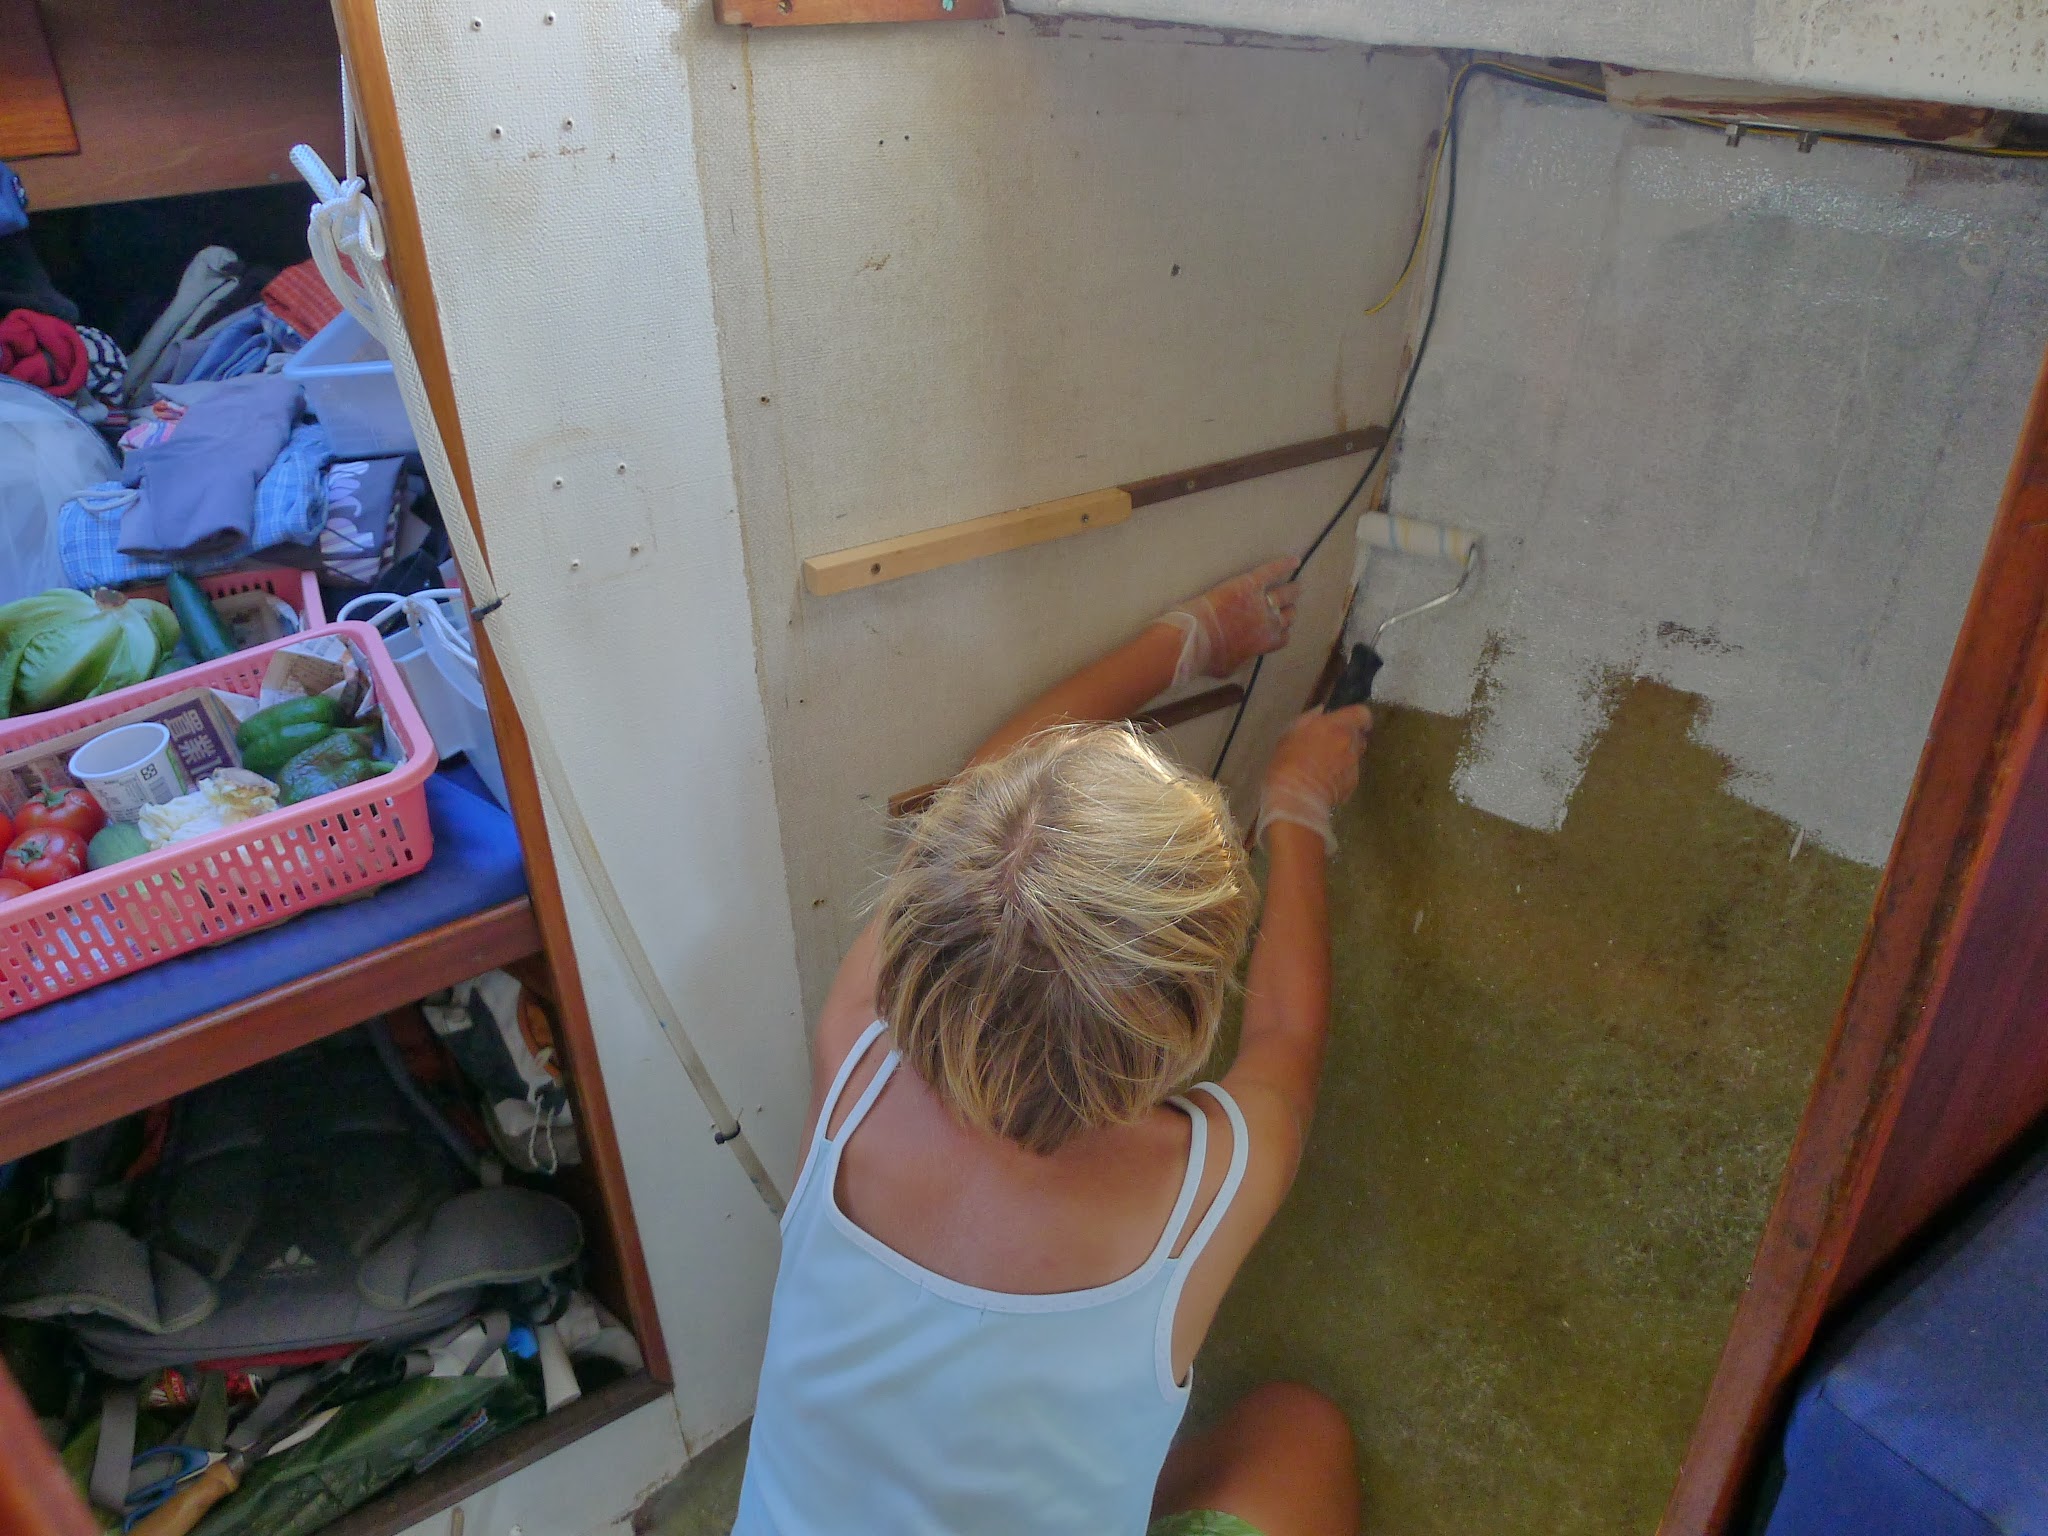
Once the retabbing was done – we used six layers of fiberglass cloth for each tabbing and ended up using almost one liter of epoxy glue – I glued back the wallpaper on the bulkheads that came unstuck or was removed because of the repairs and then I covered the rest of the furniture and wooden bits, wires, portlights etc. with masking tape. After five days of work we were finally ready for painting. Now we must wait till the paint is hard enough so that we can put everything back together.

P1030776.JPG P1030780.JPG P1030799.JPG P1030805.JPG
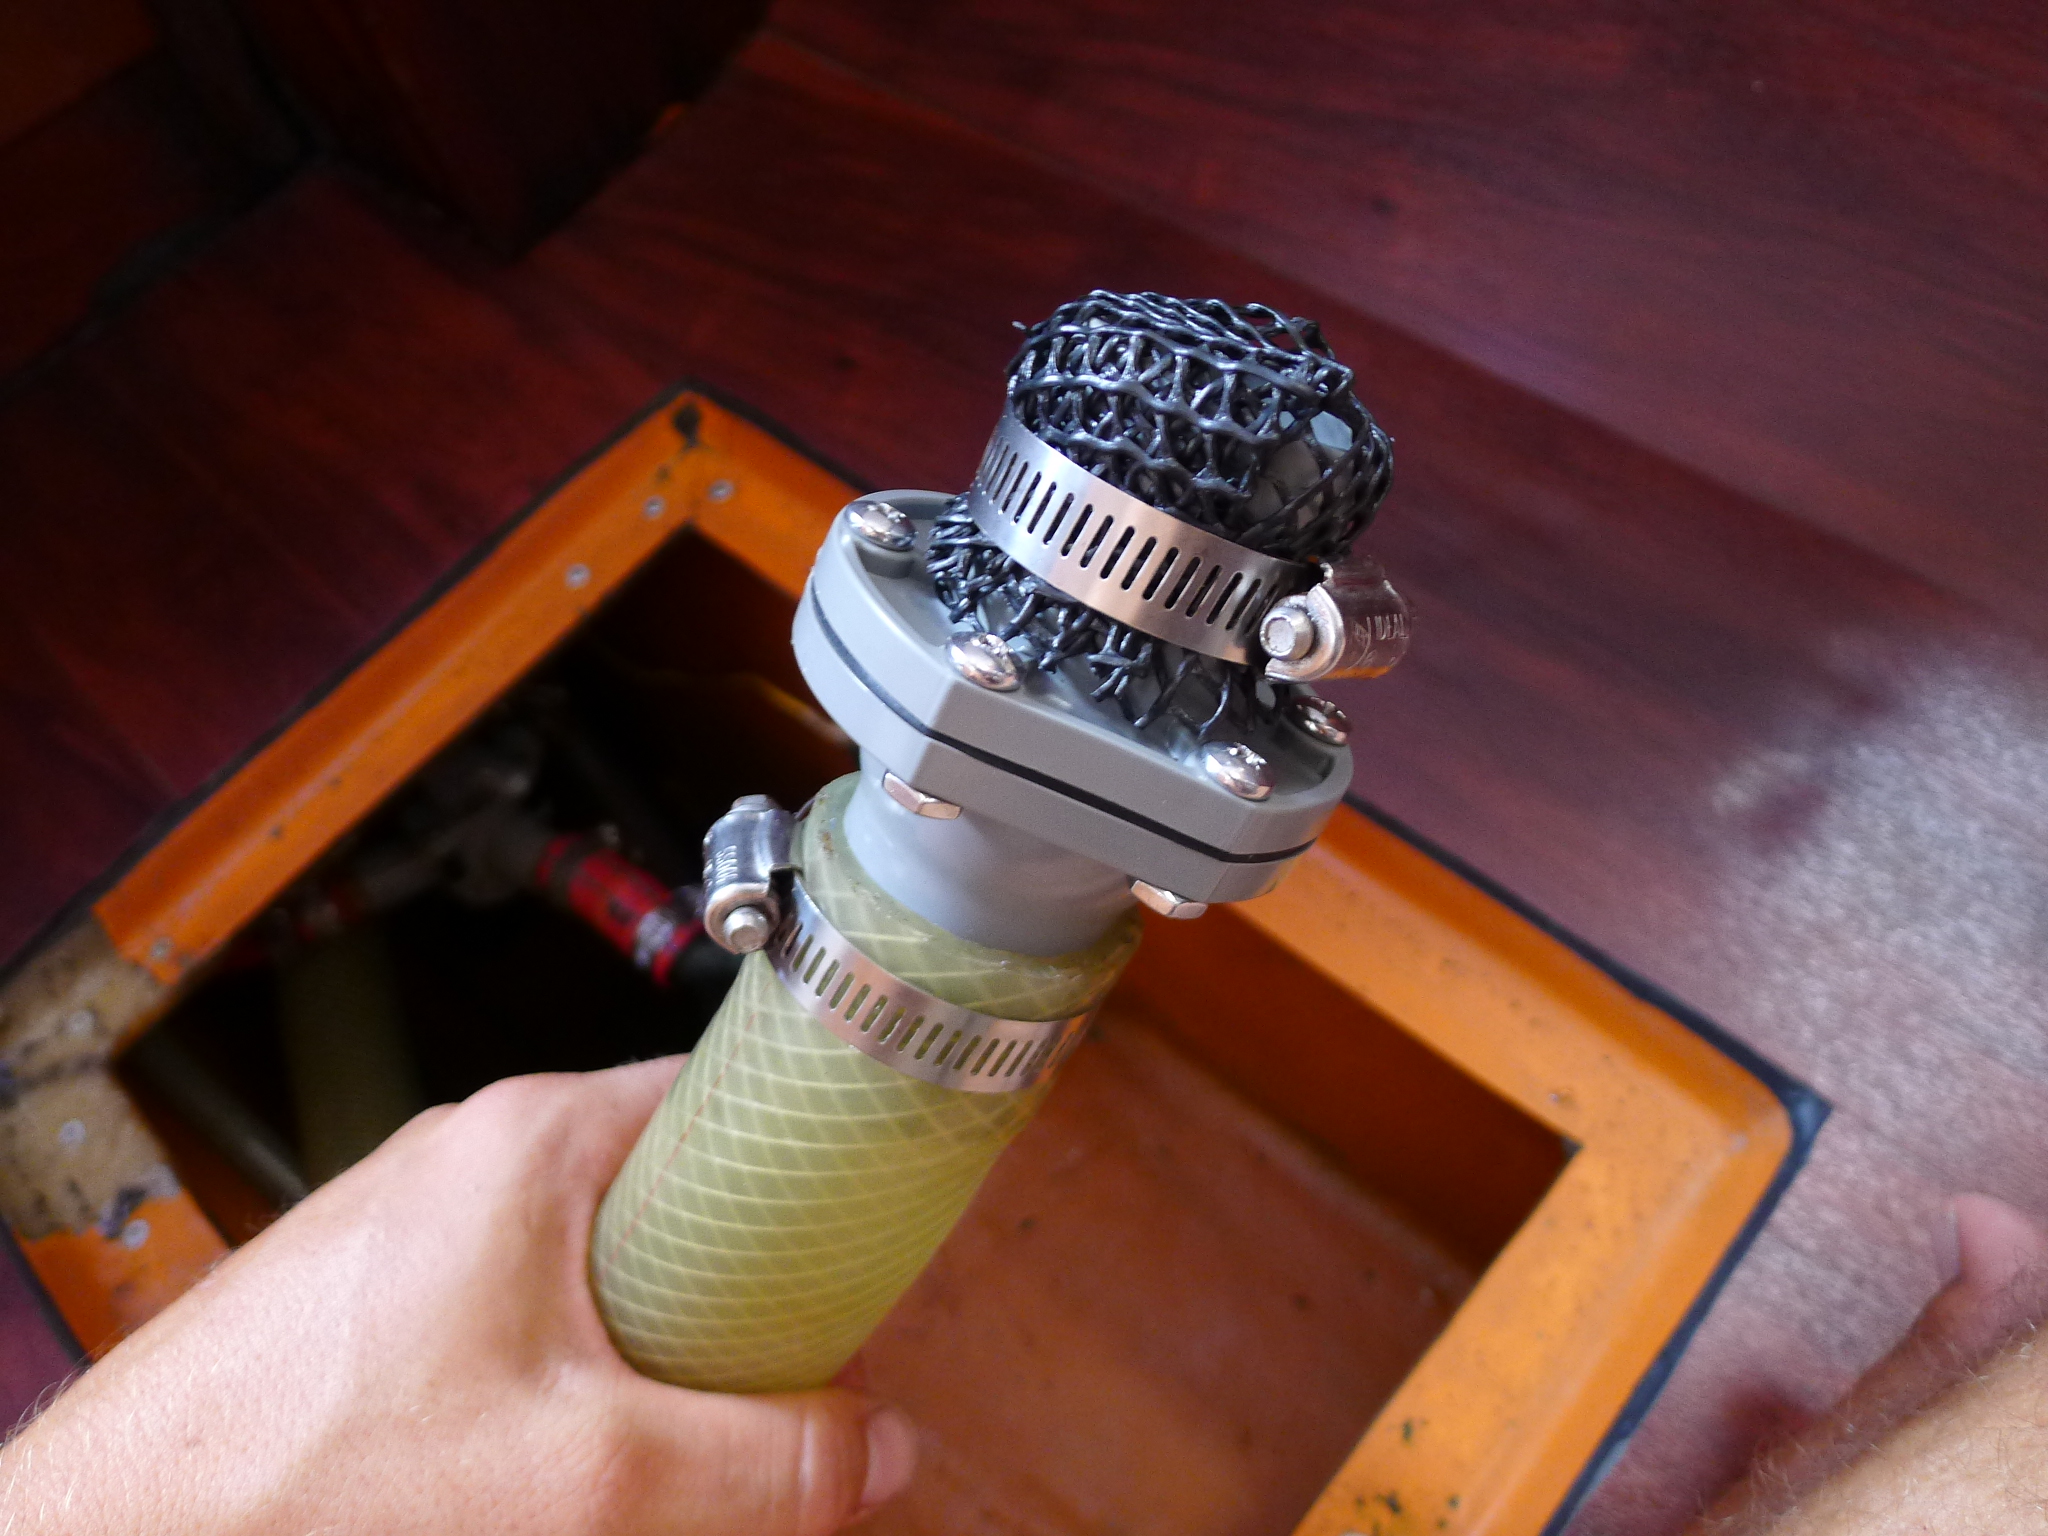
Last but not least, a quick update regarding our engine mounts. Though it’s been at least three days since they arrived back in Malaysia, they’re still stuck on the peninsula somewhere near Kuala Lumpur. The latest update on the UPS website says: The address is in a remote area and deliveries are not made daily / Delivery rescheduled. We can only guess when exactly will the mounts arrive here…

P1030803.JPG

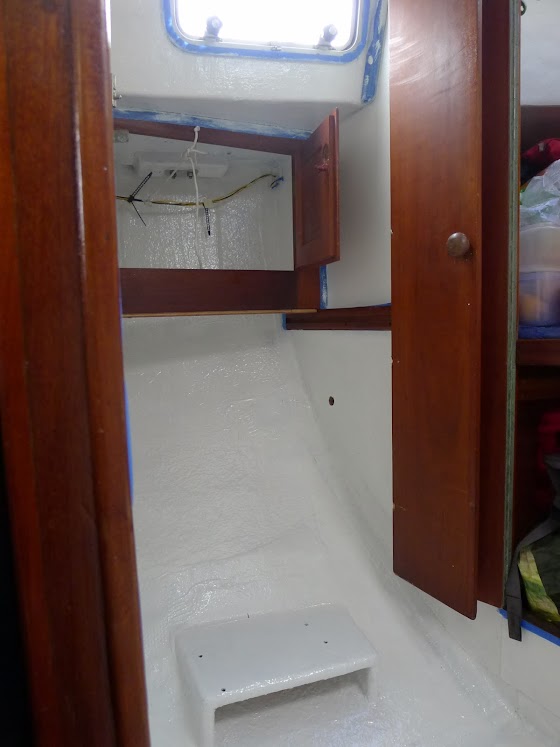
What a contrast! The above photo is actually a tiny part of the already painted ceiling in the closet and still unpainted one in the main saloon. Can’t wait to paint the rest of the boat!

Tuesday, August 13, 2013

In the steps of my pops

I didn't have a tag for leather work.  But Petr on s/v Janna shows why I added one...
My old man was an electrician by trade. But he hated the work and above all he loved horses, westerns and country music and defined himself by the cult western Monty Walsh. So one year after the Velvet revolution, he brought home a big bag full of cowhide, needles, thread, roe-deer antlers and sheets of bee wax. He put that all down in the corner of our living room, which naturally made my mum very happy. But it wouldn’t be fair to leave out the other parts of our tiny block of flats apartment, so in the kitchen he started to melt the bee wax and mould it into balls and a frame for a western saddle soon appeared in the bedroom.

A typical western saddle (example photo, not a product of my dad, even though it looked pretty much like this one)


It goes without saying that my dad had no horse, but he made himself available to people that had horses and everyone who has ever been around horses knows that there’s a lot of work to be done. More work than riding actually, so full hearted people devoted to the cause, like my dad, are always welcome.

Finally he threw away a multimeter and went to the other side of Bohemia to the Krkonose mountains to be with horses on a small farm with about 30 Hucul horses. We saw him only for few days once in couple of months, but I could spend two or three whole summer and winter holidays at the farm in the midst of those beautiful forests. Whenever there was a free horse during the rides for the paying clients one of us kids could take a ride with the group. Those calm mares always took a good care of us.

But then my dad hurt his back when he fell from a horseback and that was the end of his work at the farm. By then he made two or three western saddles and repaired many more so it was only natural that he would start his own saddler shop.

He was no businessman. He was working with too big a heart and besides, most of his clients were people that were doing some lovable jobs, like tending to horses, or had dreamer’s hobbies like country music, scouting or tramping. But you don’t need to make a lot of money if you do what you love. And he was doing exactly that till the end.

Before I grew up into an ignorant teenager, I had a chance to learn a bit of the trade and it came in handy. We were preparing to make a dodger for Janna so we visited a local canvas guy from whom we wanted to buy some material like Sunbrella, Dacron thread, and such. I knew that he must be using cowhide so I asked him about it. He said that indeed he used to use it, but now they tend to use synthetic material instead. When he asked if we wanted some of his old cowhide stored back in his shop, I didn’t waste a second.

I put that big bag full of cowhide into the corner of our cockpit and took out my inheritance: couple of awls, saddler’s needles and hole cutters.

Soon I realized that I kind of didn’t manage to inherit dad’s craftsman’s patience and eye for detail. But my goal wasn’t to create works of art like my dad, just something that will work and hopefully won’t hurt the eyes and aesthetic feelings of fellow human beings.

Pieces of cowhide and waxed thread were soon laying all around the boat and my hands hurt from piercing the thick hide and pulling the needle through, even though I used a sailor’s palm to push it in and pliers to pull it out.

Working with cowhide is really enjoyable. When you soak it in water you can actually mould it quite well and to a certain extent it will hold the form. That’s what the roe-deer antler is for. A round one for moulding and shaping, a sharp one for embossing patterns. But I didn’t venture that far. My esthetical goals were very simple, something in the lines of preventing regular people of being offended by my sloppiness. Craftsmen please shed a blind eye.

20130401-071722.JPG

20130401-071756.JPG

20130401-071808.JPG

20130401-071909.JPG

Tuesday, July 23, 2013

New Bilge Pump & Strainer

Petr and Jana on s/v Janna came up with a nifty solution for a bilge pump strainer for their new bilge pump...
We naturally love water, but same as with the fire, it is a good servant, but a bad boss. Recently we found out that our otherwise quite dependent bilge pump Rule 1100 started malfunctioning. First the float switch started to get stuck and refused to get lifted by the water in the bilge. Soon the motor would start working only sporadically and when it did work, it wouldn’t have enough power to lift the water.

I tried to get inside, but the motor is sealed in a plastic body of the pump, so we decided to order a new one, which is by the way, quite improved, the float is hidden so it cannot get dirty and stuck. At the same time we ordered an inline check-valve for our manual bilge pump Gusher 10. We were looking for a similar strainer that we had before, but the advantage of the strainer, other than being able to be attached to the floor, is not so clear to me, so I just attached a piece of strong plastic netting on the check-valve to get a cheap strainer. The netting is naturally important to prevent hard large objects getting into the bilge pump and puncturing the membrane.

Now everything is back in working order and we sleep a tad sounder, i.e. until there’s water in the bilge which triggers an annoyingly alarming buzzer…


20130320-093809.JPG

Thursday, May 16, 2013

Recycling continues

Out on s/v Janna, an old sail is not a disposal problem, it is a resource! See what Petr and Jana have done with it...
When I was a small kid back in the communist Czech and Slovak Socialistic Republic, a friend of mine introduced me to this marvelous new gadget – a digital watch.  The Vietnamese throw them into the garbage when the battery is dead, said my friend. Yes, that marvel was battery operated.   I’ve never seen battery operated watch. Why wouldn’t the Vietnamese replace the battery instead of tossing the whole watch I didn’t understand.  My friend just shook his head and pointed out to me again that the fact that these can be found in garbage cans is what I should be concentrating on.

Surely I did peek to garbage cans for a while then before emptying the content of our household bin.  Yes, there were no plastic bags used then.  All went to the bin, we would fold an old newspaper on the bottom, and the bin would have to be cleaned from time to time, because it would start to smell quite badly.  I guess we were quite ecological back then, regardless of the fact that people didn’t know much about being ecological.

20130307-153346.JPG


But the times they are a-changin’ and we buy and discard on a daily basis.  Those who take a screw driver and disassemble are breaking warranties and are being labeled as handyman or in more contemporary lingo as hackers.

I digress, however.  We try to remain faithful to our promise to the mother Earth and create as little garbage as possible. Thus, knife in one hand scissors in the other, I started butchering one of our old mainsails.  You see, right now we have three mainsails on board.  A very old one, then the one that was rigged when we bought the boat and now the new one, we just bought in Hong Kong.  The time for the other too has come, holes here and there and patches, chafed all around, grommets corroded, leech lines, stuck to the fabric.

I stretched that large piece of shred and started to plot my attack.  We need leecloths, helmsman awning, weathercloths, and couple of bags for lines, bag for cloth pins, there’s never enough bags on a boat.  So far we’ve been using plastic bags (sic), because there’s such an abundance of those things and especially in Taiwan, most things are usually packages at least twice.  Receiving piles of plastic bags seems unavoidable, but it’s time for us to say no.  Not to mention that some of the plastic bags are so noisy.

So after a few hours effort, we got new leecloths, bottom firmly screwed to our berths and the top hanged on the cabin handholds and a massive eye through bolted to a bulkhead.  We can stretch nice helmsmen awning, called “the square” over our cockpit.  Our 100m mooring lines are now stowed properly in their own bags, line flaked inside so that it can be let out quickly without snags.  And we have a new bag for a mainsheet in the cockpit (the photo of which will remain unpublished, because it’s a recycled cover from an outboard and it does not look particularly nice – but it works…).

In the conclusion I can say only this: Long live our fabulous Singer machine!

20130322-143733.JPG


20130323-083738.JPG

Tuesday, April 30, 2013

Boom gallows

Out on s/v Janna Petr and Jana tackle a project that probably shouldn't qualify as a small boat project, but it shows what you can do if you set your mind to it: Building a boom gallows.  Read on...
We have a new, large roach mainsail, which significantly overlaps the topping lift and little bit the backstay too. After few trials, playing around with topping lift and pondering our options, we decided that we will make ourselves a boom-gallows. We wanted it for a long time anyway.

We were about to make a dodger, but the gallows idea got in the way and the dodger project was postponed. It didn’t take too long to convince ourselves that we are a tough bunch and that like the many other cruisers before us, also we will cross the oceans without the unsightly roof above the companionway.

20130315-102343.JPG
Three hits were enough to make me
put up a signal flag for a day or two
before I learned to use our new space


While at Xingda fishing harbour we tied together both halves of our dinghy mast to the coach roof and put the dinghy boom between them to get some idea about the dimensions our boom-gallows must fit into. Trouble is that there are no right angles and the boat is far from being symmetrical. After an hour or so of jumping around with a tape measure and a protractor, we came up with a simple design, that we passed onto our SS man (as in stainless-steel), with whom we discussed couple of details.

When we got the supports and the teak timber, we were just in the middle of making a new non-skid on our deck.

When the day came, I was nervous. Drawing up the design was one thing, but now we actually needed to drill the boat and mount that thing so that it looks straight.
First of all, I have realized that the angle of the cockpit wall on starboard and port are about two degrees off. I did measure twice, what twice, I measure five times, but only on one side… Well, it won’t be as straight as intended.

In the end it turned out quite well. Only the forks that hold the teak timber are visually slightly off – yes they were supposed to be horizontal, but life ain’t always fair either, right?

Now it’s all done and I have even passed the initiation by thumping my head to the gallows couple of times when entering the companionway. Jana’s shorter so instead of the gallows themselves, she bumps her head into the boom on the side of the cockpit. But she has learned her ways now as well and we are both happy.

The handholds that the gallows provide are just marvelous. Boom sits calmly even in the constant waves that passing ferries, fishermen, harbour police and pilot boats create. We have also took our topping lift to the stern, where it goes through a block on the pull-pit and is tied to a cleat on the starboard. It can be easily worked with a sheeting winch and we will use it to hoist the dinghy.

20130314-095538.JPG
Massive drill bit for massive bolts


20130314-135512.JPG
First support at place


20130314-135522.JPG
Cutting a bolt is always better then buying too short


20130314-142706.JPG
This is what it's gonna look like


20130314-160458.JPG
Cutting the notches for the boom


20130314-162150.JPG


20130314-162158.JPG


20130314-171544.JPG
Cutting the notches for the boom


20130314-181700.JPG


20130314-182132.JPG

Thursday, April 4, 2013

Anti-gravitation equipment

Petr and Jana aboard s/v Janna implement a simple solution to keeping things properly stowed:
I’ve spent yesterday fighting the power of gravity, the adverse consequences of the centrifugal force and the malignant inertia.

Few years ago – yes, we are already counting our life with Janna in years, this was autumn 2009 – when we converted the original small wardrobe and wet locker into much more specious wardrobe shelves, we knew right away that we will need something to prevent our precious garments to fall out. It was obvious that they will fall out and they did. Not too often, though. Actually they stood put in many hairy conditions, so we didn’t feel too bad about postponing what should’ve been done much earlier.

P1020637.JPG

When a gale’s-a-blowing and the boat is tossed around by the elements, the last thing you need are your undies all around the cabin sole.

After a short discussion, we decided to go for a net. Simple and efficient and above all cheap! And it doesn’t look too bad either. On the port side opposite to the wardrobe is a space where the toilet used to be and where we tend to throw bulky and light stuff. We put a net there as well. Now it’s an official storage. The net is stretched on a bungee cord.

Our home is yet cozier.

P1020632.JPG

Thursday, March 21, 2013

Non-skid

Is your non-skid tired?  This can be a safety issue.  Petr and Jana aboard s/v Janna face up to it and re-do the non-skid on their decks, and they have some tips for you:
Not much has happened in the last few days, i.e. nothing worth telling a story about. We were concentrated on one thing only (not to mention translating of course): creating a new non-skid deck.

We were little reluctant to get into it, because we knew it will be slow and nasty work. The first phase for sure, because first we had to sand the old non-skid, which on our boat is a molded gelcoat. It’s 39 years old and especially the front deck was almost flat and was turning into a dangerous skating rink when wet.

We are planning to paint the whole boat, step by step, but it was imperative that we do the non-skid before our crossing to the Philippines, because most likely we are up for a bit of wave action. The north of South China Sea is well known for it.

20130313-110010.JPG
The whole boat will soon be white as a snow


Sanding the fiberglass is a nasty business, because the fine glass powder gets everywhere and when you get it on your skin it itches like hell. I wrapped myself as well as I could and Jana sealed herself inside the boat and worked on our next translation project.

First thing one has to do is to wash the surface properly, get the dirt and grease off, because experts say that you could work it into the fiberglass when sanding, which would prevent the paint to stick properly.

I spent the morning washing and waiting for the deck to dry. In the afternoon I sanded the non-skid on our deck. Took me about three hours. Not too bad. The next day I went over it again and fixed few spots I missed before.

Then we found out we have a problem. The deck was full of little holes, probably caused by improper wetting of the fiberglass mat when the boat was build. We had to fill these. Not to mention that the International boat painting guide suggests to seal old gelcoat using an epoxy primer, because it could contain microscopic holes which could trap moisture and result into blistering of the paint. We were lucky enough that they had stock of Interprotect in Kaohsiung. In the meantime we have filled the holes with Interfill. Then painted over with two layers of Interprotect and one layer of Perfection Undercoat.

Then the main step. Put on a coat of Perfection topcoat and disperse Intergrip into the wet paint using a sieve. There was naturally quite a wind so that plastic crystals were flying everywhere. Next you let the paint cure and vacuum the deck to get all the Intergrip that didn’t stick to the paint away. Or blow it away. We tried to brush it away too, but that does not work very well.

Finally we put another coat of Perfection and waited for the result. The next day we realized that the texture is actually quite coarse, too much for our delicate bums. Thus we put on another coat, which made it little better.

Few points for those that decide to follow the same path:
  1. Surface preparation is important. Interprotect will fill some tiny holes, but not very well. We tried to fill the holes that we missed when filling with Interfill as much as possible, but the hole usually remains visible. Next coat of Interprotect helps a bit and so does Prefection Undercoat.
  2. Intergrip is quite fine, you need a fine sive or it will just fall through. Also the crystals sometimes stick together creating much coarser “stones”. Had we realized that soon enough, we would have sieve them first. These are no good on the deck.
  3. Intergrip has to be spread very evenly and the cover should be a little thick, otherwise you’ll be left with spots where the Intergrip is sparse, which doesn’t look too great. We were worried that we don’t have enough Intergrip in the beginning and thus our deck does not have a very even texture. But it does not slip at all.
  4. Intergrip should be distributed as soon as possible, the paint dries quite quickly and then it doesn’t stick that well. We had about 25 degrees and we had to move fast.
  5. We used foam rollers which didn’t last very long. Regular hair roller worked quite well. But for topsides we will probably stick to foam.
  6. We also tried to mix the Intergrip into the paint and roll the result. It’s not very easy to work with it, but it’s possible to achieve quite good texture. Sieve is much better, even though it’s messy.
P1020652.JPG
Getting ready for the itchy job


P1020667.JPG
Deck sanded flat down to fiberglass and gelcoat


P1020666.JPG
First coat of epoxy primer


P1020677.JPG
Painting a hot surface is discouraged


P1020678.JPG
We covered the deck with every piece of canvas we could find


20130311-172102.JPG


20130311-172110.JPG
Jana sowing Intergrip

Tuesday, January 29, 2013

Resealing Portlights on Hallberg-Rassy 31 Monsun

Sometimes getting ready for a job is as big a task as the job itself.  Petr and Jana of s/v Janna take us along as they re-gasket their large fixed ports.  But first they make temporary storm covers for the openings, just in case it rains during the work:

The most dreaded item on our TODO list is finally crossed off. The portslights on our Hallberg-Rassy 31 Monsun probably had the original gaskets and all the windows had leaks, some leaked a lot. We were really afraid to remove them, because there was a lot of aluminum corrosion, salt sediments, etc. What if we can’t put them back again?

To get us some time, we finally made storm covers from 1/2″ acrylic sheets, trimmed with thick gasket. The storm cover is held over the broken windows by two or three supports that are placed across the window opening. It works quite well and is easy to deploy. When we removed the first window, we had the storm cover ready in case of a rain.

Storm covers with temporary plywood supports

Detail of backing plate mounting


Fortunately, the portlights unscrewed quite easily. We’ve found a lot of salt under the frames and some aluminum corrosion here and there, but nothing major. The gasket that holds the glass sheet in the frame cannot be replaced unless you open the outer frame. But all the leaks seem to be around the outer gaskets, so we didn’t mess with the glass. We’ll soon find out if we were right.

All you need is two types of gaskets, one flat and one L-shaped, contact cement, acetone, putty knife to scrape the old gaskets, sanding paper and a day of nice weather.

Salty mess
Salty mess

Jana knocking the outer frame out

Scary gaping hoples
Scary gaping holes

Cleaning the old gaskets

Final touches before the gluing begins

New gaskets glued with contact cement

Let's see how much water gets through
Let’s see how much water gets through


Related Posts Plugin for WordPress, Blogger...