When we bought Galapagos we were kind of enthralled with our Lofrans electric windlass. It’s a love affair that continues to this day and because we love her, we want her to live in a nice place. Long ago we noticed that her locker on the foredeck had seen better days. It looked to me like there was wood rot underneath her foot switches and a couple of times when we pulled up anchor, Mike saw the floor of the locker move a little bit. This gave us pause.
So it came to pass that we decided we better get to it and refurbish that part of the boat. This has been one of those projects that takes much longer than you’d like, simply because there are a lot more parts to it than you think, and because Mike still works for a living. That leaves the weekends. And me.
Mike pulled the windlass off and carried her home to take her apart and make sure all of her parts were shiny and new looking and give her a general going over. He can write about that part soon. The windlass has always worked great and we want to keep it that way considering that pulling up anchor by hand on this boat, even given the hand ‘crank’ we can use, would cost a lot in terms of energy, time, and effort. Whatever needs to be done to keep this windlass in good shape is time and money well spent.
When we examined the wood under the switches it was clear that there was not only rot, but that there was a lot of it. If it were not for the fact that this entire locker is hell for stout, we would have had a bigger job on our hands. The wood in this area is about 10” thick meaning you can have a lot of rot before things start getting serious. That also means that after I removed all the rotted wood, we still had plenty to work with. We decided we did not need to remove the entire floor (thank you, gods of windlass lockers!) and that we could fix the area with a series of epoxies, from the liquid kind that soaks into wood to give it new structure, to the kind you smear on like wood putty.
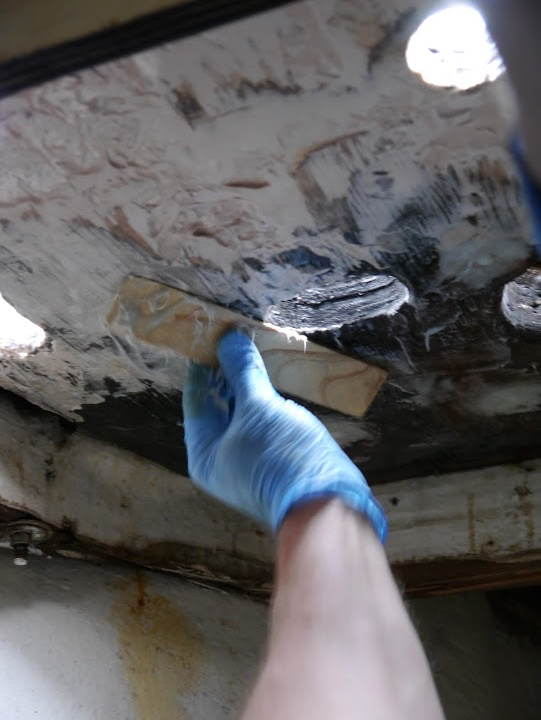
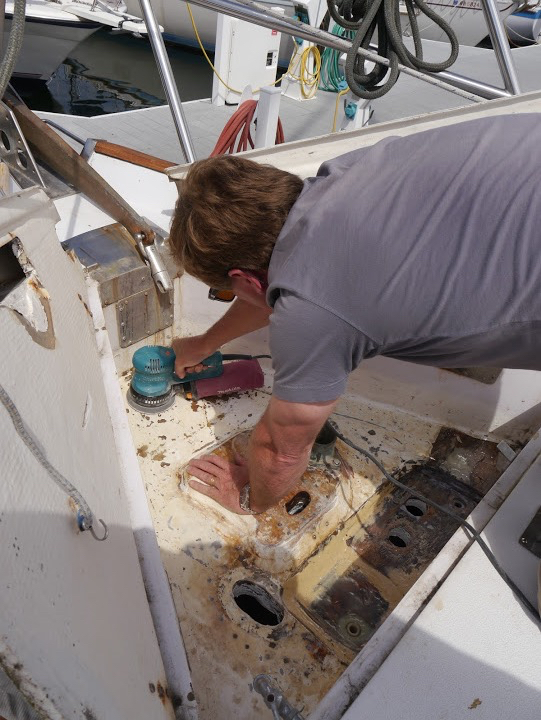
After drilling holes all over the place to make sure we found all the rot, and a good thing we did, too because water came out of some of the holes, we waited as everything dried out in the hot summer sun. Then, over a week or so we mixed batch after batch of System Three End Rot liquid epoxy and their wood putty version called Sculp Wood. When we ran out of the End Rot stuff, we used the straight System Three liquid resin epoxy. We poured the liquid stuff down into the holes and let it seep into the surrounding wood on the topside. When that was cured, we poured in more. We added fiberglass fibers to thicken the paste and troweled it onto the inside of the locker from below, filling in gaps left by the wood we removed. It was a long process that involved a lot of boat yoga, waiting, and sanding in close quarters.
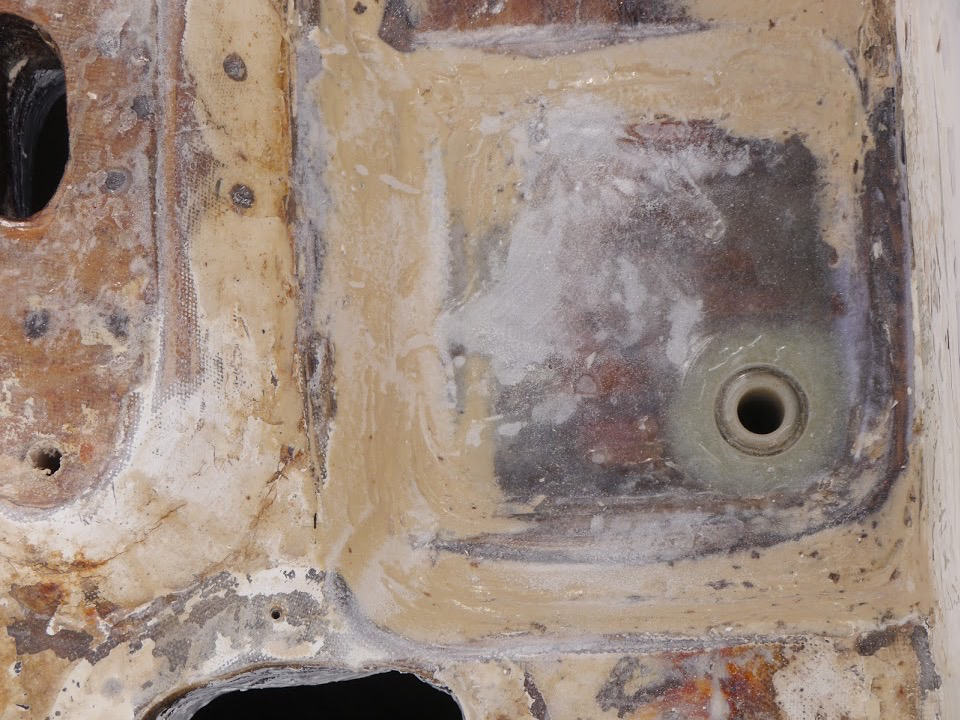
You may be wondering how rot got involved with this windlass locker in the first place. Two reasons became apparent. Let the first reason be a cautionary tale about being sure you are bedding your screws with butyl tape or the equivalent if they are going to be exposed to water. On our two foot switches, the screws holding one switch onto the wood were bedded with something that protected them from water. The screws on the other side were not. So one side had rusty screws, proving that water was ingressing in that area. The wood around that switch was where the rot started and it spread from there. Of course, it’s probably been 20 years or more since those switches were installed. Let’s keep things in perspective here.
Second, the drainage in this locker was poorly designed in our opinion. I don’t know about you, but I don’t think that drains that are above the level where water stands make sense. Think about it. In your sink, the drain is installed slightly lower than the bottom of the sink. That’s because water runs…..down. Not up. So a drain that stands proud of the surface will never, due to the laws of the physical universe, drain all the water out. Standing water is a bad thing, especially if it is close to electric switches installed with unbedded screws. Voila, rot.
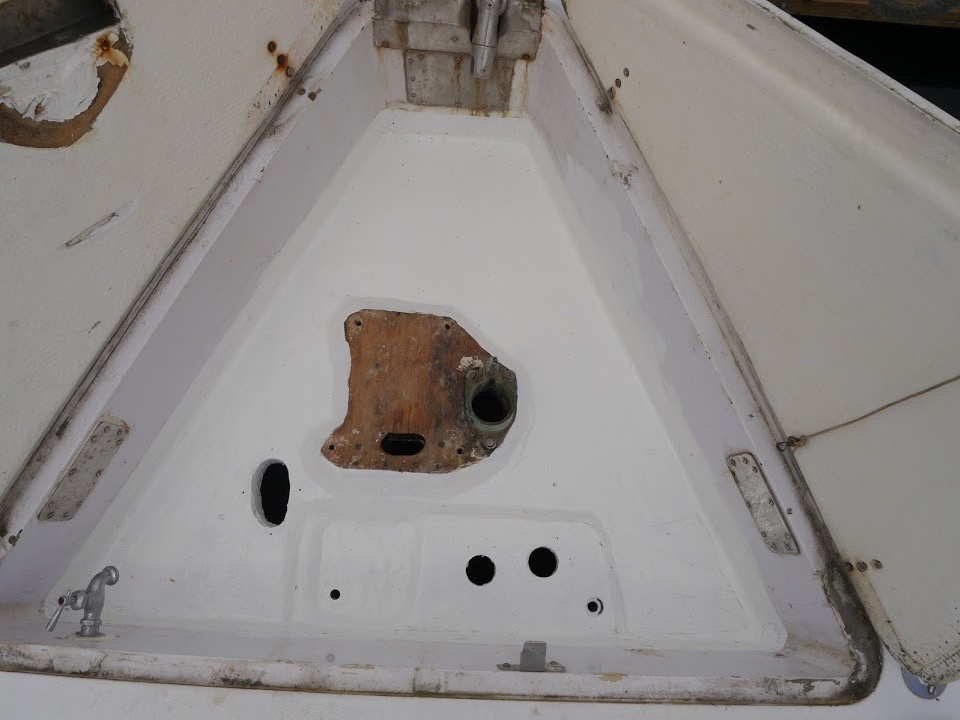
So Mike decided to redesign the drains making them much simpler, and making them drain correctly. You know how when people are married for a long time they start thinking alike? We both came up with the exact same idea independent of each other. When that happens, it’s a go. So instead of reinstalling the drains as they were, he filled in the hole where they would be set, cut off the top of the drain that was too high, then drilled out an area and epoxied the drain directly into the hole. Then he attached the hose. It’s not going anywhere and it drains really well now. Plus with all that epoxy the wood will stay protected long after we’re dead. We are considering this simple solution for some other areas of the boat.
When all the epoxy was cured, he sanded everything smooth on top and on bottom. I followed behind him with two coats of bilgecoat, since this area is protected from UV rays unless the locker is open. Although I didn’t bother with a photo yet, the inside of the locker has a nice smooth ‘ceiling’ now. Our windlass will be much happier in her newly refurbished digs. And we have a locker that will see another 25 years in good shape. Stay tuned for part two, where Mike fills you in on the insides of the windlass. Or something like that.
Showing posts with label anchor. Show all posts
Showing posts with label anchor. Show all posts
Tuesday, February 28, 2017
Windlass Locker Refit: Epoxy is Your Friend
Rot is insidious. It sneaks in quietly, eating away at the structure of your boat. Mike and Melissa on s/v Galapagos discovered the rot monster eating away at their anchor locker - this is how they defeated it:


Tuesday, February 9, 2016
A positive outcome and new skills!
Mike and Rebecca, living aboard s/v Zero to Cruising... No wait! ZTC is for sale! And Mike and Rebecca now live and cruise on s/v Frost, an Amel 53! Well, because it is a new boat for them, there will inevitably be new projects. Here is one - replacing a rusted out hawsepipe... and like the best of projects, completing it gives not only a feeling of satisfaction, but a new skill set...
There are not too many jobs on a boat that end up being easier or quicker than you initially estimate. In almost every case, it’s the exact opposite, and so it was with the project we’ve been working on for just over a week.
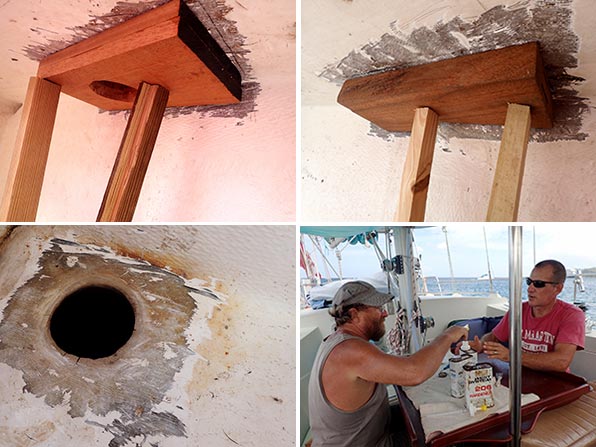
It all began with a bit of a rust stain on the exterior of our starboard bow. Inspecting the stain led us to the source, the old rusty hawsepipe in the starboard bow locker. The pipe, which the anchor chain passes through between the windlass and the chain locker, had pretty much reached the end of its lifespan. The exterior fiberglass was cracked in numerous places, and further inspection led me to find that the pipe that was inside it, made of iron I believe, was rusted and crumbling to pieces.
The old hawsepipe was the source of the rust on our hull.
Where as I had initially hoped that I could simply patch over the fiberglass, it now seemed obvious that the only proper way to fix it would be to cut the old pipe out and begin anew. Our friend Ken, who came over to offer his opinion on the job, assured me that he’d be available to help me through the steps. As the days went on, oh, how I bet he regretted that offer!
Of course, while we were at it, why not reinforce the anchor windlass to better deal with our new big Mantus anchor? It’s just a bit more work, right?
First using hammers, chisels and brute force, I removed as much of the old pipe as I could. Later, having borrowed Ken’s angle grinder, I was able to cut the remainder of the pipe and fiberglass out.
We puzzled over what to use to replace the old pipe. Stainless would be awesome but way too costly for such a job. I had read of one Amel owner who used PVC. As it turns out, some friends of friends had on hand a 3 foot length of 3″ diameter fiberglass tube that they no longer had a use for, perfect for our application! Huge thanks to s/v Virtue and Vice for passing that along to us!!!
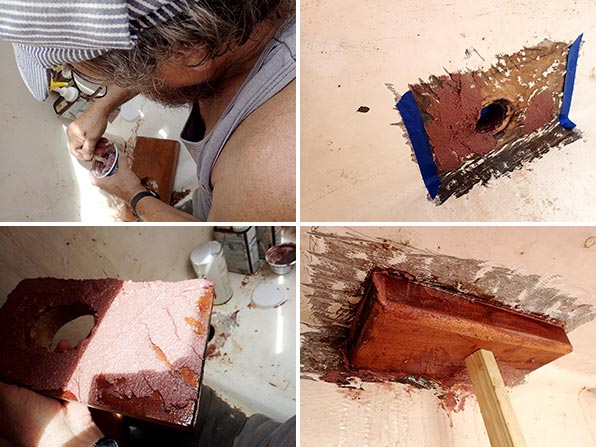
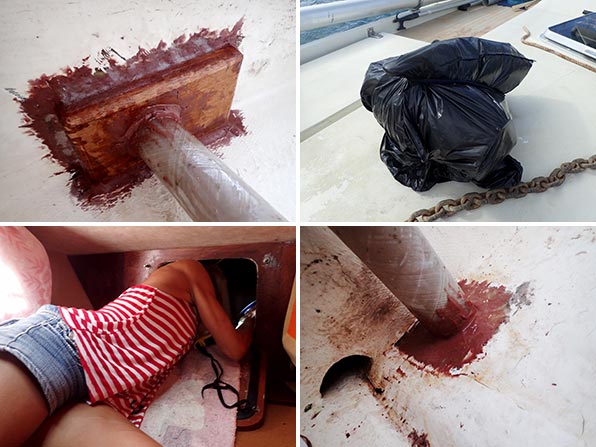
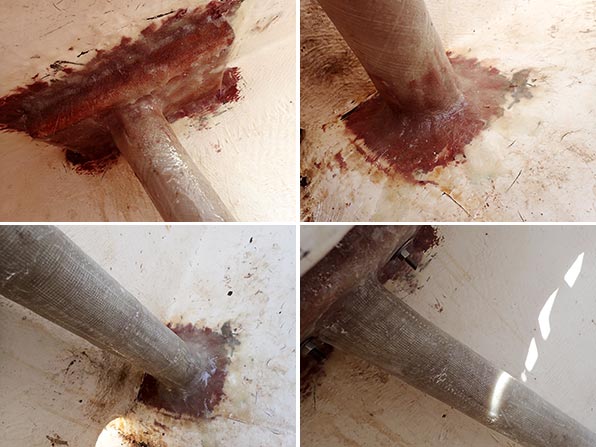
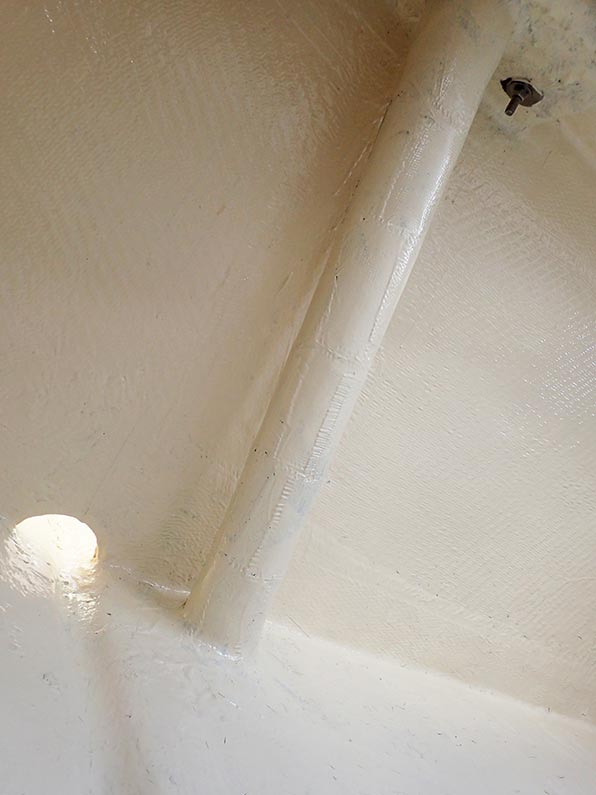
The photos below illustrate the steps that we went through. The mahogany backing blocks for the windlass, donated and shaped by Ken, were first attached to the top of the lockers using thickened epoxy. The pipe was cut to length and then also fastened in with epoxy, both from inside the locker, and from the underside, accessible from the chain locker. Later, the entire thing was glassed over. I also took the time to add a couple of extra layers of fiberglass cloth to the pipe, adding to its thickness to hopefully give it a few more years of wear.
On that note, will the pipe wear out? Undoubtedly. I’m confident it won’t happen quickly though, and when it does, it will be easy to repair. I’m pretty happy with how the job turned out, and even better, I learned a lot about this type of work from our friend. A positive outcome and some new skills… you can’t beat that.
Waiting for the paint to dry so that we can add a second coat.


Tuesday, December 9, 2014
A Platform To Stand On
Metal fabrication is not a frequent topic here because of the specialized skills and tools it requires. Nevertheless, good communication skills can substitute for those, as Ken of s/v Painkiller demonstrates:
Not too long ago on the Pearson 424 forum that I hang out, someone asked if there was any information or drawings, or possible "who" fabricated the anchor platform that was offered to Pearson owners when having a new boat built.
Nobody had any concrete answers, so I offered to the gentlemen inquiring that I would give him an accurate detailed drawing that he could have the exact piece reproduced from any competent fabricating shop.
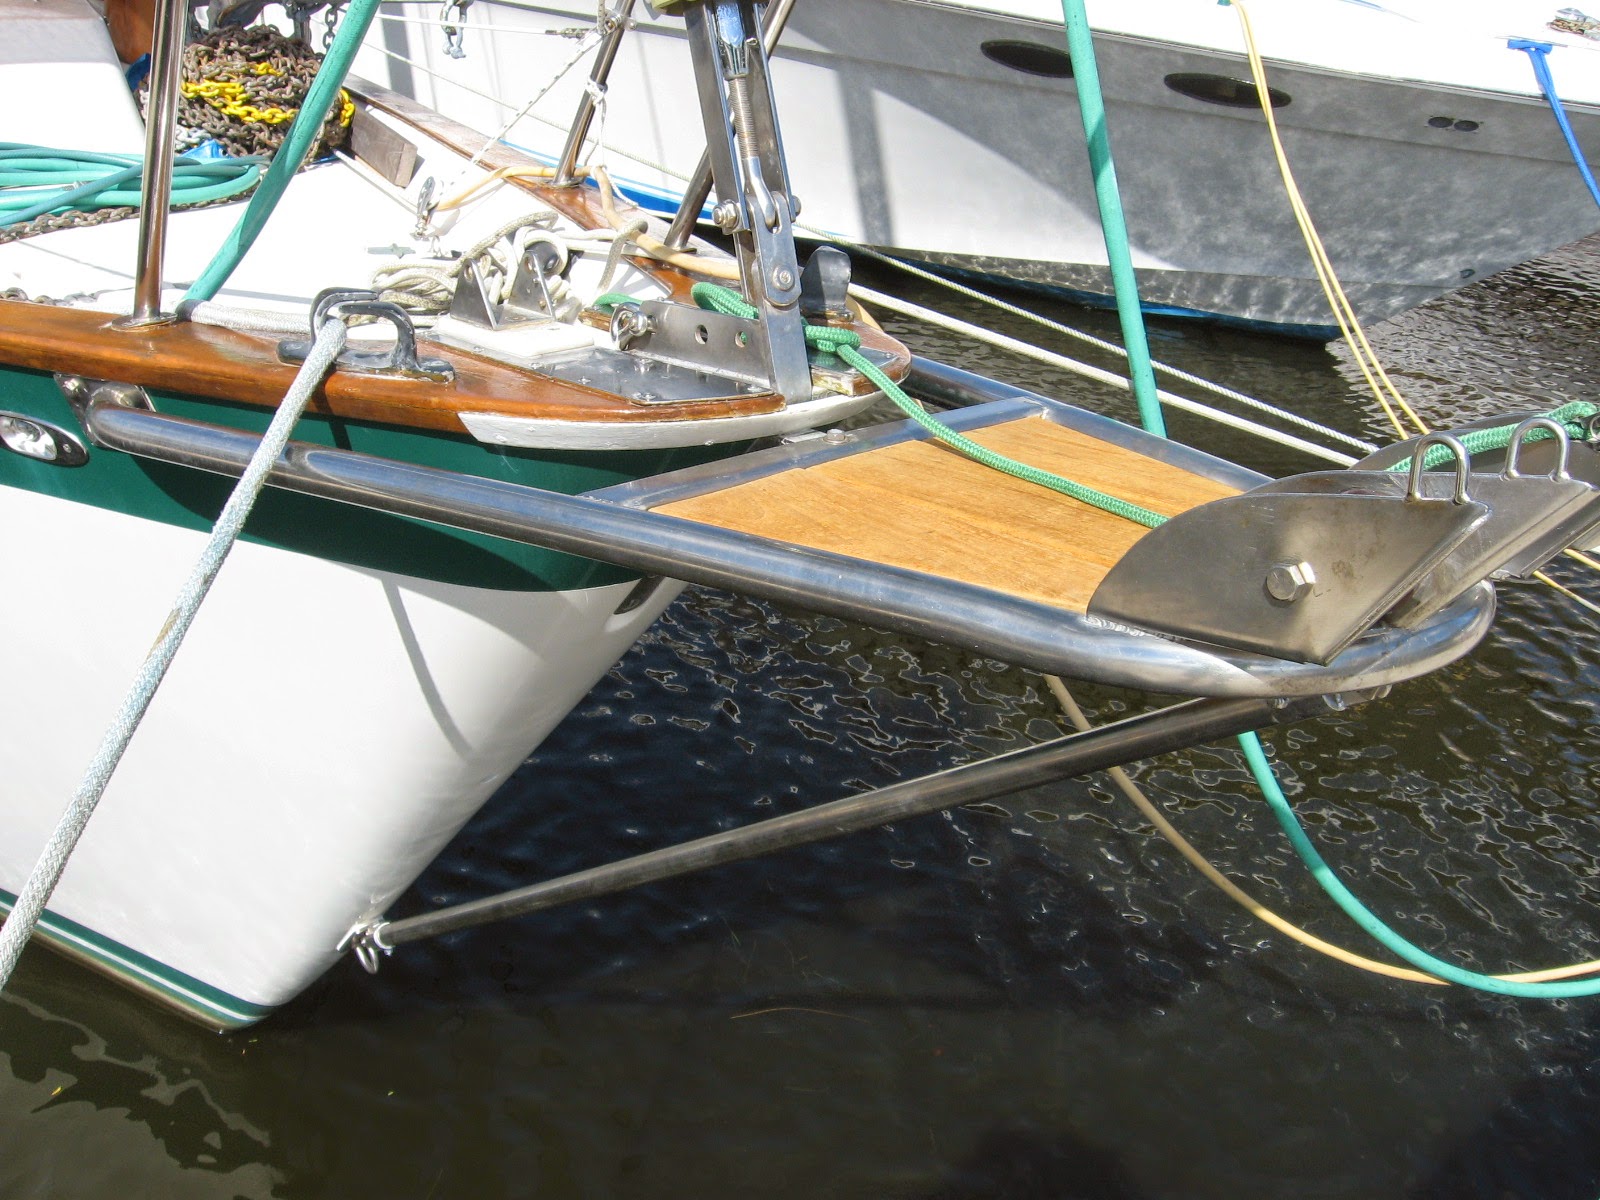
All I had to do was go forward with measuring tape, paper and and pencil. I noted in my drawings (I shared with the forum) that I would add a third or fourth point to stiffen the platform as it seemed to me it having a weak spot with potential heavy loads from getting a stuck anchor off the bottom. Not to mention that mine was bent at least 5 degrees....I never noticed it till I starting measuring for the drawings.
I had some ideas and traded some unwanted stuff at Sailors Exchange in St Augustine, FL for some various bits and pieces of stainless steel hardware that I could fabricate into something to help beef up the platform. A 1/2" U-Bolt was my starting point. The actual finished bracing point saw a few different ways before I settled on a robust 3/8" plate that supports the brace for the anchor platform and offers me a point near the waterline to lead a snubber line for anchoring. After coming up with a definitive plan, I removed the platform and brought it to a local shop to have straightened and weld up my various pieces.
I backed it all up with 12" x 5" shaped block epoxied into the forward stem. Not sure if I would tow my boat at sea in an emergency from this point, but for sure at anchor it will be fine.
I'm thinking this will take a load off my concerns of have an oversize anchor bury itself a little deep and need some persuasion to pop it free.


Friday, September 19, 2014
Why Does My Anchor Come up Backwards?
Does yours do this? Over at Sail Delmarva, Drew asks the question, and then shows why and how to fix it:
After fixing this on 3 boats (mine was the first) I thought I would share something so obvious it is commonly overlooked.
There are many things that can bring the anchor up backwards, not the least of which is a shift in the wind. The easy solution is a swivel, but failures are not unusual; my SS swivel had a nice interior crack that I noticed only when taking it apart to replace the anchor. Many sailors have abandoned swivels for this reason, and then wondered if they made a mistake when the anchor came up reversed most of the time. Never fear.
Notice the nice straight chain. No twist.
When connecting the anchor, observe that there are 4 rotation options. Unless you considered this at the time, you had only 1 chance in 4 of getting it right.
The chain cannot rotate in the gypsy, thus, getting the twist right significantly improves the odds of the anchor coming up right way round, more so if the windlass is near the roller. Not 100% certain, but improved odds. For me, >95%.
- If you are 180 degrees out of alignment, reattach inverted.
- If you are 90 degrees out of alignment, either add/subtract a shackle or clip one link.

Friday, April 11, 2014
Best in show
This post originally appeared on Windborne in Puget Sound
 We've been to a lot of boat shows since our first, in Chicago, in 1971. From one year to the next, you see mostly the same gear. But every once in a while, you see a new product that is truly new and innovative. This was one of those rare shows, and The Anchor Buoy is one of those rare products.
When we anchor here in Puget Sound, we always try to be as far from other boats as possible. Most times that works our for us, but on busy weekends the anchorages are crowded, and then there is always that yahoo who drops his anchor too close. We have experimented with using an anchor buoy, but managing the buoy and its line while retrieving the anchor was just too big a job. And then, with our tidal range here that can reach 16 feet, how much line to put on the buoy? Too little and the buoy will be submerged at high tide; too much and the buoy no longer marks the location of your anchor.
The Anchor Buoy addresses these and many more issues...
Oh yeah, the bottom line: boat show price is $249.
When we anchor here in Puget Sound, we always try to be as far from other boats as possible. Most times that works our for us, but on busy weekends the anchorages are crowded, and then there is always that yahoo who drops his anchor too close. We have experimented with using an anchor buoy, but managing the buoy and its line while retrieving the anchor was just too big a job. And then, with our tidal range here that can reach 16 feet, how much line to put on the buoy? Too little and the buoy will be submerged at high tide; too much and the buoy no longer marks the location of your anchor.
The Anchor Buoy addresses these and many more issues...
- First, it self-deploys. There is an encapsulated microprocessor inside it that knows when it is submerged, and reels out more line to compensate. Therefore no action is required to deploy it - you just drop your anchor.
- There is a tilt switch inside that detects when the buoy is no longer upright, indicating that its mooring line is slack - it then reels its line in until the slack is removed. This accommodates tidal changes, and it also means that no action is required when retrieving the anchor - the buoy reels itself in.
- It holds 100 feet of mooring line internally - That should cover the vast majority of anchoring situations.
- There are two LEDs on the upper surface that automatically illuminate after dark, so your anchor position is visible even at nite.
- It's all solar powered via an encapsulated solar cell and LiPO battery.
- It's made right here in the USA, in Garden City, Idaho. This is important to me, as whenever possible I try to support American workers and the American economy.
Oh yeah, the bottom line: boat show price is $249.
Tuesday, May 7, 2013
Chain Stripper Modification
Paul on s/v Solace makes a significant improvement in his windlass by redesigning the chain stripper. This is inspirational to me (since Eolian doesn't have a stripper on her windlass); perhaps it will be for you too:
Bent stripper compared to new stripper
Last year I had a guest on board who was trying to be helpful and undertake some of the chores on the boat. He was going through the anchoring process and while anchoring, I (he) found a deficiency in my capstan while easing out chain as one puts on the snubber.
Normally, when bringing in the chain with the capstan, a stripper is in place to ensure the chain comes off the capstan and goes down the Hawse pipe. Otherwise, it can get caught in the gypsy (wildcat in the USA) and wind up the chain around itself. Easing chain out, say when anchoring, the weight of the chain is usually sufficient to take the chain of the capstan gypsy. But in my case, my guest was not aware of the potential issue and as he eased the chain out while holding tension on the snubber line, the chain stayed in the gypsy and bent the chain stripper on the opposing side. You can see the bent stainless stripper above.
Plastic compared to SS
We were in the middle of "nowhere" and there was no way I could straighten that stainless. So what to do? I used one of my wife's "polyplastic" chopping boards and cut it up to make a plastic, but temporary chain stripper. While getting everything ready, including a cardboard template, I decided to design it so it was able to strip the chain whether it was coming in, or going out. I used both hacksaw and Dremel for fashioning the plastic stripper and the thing worked so well, it stayed on for the whole cruising season (6 months). I improved the cardboard cut out a little and had a piece of 6mm stainless laser cut when I went home.
Plastic stripper in place
New SS stripper to replace plastic in place


Thursday, April 18, 2013
Mind that windlass handle!
s/v Siempre Sabado has a manual windlass. Keeping the handle to that windlass handy to the windlass and yet still keeping it aboard would seem to be conflicting goals. Steve and Lulu show that they can both be met:
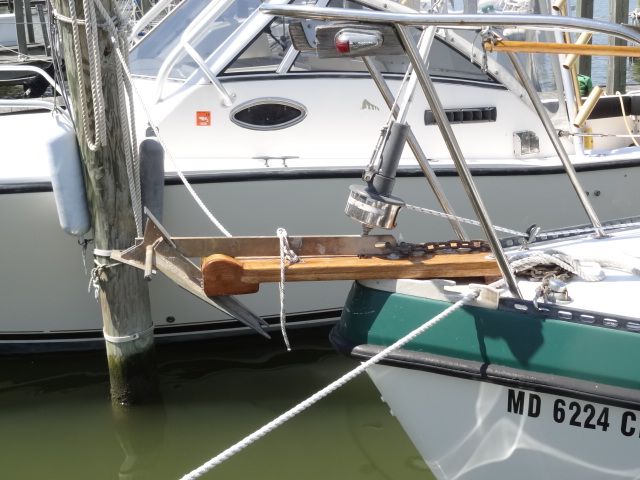
When we first got our boat, there was a mystery piece of canvas onboard. It was about 2′ long, only about 2″ wide, open at one end, and with a pair of sort of flanges along one of the long sides with snaps so the two flanges would snap together. It was anyone’s guess what the heck this thing was. We looked at all kinds of stuff on board to see if we could figure out what it was for. The only thing that fit into it was the removable windlass handle. But canvas covers on boats are usually to protect something from UV degradation, not something the galvanized steel handle was likely to suffer from. So what was it for?(And those are some nice examples of marlinespike seamanship out there on the end of the bowsprit in that last picture! Is that ocean plait?)
One day, I got the bright idea to try snapping the flange around a lifeline up forward and using the thing as a sort of horizontal holster for the windlass handle. Well, it was a perfect fit. I’m still not sure if that’s what it was originally intended for but if it wasn’t, it should have been. Keeps the handle off the deck and out of danger of being kicked or washed overboard.
That’s the handle sitting between the teak deck
and the bulwark, the thing with the black hand grip.
The main problem with the “holster” was the snaps. Even when they’re made for marine use, snaps eventually get corroded to the place that they no longer come apart, or, if apart, will not snap back together. And, sure enough, that’s what happened. At least I assume that’s what happened. For some reason or another, we removed the holster some time ago and I can no longer remember for sure why or where the heck it is. Since then, the rope tether that was on the windlass handle chafed through and for a long time now, the handle has just been riding loose on the foredeck. And, although we’ve never had a problem, once you see the potential for a problem, if you don’t fix it, you’ll be kicking yourself mightily when the problem eventually happens. I’ve always meant to have a second handle made but, so far, never have so I’d better take care of the one I have.
Lulu put a bunch of Sunbrella scraps together and sewed up a holster during our trip from Santispac to Punta Chivato last week. Today, I installed the grommets and hung it from the lifelines. I need to come up with a prettier way to attach it than with the “clothes stops” that I’m using now, but they’ll work until I come up with something better.
I also rigged up a tether so, even if I were to get all fumbly-fingered, the handle should stay attached to the boat. The handle stows all the way in the holster and can be removed just by pulling on the tether.
The tether is long enough allow the handle to be used while still attached to the lifelines.
I think I’ll still get another handle made anyway, just in case.


Thursday, March 28, 2013
Anchor snubber
Down in Mexico aboard s/v Siempe Sabado, Steve builds a new anchor snubber:
Decided it was time to refine my anchor snubber. For those who don’t know, the snubber is a piece of line that is stretchier than chain, used to take the strain off the chain and the windlass. The chain is let out, then one end of the snubber is either tied or hooked to the chain. The other end is secured on deck to either a cleat or a kingpost. Then the chain is let our further until the snubber is taut and the chain between the hook and the windlass is slack. Now, if the boat gets to hobby-horsing or dancing at anchor, when it comes up to the end of its tether, it stops softly as the nylon snubber stretches some, rather than stopping hard as it would if it came to the end of the un-stretchy chain. Much easier on equipment and nerves and lessens the chance of yanking the anchor out.
Anyway, my old snubber, while serviceable, was getting a little shabby looking. It was made up of two separate lines with thimbled eyes on one end. The thimbles were getting cock-eyed and the lines were different sizes. The arrangement of shackles to get these two eyes connected to one chain hook was a downright embarrassment. Time to straighten things up.
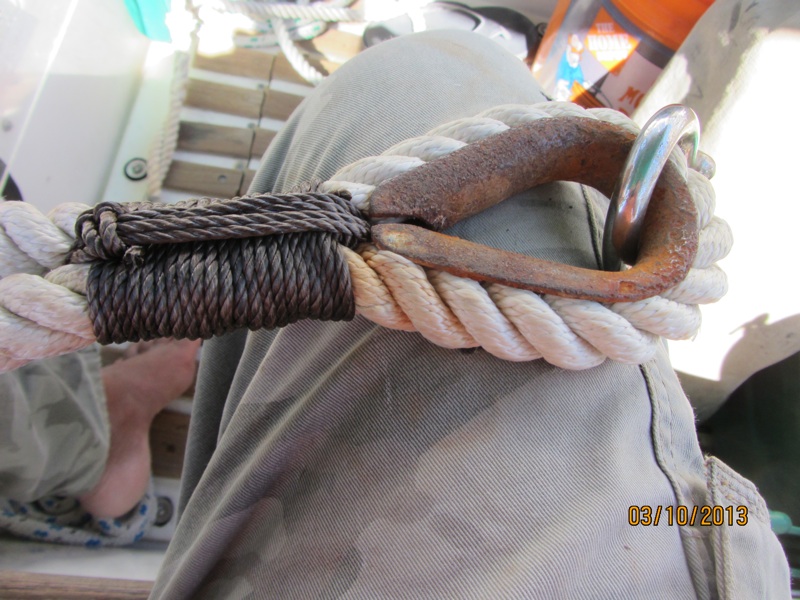
I started by finding a long enough piece of 3/4″ three-strand nylon in the lazarette. I middled it around a rusty, but still serviceable, thimble and then put on a temporary seizing using a doubled constrictor knot.
Next, I wrapped the eye using tarred nylon marline and removed the constrictor knot when I got close to the end of the wraps:
Passed the working end through the eye and pulled the other end to bury the crossover.
Made a few frapping turns to tighten the wraps and also protect them from chafe:
But, for real chafe protection, there’s nothing like old fire hose (Thank you, Silverton Volunteer Fire Department) which I sewed in place using waxed sail thread and also seized in place using a doubled constrictor knot backed up by a surgeon’s knot. Nothing like the belt and suspenders approach for peace of mind.
Add some more anti-chafe gear where the line will run through the hawse pipes and we’re good to go.


Tuesday, February 5, 2013
Simple solutions
Please welcome new contributors Scott and Brittany aboard s/v Windtraveler! For their first contribution, they face up to a problem all blue-water cruisers must deal with - how to keep the anchor from flopping around up there on the bow in a seaway - and they find that a simple solution is the best...
Shameless plug: See Salnick's First LawIsn't it funny how sometimes the cheapest, simplest solution is often the most evasive? When we put our new anchor on our boat, it became immediately apparent that we'd need a way to prevent it rocking side to side when we were underway. Tying it off prevented any up/down and forward/back motion, but regardless of how much we tied and how tight we pulled, the side to side rocking could not be quelled. It might not seem like a big deal to those of you who aren't boaters, but a 73 pound anchor rocking to and fro and banging against the bow roller over and over is not only dangerous, but would make a tremendous ruckus in our boat. We needed a better way to secure it before we left.
Our first idea was to modify our bow roller to accomodate our specific anchor. That seemed simple enough. We called a local metal working company and after they presented us with a quote for over $2,500.00, the decision to go a different route was very easy.
It became comical, actually, how many people were putting their heads together on this thing. Even guests here at the building we are docked behind came over to offer their two cents on how to rectify our issue. With each new idea the solution snowballed into something more and more complex. I'm all for brainstorming, but this was getting out of hand. One afternoon, when Scott and some of our friends were on the bow talking about new rollers, drilling contraptions into the deck, raising the windlass, the addition of a pulley system and god knows what else I said, "We need a block to fit around the top of the anchor, essentially wedging the anchor into the roller, and then we need a hole in the top of that block to lash it down to the roller". The guys looked at me, looked at the roller, scratched their heads and after a pause replied, "That could work".
And it did. The very next day Scott fabricated my solution with $25 bucks worth of parts, and a little modification of his own. What we did was make a block out of pieces of starboard, with a slot down the middle for the anchor shank to fit in. Scott made the block sightly larger than the bow roller, and then routed out the sides of the block (with the new router I got him for Christmas!) so that it fit in the roller exactly. With the sides routed out (Scott's brilliant modification) the block will not slide fore or aft, and all I need to do is lash it down to the bowsprit with some line through the hole he drilled though the top. Make sense? I'm sure there are other solutions, but we think this will work for now.
It's strangely easy to overcomplicate things on a boat (we've done it time and time again). But usually, there is a very simple solution for just about any problem. You just need to clear the table, clear your head and find it - it might mean the difference between $25 and $2,500!


Tuesday, October 23, 2012
A custom anchor platform
Because of their shape, Danforth anchors are difficult to stow on a "standard" bow roller. Rick dealt with this problem on s/v Cay of Sea by making his own anchor platform, specifically designed to work with the Danforth. Tho the project below does not show the design and construction of the platform directly, I think the pictures give enough detail to allow one to construct their own anchor platform:
A year ago last month, I fabricated and installed an anchor platform for Cay of Sea. This took quite a while, because the platform had to accommodate a danforth-style hook – not the easiest anchor to fit to a platform. Also, it was a “custom” fabrication, so there was a great deal of measuring, marking, trimming, fitting, refitting, remarking, designing, redesigning – you get the idea. It was a lot of fussy work, but the result was a great improvement for stowing and handling the ground tackle.
This is the way it looked this spring before the finish failed. Compare with the following images:
Failed Finish
Close-up of failed varnish and darkened grain
So maybe this doesn’t look to alarming to you, but considering that it is made of red oak, taking action is indicated sooner than later. Red oak is a lovely dense, hard wood that is tough. The problem with it is that it is rot-prone. I knew that when I used it to build the platform, but I used it anyway because it was readily available and reasonably cheap. I reasoned that if I kept it protected with epoxy and varnish, it would do fine.And it would have done fine, if I had kept up with it this year. However, I got in a hurry last fall to use it, and only put on 3-4 coats of cheap varnish, promising myself that I would do a better job soon. . . Soon is relative, you know. I should have re-varnished this spring with the good stuff, but I didn’t. Subsequently, here we are in mid-fall, and I’ve got to redo the finish correctly.
I was also dismayed to find out that the fender washers I used weren’t stainless, or were an inferior grade of stainless, and they rusted. I know I chose them from the stainless bin, but sometimes fasteners and hardware gets shifted about. When I reinstall that platform, I’ll be sure to use high quality stainless fender washers.
After removing the platform, I was happy to see that my sealant (Boatlife caulk) did a great job of keeping the water out of the boat and out of the bolt holes. I sealed the deck holes with epoxy last fall, but did not pot the holes and re-drill. I intend to do that while the platform is off too.
So the first step was to remove/strip all the finish off. I used Strypeez paint remover – the really thick stuff, and it did a really good job. It was in the 50s yesterday while I was using it, so it worked a little more slowly, but it did the job.
Strypeez slathered all over
After removing the finish, I used oxalic acid to bleach the dark lines out of the wood, and lighten it over all. Three heaping tablespoons in a quart of hot water made a very strong solution.
I wiped the piece with solvent, then mixed my epoxy resin, and here I may have a glitch. My container of West System resin pulled air with the second pump, and I got an imprecise measure of resin. I pumped in two pumps of catalyst anyway, and hope the ratio is nearly correct. If it isn’t, it won’t cure properly – I’ll know tomorrow morning if it cured. If it didn’t cure, I’ll have to strip it again and re-coat with a properly mixed ratio. Regardless, I’ll need more resin for subsequent coats, so there’s no great loss if I need to take an uncured coat off – just a bit of time.
And, I got a comment on my introductory post requesting a few more photos of the platform, so here they are:


Subscribe to:
Posts (Atom)


