That's some chalkboard, "Einstein"!
Every point on the mollusc is treated as a space-point, and every material point which is at rest relatively to it as at rest, so long as the mollusc is considered as reference-body.From Relativity by Albert Einstein
Navigating Foamy Seas of Fabric
To those of us used to the Newtonian absolutes of 'rigid' plywood, turning to fabric is to enter the undulating reaches of Einstein's relativistic universe.
Fabric is visibly flexible. Roll out a strip of it, and it may lay straight. Or it may curve like a banana, one way or the other. Or snake both ways. It can fold, hump and pucker, too, leaving its two dimensional plane. Hang an end over an edge, and it has the tendency to siphon itself to gravitational equilibrium. Fortunately, in the era of synthetic threads, we don't have to worry about shrinkage in the temporal dimensions!
Foam - at least the cushy sort - isn't much better.
To tame the mollusc, we need an external reference... in our case, the straight edge of a long-ish table in the caretaker's cabin. Line up one edge of foam or fabric with that (and keep it aligned) and smooth it flat, and we've imposed a reference edge and a planar surface. After that, it's just a matter of layout, cut, fold, and sew to the lines.
Of course, folding is something we seldom do to plywood.
Spatial visualization of flat stuff folding into shape tries the imagination. Some folks have developed it more than others. But really, unless you're a genetic sport, it starts out hard. Practice makes perfect. Like learning a new dance, the first attempts tread on toes. First one is a mind-bender; second is not half-bad; third a piece of cake.
Mostly.
As in all things, we looked for the KISS approach. No piping, fancy shapes, zippers (velcro, instead), etc.. We sewed a single join around the perimeters. At the corners, where excess gathers, we fold under as one would wrap a package in paper. Here and there we tack any floppy excess with thread and needle, or dart it out, as seems indicated.
A confused sea
Tips n' Tricks (from the Ignorant):
- Bobby pins can be used to secure hems for sewing... not as prickly as pins.
- Hot Melt Glue can often be used to tack things together... be sure to press the 'dots' flat before they cool!
- Woof and Warp (the long and cross threads in fabric) are freebie square and parallel... follow them and it's hard to go wrong.
- An Electric Knife cuts foam cleanly... the double bladed, turkey carvin' kind.
Dinette, cushions, left
Settee cushions behind
Folded Bunk (upside in), with ice blanket showing
Loose fit will snug up when finished with Hook n Loop
Salon Seats and Backrests:
These were all variations on a theme. Simple boxes in simple wrappers.
The only complication was that we wanted to use a second type of fabric for inboard faces. It was from SLACKTIDE's bunk, and we like to carry a bit forward from each boat. Also, we under ordered the blue nylon seconds by about a yard. 8/
Bunk:
Pretty simple in retrospect, but we burned a lot of braincells on this one.
First, our 60in cloth has to be joined to cover the 72in x 78in bunk. A longitudinal join, we figure, runs up where our sensitive upper bodies lie, like a miniscule bolster. A transverse join runs across our shins/calves, and seems much less intrusive. So that was our choice.
Our foam is open cell. Moisture travels downward and condenses at the first cool surface (the plywood bunk deck, in this case) and soaks the mattress from the bottom up. One semi-fix is to raise the mattress on a low lattice for airflow under, which evaporates and transports moisture. But also, we laminate a layer of close cell foam on the upper surface. This keeps moisture to the upper surface where it can harmlessly evaporate. Plus it firms the total foam, which we like for sleeping.
Next problem is that, to access the under-bunk storage, the bedding has to fold in half around the long axis. If the foam is a single block, this is AWKwaaaaard! But if we cut the foam into two blocks, then, if not compressed equally, we get a cliffy rift along the centerline.
Our solution was to cut the foam in two along the long centerline, then glue the close cell foam in a contiguous sheet to both surfaces, crossing the divide. We left the first foot to either side of the divide unglued.
Our cover unfolds to resemble a couple of bicycle panniers; two pockets topped by a flap that tucks between open and closed cell foam into that first, unglued foot.
The entire cover is made from a single strip 'scrolled' from one flap, down the divide face, across one bottom face, up the side face, all across the top face, down the other side face, across that bottom side, up the divide face and tucked between foams. End faces sewn together pillow-case style along the mid, end face (not shown). Whew!
The fabric and closed cell foam form a longitudinal hinge for folding the mattress over. Meanwhile, since it spans the divide, it eliminates that cliffy ridge. Result... works like a charm and comfortable!
Looks like we made harbor.
Tuesday, June 28, 2016
Navigating Foamy Seas of Fabric
Up in Alaska aboard s/v Wayward,work turns from the rigid determinism of wood to the flexibility of fabric...


Tuesday, June 21, 2016
Cheap Boat Tricks – Cockpit Floor Mat
Please welcome new contributors Melissa and Mike, of s/v Galapagos, a 1975 47 foot Olympic Adventure ketch! For their first contribution, Melissa shows us a cheap and easy addition to cockpit comfort...
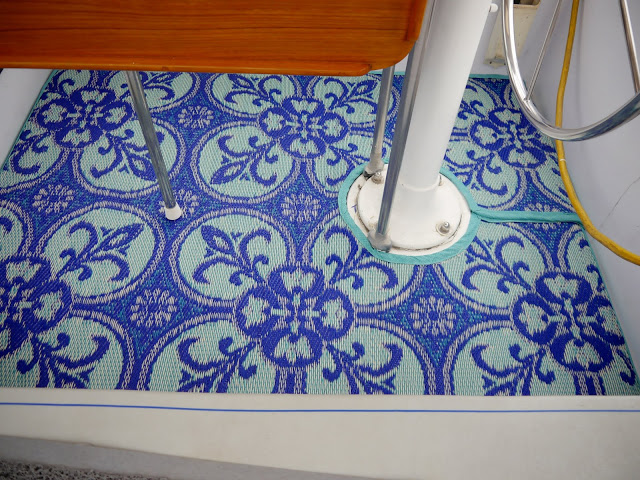
This little project has all the qualities that make a project satisfying for me: creative use of a material, hunting and gathering all the crafty pieces, long straight seams to sew, fairly low level of difficulty, and lots of colorful bang for less than 50 bucks. In this case, much less, only about $32 all in. Woo hoo!
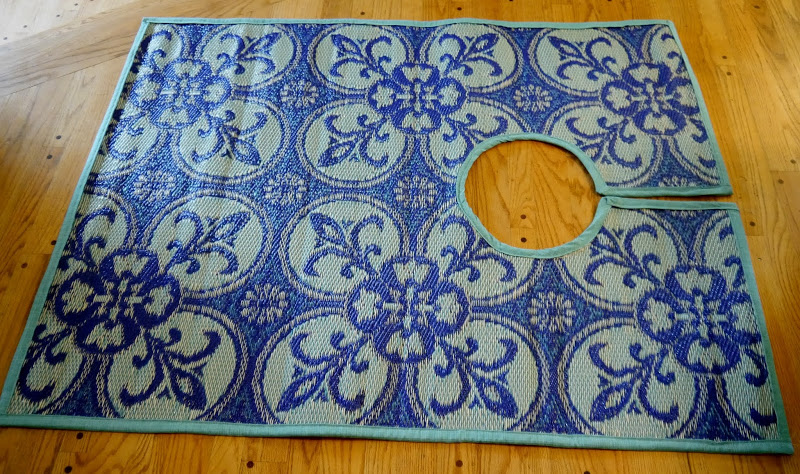
Don’t ask me what I was doing in World Market because truly I don’t even know. I had just bought fabric for another project over at the fabric store and with time to kill I wandered in just to look around. That’s usually a dangerous thing, but since I’m determined to NOT buy anything for the house, I felt safe. But then, I found these cool mats made from woven recycled plastic. Hmmm. The little grey cells began to process all the possibilities and 20$ later I left with a 4×6 mat destined to cover our cockpit floor.
Want to make one? Here’s how I did this one.
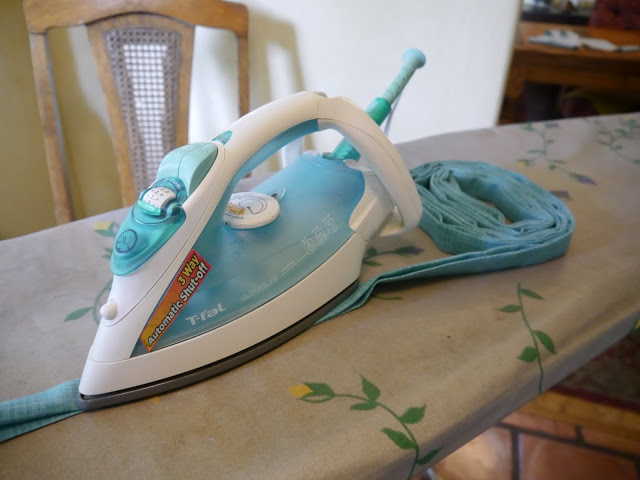
You will need: your mat, scissors, outdoor thread, outdoor fabric in a matching color, masking tape, butcher paper and tape for the pattern.
Et voila! This will be exposed to UV rays all the time, so who knows how long it will last? But who cares? For that price, it was worth it just for the fun.
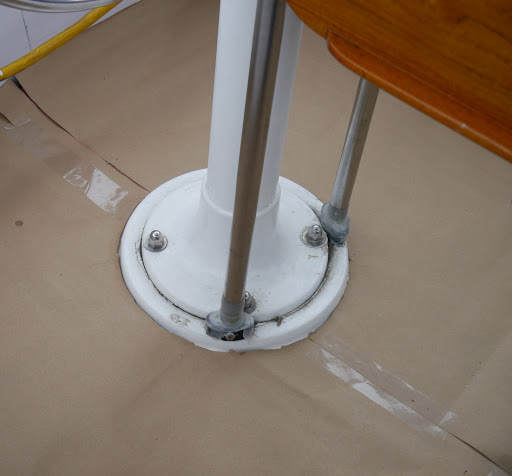
- Make a pattern of your cockpit floor. In our case, I needed to cut out a circle to fit around the steering pedestal. Sure, the engineering types reading this will come up with a thousand easier ways to make a pattern, probably using things like numbers and formulas and measurements. I prefer my patterns to be on paper. I’m tactile and visual, and I just feel better having a template I know fits exactly. Or at least close. I used left over butcher paper I had from making the patterns for the aft cabin berths.

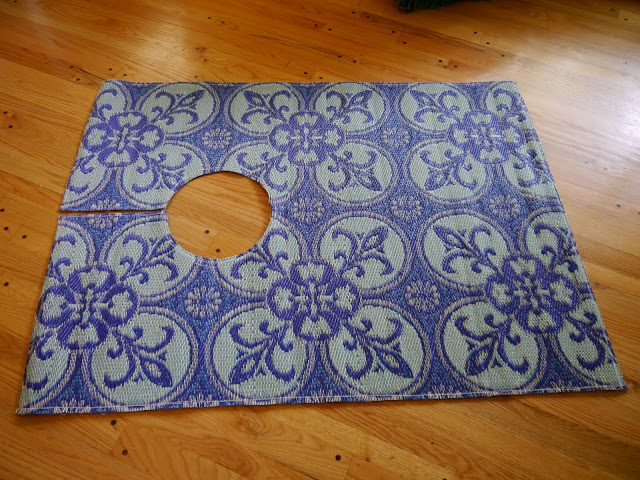
- Center the pattern over the mat. It’s easy to do this by folding the pattern in half the long way and marking the middle, then repeating in the other direction. Do the same thing with your mat. Mark the middle on each side, then lay the pattern on top of the mat, making the marks match up. Then trace around the pattern using a sharpie marker.

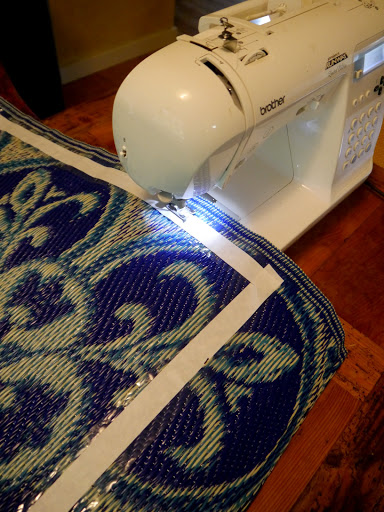
- Now put tape along the edge of the line. The purpose here is to keep the mat from unraveling when you are cutting it, before it is sewn. With this mat, that was only an issue in one direction, but I didn’t know that before I cut, so better safe. Place the tape on the inside of the line. Cut along the tape and get ready to sew. I used sail thread that I already had, but be sure to use outdoor thread. I sewed this on my Brother sewing machine, which is a regular machine. It handled this just fine. Sew along the middle of the tape to secure the edges.

- At this point, make sure your mat fits the cockpit floor.

- Make the binding. Cut 4″ strips from your chosen fabric. Using an iron, fold the fabric in half, then fold each side in half again. Use the iron to make crisp edges. Then cut 4″ strips along the bias of the remaining fabric for the binding for the circle cut out, if you have one. fold and iron that the same way.

- Sandwich the edge of the mat in the folded binding and sew along the edge, binding a blanket. Use the bias cut binding to do the circle.


Wednesday, June 8, 2016
Canvas, Round Two
This post originally appeared on Windborne in Puget Sound
In the past few days, we had an appearance (sadly brief) of nice spring weather... weather where the following all coincided:
And glory of glories, the weather held for the next day, which allowed me to use the pattern to cut out the pieces to make the roof panel. As you can see from the picture above, there simply is not enough room to do this down below on Eolian, out of the weather, making this an outside job.

Our existing dodger has the roof panel and the forward panel (the "windshield") attached, making the combination large and unwieldy. I will not be continuing that design. Instead, I will use Common Sense fasteners (male on the roof, female on the forward panel) to fasten the panels to each other.
I expect to start sewing on Friday, but I doubt that I will finish this weekend. Besides doing the sewing, there is the matter of the installation of all those Common Sense fasteners.
[Finally, a brief note to those of you to whom I cryptically mentioned Wood's metal: that post is coming, it's just not far enough along yet.]
Previous post in this series
In the past few days, we had an appearance (sadly brief) of nice spring weather... weather where the following all coincided:
- It wasn't raining
- It was warm
- It wasn't windy
 |
| The pattern, before trimming |

Our existing dodger has the roof panel and the forward panel (the "windshield") attached, making the combination large and unwieldy. I will not be continuing that design. Instead, I will use Common Sense fasteners (male on the roof, female on the forward panel) to fasten the panels to each other.
I expect to start sewing on Friday, but I doubt that I will finish this weekend. Besides doing the sewing, there is the matter of the installation of all those Common Sense fasteners.
[Finally, a brief note to those of you to whom I cryptically mentioned Wood's metal: that post is coming, it's just not far enough along yet.]
Previous post in this series
Tuesday, May 31, 2016
Getting aHead
Please welcome new contributors Dave and Anke, who are living aboard and simultaneously constructing s/v Wayward, a beautifully constructed sailing barge, in SE Alaska. As I mentioned, Wayward is still under construction; here Dave works out how to fit in a head:
By Jo Hudson
from the SEARUNNER Construction Manual by Jim Brown
Viewed objectively there is nothing more absurd than the usual sea-going toilet of the modern production yacht. What expense and engineering, what a profligate use of space and materials, what a baroque concoction of pipes and valves and pumps and skin fittings, what a sop to over-developed human sensitivities, all for the purpose of transferring a small amount of matter a distance of about twelve inches, from here on the inside of the hull, to there on the outside of the hull.
-- From Mingming and the Art of Minimal Ocean Sailing by Roger D. Taylor
Getting aHead
To date, Anke and I have never built an enclosed Head into one of our boats.
Our boats are small to begin with. Partitioning a chunk off for a room that's in use for a few scant albeit imperative minutes a day seems to needlessly cramp our style. The walls block the view (high crime, in our book) and crowd the remaining space.
Anke and I are mostly alone together, and quite comfortable with our nitty gritty. When friends come along... let's just say things are 'up close and personal'.
So a little more privacy would accommodate the sensitivities of our guests, not all of whom are as... um... earthy as others.
On the other hand, the one thing we've always longed for but never had was a Wet Locker; a place to let our raingear drip dry. Heads are traditionally not too bad for that purpose, though their ventilation is often wanting.
To that end we came up with the following:
Note the Head/Wet Locker at the lower, right (port, aft),
outboard of Companionway steps.
What we're looking at is a row of coat hooks along the wall, outboard of a section of flip up counter. This allows space for hanging outdoor gear, especially raingear, where it can drip harmlessly to a well-sealed floor.
The counter, when horizontal, extends the galley counter by (about) 3ft. It also doubles as the port, pilothouse seat, from which we can steer the boat under cover (workbench shares the same role, opposite).
When flipped vertical - hinged along its forward edge, it locks into position to form a partial wall. A curtain may be drawn across the inboard face, and voila! A semi-enclosed head!
It's not as isolated as the typical Head, but visual privacy is ensured. It's positioned under a pilothouse window, so ventilation is better than most. It's still a bucket affair, but a two bucket compost system isn't out-of-the-question. (Here's a great resource on DIY composting toilets from one of our readers).
Set-up and -down take but a matter of seconds, for those in haste.
So this has been a paper possibility for a couple of years, now, and I've been drawing them into Triloboat StudyPLANS. But if anyone's built one, I haven't heard... until now.
So here's a sneak preview of the as yet untried system, at the roughed-in stage. Stay tuned for trial and error to come!
Looking aft into to the portside Galley.
Head/Wet Locker aft.
Looking kitty-corner at Head/Wet Locker
Anke holding counter vertical...
will eventually have a barrel bolt into a small, partial wall outboard
(Mirror on the underside?)
Oh God!
Scrounged hinges...
installed 'upside down' to reduce gluteal hang-up
(the pronounced hinge curl could otherwise bite us in the A**
while sitting on counter)
Sitting Pretty
(and able to look out,, 360deg)


Tuesday, May 24, 2016
Good Enough
Over at Dock Six, Brian holds forth with a little philosophy, philosophy that I must confess strikes a chord with me:
A fleet of beveraged sailors congregating to celebrate sundown (and we had some great ones last season:
),
inevitably leads to discussion deep into the dark hours. One such confab meandered through the usual "Cruising versus Racing", "Tiller versus Wheel", "Power versus Sail", "Rum versus Rye", "Dock 6 versus Dock 5" debates to a topic which we discovered is a lot more nuanced:
"Correct versus Incorrect Gear and Installation."
or, "When is Good Enough, Good Enough?"
One thing all in attendance agreed on:
The answer, as it so often is, is...
..."It depends."
Except when it doesn't.
Electrical/electronical stuff is kinda fussy about how it is connected, for example. Get yer positives and yer negatives backversed and all the smoke comes out of the wires and you're left pondering how to lie on the warranty claim for your new, but now dead, chartsounderhaildar thingy.
Same thing with wrapping jibsheets around the winch- it only works one way, clockwise, dumbass!
On BOTH sides of the boat!
(At least 8 of you out there just air-wrapped an invisible winch to see if I was right... after you first pointed your finger in front of you like a pistol and then rotated it in the air, lefty-loosey and then righty-tighty, to remind yourself what "clockwise" meant.)
(( You KNOW you did. Don't even try.))
Restringing 6:1 mainsheet tackle takes at least two tries because nobody ever gets the sheave order right the first time and nobody bothers to take "before" pictures before unstringing the old sheet from the blocks... and, of course, it only works one way.
Adjusting the valve clearance on your engine, and flushing the head are other examples of "one way only" systems, gear and procedures.
Most of the other stuff on your boat?
Not so much.
Which is kinda reassuring.
When I am not sailing, and boatbuilding and boatpart building and wordsmithing, I am a gearhead.
But not as gearheady as I used to be.
Back in the day, BB (the era Before Boats), I was a die-hard 24/7 VW freak. Since I was 16, I owned 'em, fixed 'em, bought 'em, built 'em, sold 'em, lived 'em, and, sometimes, in 'em. At last count I had owned 47.3 of them.
The .3 is still in the backyard of Stately Jones Manor.
(NOT the backyard of SJM, but at times, it was close.)
I've laid hands on some of the rarest of the rare,
...and rubbed elbows with some of the coolest of the cool.
At the top of my "I Shit You Not" Stories list, I helped a bunch of local Canadian high school kids build a race car that ran in the 2005 Baja 1000:
As the old NASCAR joke goes, I wasn't involved, I was committed. (Look it up.)
Occasionally my wheeled obsession met my keeled obsession. Little known fact: my first dinghy , Chirp , built back in 2009, was sized to fit inside my VW Vanagon Syncro.
Confession: I haven't wrenched on a VW in 5 years.
What happened?
I discovered the "good enough" freedom of boats, and realized the math worked.
See here's the deal:
Old VWs are not just collectible, they are appreciating. Like crazy. Like, a -$5000 -price -tag -on- a- rusty- dented -non-running- project- bus- that- needs -everything -is -a -steal kind of crazy.
The shit got serious. And when the shit gets serious, you gotta get serious about the shit- an incorrect part, an ill-fitting aftermarket panel, a wheel with the wrong date stamp, is a step backward. A perfectly serviceable, but incorrect, $100 aftermarket muffler might cut the value of your pride and joy by $150.
And there are plenty of enthusiasts who will happily let you know, at every show and swap meet you attend with your incorrect ride.
As the value of the vehicles rose, the price of original and good aftermarket parts rose accordingly, stretching my always tight fun budget.
Meanwhile, in Old Boat World, or at least the part of it I discovered and happily reside in, nobody gives a shit about whether there are period correct bolts holding the stanchions to decks that are covered with unscuffed original non-skid. Having peeling decals on the air filter will not hurt the value of my boat at all.
Owning a floating summer home that will likely not appreciate in value, but will just as likely not depreciate much either, is kinda liberating.
I was spending more time messing around with boats, and less time in the garage. Finally, I had to face the fiscal reality:
My fun budget can support messing around with boats, or messing around with cars. Not both.
For now.
So, back to the original question. What was the consensus that our confab reached that night?
When is good enough, good enough?
We came up with the "Good Enough" rule of thumb: Every part, part replacement and modification on-board must answer "Yes" to three questions-
- Does it work?
- Is it safe?
- Is it durable?
That's a standard I can meet.
Thanks for stopping by. Feel free to "Talk the Dock" and pass the word.


Tuesday, May 17, 2016
Exposed Wiring
Over at Sail Delmarva< Drew cleverly fabricates a cover for some exposed wiring...
This exposed solenoid always bothered me. Non-AYBC compliant, non-USCG compliant, and a short looking to happen, the backside of this anchor windlass breaker has high-amperage exposed terminals.
I fabricated this simple cover from 0.09-inch FRP (the same materials I used for the window covers. Cut by score-and -snap, trim with disk sander, fillet corners with Epoxy + colloidal silica, finish with orbital sander and paint. In stead of screws (holes would show), attach with 3M Dual Lock.
The finished product looks factory. I think I will be using a lot of Dual Lock during the AC installation.


Subscribe to:
Posts (Atom)


