When we were preparing our boat (and selves) for cruising we watched all of Lin and Larry Pardey’s videos (and read all of their books). The inspiration for these pillows came from one of their videos. I can’t remember which one so you’ll just have to watch them all and figure it out for me ;)
In the video, Lin shows some pillow cases made in a velvet-like material that she used to stow fabric items, like sleeping bags. I thought to myself “Brilliant!” and enlisted my sister-in-law to not only make us slip covers, but also to make us pillow covers.
My very, very nice sister-in-law did an excellent job but I chose a crappy fabric for the pillows and so even though the slip covers she made looks like new after 3 years of hard cruising, the pillows were disintegrating and the cotton fabric had absorbed salt air and humidity from the start.
Tip: The Crypton Suede we bought for the slip covers, and used in this version of the pillows, is almost indestructible. We’ve spilled wine, coffee, etc on it. Rubber our salty, sunblocky skin all over it. More than three years cruising in the tropics and each time we machine wash the covers, they come out looking new again.
I used the exact same Sailrite video/pattern that I used to make the cockpit cushions. I measured out panels of the Crypton Suede (Curaco) 14” x 20” and used 6” as my width. I didn’t bother adding for seam allowances because I didn’t care what exact size the pillows were, just the approximate dimensions. I also put the zipper on the small end of the pillow this time so it makes them more comfortable to lay on while watching videos.
We have 4 pillows: one for towels, one for bedding, one for sleeping bags and one for everything else. When we go between laundry for a long time, the pillows can get half-empty and if it bothers us, I’ll consolidate – putting one pillow and its contents inside another.
And there you go. Hidden storage, comfy pillows, and linens that don’t smell (too much) like “boat”.
Tuesday, September 29, 2015
Sewing Project: Pardey Pillows
When you're living on a boat like Livia and Carol and cruising the world aboard s/v Estrellita 5.10b, space is at a premium. Having things do double duty is a good thing, especially where stowage is concerned...


Tuesday, September 22, 2015
No More Neon
This post originally appeared on Windborne in Puget Sound
In 1978, when Eolian was built, LED's were an expensive novelty. Therefore the lamps on her control panel that indicate the presence of shore power, generator power, and correct AC polarity were the tried and true neon lamps.
A neon lamp is a stupid simple device - a glass envelope filled with low-pressure neon and containing two closely-spaced metal pins. It will light up when presented with 110V, drawing a vanishingly small current (400 uA). But they don't last forever. Eventually they grow dim and begin to flicker. And then finally they go out.
I had replaced the shore power neon lamp in the power panel in our first year of stewardship of Eolian. It's the one that is lit the most, and therefore was the first to fail. And, coincidentally, it's the only one that is somewhat easy to get at on the inside of the panel.
After 15 years, it had failed again.
But now LEDs are common and cheap. I found these, designed for direct connection to 110V, on the Internet for a couple of bucks apiece. Installing them was not easy. The back side of the power panel is quite crowded, and it was apparent that the original lamps came with the panel and had been installed before any of the wiring.
I did the deed at anchor, with the generator and inverter off, so there was no 110V present to worry about. I got them in, but I had to take an Excedrin afterwards to deal with the cramps in my shoulder.
Hopefully they will last longer than the neon ones.
I'll let you know in 15 years.
 |
| Yup, AC polarity is correct |
In 1978, when Eolian was built, LED's were an expensive novelty. Therefore the lamps on her control panel that indicate the presence of shore power, generator power, and correct AC polarity were the tried and true neon lamps.
A neon lamp is a stupid simple device - a glass envelope filled with low-pressure neon and containing two closely-spaced metal pins. It will light up when presented with 110V, drawing a vanishingly small current (400 uA). But they don't last forever. Eventually they grow dim and begin to flicker. And then finally they go out.
I had replaced the shore power neon lamp in the power panel in our first year of stewardship of Eolian. It's the one that is lit the most, and therefore was the first to fail. And, coincidentally, it's the only one that is somewhat easy to get at on the inside of the panel.
After 15 years, it had failed again.
But now LEDs are common and cheap. I found these, designed for direct connection to 110V, on the Internet for a couple of bucks apiece. Installing them was not easy. The back side of the power panel is quite crowded, and it was apparent that the original lamps came with the panel and had been installed before any of the wiring.
I did the deed at anchor, with the generator and inverter off, so there was no 110V present to worry about. I got them in, but I had to take an Excedrin afterwards to deal with the cramps in my shoulder.
Hopefully they will last longer than the neon ones.
I'll let you know in 15 years.
Tuesday, September 15, 2015
New Shelf for the Cockpit Locker
Jeff and Anne continue the complete refit of s/v Pilgrim. Adding organization to the storage in the cockpit locker is a part of that refit...
Adding a shelf outboard along the hull in the cockpit locker will provide some additional storage possibilities and a platform on which to mount the refrigeration compressor.The fore end of the shelf will rest upon the top of the new bulkhead.
Test fit of new 1/2" plywood shelf in cockpit locker. Tabbing a ½” plywood panel to the upper, aft interior of the cockpit locker (upper, left in image above) allowed me to easily attach a bracket to support the aft end of the shelf.The shelf will be tabbed to the hull along the outboard side thus another round of grinding to expose the fiberglass hull.
Pile of gel-coat and fiberglass dust after grinding to expose bare fiberglass. YUCK! I am eager to be done with grinding fiberglass inside the boat. It creates a huge mess and fine dust spreads throughout the interior.We created the new shelf using the 1/2” prefinished birch plywood.
Unfortunately the nice finished surface must be ground off in the areas receiving tabbing.
48" run of 1708 cloth tabbing between the hull and the new cockpit shelf.
For people familiar with the M382, yes, this photo was taken from below the helm seat.We installed a 48” X 6” strip of 1708 cloth . The tabbing stiffens and strengthens the shelf significantly.Next, we applied two coats of primer and two coats of paint to the shelf and the upper sections of the cockpit locker.
Ahh... the satisfaction of fresh, unmarred paint. Our plan is to mount the refrigerator compressor near the aft end of the shelf. Then install one maybe two vents in the cockpit side wall to provide the unit with fresh air. The forward end of the shelf will store cleaning, maintenance, misc supplies in plastic bins. To keep the plastic bins in place while the boat heels we added a tall fiddle along open face of the shelf.
Teak fiddle installed on the shelf and deck drain hose secured to underside of shelf. Next up is installing the engine access panels and plumbing the lower and middle bilge pump discharge hoses to the drain manifold.
More images and notes from this on-going project are available in the Cockpit Locker Refit Photo Album


Tuesday, September 8, 2015
Glass-Bottomed Dinghy
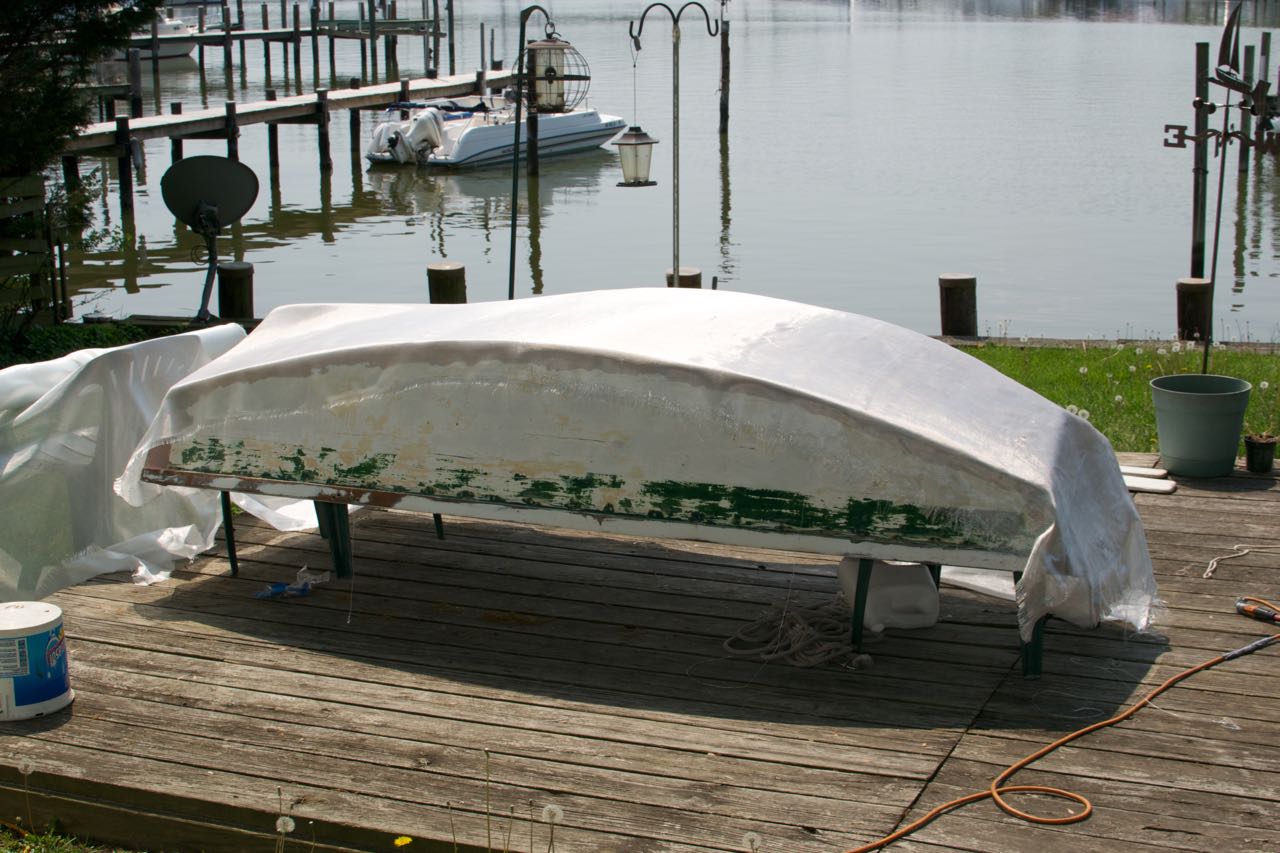
Over on s/v Cay of Sea, Rick and Ruth go to work sheathing their dinghy with fiberglass. Why do this? Well, it is a way to extend the life of a wood dinghy, and the fiberglass takes running up on sand and gravel much better than does wood.
[Editor's note: for those of you that have not worked with epoxy, as it cures a substance is pushed to the surface, called the "amine blush". If this is not removed before anything else is applied, it prevents a bond from being made.]I filled more small splits with peanut butter-consistency epoxy on the bottom today. These are super small splits – just narrow cracks – I forced epoxy into them with a putty knife, filling with cross-grain motion, then scraping up excess with the grain. Had I prepped the bottom for glass and resin, I could have gone directly to sheathing without waiting for resin cure. But I didn’t think it through, and needed to solvent wash the surface first and grind a few patches of cured epoxy. After letting the crack fills cure, I finished the prep.

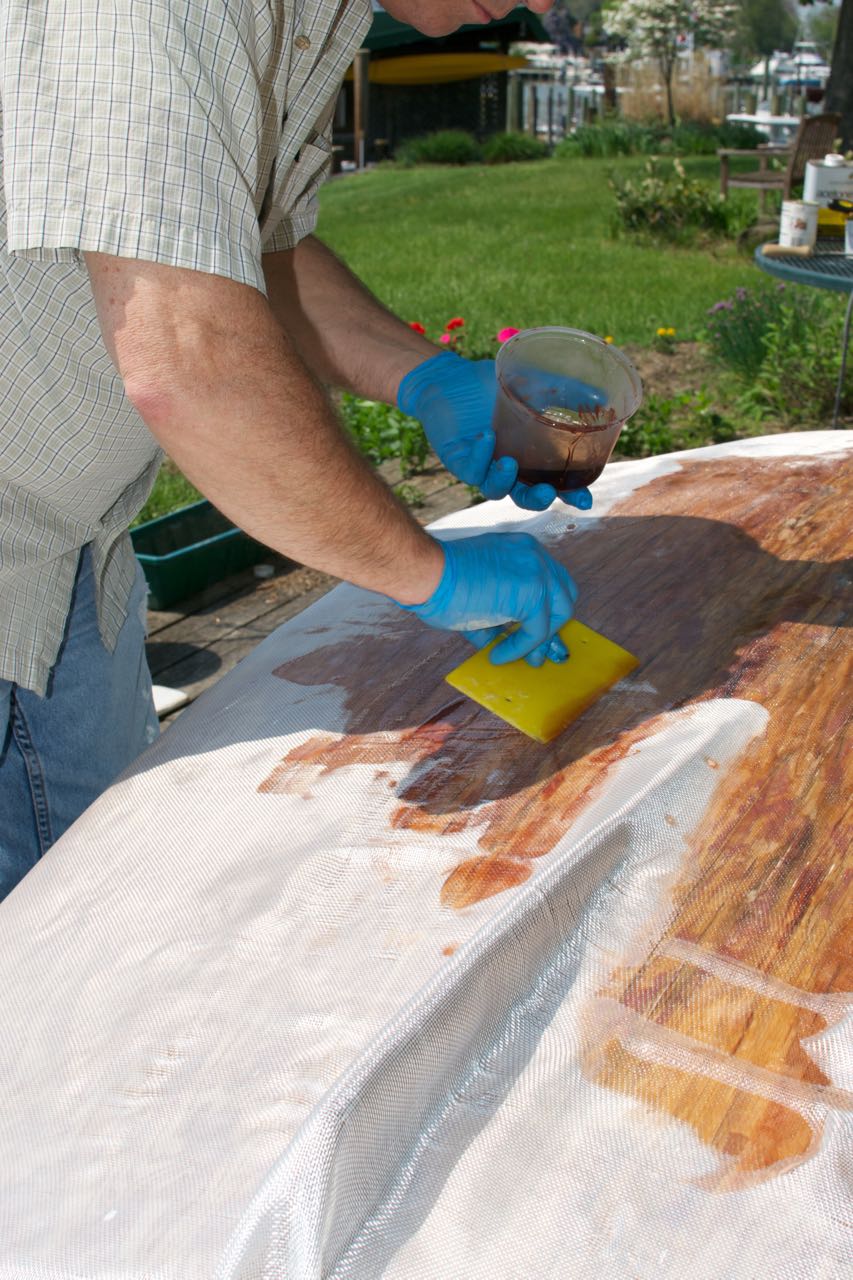
Draping the glass over the bottom showed me where to trim the excess, and where likely relief cuts were going to be needed: at the keel, in the corners, and a couple of places on the transoms I didn’t anticipate. It’s easy to push the weave of the fabric around while it’s wet, but care has be taken to keep pockets of void from pushing up as a result. Relief cuts are the best way to get the fabric to lay flat.
A large squeegee or putty knife/scraper is the best tool for wetting out on horizontal surfaces. It was a beautiful day – about 70 degrees – but the sun shining on dark surfaces made them warm, and consequently the resin set up pretty quickly. I had ample time to wet out each section, but I still had to move quickly. I spread out the resin and thoroughly saturated the weave, then quickly replenished my resin container. Three pumps each of resin and catalyst provided just the right amount to spread at one time. I used about 20 ounces of resin and catalyst to saturate the whole surface, including transoms.
I switched to a chip brush for the transoms and turn of the bilge, as pouring the resin wasn’t going to work on vertical surfaces. After an hour’s steady work, the entire surface was done and beginning to cure in the sun. I’ll do an additional coat tomorrow (or next time, depending on weather). One more coat will serve to completely fill in the weave pattern of the fabric, and provide a smooth surface. When I removed the boat from its elevated supports, I could readily feel the increased rigidity the glass and epoxy provides. The transoms will get even more rigid when I glass their inside surfaces.


Tuesday, August 25, 2015
How Much Is There?
This post originally appeared on Windborne in Puget Sound
I recently did a post which talked about establishing what the right amount of glycol in a holding plate solution was. Well, OK, now that we know what we want to have in there, how do we determine what we actually have? I suppose one possibility would be to simply empty the holding plate and refill it with a solution of known concentration, one that we just made up by careful measuring. Yeah, that would work.
But what if we just want to add a little water or glycol to what we already have? For that we would need to be able to measure the concentration in the solution.
This is the tool for that: It is a refractometer - it measures the refractive index of a liquid.
What is that?
All transparent substances slow the passage of light thru them somewhat - some more than others. The refractive index is the ratio of the speed of light in a vacuum compared to the speed of light in the transparent substance. So, if I tell you that the refractive index of a particular glass is 1.33, that means that, yes, light travels thru that glass only 3/4 as fast as in a vacuum. You have witnessed refractive index differences when you, for example, mixed water and vodka, or dove in a place where fresh water and salt water are mixing (at Shilshole, for example).
But for our purposes, it is enough to know that the refractive index of a water/propylene glycol mixture changes in a predictable way with the concentration of glycol. We don't even have to know the details of that change because the manufacturer has taken that into account in the preparation of the scale inside the instrument.
All that remains is for us to obtain a drop or two of the solution and put it onto the prism covered by the clear plastic flap, and look thru the lens at the other end of the instrument, for a view like this:
But there is a catch (isn't there always?). Before I sample the holding tank solution, I have to completely defrost the freezer. If I don't, some unknown quantity of the water in the system will be frozen out, which would skew the results in the direction of increasing concentration. So the refractometer stands ready for duty, waiting for a freezer defrost event.
Who knows when that will be?
I recently did a post which talked about establishing what the right amount of glycol in a holding plate solution was. Well, OK, now that we know what we want to have in there, how do we determine what we actually have? I suppose one possibility would be to simply empty the holding plate and refill it with a solution of known concentration, one that we just made up by careful measuring. Yeah, that would work.
But what if we just want to add a little water or glycol to what we already have? For that we would need to be able to measure the concentration in the solution.
 |
| Hand-held refractometer |
What is that?
All transparent substances slow the passage of light thru them somewhat - some more than others. The refractive index is the ratio of the speed of light in a vacuum compared to the speed of light in the transparent substance. So, if I tell you that the refractive index of a particular glass is 1.33, that means that, yes, light travels thru that glass only 3/4 as fast as in a vacuum. You have witnessed refractive index differences when you, for example, mixed water and vodka, or dove in a place where fresh water and salt water are mixing (at Shilshole, for example).
But for our purposes, it is enough to know that the refractive index of a water/propylene glycol mixture changes in a predictable way with the concentration of glycol. We don't even have to know the details of that change because the manufacturer has taken that into account in the preparation of the scale inside the instrument.
All that remains is for us to obtain a drop or two of the solution and put it onto the prism covered by the clear plastic flap, and look thru the lens at the other end of the instrument, for a view like this:
 |
| Approximately 33% propylene glycol shown |
Who knows when that will be?
Wednesday, August 19, 2015
LED Light Upgrade Project
It seems that converting your interior lights from incandescent to LED is becoming a popular project, and why not? Here, Rick and DAR of m/v September Dream show us theirs...
Now that the boat is back in the water, it's time to start taking care of some projects that I've wanted to do for a while now. The first project is an upgrade of the interior lights to LED.
I'm finally getting around to completing the conversion of our interior lights from incadescent bulbs to LED bulbs. Of course, this would have been a great project to have completed before we left for the trip, when saving amps would have been useful. Oh well, better late than never... :-)
The first task was to source the replacement bulbs. Primarily I just use google as my main research tool, but the Dr LED site (http://doctorled.com) is a great site with a lot of information on LED lamp replacement.
Most of the lighting (two double light fixtures in the salon, one double in the galley and two singles in the head) on the boat use a bulb with a model number of 1141 and a base of ba15s. I found a number of different LED bulbs that would work as a replacement for the 1141 bulbs, but I chose the following from amazon;
http://www.amazon.ca/gp/product/B00DDOSNH2?psc=1&redirect=true&ref_=oh_aui_detailpage_o00_s00
Part of the reason I chose these bulbs was the price ($5.00 per bulb is pretty good), but also because of the colour.
When you look at LED lighing, you'll see references to 'cool', 'warm', etc. This refers to the colour of the light given off by the bulbs. Here's a good link that illustrates this;
http://www.seesmartled.com/kb/choosing_color_temperature/
We previously had two LED bulbs in the salon, one in each light fixture, so we were able to run low current with our lights. These bulbs were quite blue though ('cool' white colour according to the colour temperature) and we didn't find they did that good a job providing usable lighting. I decided to change to 'warm' white colour for the replacements.
The new bulbs in one of the salon fixtures
A nice 'warm' white colour
After replacing all the bulbs it was time to do a current usage test to see just how much of a difference LED lights can make.
Everything turned off
Current usage of the incandescent bulb
Current usage of the LED bulb
As you can see, the LED bulbs are a great deal more efficient than the incandescent.
I still have a couple other lights to replace the bulbs in. We have two reading lights in the stateroom, and a couple side lamps on either side of the couch in the salon. They have a different bulb, with a screw in base known as an Edison E26 or E27. I've yet to pick a replacement LED bulb for these yet, but now that I see the other LED bulbs I picked up I have a reference for what the colour looks like.


Subscribe to:
Posts (Atom)


