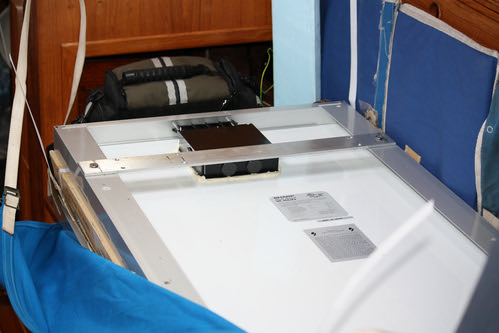
Back when we installed our solar panels I had taken these photos so I could talk about the install. I had a pretty complicated time figuring out how to get everything to fit on top of the bimini. I'm not sure exactly why because in hindsight it seems so simple. Hopefully some of these visuals might help someone else work out their installation.And by the way, you can now find solar panels on eBay for less than $2/watt...
We mounted aluminum barstock on the back of the frame to give us more options for mounting and also to act as a stiffener/brace to the existing aluminum frame.
We fastened the aluminum barstock to the frame with spacers I cut from starboard and stainless u-bolts with wing nuts. The wing nuts and u-bolts are intended to simply the removal process in an emergency because they can be removed by hand without tools.
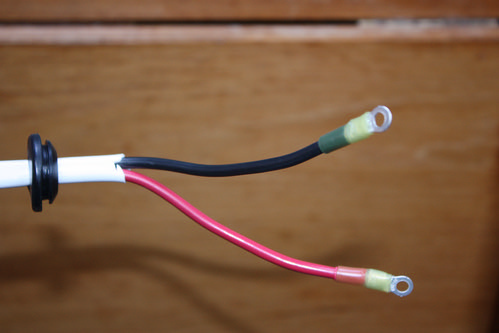
We used sealing ring terminals on the ends of the wire which were fit through the gasket provided by the manufacturers (2 Sharp 80W and 1 Kyocera 85W).
This is what the inside of the built in junction box looked like. We wired the panels in parallel and this panel has the wires from the preceding panel as well as wires going out to either the next panel or the MPPT controller.
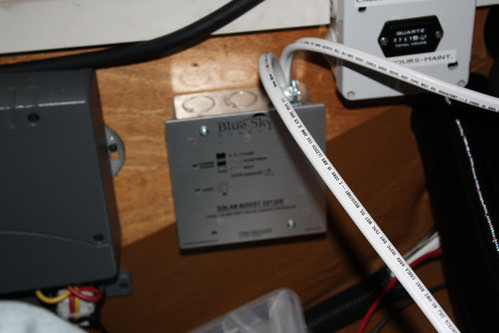
The end wires come through the cockpit combing and down under our aft berth to our Blue Sky MPPT controller like this.
An overview of how the panels were working during this past summer is here.
Friday, October 29, 2010
Solar Panel Install on Estrellita 5.10b
Livia and Carol have described the installation of their solar panels on s/v Estrellita 5.10b. Nice machining and a very professional job. And I like how they planned ahead for the need to remove the panels quickly in an emergency.


Wednesday, October 27, 2010
Dutching in
On a boat of any age, there will be places where the woodwork has been damaged. In Eolian's cockpit, the coaming cover had holes drilled to accommodate pegs in the cushioned seat backs (to keep the seat backs in place). Because of the design, it was easy to apply substantial leverage on the pegs and holes when lifting up the seat backs. Not surprisingly then, there were places where the pegs broke out the edge of the teak cover board.
What to do? We'll pick just one of the breaks in Eolian's coaming cap to follow - one in which the Previous Owner had sanded and finished the split-out surface in an attempt to disguise the damage:
We will be gluing in a new piece of wood, in a process called "dutching in". Sorry, I don't know where this name came from. In order to do this and have a thin glue seam, the contour of the area to be repaired must match the contour of the piece which will be ductched in. This is easiest by far if we are matching two flat surfaces. So, using whatever tools are appropriate for your repair (I used a hammer and a chisel here), clean up the surface of the area to be repaired, creating a place for the filler piece to nestle into. Choose your filler piece carefully - it should have grain and color that are a good match for the area being repaired.
Next, using epoxy (I used 30-minute stuff here), and whatever clamps are required to hold things together until the epoxy goes off, glue in the filler piece:
Once the epoxy has hardened, use whatever tools are required to trim away the extra wood. In this example case, I again used a chisel, but a small saw could have worked too, or perhaps a Dremel tool. Then sand the repair area. You'll see that in the example, I did not pay too much attention to the actual peg hole because I was going to re-drill it anyway to take a bronze bushing:
It's really not hard to do. Just don't be in too big a hurry... spend the time to make the patch as invisible as possible.
Look closely at any classic wooden boat - you will undoubtedly find dutched in areas... now that you know what you are looking for.
What to do? We'll pick just one of the breaks in Eolian's coaming cap to follow - one in which the Previous Owner had sanded and finished the split-out surface in an attempt to disguise the damage:
 |
| Piece broken out, and then refinished! |
We will be gluing in a new piece of wood, in a process called "dutching in". Sorry, I don't know where this name came from. In order to do this and have a thin glue seam, the contour of the area to be repaired must match the contour of the piece which will be ductched in. This is easiest by far if we are matching two flat surfaces. So, using whatever tools are appropriate for your repair (I used a hammer and a chisel here), clean up the surface of the area to be repaired, creating a place for the filler piece to nestle into. Choose your filler piece carefully - it should have grain and color that are a good match for the area being repaired.
Next, using epoxy (I used 30-minute stuff here), and whatever clamps are required to hold things together until the epoxy goes off, glue in the filler piece:
 |
| Repair piece is epoxied into place |
Once the epoxy has hardened, use whatever tools are required to trim away the extra wood. In this example case, I again used a chisel, but a small saw could have worked too, or perhaps a Dremel tool. Then sand the repair area. You'll see that in the example, I did not pay too much attention to the actual peg hole because I was going to re-drill it anyway to take a bronze bushing:
 |
| Trimmed and sanded |
 |
| Finished; bushing installed |
It's really not hard to do. Just don't be in too big a hurry... spend the time to make the patch as invisible as possible.
Look closely at any classic wooden boat - you will undoubtedly find dutched in areas... now that you know what you are looking for.
Monday, October 25, 2010
In praise of DIY
I have long been an adherent of the DIY philosophy - you might have guessed that, given the purpose of this blog. Most boaters are DIY'ers by nature - thus the popularity of this site! Aside from the obvious cost savings, when you successfully complete a project yourself, there is a wonderful feeling of satisfaction, of competence.
And in the boating world, DIY makes even more sense. There are those who proclaim that "the only tool I need is a Visa card." That certainly works, if your boat never leaves the dock. But when you are at sea, that credit card is not very useful - except, perhaps, if you are in need of a thin plastic shim.
Over at Boat Bits, Robert has posted an essay on this subject that I encourage you to read.
Friday, October 22, 2010
Safety warning: Sealed lead-acid batteries
Scott over at DowneasterYachts.com has posted a graphic warning concerning sealed lead-acid batteries. Because we feel that safety information should be broadcast as widely as possible, we will repeat it in full here on Small Boat Projects. Please do not take this as a condemnation of this type of battery. Instead, this is a reminder that there is no ideal type of battery - all choices are compromises.
Here's Scott:
Sobering. I wonder if our Australian readers can shed any additional light on this incident?
Here's Scott:
David Gill, new owner of Tondelayo and new member here ran into an interesting situation that is relevant to us here. As a matter of fact I have 6 AGM batterys on Valkyr. I like them because you can’t spill acid out of them. I have had bad problems on a prior boat with that.
However the description here and the photos David provided are very sobering. I have had 3 AGM batteries in the past that have swollen in a very limited way and went bad. We had them replaced. I have had this happen to a couple of west marines SeaVolt AGM group 27 and 31 batteries as well as one of the optima blue top spiral AGM batteries just in the last month. So this is a very reasonable heads up. Thank you David for writing this up, and submitting it with the pictures.
Hi Scott.
Here’s a bit of information that may be relevant to anyone using Sealed 12v batteries. I don’t use them on Tondelayo but anyone who does wouldn’t want this to happen while at sea.
At 0848 hrs on 12 July 2010, pumper 402 Nelson Bay attended a caravan park in Nelson Bay. On arrival they found a 12V sealed caravan battery (also called Valve Regulated Lead Acid or VRLA battery) with its sides and top markedly bulging.
")
Park staff had removed the battery from inside a caravan to a grassed area.
The BA team was to cool the battery with spray from a line of 38 mm hose from behind substantial cover. However, the battery slowly continued to expand. Temperature readings taken with a TIC registered 49 ºC.
As it appeared the battery could explode, a hot zone of 30 m and a 50 m exclusion zone were established. A second pumper and hazmat were called to assist.
Accessing the internet from 260 Hazmat’s laptop, a VRLA battery distributor was contacted. They advised to cool with water for the next 24 hours and then disposed of at a regular council battery collection point.
Sustained cooling from substantial cover eventually reduced the battery’s temperature to 26 ºC. After being deemed safe, it was immersed in water and placed in an isolated area of the council waste disposal facility at Port Stephens. The battery’s condition was monitored by council staff and the NSWFB was contacted when the casing broke open two weeks later.
Concerned about the impact that a battery explosion would have in the confined living area of a caravan, SO Kwan submitted an observation to the Lessons Learned Centre. We found that:
At the Nelson Bay caravan park, it appears that either the relief valve failed or the heat and gas generated during charging exceeded the valve's capacity. The plastic case softened with the increased temperature and the higher pressure inside caused it to expand. As it cooled, the plastic case became hard and brittle, and eventually broke.
- VRLA batteries are used in a variety of applications. Different types can deliver short duration – high energy output (for starting combustion engines) or release energy more slowly (as power supply backup for telecommunications equipment, etc).
- They do not need topping up with water. Oxygen evolved at the positive plates recombines with the hydrogen ready to evolve on the negative plates, creating water and preventing water loss.
- Several conditions can cause the battery to heat up, such as high ambient temperature, poor ventilation, incompatible charging equipment, charger malfunction and battery cell failure.
- Generally, gas is not produced during charging. However, if a battery is overcharged due to charger malfunction or battery failure, gas pressure can build within the battery. A pressure relief valve is designed to release the excess hydrogen and oxygen.
Firefighters are asked to contact FIRU if they encounter expanded VRLA batteries. This will help to research the frequency of this and whether there is a problem with charging units or the batteries themselves.
Regards,
Dave Gill
Mobile: 0488 285 286
Email: davegill@southernphone.com.au
PDF Download

Sobering. I wonder if our Australian readers can shed any additional light on this incident?
Wednesday, October 20, 2010
Shore power issues
If In Doubt, Change It Out

If your shore power inlet looks like this, you know you need to change it. That pin got hot because of a poor connection, which could have been in one of three places:
- Where the wire is connected to the pin, at the back of the inlet fitting.
- Where the plug contact makes contact with the pin
- A poor connection between the wire and the contact in the mating plug
In any case, now you must change out the shore power inlet fitting. But you should also change out the plug which mates with it. Here's why: In order to ensure a good connection, the contacts inside the plug spring apart as the pin from the shore power inlet is inserted. This spring action results from the shape of the contact, the material, and its temper. If the pin has been overheated, its mating contact likely has too, and probably has lost its temper. Therefore, if you only change out the shore power inlet, the connectors in the mating plug, now having lost their springiness, will make a poor connection with the pins in the shore power inlet (see #2, above). The next time the boat draws a big load, it is likely that the plug will heat up, destroying both itself and the newly installed shore power inlet, and possibly even the entire boat.
Be a Loner - Get Isolated
There are three wires in that connector. Traditionally, these are called the hot, the neutral (these two carry the power) and the ground. Strictly speaking, the ground is unnecessary - it is there as a safety precaution. If, for example, one of your appliances should develop an internal short (say, the casing of the heating element in your water heater cracks, and water seeps in, connecting the actual heating element and the casing, and in turn the water, and the water heater tank, etc.), this ground lead, which is connected to the external parts of everything electrical on your boat, ensures that you are at the same potential as the cases, knobs, etc. and therefore do not receive a shock. If substantial current flows thru the short, a breaker will trip - which is the desired action.On shore, "ground" is established by driving a metal rod literally into the ground (your house ground will also be connected to your water supply, which is even more metal in the ground). On the water, what gets used as "ground"? This is not as easy to explain. The obvious answer is: the water. But on a boat, there is something else going on. Much of the submerged external metal on your boat will be protected from galvanic corrosion by attached zincs which, being higher in the electromotive series, will corrode to protect that submerged metal. But if we connect the boat AC ground to the water, then we are at great risk of electrolytically dissolving that external metal! More on this in a moment. Selfishly, look at it this way. If your zinc-protected external metal is attached to your neighbor's external metal, then your zinc will be protecting both your submerged metal and his. If both boats have their green ground wire connected directly to the boat ground, then your zinc will protect his metal. But it is much worse than this... your zinc will also be protecting all the marina's submerged metal as well, starting with your dock. So how to provide the safety protection that a ground delivers to someone onboard, without truly sacrificing your zinc?

Belt And Suspenders
 Adding a second layer of protection, Ground Fault Interrupters are now, like in houses, required equipment on all circuits on a boat near water: the galley and the heads. But realistically speaking, any circuit on a boat is near water. They should all be GFI protected. This one is easy to do. How many AC outlet circuits do you have on board? One? Two? Three? Well then you just need to go to Home Depot and buy one/two/three GFI outlets. Locate the first outlet on each breaker (it'll probably be the closest one...), and replace the standard outlet with the GFI outlet. All the downstream outlets on that circuit are now protected (they even include little stickers in the GFI packaging that you can affix to the downstream outlet covers to attest to this). This would certainly qualify as a small boat project.
In Should Equal Out

Clamp on ammeters do not need to be expensive. So here's another small boat project: get one, and check your boat's electrical system from time to time. Check your neighbor's too! Heating elements in water heaters and coffee pots crack long before they fail completely, motor windings short to their casings thru conductive dust from the brushes, insulation on wires chafes. An annual check is a good thing.
Final Words
Shore power is a wonderful boon to the boater, but it is not as simple as just plugging in the cord. But then, nothing on a boat is.
Monday, October 18, 2010
Sticky question
Polyvinyl chloride (PVC) is a brittle plastic. (In your mind's eye, take a vinyl record and smack it on the edge of a table - it shattered, didn't it?)
PVC can be made into an entirely different sort of material by blending it with an "inert" oil as it is molded - this gives you the flexible PVC you know for fenders, lifelines, and wire insulation.
Unfortunately, the oil doesn't stay put - in sunlight, it migrates to the surface of the PVC and then it oxidizes and polymerizes into a sticky mess.
So here's my question to all of you reading:
Come on now, don't be shy - I know there are a lot of you reading this - tell us how you deal with this problem!
PVC can be made into an entirely different sort of material by blending it with an "inert" oil as it is molded - this gives you the flexible PVC you know for fenders, lifelines, and wire insulation.
Unfortunately, the oil doesn't stay put - in sunlight, it migrates to the surface of the PVC and then it oxidizes and polymerizes into a sticky mess.
So here's my question to all of you reading:
What method have you found best for ridding fenders and shore power cords of the sticky polymerized plasticizers in PVC?
Come on now, don't be shy - I know there are a lot of you reading this - tell us how you deal with this problem!
Subscribe to:
Posts (Atom)


