My first foray was a cockpit table. I needed a cockpit table. Well, I, personally, didn't need a cockpit table, but SWMBO did, and I need a warm place to sleep, so you can see how the stars aligned on this one. I sussed out commercially available, marine priced cockpit tables and promptly gagged. So, I thought to myself, "Self, you could make it yourself for a lot less." One problem. Well, four actually.
So, I went to plan "c".
- I have limited woodworking skills,
- limited woodworking tools,
- and limited time. oh yeah, and
- I am cheap.
I spent some time eyeballing the cockpit in question:
Then I moseyed into action. I bought one of these for $29.99
A frenzy of measuring, remeasuring, cutting, screwing, drinking, varnishing, etc. later, and this is how it finished up:
As an added unplanned bonus, the table is reversible- install it aft of the wheel while Dockside for easy companionway access, mount it ahead of the binnacle while underway. When not in use, it simply stows under the salon table below.
Monday, October 31, 2011
Easy cockpit table
Please welcome new contributor Brian over at Dock 6! Brian has a good list of small boat projects, one of which we will pick up today:


Thursday, October 27, 2011
Arts and crafts, part III (finis)
Jeff and Anne aboard s/v C'est la Vie show us the final results of the construction of their chainplate platforms. If you missed Part I or Part II, it would be best if you read them first.
With the completion of the new chain plate deck fittings we are one project closer to re-stepping the mast. The entire process is detailed in our photo album - Chain Plate Deck Fittings - Fall 2011
Before:
After:
We applied the third coat of Brightsides Paint to the surrounding area yesterday. spot painting around the chain plates, mast step, and anchor windlass certainly highlights the sad state of our topsides paint.
Today we used 3M 4200 to re-bed the chain plates. This process prevents water from seeping through the deck fittings.
While working in the area we installed & bedded a new flush deck waste pumpout fitting. Over the past few weeks of working in the head I have noticed some water leaking in near the portside aft chain plate fitting. Unsure of how the water was intruding, we played it safe and re-bedded the port and starboard stanchion bases as well.


Monday, October 24, 2011
Discount Air Conditioning
Some places in the world are still dealing with heat (not us here in Seattle). Drew over at Sail Delmarva extols the virtues of fans...
I have a Cruise-&-Carry AC unit. We have a love-hate relationship. It's heavy, blocks some of the view, and is in the way when stowed below. It snags genoa sheets. I can only use it when plugged in at the dock because of the power demand--I could run a 2000 watt genset, but that's just too much total noise and too much complication.
Lucky folks are enjoying trade wind AC about now. I don't want to hear about it. Actually, the Chesapeake is beautiful this season, but I'm writing about summer. Still air, temperatures in the mid-90s to 100s, and all the humidity you can stand.
A few years ago I was in Annapolis with my parents for an over-night.We'd finished the tourist thing, were fixing dinner, and were listening to thunderstorms grumble in the distance. We were going to watch an old movie around the salon table after dinner. However, even with the slider open, when we close the rest of the hatches it gets darn steamy fast, and the heat of cooking doesn't help. We needed to do something.
When we bough the boat it came with a 20-inch fan, hidden away in the huge under -bunk lockers. I figured it was for drying things out or something, but was clearly to big for convenient use. But desperate times call for desperate measures; I'd set it somewhere, just to get some air moving. I sat it on the chart table, swiveled to point up and over into the salon, and even on low it served as a silent ceiling fan. You can still slide by into the head.
Since then we've found many uses:
It draws 0.6-1.2 amps @ 110v AC (about 6-12 amps at 12 volts from the batteries, post inverter) depending on the speed setting, about 66-132 watts, or about 10x less than AC. About 70 amp-hours if you run it all night on low--though generally at some point in the night we turn it off--a manageable load easily handled with a solar panel system. There are many equivalent models, probably even better models; be certain to get one that is very quiet on low and that swivels up. It moves 1400-2000 CFM: compare this to the 225 CFM and 0.3 amps of a typical cabin fan. Oddly, not as energy efficient, but much quieter than 10 6-inch fans!
- Ceiling fan. Sit it on the cart table and aim it up. Even on low it moves a lot of area around the cabin, 10 times what the 6-inch fans can manage on low. It is also whisper quiet in that location, perfect for watching a movie.
- Sleeping cabin fan. Place it in the door and try medium if it's really hot, low if not. It's not too high to step over.
- Salon door. Same idea.
- In the cockpit, if stuck in a marina and it's sizzling hot.
One of our best finds.

Friday, October 21, 2011
Mosquitoes: No access!
How do you keep the pesky critters out? Lotte on s/v Lunde shows us how she builds custom-framed screens for Lunde's hatches:
[Editor's note: Apologies for my poor editing of Google Translate's translation from the original Danish.]
The mosquito net is finished. Below is instruction in pictures and text. If anything is unclear, just ask.I think that the idea of fastening the netting to the construction base instead of the slats is crucial. Otherwise, the slats would bow inwards, due to the tension.
You start, of course, taking aim. Here I would like to make a mosquito net with the target size 480 x 480 mm (external dimensions), but the method can easily be used to make a rectangular net too.

Slats of the correct length will be posted on a reusable base (here a blunt old tabletop), adapted in size. It is advantageous to let the base be slightly larger than the dimensions of the finished nets. Here is used forty slats 21 x 5 mm, depending on frame size and personal taste, you can use many other dimensions and wood types.

The joints are kept in position using double sided tape. Be careful not to use too much tape!

When slats are fixated on the base, put the net over and firmly attach to the base with a staple gun. It may be advantageous to have a helper to do this, because the net must be kept tight to get even and neat result. Here is spent brudetyl [Ed. ?], which is very dense, but you can also buy outright mosquito net.

Put a strip of glue in the middle of the slats around the frame and place a similar set of slats on top of it so that they are staggered in the corners. The trick is to use enough glue so that the slats are covered, but not so much that a whole bunch runs out. It will be impossible to remove from the net.

To fix the slats so they stay lined up, drive a little brad through the slats and into the plate. Here is used a total of eight brads (one at each end of each slat). Do not get too close to the corners, so you avoid splitting. Heads of the brads (use pliers or a cutter) are cut off and pounded in until they are flush with the slats.

Place a small piece of plastic (eg cut out of an old plastic bag) over the corners, so the glue does not ooze when the slats are put under compression .

Clamp the slats. To get an even pressure, pieces of wood are placed over the slats under the clamps.
Let the glue harden.

When the glue has hardened, cut the net off of the frame and staples. Then lift the frame gently off of the headless brads. Use, for example, a putty knife and push it under the corners, which are still held firmly by the double sided tape.
Cut off the excess net (and any glue) with a sharp utility knife.A voilá!

Fill the corners and the holes left by the brads. Sand and paint. It is possible to hang the frame by pulling a length of fine wire through the netting right in a corner, but be careful not to damage the netting. In this way, both sides can be painted simultaneously. Alternatively of course you could just paint one side at a time.
The mosquito net is finished and ready to keep the little blood-sucking and extremely rude intruders away. The frame can be mounted as desired, eg hinges and fasteners, or more permanently with screws. We needed a method that makes the screen easy to remove, so we can get to open and close the front door. The solution was another small home-made project that I will share with you soon.


[Editor's note: Apologies for my poor editing of Google Translate's translation from the original Danish.]
Wednesday, October 19, 2011
Arts and crafts, part II
Jeff and Anne aboard s/v C'est la Vie continue with Part II of the construction of their chainplate platforms. If you missed Part I, you really should read it first.
Epoxy cured, chain plate removed, and modeling clay removed; I sand down the new fittings with 80 grit sandpaper and a Dremel tool.
The battery powered Dremel with a rough sanding drum saved a great deal of time and effort when addressing the interior edges of the reservoir. Initial sanding complete it is time to add the fillets (rounded edges) and remedy any gaps in the initial round of epoxy.
I refilled the reservoirs with model clay and re-taped the surrounding area before mixing up another round of epoxy. This time around I used a fairing filler to thicken the epoxy to a consistency similar to petroleum jelly. The fairing fillers are easier to sand down and this application is more about cosmetics than structure.
No clay molds on this application. The epoxy was added to the fitting using a stir stick and a 3" spreader. Before the epoxy fully set, I used a razor blade to cut through the skin across the top of the area filled with modeling clay. Once cured I removed the clay and tested the height of the new fitting by inserting the chain plate and attaching the turnbuckles. It is a very important test the fitting before continuing on to painting. I found that I had raised both forward fittings too much. The forward fittings did not allow enough clearance for the shoulders of the turnbuckle. I removed to excess material from the top of the fitting, approx 3/32", using an orbital sander armed with 80 grit paper. The aft fittings did not require any material removal.
Another round of sanding with 80 grit paper followed by a round with 120 grit paper preceeded the application of primer.


Monday, October 17, 2011
Arts and crafts, part I
In the first of a two part post, Jeff and Anne aboard s/v C'est la Vie show us how to use modeling clay and epoxy to make professional-looking raised platforms for their chainplate deck penetrations. This is a two-part post because Jeff does such a good job of describing the work and the problem-solving process - a great read and an inspiration to all of us.
With all the standing rigging down the time is right to tick off a long time resident of the projects list - rebuild the chain plate deck fittings. I'm unsure of the technical name for these things, but they serve to keep water from intruding into the cabin where the chain plates pass through the deck. They perform this task in two ways. First, they are raised so thin sheets of water running across the deck will pass round the structure. Secondly they have a recessed reservoir that when filled with caulk and compressed by a metal top plate forms a water tight seal around the metal chain plate. C'est la Vie has four such fittings on her deck. The aft fittings are doubles and accommodate the cap and aft lower shrouds.
Visible in the image above is a green outline of what I envision the for the shape of the finished product. The forward fitting is a single chain plate that serves the lower, forward shroud.
In the images above the metal fittings are the chain plates. The yellow modeling clay is filling the reservoir and extends above the height that I plan to build up the new fittings. Surrounding the modeling clay are the eroding remnants of the original fittings.
At the the stage of the process pictured above, I have drilled out and refilled with epoxy the four screw holes used to tighten down the metal top plate. With these holes filled the next step was to create a mold for the new deck fitting. Modeling clay works well as a mold for epoxy, but how to create nice round ends and straight sides? I searched around the boat for a something that looked to be the appropriate radius.
Can't use the can, but the lid will do nicely.
I cut the plastic lid in half vertically for use as a guide, and then molded the clay around the lid.
Once the round ends were complete, I used a straight edge and a box cutter blade to clean up the sides of the mold.
Repeat this process on each of the four fittings and it is time to pour the epoxy. I used West System epoxy thickened to a consistency somewhere between honey and ketchup with high density filler.
Allow epoxy to fully set... see part 2


Thursday, October 13, 2011
Spice up your Life
Are all spice jars in the supermarket a standard size? Well, no they aren't. This means that inevitably, some will be too big to fit into standard spice racks, and some may be small enough to not be adequately captured and thus escape. Mike of s/v Chalice solves that problem by making his own spice rack, to his own dimensions.
Spice up your Life
I needed to build a spice rack. So I got some spice jars to see what heights and depth I needed. This is what I came up with. Sorry no construction photos as I was busy building other things.
From Spice Rack
From Spice Rack
Finished Rack in place. Just need to screw it home. It actually does 2 jobs as it hides the deck/liner/bulkhead joint to. Also you can see my electric fan is installed. The gage you see by the fan is for pressurizing the kerosene stove. I built the bracket as I could not find one. Untested as of yet. Hope it works.
From Spice Rack


Monday, October 10, 2011
Chop chop!
Kitchen appliances that use 110V (or 220V for you Europeans) are problematic on most boats. And there frequently are not 12V versions. Sometimes the best answer is the 0V equivalent: a manual appliance. Lotte on s/v Lunde presents one here for our consideration:
[Editor's second note: Apologies for my poor editing of Google Translate's translation from the original Danish.]
[Editor's note: These can also be found at the American version of Amazon]I have for several years on land been very happy to have a hand blender. I blended very little with it, but chopped rather a lot. Lots and lots of onions. Garlic. Nuts. Parsley. Everything is smoked in the chopper, and I have therefore looked for a replacement for it. Not because it is dying, but because of course it requires 220V and on the boat we have 12V. Best of all, it would be if you could find one which did not use electricity because it can at times a limited resource - despite the solar and wind. Other things have a much higher priority in current accounts than just a kitchen appliance which really could easily be replaced by a knife (it's just much easier to use a hack! Especially in a seaway.).
The answer to my prayers was a manual food processor, a VeggiChop from Chef'n . And it really IS the answer.

It is powered with a pull ring like a few salad slings do.

I've now tested it with onions, garlic, ginger and various spices, and it is something close to phenomenal!
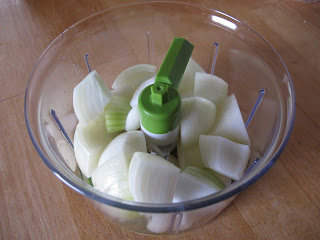
Five jerks on the leash and onions are ready.

If one goes on and pulls fifteen-twenty times, then you have something similar to puree. Wow!


[Editor's second note: Apologies for my poor editing of Google Translate's translation from the original Danish.]
Thursday, October 6, 2011
How much do you have out?
There are many ways to know how much anchor rode you have veered out. In this post copied from Sail Delmarva, Drew shows us a simple way he used to mark his chain, on his own deck, without making a mess!
Knowing how much rode you have out is essential to proper anchoring. When I had an all-fiber rode I would measure it as deployed, counting the fathoms by arm span. I could time the windlass (about 6 feet per second) but I always loose count. My windlass doesn't like anything attached to the chain, so paint was the most obvious choice. But how to mark 100 feet of chain on-deck without making a mess?
Easy and fast. Neat too--I painted the chain on the deck in a light breeze with no real risk of over-spray mess.
- Flake out the chain in even loops. In this case, 10-foot lengths fit across the tramp.
- Pick marking points and temporarily mark with tape. I chose 25, 50, 75, and 100 feet.
- Collect a box from the dumpster, notch it as needed, and paint away. Plain-old Rustoleum or anything similar will hold-up for years; it chips going through the windlass but remains visible.
- Just leave the box on-deck until your next visit, to make sure it's dry. No rush.
My 100-foot mark is long because I like to keep the splice off the windlass. It passes fine, but the windlass doesn't grip rope well, so hand tensioning is required.
PS. Not my original idea. I saw it posted somewhere, tried it this past weekend, and deemed it worth sharing. Good boat keeping common sense tip.


Monday, October 3, 2011
Up the Creek...
For cruisers, the dinghy fills the role of the family car. But what if your family car broke down? Steve and Lulu on s/v Siempre Sabado tell us that you'd be up the creek...
...with a broken paddle.
We were rowing back from shore the other afternoon, having returned the Terminator to John on Trick as they were headed back to Puerto Escondido. I'm merrily rowing along when *SNAP* the port oar just broke in two, Right at the oarlock where, of course, the greatest stress is. Lulu took the broken piece and used it as a paddle. I would row with one oar and then Lulu would correct our course with the paddle. Slow, but we got there. About a week ago, Mick from s/v Kashmir lost an oar sometime during the night. Now he had just one oar which wasn't doing him much good. We borrowed his remaining oar but the mismatch made rowing pretty difficult.
Nothing left to do but repair our own oars.
The repair was nothing Earth-shattering but it worked out well. We happened to have a couple of pieces of closet rod stock on the boat. It was bigger around than the interior diameter of the broken oar shaft so I had to plane it down to size.
Once it was small enough to just slip into the shaft, I put one end in and pinned it in place with some screws.
Then I slipped the other end over the protruding plug and screwed in in place.
And voila! we once again had a matched set.
The repair went so well that today, I cut the other oar apart at the stress point and inserted a wooden plug in it, too. Figured I'd head trouble off at the pass for once.


Subscribe to:
Posts (Atom)


