As I continue to work on my book on "Faster Cruising" I found myself feeling like the cobbler with no shoes for his children; I don't always follow my own advise, even when I know I'm right. In the book I argue that cruising boats are often lack the rigging and hardware needed to make basic trim adjustments quickly and easily, as though cruisers don't care about efficient sailing or understand the fine points. I care, but I have to admit my cruising cat doesn't have the quick access to fine trim that my performance cat had. I aim to fix that.
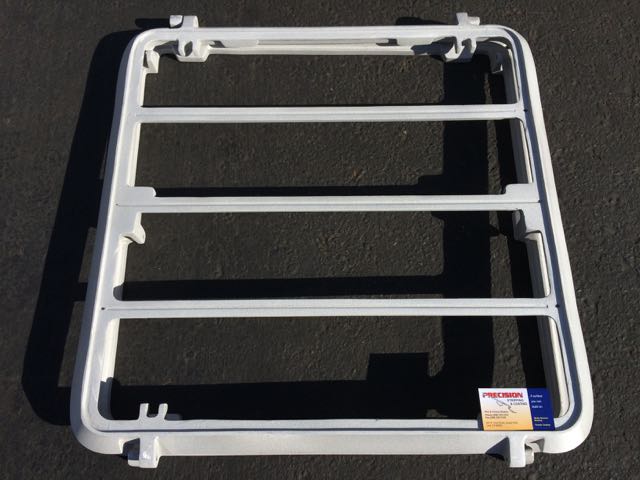
Case in point. My PDQ 32 came with a good boom and internal reefing, but the main outhaul was secured to an undersized cleat . To tension it under load, you take the tail to a mast-mounted winch, wrap the line under the cleat, and lift the line sharply when taking the line off the winch in an attempt to minimize slippage before that first wrap is on the cleat. Boy scout at best.
A few days ago I removed the undersized cleat (closely spaced holes on the seam) and I tapped four new holes to secure a proper jammer. Now I can ease the outhaul in a blink and tighten with a winch in control.
The smaller line is for the lazy jacks.
Why a double jammer? The few times I have found myself sailing with three reefs (winds gusting to over 30 knots) I found I needed a better way to winch the clew down. The tack is easily secured with a loop through the reefing tack and under the gooseneck, but there is no internal rigging for a 3rd reef. Thus, I tie a bowline around the boom under the reef clew (like the other reefs), go up through the reefing clew, and back to a snap shackle-equipped snatch block at the main outhaul. From there the reefing line is threaded through this new jammer, allowing a mast mounted winch to tension the clew outhaul.
The only challenge is to remember to thread the reefing clew while hoisting.
[The jammer came courtesy of freecycle--it patiently awaited re-purposing for several years in one of my might-need bins. Whooppee!]
Tuesday, November 21, 2017
Outhaul Jammer
I'm working thru my backlog - this is an old post from Drew at Sail Delmarva - so old in fact that he has sold this boat and gotten a new one since this was posted. And the book he mentions has already been published - I recommend it and several others he has published. You can find them in his bookstore.


Tuesday, November 14, 2017
Aft Cabin Project
Please welcome new contributors Deb and Tim, who live aboard and cruise their Tartan 42, s/v Kintala. If you live aboard your boat, you undoubtedly work on your boat. So where do the tools, electrical connectors, plumbing bits, spare pieces of precious teak, etc go? Deb and Tim created a nicely organized storage area for just these things...
The aft cabin is finished with the exception of a few coats of wax so here are the pics for your perusal.
This is the starboard aft cabin berth that we removed the mattress from. We bought these hardwood drawers from Lowes in a kit for less money than we could have bought the materials.
Tim built a bulkhead across the foot of the berth at the same location as the front of the pantry cupboard. The area behind this bulkhead will store boxed tools like drills and the Dremel. In this picture he's working on installing the wire shelves that will hold our Harbor Freight plastic storage boxes. And yes, we know the shelves are upside down. We needed the lip to keep the boxes from sliding back and forth every time we tack.
The finished project minus the waxed finish. There is a handy shelf on the top for putting the tools currently being used. Below the hinge are the two drawers that hold tools. You can now see the door on the bulkhead to access the boxed tool storage. We left enough room then in front of the drawers for guests to put their duffels.
Here it is with the front panel lowered on the hinge. This makes our workbench which will soon have a quick-mount vice on the corner in the front of the picture. It's hard to see in the picture, but under the workbench are three drawers that we put 100# heavy duty sliders on and locks to hold our heaviest tools.
The drawers have good sliders on them and are stopped by the fiddle.
The cupboard at the foot holds an amazing amount ofjunktools.


Tuesday, October 31, 2017
The Changing of a Hanging Locker
All of us have boats with storage compartments wedged into any void space in the design. Not all of these spaces provided by the designer are useful to our particular needs. Dana on s/v Rubigale, tackles this issue head-on...
Empty Locker Before
I was frustrated with the inability to store much of anything in the two hanging lockers that I had, and the lack of storage in general on the boat. The shape of a hanging locker doesn’t lend itself to any item of clothing I can think of other than perhaps a miniskirt or skinny jeans, and I doubt that is what most people want to store in them. I decided to convert the locker in my V-berth to shelves instead and see if I could recover some of that space.
Supports Installed The first challenge was that with the curvature of the hull, nothing looked straight. I ended up measuring down from the top and then using a level to draw lines on the walls where the shelf supports would go. Never would I have thought that those lines were straight due to the visual tricks of the curvature and I had to trust the level. Each of those lines were measured for the supports which were cut 1” short of the back wall and angled at 45 degrees due to the slant of the wall. These were predrilled with a small countersink. Once this was done they were coated in polyurethane and screwed onto the side walls where the marks had been made and the holes filled with wood filler.
Logan Helps With Patterns The second challenge was that the back wall is the hull of the boat and curved not only top to bottom, but from forward to aft. After starting, I discovered that one of my two “straight” walls was not straight. Not being a geometry genius, I had to come up with something that would allow me to cut shelves with as few tries as possible. I took a piece of scrap trim and drilled a hole the size of a pencil at one end. I used a thin piece of balsa wood about 4 inches wide as a temporary shelf, put brown wrapping paper over it and placed it on the supports. I then used my pencil “protractor” to trace the hull shape onto the paper.
Once I had the side measurements and the shape of the back, I cut the shelves. I left a one inch gap at the back for air flow. I used 1/2’ plywood for the shelves – anything thinner wasn’t going to be strong enough and thicker just took up room I could use for storage.
Cut Shelves With Rail After a few coats of polyurethane, a small fiddle-rail, stained to match the outside of the locker was attached to the end with small brads. The shelves sit on the supports unattached. The fit is snug enough that there’s no movement, but they can still be easily removed. The fiddle-rail keeps containers from sliding into the door when the boat heels.
Finished Shelves A relatively large amount of storage was gained by changing a traditional hanging locker to shelving. This solution works well for me since I don’t really have clothes that need to be hanged. I plan to convert the only other hanging locker as well, but will use L brackets instead of wood supports to save some steps and time.


Tuesday, October 17, 2017
Actualization
This post originally appeared on Windborne in Puget Sound
I have no excuse for the long pause in posting here, except: life.
I unrolled the Sunbrella on the dock, laid out the pieces using a chalk line, and cut them out using my brand new, handy-dandy hot knife (you really want to use a hot knife for this work because it seals the edges of the cut, preventing unraveling). The only tricky part of the layout was the placement of the cut outs on the side pieces for the lazy jacks. To get these right, I tied the lazy jack lines to the boom at their design locations, and then stretched a tape measure along the diagonal that the top of the sail cover will make, taking the measurements where the diagonal intersected the jack lines.
Then the depth of the cut outs needed to be established. I wanted them to be just deep enough so that the top of the cut out, which will be the bottom once the stitching to make the batten pocket is completed, would be just above that seam in the finished product. Here's the detail on that: I had determined that a 4.5" circumference would make a batten pocket large enough to accommodate the 3/4" schedule 40 PVC pipe that I was going to use as battens. Adding a 1/2" seam allowance, I struck a "fold-to" line 5" away from the top edge of the side piece. Then I laid out the cut outs so that their ends were 1/2" (seam allowance) + 3/8" (allowing for the edging to be applied to the cut outs) = 7/8" from the fold-to line.
The rest was just sewing. The cover is just shy of 12 feet long, and there is no place inside Eolian to stretch it all the way out. But sewing it over the saloon table worked out OK.


I added ties that go under the sail using black Sunbrella webbing and Common Sense fasteners (not visible in this picture - they're on the other side).
The top zipper would be impossible to operate if its aft end were not stabilized - a short strap there is seized to the topping lift line. The finishing touch is a tiny block seized to the topping lift line just above the zipper seizing - and a 1/8" line loop routed thru the block and tied to the zipper pull allows the zipper to be operated while standing on the deck, not hanging over the rail. Doing this work was interesting... I had to swing the boom out over the dock and stand on top of a ladder to reach the aft end of the boom.
I wasn't sure what I was going to do with closing off the aft end - I think I'll do nothing - the opening is not large enough to bother with.
I still need to make a front panel that wraps around the mast - the zippers that will attach it to the sail cover are already installed on the sail cover.
And I haven't yet cut the lazy jack lines to length - I think I am going to fiddle with them a little more - I want to see how things settle in with some use.
Previous post in this series
I have no excuse for the long pause in posting here, except: life.
As with many projects, the design and planning stages take longer than the actual execution. Making a new sail cover for Eolian's mizzen was one of those projects. I started thinking about this last summer, while hanging on the mizzen boom by one arm, way out past the stern rail, making up the fasteners on the far end of the sail cover. I have been doing this acrobatic act for 20 years, but lately my shoulders have started to bother me, telling me that this process was going to have to change.
Well finally last week everything came together and I was able to spend the time to put the plans and design to the test: actual sewing.
 |
| You really want to use a hot knife for this... |
I unrolled the Sunbrella on the dock, laid out the pieces using a chalk line, and cut them out using my brand new, handy-dandy hot knife (you really want to use a hot knife for this work because it seals the edges of the cut, preventing unraveling). The only tricky part of the layout was the placement of the cut outs on the side pieces for the lazy jacks. To get these right, I tied the lazy jack lines to the boom at their design locations, and then stretched a tape measure along the diagonal that the top of the sail cover will make, taking the measurements where the diagonal intersected the jack lines.
Then the depth of the cut outs needed to be established. I wanted them to be just deep enough so that the top of the cut out, which will be the bottom once the stitching to make the batten pocket is completed, would be just above that seam in the finished product. Here's the detail on that: I had determined that a 4.5" circumference would make a batten pocket large enough to accommodate the 3/4" schedule 40 PVC pipe that I was going to use as battens. Adding a 1/2" seam allowance, I struck a "fold-to" line 5" away from the top edge of the side piece. Then I laid out the cut outs so that their ends were 1/2" (seam allowance) + 3/8" (allowing for the edging to be applied to the cut outs) = 7/8" from the fold-to line.
The rest was just sewing. The cover is just shy of 12 feet long, and there is no place inside Eolian to stretch it all the way out. But sewing it over the saloon table worked out OK.
I mentioned that I used 3/4" sched 40 PVC pipe for the battens (the gray kind, rated for outdoor use). PVC pipe comes in 10 foot lengths; the sail cover is just shy of 12 feet long... a splice was necessary. I didn't want to use a coupling, since that would make a lump that would make feeding the battens into the pockets difficult. It turns out that 1/2" sched 40 pipe has an OD just slightly larger than the ID of 3/4" pipe. So I bought a short length of 1/2" pipe, cut two 12" lengths, a slit one side of each piece lengthwise on my little table saw. That 1/8" kerf provided just the right amount of clearance to allow the 1/2" pipe to telescope into the 3/4". Assembling with pipe dope gave me a smooth splice.
 |
| Almost done... |
The top zipper would be impossible to operate if its aft end were not stabilized - a short strap there is seized to the topping lift line. The finishing touch is a tiny block seized to the topping lift line just above the zipper seizing - and a 1/8" line loop routed thru the block and tied to the zipper pull allows the zipper to be operated while standing on the deck, not hanging over the rail. Doing this work was interesting... I had to swing the boom out over the dock and stand on top of a ladder to reach the aft end of the boom.
I wasn't sure what I was going to do with closing off the aft end - I think I'll do nothing - the opening is not large enough to bother with.
I still need to make a front panel that wraps around the mast - the zippers that will attach it to the sail cover are already installed on the sail cover.
And I haven't yet cut the lazy jack lines to length - I think I am going to fiddle with them a little more - I want to see how things settle in with some use.
Previous post in this series
Thursday, June 22, 2017
Cockpit Cup Holders
Please welcome new contributor Olly, who sails aboard his family's Beneteau Oceanis 361, s/ v Rhùm; he also sails his own Laser 4.7. (Olly is 15 years old.)
For his first contribution, Olly describes how he solved a perennial boater's problem: Where to safely put the beverage?
One problem I have with boats is that there aren’t many places to put cups in the cockpit when at sea. However with some scrap wood or plastic, thin rope and a spare snap shackle or hook you can easily make a swinging cup holder.
Most cups on boats are stackable however every type of cup will work. First I measured the diameter of two points in the cup. I luckily had access to a laser cutter at school and made a CAD of my cup holder. My design has a hole in the middle for the cup to partially fit through and 4 holes for the rope to go through round the outside of the holder.
However, a laser cutter is not essential, the holder can just as easily be made by cutting a large hole through a piece marine grade wood or plastic and drilling 4 holes around the side.
You need to make two of these rings with different sized holes through the middle so that they sit at different places on the cussp.
Next is the difficult part, you must pass some thin rope through the cup holder and tie stopper knots just below where each of the rings go. Make sure that both the rings are tight around the cup so it does not rattle.
Lastly tie the end of the ropes to a small snap shackle, carabiner or even a hook so that the cup holder can easily be attached to the guardrail.
If your cups are not stackable or you want to use mugs instead place the top ring lower down the cup and don’t cut a hole in the middle of the bottom piece and rest the cup on top of the bottom piece.
These cup holders can be easily placed anywhere where there is a horizontal wire or rope and are perfect for small cockpits because it stops them being cluttered.


Tuesday, June 20, 2017
Starting A Boat With A Paperclip
This isn't a project per se... well actually it is, but the most important part of this post is the successful trouble shooting of a problem. And yes, it does invoke MacGyver-ism. Read along with Dana on s/v Rubigale, as she deals with a motor that suddenly refuses to start...
About a month after buying Rubigale, and with a boat full of crew, we were ready to leave the fuel dock after a day of sailing. After pumping out I went to start the engine, turned the key, and nothing. Not even a click. I knew nothing about engines-zero, zip. I could find the alternator and the dipstick. My knowledge of cars surpassed that of boats only because I knew where to put in windsheild wiper fluid. I didn’t know how I was going to get back to my slip and had a half dozen people that needed to go home. My boat mentor J had his own boat full of crew and couldn’t help at the moment. Fortunately, T lives aboard a few docks away, and after I fished out a mystery set of wires with clips that I had found in the bowels of weird boat storage (had this happened before?), he jumpstarted the boat by connecting the battery to the start switch.
Success!
I thought the crew would disappear as soon as we were back to the slip, but J and T started troubleshooting the starter and half of the people stayed, rapt with the process. I didn’t understand much of what I was hearing, but I was mesmerized by the problem solving. I photographed where to connect the wife to the starter just in case. Final diagnosis, probably a bad starter switch because there were loose connections and a little corrosion. J showed up with a new starter the next day and showed me how to put it in. It was much easier than I had expected and I photographed that as well. As a bonus, he connected a new engine hour meter to the switch so I could keep track of hours since the previous meter had died at just under 4000 hours at some unknown point in the past. Everything seemed to work great and I put it away in my mind as a solved issue.


Tuesday, May 30, 2017
The Cardboardeaux Trash Compactor!
Every boat has a limiting capacity of something... water, fuel, provisions stowage, black water, etc. What is it that makes you tie up to a dock? Aboard Eolian, the first thing we seem to run out of is stowage for trash. With that in mind, please welcome new contributors Jonathan and Sarah who live aboard their Baba 35, s/v Odyssey. They have a wonderful solution for the trash/garbage stowage problem:


Take one empty wine box, open top, extract empty bag, fold flaps down, insert produce bag or similar size, and secure with rubber band. I cut a piece of a foam meat tray to make a lid/pusher, and it's all set. You will be amazed how much trash can be pressed down into this cube! When its full, twist the bag closed, tape the cardboard shut and it can easily be stored till you get to a dock. For super recycling, the box can be opened up and the trash block removed and the cardboard recycled too.

Tuesday, May 16, 2017
Hatch Rennovation
Aboard Tayana 37 s/v Ramble On, Rich & Jeni continue their re-fit. Here, they refurbish their two Bomar hatches and their mounts...
Hatches & Cabin Top Projects – Week 2
In typical boat-project fashion, refurbishing the two overhead hatches has taken way longer than expected. Rich managed to get both Bomar metal hatch frames off the boat without bending them too much. He removed the old glazing, scraped out the weather-stripping, and attempted to remove the old paint with mechanical means, but it was just too tough. Sand blasting all the old paint off was the better option and after 3 days we finally got the frames back from the sand blasting guy. Rich used an entire can of zinc phosphate primer on one hatch, ran to West Marine for a second can and finished the last hatch last Friday.
Last Saturday Rich spent spraying Interlux Primkote on the metal hatch frames and faring in the wooden hatch frames on the boat with epoxy. Those things should never leak again (fingers crossed). I picked up trash in the morning for the annual Coastal Cleanup day. It’s always so disappointing to find so much trash right near the water. It makes you wonder what is wrong with people.
Interlux Primekote
Last Sunday we lightly sanded the Primekote on the cabin top that Rich put on last summer. We just had to sand it enough to give the next coat of Interlux Perfection something to hold on to. Next, we removed all unnecessary tools and the traveler from the boat. Then we washed the boat and scrubbed the cabin top really well. What a dirty mess it was; not only from our work on it, but also from the neighboring farmers who are harvesting and planting again. Finally, late in the day, Rich painted the Interlux Primekote on the two wooden hatch frames.
Interlux Perfection
Monday I went to work and Rich prepped the boat for painting the shiny Interlux Perfection on the parts of the cabin top that won’t get non-skid. The mornings have been dewy so Rich had to first dry the boat off. He taped off the teak trim, teak handrails, and other deck hardware then wiped down the cabin top with solvent. Late in the day he started the first coat of Interlux Perfection and finished just as the sun went down. When he started peeling off the masking tape, it was clear that the paint had creeped under the tape on the teak, even though he used the super special masking tape that’s not supposed to bleed. He spent another hour or so with a putty knife and rag scraping paint off the teak.
Tuesday morning was a drier than it had been. The paint looked pretty good, but Rich decided to give it a light sanding before painting on a second coat of Perfection. Wednesday morning we woke up to rain on our faces at 4:20 in the morning. The paint from the day before was fine, but Rich had to spend the day in the shed due to weather painting the first coat of Perfection on the metal hatch frames.
The whole week went by in a blur. On Friday Rich installed the new Lexan lenses into the metal hatch frames. Saturday morning we were determined to finish the non-skid on the cabin top. I started off masking the white areas that Rich painted on Tuesday. Rich came over to give me a lesson in masking and when he ripped off some of the tape I had put down, some of the Perfection came up on the tape (ALARM BELLS SOUND!)
We stopped everything to caucus and decide what to do next. We had to fix the big ding in the paint from the masking tape and Rich also pointed out some other areas where the paint didn’t brush on as smoothly as he’d like. Plus there were a few drips and sags; nothing major, but enough to sway me to decide that we had to do a touch-up coat of Perfection. We did a 180 and started masking the teak for another coat of Perfection.
I also talked Rich into spraying the Perfection instead of brushing. Spraying is Rich’s preferred painting method, but it was windy this week and it would have been too difficult to spray. Plus there is a really nice, and expensive powerboat in the slip next to us. The last thing we need is to get over-spray on their shiny gelcoat.
So with the teak and other bits masked off, Rich sprayed paint while I held a large piece of cardboard to block the wind. We didn’t spray the entire boat, just the areas that needed touching up; mostly under the grab rail and along the forward edge.
Late in the afternoon on Saturday, we started installing the hatches. Rich had to drill out the holes in the wood frame that he had epoxied over. He used 3M’s UV4000 sealant to secure the metal hatches to the wooden frame. Lastly, he installed the metal pins for the dogs that hold the hatches closed.
So we didn’t get the cabin top completely painted before Rich starts his new job on Monday, but the weather should be good next weekend and we’ll try again.


Tuesday, April 25, 2017
Something Lazy, Something Free
As usual, Drew over at Sail Delmarva has been messing about with chemicals - here's a tip he has for everyone with a head...
Free is always good, except this is not quite free.
Or rather, it is free if you use any sort of holding tank treatment chemical.
I've done all sorts of holding tank stuff for Practical Sailor Mag. Chemicals, hoses, vent filters. Fun stuff. And in the process, in addition to learning all sorts subtleties, I solved all of my own odor problems, save one; odor from the bowl itself. If I flush with seawater and leave it a few days, there's some stink; sulfate in seawater is converted to hydrogen sulfide by millions of wee bacteria. If I flush with fresh water, it's better, but not zero; I guess something sneaks back down the waste hose, or perhaps up the feed hose. And either way, the bowl tends to get ratty, as marine flush volumes are limited and the water isn't chlorinated. I hate scrubbing.
Place a 20% solution of holding tank treatment in a spray bottle and mist the bowl down with each use, or at least each day, or and certainly whenever you'll be leaving the boat for a while. This cleans the bowl, treats the water in the bowl, and treats the water in the waste hose, preventing stink. And since it's the same treatment you would be using anyway, just subtract this from the usual dosage.
However, not all treatments work.
Less work. Less money.
- No blue sterilizing treatments, containing with formaldehyde and the like. Toxic, smelly, stain-prone, and well... gross. Too much like a portable toilet. Very tough on joker valves. Formaldehyde is listed as a human carcinogen. I don't understand why they still make these. Ban them from your boat.
- No bacterial treatments, like Bactank T3 or Happy Camper. They grow in the bottle and get gross. They are quite effective in the tank, just not for this.
- Pick a scent you like, preferably very mild. I like Forespar Refresh and Raritan CP, but Camco TST Ultra-concentrate is our favorite
. These are compatible with any type of holding tank treatment, including bacterial treatments. I tested a bunch for Practical Sailor Mag (February 2012 and December 2012).

Tuesday, April 11, 2017
Cockpit Cushion Toppers
Aboard s/v Galapagos, Melissa finds a wonderful use for something that would have been simply discarded. She also has significant puzzling skills:
Regular readers will recall that we recently had new mattresses made for our aft cabin. Part of that remodel was the purchase of some rather expensive latex foam toppers for the berths. These came at a cost of $570 for the space. That’s not an insignificant cost, even though it was completely worth every single penny. As every boat owner knows, boat beds do not come in regular sizes like your earthbound beds. Therefore, in order to get what you need, you frequently have to cut to fit. And you know what that means. That’s right. That means extra material. Extra EXPENSIVE material!
When we picked up our new mattresses we were blessed to receive all of the extra pieces of latex foam, neatly stuffed down into large plastic bags. I was going to toss them, but being the cheap and easy boat trick queen, I just couldn’t bring myself to do it. I don’t like to throw away perfectly good materials that I might put to use. So I kept them and waited for an idea to pop into my head. And it did.
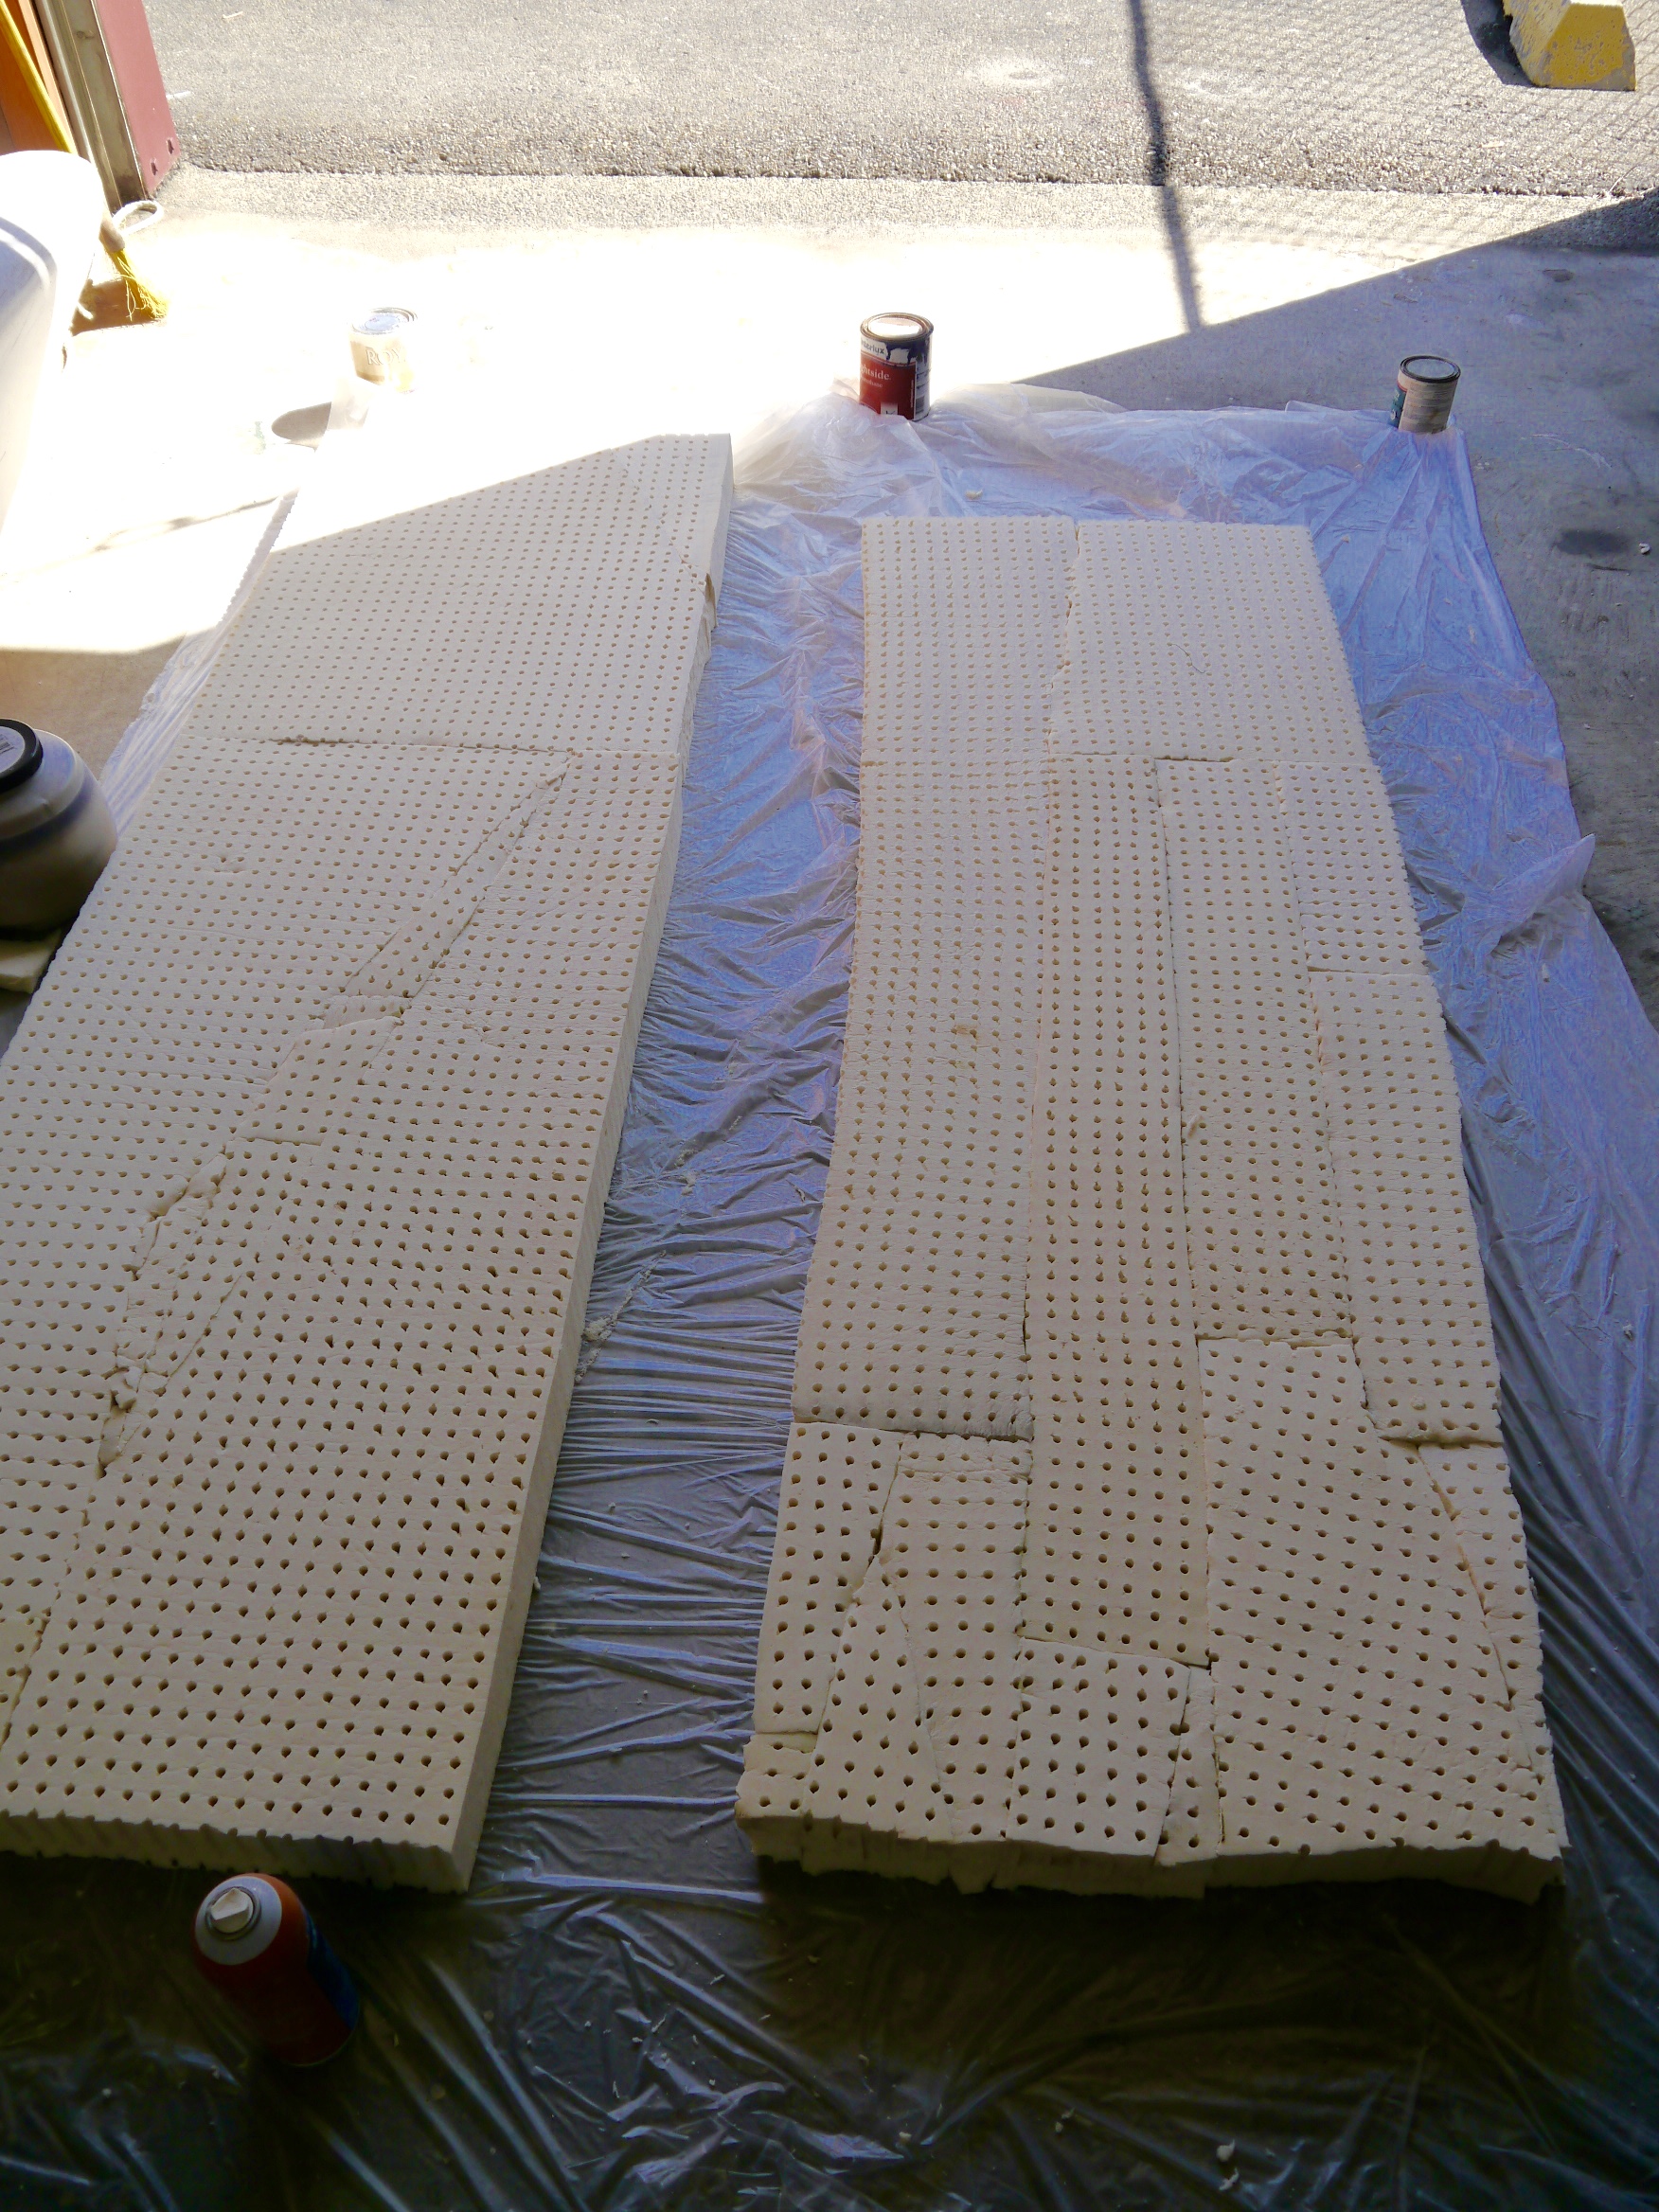
Galapagos has a great cockpit. We love it. But one of the things that I’ve wanted to improve is the napability of the two longest sides. They are long enough to lie down on (one of the absolute requirements for us in a boat, being the famous sleepers that we are), but the hard Bottomsider-style cushions that came with the boat are dead uncomfortable. I decided to see if I had enough latex foam to make cushion toppers for them.
After measuring the sides, I lay the foam pieces out on some plastic up in our workshop/storage space at the marina. Supplied with Elmer’s spray glue and a healthy love of puzzles, I began piecing the foam together to make the long, thin rectangles required. I glued the seams as firmly as possible and then let them sit for a day to cure. Although I had the garage door open for all the gluing, I cannot swear that I didn’t lose a few brain cells to that spray. Do make sure you have good ventilation with that stuff. I trimmed the uneven ends with large scissors, making several cuts from the top down. Sure, I have an electric knife, the tool of choice for this job. It’s at home. Not at the marina. Scissors worked just fine. We’re not building the Parthenon here.
As I did with the new cushions in the v-berth and aft cabin, I decided I wanted to protect these with that PUL fabric I used to keep water from soaking into the foam. This also makes coverings easy to take off and put back on. Once again, I used the handy 40% off coupon Hobby Lobby has each week.
My only concern here is that there really are a lot of glued seams on these. It is possible that the glue will not hold up in the heat of Mexico and beyond. If that happens, though, I will still have all the other materials all set up to pop the latex out and replace it with foam all in one piece. The PUL fabric has a lot of stretch to it so it can be pulled tightly around the latex. It supports the seams in the foam as well as making the whole thing waterproof. The extra support makes it less likely that we’ll experience a total fail just from moving the cushions around.
To ‘upholster’ these, I wanted outdoor canvas that was water and UV resistant. Since it’s fall, this is a good time to look for summer fabric in the clearance section of Joanne Fabrics. I made a beeline for the clearance bin and found some perfect yellow canvas for $3.50/yard. Done! I actually bought extra of this because I liked it and it was such an excellent price. Retail on this canvas is $29.99/yard. As if I would ever pay that much.
The sewing was straight forward; not exactly my favorite kind of sewing but at least with this project my machine doesn’t protest. I cut two rectangles, some sides, then sewed them together.
These are just the ticket in the cockpit for sitting or laying around at anchor. While underway they can be stored along the sides in the v-berth, or even in the aft cabin, just tucked under the shelf, which will hold them in place. They are a cheap and cheerful addition to the comforts of home on board Galapagos.
Cost Breakdown:
Total cost: $48.20 plus tax. Win!
- Latex foam – 0 because it was leftover from another project, destined to be thrown out
- PUL fabric – 4 yards, 40% off – $31.20
- Yellow Canvas – 4 yards at $3.50/yd – $14.00
- Yellow thread – $3.00


Subscribe to:
Posts (Atom)


