Thursday, March 27, 2014

Shape changing

This post originally appeared on Windborne in Puget Sound

Eolian's masts are canted aft.  This means that, if the booms are to be aesthetically and pleasingly level, the angles between the foot and the luff of the main and mizzen sails must be less than 90°.  Our mainsail was correctly built, but the mizzen was not.  Whether it was incorrectly built for the boat (unlikely), or it was an adapted mainsail (more likely), the cut of the mizzen sail was such that the boom drooped.

Further, flying where it does in the dirty air behind the main, the mizzen needs to have less draft than the mainsail so that it will fill properly.  In another indication that our mizzen is a re-purposed mainsail, it had a lot of draft.

One of the reasons for our acquisition of our Sailrite LSZ-1 was to reshape the mizzen.  And in particular the "Z" part, since this model does the zig-zag stitching that sails use.  So, an afternoon's project: recut the mizzen.

Before removing the sail from the boat, I measured (using a steel, non-stretchy tape measure) the leech of the sail when sheeted in.  Then I raised the boom to where I thought it should be and remeasured the leech.  The difference was about 7".

Next, with the sail on the floor at our cabin, I arranged it so that I could take a wedge-shaped piece of cloth out of the lowest seam, one that had no "complications", like a batten pocket or a second clew for reefing.  This was non-trivial - even tho it is a mizzen, the sail is pretty big, with a luff of 32 feet and a foot of 11 feet.  It just barely fit on the floor, with all the furniture moved away.

Tight squeeze
Next, I struck a chalk line from where that first seam met the luff to a point 7" below where it ended on the leech.  Then with the reference mark in place, I took apart the triple-stitched seam.

No going back now.

Then, allowing a 1" seam allowance, I trimmed away the long wedge-shaped piece of cloth from the lower panel.

Now all I had to do was put it back together.  My first attempt failed.  I simply could not manage all that cloth and keep the seam lined up.

A cloth management problem
So I ripped out my first attempt and I got out my sticky basting tape and stuck the seam together with it.  This is not the crap they sell in sewing notion stores, the stuff that is designed to wash out.  This is 3M stuff I got from Sailrite - it holds like, um, glue.

And this time I spent more time to carefully line things up.  I found that the draft in the sail was created on the bottom of the upper panel - the top of the bottom panel (to the right in the pictures) had been straight, and remained so since I used the chalk line.  But when lining things up with the basting tape, I did not honor the 1" seam allowance I had granted myself, since that would have recreated the draft.  Instead I just pulled the seam straight.  In the center of the sail, it turned out that I had 2.5" of seam.

The only tricky part was at the leech, where I had to be very careful to handle the triple-folded surface and keep the leech line from getting sewed in place.  Well that's not quite true.  Managing all that cloth is a real problem.  You can see that my carefully-flaked upper portion of the sail did not long survive.  It is important to allow the sewing machine to move the fabric, and that requires two handlers, one on each side of the seam, to keep a little slack in front of the presser foot, and to move the sewed section away from the back of the presser foot.  The sail is heavy and bulky; keeping that little bit of slack was not easy.

I triple-stitched the seam using Helios thread.  I see no reason to use anything but the lifetime-guaranteed teflon thread for any kind of outdoor work.

With the sail back on the boat, the boom hangs where I had hoped, and the sail is a lot flatter.  Now all I need is for the seasons to advance enough to take it out on the Sound and see how it looks when it is full of wind...

Tuesday, March 25, 2014

Filling Big Holes

Ken & Vicky, who live aboard s/v Painkiller show the technique they used to close off holes in the hull left when unneeded thru hulls are removed. It's a little bit of a departure from the normally advertised technique...
As those who have been following along know, I am replacing some thru-hulls and relocating others, so I am left with six holes through the hull that need to be filled/repaired well enough that I can sleep well knowing they will never pop out. I do not claim to be any kind of fiberglass master but after reading and examining multiple ways to make this repair.....this is how I am doing it.

Here is a hole left from a 1 1/2" PERKO sea-cock, I have three of these and three from  3/4' sea-cock. I ground from the outside to within an 1/8" of breaking through.  Then, what I have no pictures of is that on the inside of this hole I then ground another taper around the circumference although much smaller than what is on the outside.


Then with a wax paper covered disc of an appropriate size, I mushed some thickened epoxy up into the hole and then scraped the inside flush . Sorry the pictures are missing so many details here but....


...what is really left is a puck type plug being held from both sides of the hull. It can neither punch in or punch out. The hardened epoxy puck is kinda shaped like this...>  <.....looking through the cross section of the hull. It just so happens that this inside picture of the plug is the worst looking of the bunch. Looks really don't count here, quality does.


After it set , I ground and cleaned the inside and outside ready for the fiberglass matt to be used as filler.


I cut multiple size discs in about 1/2" increments to wet out and fill the exterior holes. Each overlapping the next getting bigger as it fills.


This shows three consecutive layers being filled into the exterior.


This shows the same size three layers layed directly over the plug from the inside. Th finish the inside next I will lay two or three more consecutive layers spread out to rectangular shape thoroughly cleaned to bare fiberglass. (note: I am using west epoxy for this repair)


These interior patches should without a doubt be enough even if the exterior somehow broke free. This might be way overkill of a patch or I might just have my head far up the nether regions of my backside in regards to a "proper" fiberglass repair. Either way....I'm going to be OK with this patch.

I'll have more pictures for the finishing up in due time.


Friday, March 21, 2014

Electronic charting on Estrellita: SAS Planet & OpenCPN

The electronic charting world continues to evolve, with the cruising sailor a prime beneficiary.  Livia and Carol, living aboard s/v Estrellita and (currently) cruising in French Polynesia show us a couple of free charting programs that they use while cruising in reef-strewn waters...
sas_opencpn
(Please click on image for full-sized versions -Ed)

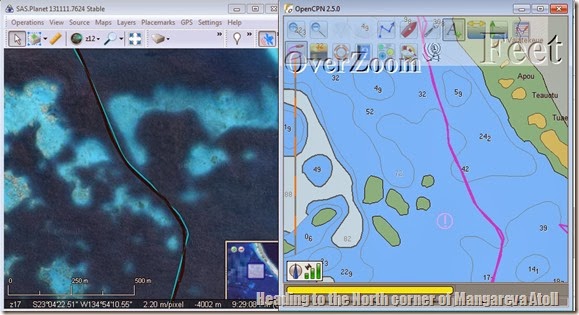
This is what the split screen on our netbook looked like when we were making landfall and first anchorage at the town on Rikitea Island, in Mangareva Atoll, in the Gambier Archipelago, French Polynesia (whew! big name, small place).

SAS Planet (on the left) is a neat bit of freeware that allows you to use satellite imagery, from a variety of sources, with a GPS plugged in. It was passed to us on a hard drive but you can download it here. You accumulate a cache of satellite images while you are online. These caches can also be passed around so that the same images don’t have to be downloaded on the slow internet connections in the islands by every cruiser.

SAS Planet allows you to download satellite imagery from various sources including Google, Yahoo and Bing. Because these sources aren’t identical this is very useful. For example, if the Google image for the anchorage you want has a big cloud in the middle, you can try the Yahoo or Bing image – all from SAS Planet.

You can make tracks, and import and export tracks, routes and waypoints in the commonly used .gpx format. There are a few things I find awkward, such as the fact that the measure tool will only give metric measurements (not nautical miles) and that you have to actively save a track before you close the program otherwise it gets dumped. Also, Google will sometimes lock you out, stopping your ability to download their imagery, if you download too much at once. Still, overall a great piece of freeware.

Having satellite imagery while offline was revolutionary for us.  If you like to pore over images to find out of the way anchorage possibilities, to imagine routes through reef laden areas that will allow you to go somewhere that other people are not going, satellite imagery in some form is the ticket. We had previously tried the Google Earth plug in for OpenCPN and, at least at that early stage of development, found it cumbersome. Take a look at the difference between a CMAP chart and SAS Planet in this close quarters reef navigation (yes, yes, we used our eyes as primary).

reefie
(Please click on image for full-sized versions -Ed)

OpenCPN (in image above on right) in its newest iterations is a very useful piece of software. It is not as slick as our previous (purchased) navigation software (NavSim’s SailCruiser), but, well, it’s FREE. I love the flexibility and customizability of it. Importing and exporting tracks, routes and waypoints between our various programs is easy. Almost everything in the program can be customized or turned off or on. The plug in we find most useful is the GRIB visualizer. The older versions of OpenCPN worked with a Fleet Nadi plug in as well but we haven’t been able to find that plug in for the newer versions so we are currently running an older version because we download the Nadi Fleet Code regularly with our SSB.

In order to run both programs simultaneously with one USB puck GPS, we downloaded and installed Franson GPSGate. This allows us to take the single COM port created by the GPS and turn it into a bunch of virtual COM ports which can then be assigned individually to any program that wants one.

Wednesday, March 19, 2014

Curing oven

Ever want to speed up epoxy hardening?  Or 5200?  Because time is money, manufacturers use curing ovens to save time.  But how can the savvy boater do it?  Are we doomed forever to wait for the slow cure?  Over at Sail Delmarva Drew has an answer.
Numerous times I have post-cured epoxy projects or hurried alone some small painted object by placing it in the kitchen oven set to "warm." The object would be dry already, but probably not so well cured as I would like by the weekend, and a few hours at 150F can work wonders, reducing chipping on new paint and bringing epoxy to full strength. It always causes a little disruption to havea project in the oven.

Another common problem, at least for northern sailors, is to get polyurethane adhesives and caulks to cure in the winter. Even if we take them inside where it's warm, they just don't cure. The problems is that polyurethanes require moisture to cure, just as epoxy requires a "part b," and a heated home is desert dry, the RH typically below 40%.

When I started to repair the exploded hiking boots with polyurethane adhesive, particularly because of the thick application. I knew I would need a very warm humid cure. Because om my work with mold and mildew for Practical Sailor, the solution was obvious.

A heating pad on medium seemed about right, but it has 3 settings. Generally it is better to have a gel cure before going in; the higher temperatures can make paint and epoxy sag.

If humidity is required, add a damp towel.

Bingo. By adding humidity, sealants like 3M 5200 can be pushed in 12-36 hours instead of a week or more. If dry curing is the goal, skip the damp towel. In the photo I had polyurethane coated some straps, but only in the center for wear resistance; by trapping them in the lid they don't touch anything and were cured in the morning.

If some things are so bloody obvious, why does it take us so long to figure them out?

Tuesday, March 11, 2014

Oooo... Shiny...

This post originally appeared on Windborne in Puget Sound

Dull.  Boring.

In an earlier post I bemoaned the passing of the "good" Brasso.  These two posts were not unrelated, because Eolian's wheel has a bronze hub.  And that hub periodically gets treated to a polishing with Brasso.

But in this post I referred in passing to the use of a buffing wheel as the tool of choice when polishing metal, and I realized that some of the readers of this blog might not know what a simple, basic and effective tool it is for polishing metal.

The tools
If you have a grinder, then you could have a buffing wheel.  Get thee to a Harbor Freight or whatever your local cheap tool emporium is, and buy yourself a couple buffing wheels - these are made by stacking multiple canvas disks together until you have a combined thickness of about ½", and then sewing them together.  Here I have removed one grinding wheel from my grinder and replaced it with a buffing wheel.

You'll also need compound - the cloth alone is not enough.  That orangish pink bar on the work bench right below the buffing wheel is a bar of rouge.  Well, more accurately, it is a bar of rouge polishing compound. Rouge is a very fine iron oxide powder; the compound is a suspension of rouge in a wax base.  You hold it against the spinning wheel for a moment to charge the wheel, and then you apply the piece of metal to the wheel.  You'll have no difficulty in telling when more compound is needed, because the wheel will simply stop polishing.

(I should be using two hands, but then how would I take the picture?)
Rouge is not the only polishing compound - in fact it is the last and final step when starting with raw, heavily oxidized and rough metal.  But for lightly oxidized brass or bronze, it is ideal.  Oh, and you should not mix compounds on a wheel - get one wheel for each type of compound you buy.

When applying the metal piece to the wheel, you must think about what is happening.  You must be very careful to not let the rapidly spinning wheel catch on any edge - if it does, it will grab the piece right out of your hands and throw it against the wall, probably damaging the piece, the wall, and possibly your hands in the process.  Also, since the wheel is continuously shedding threads - you absolutely must wear safety goggles.  If you are working on a small piece, it will rapidly get too hot to hold.  Wearing a pair of heavy leather work gloves is a good idea.

Ten Minutes:  Ta DAA!
It is quick and easy to get a factory finish on a piece of metal using a buffing wheel - because this is how the factory polishes metal!

(I've seen attachments for an electric drill to hold a buffing wheel.  These are not effective because the drill does not turn fast enough.  But I have chucked a buffing wheel onto an angle grinder to work on pieces that I cannot take to the grinder - this  works well.)

Thursday, March 6, 2014

Let The Water In!

Ken & Vicky, living aboard s/v Painkiller take us on a journey of discovery. The lesson is, always be thinking about the function of things when you are working on them (good catch Ken!)...
Do you ever want salt water (or fresh, in the lakes) coming "into" your boat?  The most common reason you must, is of course, if you have an inboard engine. You need to keep it and it's exhaust running cool. There are others like, the toilet (head) that uses raw (from the exterior of the boat) water to flush, there are hand or foot pumps at the galley sink to help save fresh water from tank storage (wash dishes in raw water, rinse in fresh), some refrigeration uses raw water to help keep things cool, there are wash down pumps at the bow to help clean anchor and chain as it comes aboard and water-makers (turning salt water to fresh water) to help keep the freshwater tanks full. With a few of these, you can get away from 'straining' the raw water, but it's always a good idea to keep large chunks that might be near your intake hole under the boat from entering any of these systems....don't you think? Here enters the raw water strainer.

Below on the left (some red bits remaining) is my engine raw water strainer that after I disassembled, cleaned, wire brushed and over all took a good look at, along with removing the old, hardened, caked with added silicone gaskets that kept it from leaking and made new cork gaskets. I can't say it was 'clean' when I took it apart but it was functioning I guess keeping the big chunks from running through the engine exhaust! The clear plastic housing needs to be replaced, other than that it will be fine.  On the right is the green fully intact strainer for my water-maker, refrigeration, and galley sink.


First glimpse inside is looking very poor!!!! 100 points for "me" for never using this in the the almost 4 months I have owned the boat. Yuk!  Now we're talking total lack of maintenance here.  I knew when I bought this boat I'd be going in here....but never did I imagine it would be this gross and totally neglected. Holy shit Earl, I'm ashamed at myself for not seeing this.


Now the real kicker here, or lack of  thought, is in this picture below. This is the underside of the top of the strainer.  Now, doesn't it make sense that when a strainer does it's job of straining (see the mucky basket with a little finger handle on top on the right, in the above picture)? That's where the raw water goes in from the top and catches the chunky bits before being pulled up and out the top of the strainer. Do you see it yet? this is the top............


.......do you see it now? Whoever made or replaced this gasket for the top of this strainer at some point in time, almost completely shut off the ability of the strainer to do it's fricken job! The curved slot is the exit for the strained water. Look at that picture above again!


There is nothing vitally wrong here with this discovery because I found it before I used it. I knew I would go through most all the systems on this boat, one by one, to become aware of the whole picture, but I didn't imagine this kind of shit was sold to me right under my own eyes.  Buyer beware!   Oh Well, I know how to make it right!  I should get a $2000 refund just because I really like the guy! Is that my "bad"?

Both strainers will get what they need........

Tuesday, March 4, 2014

I won't steer you wrong

This post originally appeared on Windborne in Puget Sound


So when your wooden wheel needs refinishing, and the weather is too inclement and cold to do the work in the cockpit, what do you do?

This is the solution we've developed here on Eolian:
  • Remove the bronze hub (and take it to the shop for a trip to the buffing wheel - much better than you can do by hand with Brasso, especially the new Brasso)
  • Sand.  I used 220 because I just wanted to rough up the original finish enough to give it "tooth" to hang on to the new finish.
  • Fit a spare piece of 1" stainless tubing to the hole in the center normally covered by the hub
  • String a piece of small line thru the tubing and make fast to the overhead handhold.
  • Put down a piece of polyethylene to catch any drips
  • Apply three coats on three successive days
This allows me to spin the wheel as I apply the varnish so that I can get at all sides.   Of course it does take up a lot of space in the interior, but there is just enough room that a svelte guy (like your correspondent) can slide by.
Related Posts Plugin for WordPress, Blogger...