It was a tremendous relief to get the old, mismatched fixtures off the boat. They’ve bothered me for years, but I wasn’t going to pay the very high price for new fixtures and LED bulbs. I knew if I waited long enough, LED technology would become more reasonably priced.
Four different light fixture styles on the boat. Now we’re down to two.
I will install a couple of the old fixtures in the engine compartment for convenience.
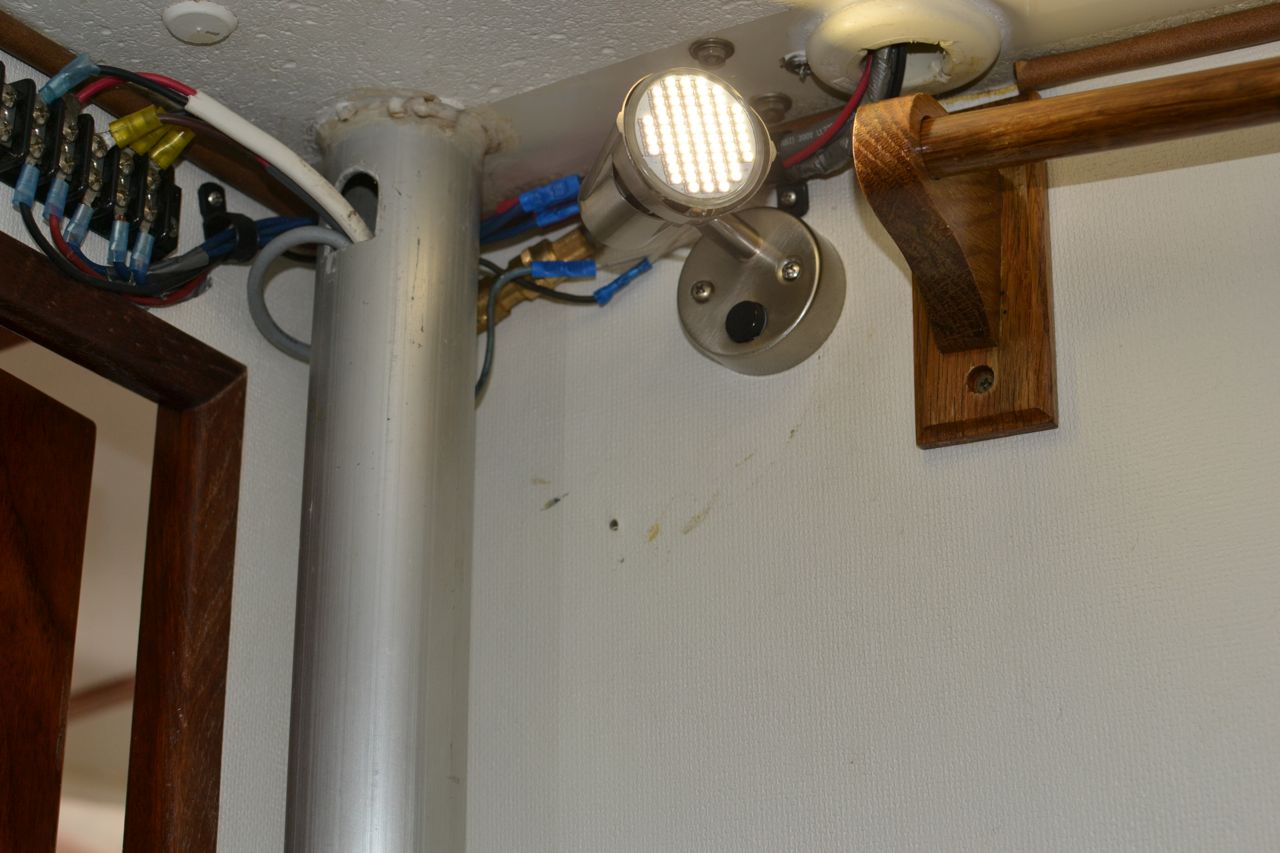
After some slight hesitation, I removed the round fixture in the head. It is a festoon bulb, and gives off a lot of light. And heat. Meaning, of course, that it burns through electricity at a tremendous rate. The new bulbs are rated at 3.12 watts (each). That’s .26 amps. Not much, and not much heat either. And for 3.12 watts per lamp, I get this kind of light output:
It’s too bright to look at.
It’s going to take some getting used to not seeing that big round fixture in the head. Looks like I’ve got some cleaning and touch-up to do on the paint where it was mounted.
The light quality tends to be a bit harsh, especially if there are two or three lamps lit at once. However, there is no lack of bright. I think that’s good – far better than dim. So with four of these lit at once, I’m using 1 amp. That’s a phenomenal amount of light for that little power.
I made the electrical connections with butt connectors, as you can see in the above photo, except for the first lamp, which unaccountably was wired with spade connectors. I saved my self a couple of crimps, and used the existing female connectors, installing spades and then shrink tubing on the lamp wires.
Just this one lamp had spade connectors. Can’t figure out why, and I don’t remember doing it. Maybe a previous owner did it.
Now I have a confession to make. I’ve never told this to anyone. . . I make my crimp connections with vice grips. I know, I know. I’m supposed to use ratcheting crimpers (the more expensive, the better). But I discovered a few years ago that vice grips do this really well. I mean, really well. The crimps don’t pull out. You can get the crimp almost completely flat with successive adjustments of the locking mechanism. So, I already have vice grips, but I don’t have the expensive ratchet crimpers.
Oh, one cool thing I discovered about this brand of light fixture, is that it is not polarity sensitive. The bulbs work regardless, which surprises me. LEDs are typically polarity sensitive, so I guess there is circuitry either in the bulb or fixture that accommodates reversed polarity and allows them to light up anyway.
Thursday, October 31, 2013
New LED Fixtures And Lights Installed
Over at s/v Cay of Sea, Rick has renewed his light fixtures with new LED-based ones, and gained a significant improvement in power consumption...


Tuesday, October 29, 2013
Reboarder patrol
Please welcome new contributor Marc of s/v Alchemy (and s/v Valiente)! Marc 's two boats, one steel and one fiberglass, give him a unique perspective. For his first contribution to Small Boat Projects, Marc faces the reboarding problem: How to board the boat from the water...
Drastic steps were required.
Apparently, I have readers who worry when the pace of my blog posting slackens somewhat. Often, that's either because I have little to say, or it isn't particularly interesting (or is even less interesting than the usual not-very-interesting boat blagging), or I have to down boat tools and apply myself to money-making for the boat habit. Such has been the case recently.
It's also been the hottest part of the summer, making the interior of the steel beast intolerable even for those, like me, used to panting in its torrid, insufficiently ventilated bowels. Now, if that description hasn't been off-putting enough, I'll recount a recent repair gig on the old plastic fantastic, Valiente.
A boarding ladder bought last year to replace a previously busted ladder itself improvidentally folded the wrong way while I was descending for a swim. I'm considerably lighter than I was this time last year, so I blame shoddy construction. Irrespective of that, getting back aboard was a trial and I bear the bruises and cuts to prove it. So I determined to do better, meaning sturdier and stronger.
In our part of the world, ladders are required for the purposes of rescues, for which having at least one aboard is a mandatory safety equipment item, like flares, and of course for swimming and reboarding a boat at anchor. There are many ways to mount and deploy the many types of boarding ladder, which range from simple rope ladders...
Uh, no.
...to heavy duty welded jobs that would suit the stern of Alchemy...
Note: Not the stern of Alchemy.
There are plenty of boarding ladder options, most of which are spendy. There are folding, telescoping, single leg and even fairly novel ideas:
Novel is also expensive, although I think firemen use something like this.
All of which got filed for when the time comes to address this on Alchemy, probably at the same time I address the conceptually linked issue of "what mast step can possibly fit my giant feet". In the meantime, Valiente needed a new, unbusted and stronger ladder for the preferred amidships location (the stern is too narrow in my view and too hard to access for backing plates to bolt a ladder there).
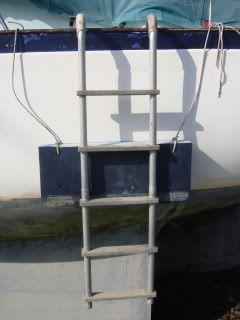
Due to a chance perusal at the chandlery where my wife works, I picked up a ladder not only of a type I had yet to see: a gunwale-mounted aluminum ladder that was light, of a good width and which folded vertically.
Nice and long, too, meaning a couple of steps are below WL
This ladder, the maker of which is not on the label, was the right price by virtue of looking pretty industrial and having hung, neglected, on the wall of more stainless, hot 'n' happening models. Maybe it's for a dock. I am indifferent. I want its functional length and its stowage compactness.
Ignore the general grubbiness. This was prior to a Big Summer Scrub/Debirding
Looks like a real house ladder, doesn't it? For me, this is a Good Thing, given how lame and plasticky swim/boarding ladders have seemed to me.
See previous repairs and former mount points. Also 40-year-old chrome on bronze. Sigh.
Installation was straightforward, if longish, as I decided on a proper "drill 'n' fill" process of oversizing the mounting holes, isolating the balsa core with thickened epoxy (West System) and then drilling the proper-sized bolt holes (3/8") through the resultant "hard core".
Slightly blurry...or was that the epoxy kicking?
The mounting plates were sealed around their edges with 4200, as were the bolts themselves. As the bolts are snugged down, the "bead" of sealant climbs up the threads, making a further gasket of sorts under the bolt head and in the drilled hole itself, without mucking up the part the nuts and washers go on. This greatly lessens, for the years I've been doing it, the chances of rain or seawater migrating below, which can really ruin your Little Library of Boat Repair, in my unfortunate and pre-smartening-up experience.
Evidence of my previous labours
After letting the epoxy fill cure, the holes were drilled and "backing plates" in the form of largish fender washers were installed; my son held the bolts still while I used a 1/4" ratchet driver to dog down the nuts to an acceptable degree (Note to self: must get a "clicky torque wrench" in order to quantify "acceptable degrees"). The line of larger bolts running aft is the port genoa track, fixed after it tore straight out of the deck at 28 knots. Has not budged since the recore and remounting!
Might have to consider repainting the interior at some point as this is getting old.
A closer look: The tape was there to keep the epoxy from dripping, but leaving this piece in place is a tell-tale. As it is paper painters' tape, if it feels damp, you've got a leak and a sealing job ahead. Not damp so far after several drenchings of mid-summer intensity.
Will swim shortly, applying the ultimate field (stream?) test
The finished project looks good to me and packs down even better into the starboard cockpit locker than did its crappy forebear. I saw on a sailing forum an idea to get the ladder more vertical vis-a-vis the turn (in) of the hull by lashing crosswise a foam pad or a small fender under the ladder. This sounds like a smart (and cheap!) idea I will employ.
Cleverness courtesy of Cruisers' Forum's "David Old Jersey"
Once again, needful work on Valiente leads to applicable solutions (or at least, bad ideas probably avoided) on Alchemy.


Friday, October 25, 2013
A fairly exclusive club
Here on Eolian, we have joined a fairly exclusive club - owners of Sailrite's walking-foot sewing machines.
Our cockpit canvas, custom-made for us at great expense 9 years ago is starting to come apart. The thread is failing. When we had the canvas made, the tradesman (Barrett Enclosures) asked us if we wanted to use the very expensive Tenara thread, or the regular UV-stabilized polyester. Given that the Tenara cost more than $100/spool and that the Sunbrella itself is UV stabilized polyester, we selected the less expensive thread.
Tho the Sunbrella is clearly aging, it has years to go. But the thread has failed on all of the horizontal surfaces. I have been stitching it back in with a hand stitcher, but this is extremely tedious, and it is difficult to do a good job. And we have lost four zippers to UV exposure, so far.
So I have been on the lookout for a sewing machine capable of sewing multiple layers of heavy canvas. A couple of weeks ago, I responded to a craigslist ad and bought a used Sailrite LSZ-1. This is a walking foot machine: the presser foot on top of the fabric moves, at the same time and for the same distance as the feed dogs on the bottom of the fabric. Your standard home-owner machine has a stationary presser foot, which means that with multiple layers of fabric, the top-most layers tend to be dragged back by the stationary presser foot, causing the seam to pucker and curl. The LSZ-1 also has a powerful double gear reduction drive. How powerful you ask?
This machine is a monster. Here you see 8 layers of heavy Sunbrella that I sewed across - the machine didn't even break a sweat. It just went ker-chunk, ker-chunk, ker-chunk, with no hesitation and no manual persuading from me - like it was sewing butter. This is not your Mama's sewing machine.
So I am now busy re-stitching all of our canvas. And yes, I did spend the $$$ for a spool of the lifetime warranted fluorocarbon thread. I wish I had done that 9 years ago.
But then if I had, I wouldn't be learning the trade of cockpit tailor.
 | |
| Sailrite LSZ-1 |
Big Mistake.
Tho the Sunbrella is clearly aging, it has years to go. But the thread has failed on all of the horizontal surfaces. I have been stitching it back in with a hand stitcher, but this is extremely tedious, and it is difficult to do a good job. And we have lost four zippers to UV exposure, so far.
So I have been on the lookout for a sewing machine capable of sewing multiple layers of heavy canvas. A couple of weeks ago, I responded to a craigslist ad and bought a used Sailrite LSZ-1. This is a walking foot machine: the presser foot on top of the fabric moves, at the same time and for the same distance as the feed dogs on the bottom of the fabric. Your standard home-owner machine has a stationary presser foot, which means that with multiple layers of fabric, the top-most layers tend to be dragged back by the stationary presser foot, causing the seam to pucker and curl. The LSZ-1 also has a powerful double gear reduction drive. How powerful you ask?
 |
| Eight layers of Sunbrella: with ease |
This machine is a monster. Here you see 8 layers of heavy Sunbrella that I sewed across - the machine didn't even break a sweat. It just went ker-chunk, ker-chunk, ker-chunk, with no hesitation and no manual persuading from me - like it was sewing butter. This is not your Mama's sewing machine.
So I am now busy re-stitching all of our canvas. And yes, I did spend the $$$ for a spool of the lifetime warranted fluorocarbon thread. I wish I had done that 9 years ago.
But then if I had, I wouldn't be learning the trade of cockpit tailor.
Wednesday, October 23, 2013
Shelves instead of hanging space
Over on s/v Valkier, Scott has converted a small hanging locker to shelving. Here is the final product:
We replaced the hanging rod in the closet on port side in the v-berth with three Cedar shelves. It has increased usable storage space by about a factor of four.


Thursday, October 17, 2013
VHF upgrade project
Please welcome new contributors Rick & Dar aboard m/v September Dream! I think you will enjoy following along with them as they cruise their Mainship 34 from Kemptville, Ontario to their intended destination of the Bahamas.
But for today, their first contribution to this site is the installation of a new VHF, complete with a remote speaker/mic/control:
But for today, their first contribution to this site is the installation of a new VHF, complete with a remote speaker/mic/control:
The downtime from travelling while visiting Dar's sister has given me some time to get some work done on a couple projects.
The first project that I worked on was the completion of my VHF radio upgrade.
When we bought the boat it came with two VHF radios that were both more than a decade old. Besides not having DSC (Digital Selective Calling) capabilities, the radio on the flybridge was starting to die.
I decided to replace both with a Standard Horizon GX-2150+, which not only is a modern DSC capable radio, but also has AIS (Automatic Identification System) receive capabilities.
Rather than go with two VHF radios again, I decided to go with a single radio, located at the lower helm, and use a RAM3 CMP-30 remote mic for the flybridge. We still had an old VHF handheld for a backup, but I picked up a new Standard Horizon HX-290 as a primary backup, as well as a radio to use on the flybridge until I finished the RAM3 installation.
Another side benefit of going with the single radio is that it freed up one of the antenna mounts that can now be re-purposed, and will eventually be used as a mount point for an Amateur Radio HF antenna.
Installing the GX-2150+ at the lower helm was relatively easy. It was pretty much a straight swap out for the radio that was at the lower helm, and I completed that the week before Canada Day.
To finish the project though meant that I had some cable runs to do between the flybridge and the lower helm. First I had to run the interface cable between the radio and the remote mic. Second I had to run an NMEA cable to interface between the chartplotter and the radio. In order to do the AIS receive function, the radio needs to have GPS data. As well, it also sends the AIS target information back to the chart plotter to be displayed as a data layer overlay.
Finally, I had to run a cable to connect the PA/Fog-horn, which was previously connected to the flybridge radio, to connect it to the new radio at the lower helm.
The first step was gaining access to the cabling space under the flybridge dash. Imagine my surprise when I cracked the panel and found this;
These are two of the *seven* wasp nests that I found. Luckily, none of the nests were occupied by anything still living, but it was still a bit of a shock to find these. I have no idea how old they were. I do know that we never had any issues with wasps on the flybridge since we've owned the boat, so I have to assume they were from before we bought it.
Flybridge wasp nests
After cleaning up the nests I got to work running the cables I needed. Unfortunately this also involved a number of new holes being drilled. This is something that no boat owner enjoys, but it was required.
I completed the cable runs on Wednesday and called it a day. Today I worked on getting everything connected up.
The first connection I did was the remoting cable for the RAM3 mic. I was lucky in that I could route the cable between the helms without having to cut the cable, and subsequently splice it back together.
Next I worked on the NMEA connection between the chartplotter and the radio. One of the things I had wanted to do and did today was to wire the chartplotter in properly at the flybridge. Previously it had a cable that had a 12v plug on the end, which you plugged in at a 12v socket on the flybridge or lower helm to use. Because I had to wire in the NMEA connection I also wired the power in as well, and routed it through the flybridge dash. I'm waiting for a second A-50D power/signal cable to come in at Marine Outfitters. Once that comes in I'll do a similar setup at the lower helm.
I wired the NMEA connections on the A-50D cable to the NMEA cable that I ran yesterday. At the lower helm I connected the NMEA cable to a 4 pin plug, and the radio side of the NMEA connection to a 4 pin socket. I ran it through a plug rather than connecting directly so that if I needed to take the radio down for any reason there was no permanent connections that would have to be cut.
After checking all my connections I ran through the NMEA setup on both the chartplotter and the radio, both of which supported a 38400 data speed. It was quite the thrill to hook everything up and see the GPS information on the radio. I'll have to wait until we're back near Kingston next week to see how the AIS display works.
I was already quite impressed with the GX-2150+ radio, but I was also very pleased with how well the RAM3 remote mic works. It has more than enough volume and all of the radio's functions can be accessed from the remote mic.
Standard Horizon GX-2150+
Standard Horizon RAM3 remote mic


Tuesday, October 15, 2013
Bedding with Butyl Tape
Scott and Brittany, aboard s/v Asante, rebedded their ports using a mixture of butyl rubber tape and 3M UV 4000 as a belt & suspenders approach to keeping out the rain. Here's how they did it:
Leaks. They are, quite possibly, one of the more (if not the most) annoying malady to befall the cruising sailboat. If they are below the waterline, they can prove catastrophic (as in; your boat can sink). If they are above, they can be madness inducing, teak-tweaking and gear-ruining. Lucky for us the leaks we have had have always been topside, and - even luckier - their origins have always been obvious. There are plenty of accounts of leaky boats who's sources are nothing short of a mystery. It is not unusual to see water coming into, say, an aft hanging locker - only to trace it all the way to a poorly bedded cleat up on the bow days, weeks or months later. Water, being what it is, has a way of migrating before entering the interior of the boat and playing detective in this regard has been known to cause some cursing.
Speaking of bedding (and, no, I am not talking about the new queen set that you found on overstock.com), the majority of topside leaks will come from poorly bedded deck hardware. For those who have no idea what I am talking about, the art of "bedding" deck hardware is mounting and installing it to the deck. Cleats, portholes, chainplates, stanchions..etc. Don't be fooled though. This is no small task! There are literally hundreds of holes drilled into our deck for various pieces of hardware which means there are hundreds places that water can potentially enter our boat, so the job must be done with painstaking care. Nothing will make you curse the previous owner of your boat more than discovering what a crap job he/she did bedding deck hardware and, for better or worse, the attention they paid to this crucial job is pretty indicative of the way they maintained their boat.
So far, our only leaks have come from our portholes (aka 'windows') in our cabin. We need to re-bed about six out of fifteen. I have mentioned before that being a full-time boat mommy has pretty much nixed my ability to help with boat work (dang!) but one thing I am still very, very good at is research. When investigating the best bedding compound, I discovered (and kind of fell in love with - in a deep respect sort of way) "Maine Sail" of Compass Marine. He is all sorts of awesome and his site is full of how to do a litany of boat projects the right way. It was through him I learned the beauty of Butyl Tape.
Scott got to work removing our old porthole, and discovered that it was bedded with the dreaded silicone. Silicone SUCKS. Say it with me people, "silicone sucks" and, in our opinion, has no place bedding deck hardware. After spending a few hours painstakingly scraping away all the silicone remnants, he epoxied the inside of the window cavity (so that if any water gets in, it's not absorbed by the core) applied the butyl tape around the edge of the porthole, and wedged it in. He then - for good measure - applied some 3M 4000 UV to the outside casing of the porthole and put the thing back together. Between the epoxy, butyl tape and 4000, we are 100% leak-free (and yes, it has been put to the test!)
Since we're far from experts, that's about as step by step as I want to go, but if you are curious about using butyl tape to bed your deck hardware the proper way*, please check out this article.
*There's more than one way to skin a cat and I am sure plenty of you have leak-free boats that swear by other products, but for us butyl tape is the way to go for bedding deck stuff from now on.
The role of butyl tape
Scrapey McScraperton. This is the most annoying part of the job for sure.
So it helps to have a very good friend around for moral support. Ben Affleck and Jake Gyllenhal in the Hiz-OUSE!
Applying some butyl.
Peek-a-boo! Clamping the porthole into place.
The outer edge of the window was sealed with some UV4000.
Tools of the trade.
Look, ma!! No leaks!


Tuesday, October 8, 2013
Pledge Drive
I hope you have been enjoying the ongoing series of projects posted here.
This is your site. For this to work out for all of us, everybody needs to contribute - think of this as a pot luck dock party.
Come on now. All of you have a small project of one kind or another that others would be interested in seeing. Contribute to the feast:
Every posting will feature a link to your article (if there is one) and a link to your blog (if you have one). In addition, all contributors will permanently have a link in the "Contributors" box on the right side of the blog. This ought to drive some of the traffic that this site is seeing back to your site. I will not take any recent posts (unless you tell me otherwise) - that way this site will not be in competition with yours. Instead, it will hopefully serve to "reactivate" some of your older posts.
But the most important benefit you'll get is the warm feeling of having helped someone thru a problem - one that you have solved. And we will all be the richer for it.
Pitch in!
This is your site. For this to work out for all of us, everybody needs to contribute - think of this as a pot luck dock party.
Come on now. All of you have a small project of one kind or another that others would be interested in seeing. Contribute to the feast:
- Write it up and send it to SmallBoatProjects at gmail dot com
- or -
- If you have already written it up on a blog somewhere and are willing to share, tell me where in the wide world of the Internet to find it , and I'll come and get it.
- or -
- Give me permission to "mine" your blog for projects. Anybody who is writing a blog about boating has numerous small projects buried in there. I'll ferret them out, if you let me. No, I won't put your content on here without your permission.
- or -
- Send me what you have, and I'll do the write-up, with full credit going to you as your project, of course.
Every posting will feature a link to your article (if there is one) and a link to your blog (if you have one). In addition, all contributors will permanently have a link in the "Contributors" box on the right side of the blog. This ought to drive some of the traffic that this site is seeing back to your site. I will not take any recent posts (unless you tell me otherwise) - that way this site will not be in competition with yours. Instead, it will hopefully serve to "reactivate" some of your older posts.
But the most important benefit you'll get is the warm feeling of having helped someone thru a problem - one that you have solved. And we will all be the richer for it.
Pitch in!
Tuesday, October 1, 2013
Not all projects have to be huge to be worthwhile
If you have been following Mike and Rebecca's blog, you will know that they have moved aboard s/v One Love, a Leopard 4600 catamaran, which they are getting ready for charter service. This is one of the small, but important, projects that getting the boat ready required:
Not all projects have to be huge. Take for example the new switches that we added for One Love’s shower sump pumps. Some readers may not realize the difference between a household shower and one on a boat. Whereas, in a house, the water simply drains away via gravity, in most cases on a boat the grey water from the shower needs to be pumped overboard (or into a tank) by an electric pump. It just so happens that the shower sump pumps on this Leopard were activated by a pushbutton momentary-on switch. This means that, while standing in the shower, you would need to push and hold the button to make the pump run. As the evacuation process can take over a minute, a period of time which seems exponentially longer when one is standing naked and dripping wet, I knew that there would be no way a guest would ever do it properly.
Old switch, push and hold to turn on. Sourcing new switches was as easy as making a trip to Island Water World. In order to cover the large hole left by the other switches, I did have to use large stainless steel fender washers. Unfortunately, they only had three switches in stock so I was only able to fix the showers in the guest cabins, not our own. We have been using the other showers though and I can say that the new pull-on, push-off switch is a huge improvement over the originally installed ones.
New switch, pull to turn on, push back in to turn off.
- Time required to complete the change: approximately 20 minutes each.
- Cost: less than $20.00 each.


Subscribe to:
Posts (Atom)


