Drastic steps were required.
Apparently, I have readers who worry when the pace of my blog posting slackens somewhat. Often, that's either because I have little to say, or it isn't particularly interesting (or is even less interesting than the usual not-very-interesting boat blagging), or I have to down boat tools and apply myself to money-making for the boat habit. Such has been the case recently.
It's also been the hottest part of the summer, making the interior of the steel beast intolerable even for those, like me, used to panting in its torrid, insufficiently ventilated bowels. Now, if that description hasn't been off-putting enough, I'll recount a recent repair gig on the old plastic fantastic, Valiente.
A boarding ladder bought last year to replace a previously busted ladder itself improvidentally folded the wrong way while I was descending for a swim. I'm considerably lighter than I was this time last year, so I blame shoddy construction. Irrespective of that, getting back aboard was a trial and I bear the bruises and cuts to prove it. So I determined to do better, meaning sturdier and stronger.
In our part of the world, ladders are required for the purposes of rescues, for which having at least one aboard is a mandatory safety equipment item, like flares, and of course for swimming and reboarding a boat at anchor. There are many ways to mount and deploy the many types of boarding ladder, which range from simple rope ladders...
Uh, no.
...to heavy duty welded jobs that would suit the stern of Alchemy...
Note: Not the stern of Alchemy.
There are plenty of boarding ladder options, most of which are spendy. There are folding, telescoping, single leg and even fairly novel ideas:
Novel is also expensive, although I think firemen use something like this.
All of which got filed for when the time comes to address this on Alchemy, probably at the same time I address the conceptually linked issue of "what mast step can possibly fit my giant feet". In the meantime, Valiente needed a new, unbusted and stronger ladder for the preferred amidships location (the stern is too narrow in my view and too hard to access for backing plates to bolt a ladder there).
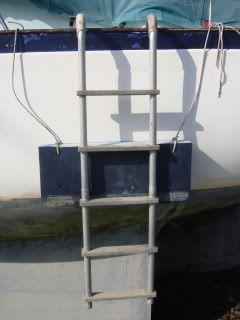
Due to a chance perusal at the chandlery where my wife works, I picked up a ladder not only of a type I had yet to see: a gunwale-mounted aluminum ladder that was light, of a good width and which folded vertically.
Nice and long, too, meaning a couple of steps are below WL
This ladder, the maker of which is not on the label, was the right price by virtue of looking pretty industrial and having hung, neglected, on the wall of more stainless, hot 'n' happening models. Maybe it's for a dock. I am indifferent. I want its functional length and its stowage compactness.
Ignore the general grubbiness. This was prior to a Big Summer Scrub/Debirding
Looks like a real house ladder, doesn't it? For me, this is a Good Thing, given how lame and plasticky swim/boarding ladders have seemed to me.
See previous repairs and former mount points. Also 40-year-old chrome on bronze. Sigh.
Installation was straightforward, if longish, as I decided on a proper "drill 'n' fill" process of oversizing the mounting holes, isolating the balsa core with thickened epoxy (West System) and then drilling the proper-sized bolt holes (3/8") through the resultant "hard core".
Slightly blurry...or was that the epoxy kicking?
The mounting plates were sealed around their edges with 4200, as were the bolts themselves. As the bolts are snugged down, the "bead" of sealant climbs up the threads, making a further gasket of sorts under the bolt head and in the drilled hole itself, without mucking up the part the nuts and washers go on. This greatly lessens, for the years I've been doing it, the chances of rain or seawater migrating below, which can really ruin your Little Library of Boat Repair, in my unfortunate and pre-smartening-up experience.
Evidence of my previous labours
After letting the epoxy fill cure, the holes were drilled and "backing plates" in the form of largish fender washers were installed; my son held the bolts still while I used a 1/4" ratchet driver to dog down the nuts to an acceptable degree (Note to self: must get a "clicky torque wrench" in order to quantify "acceptable degrees"). The line of larger bolts running aft is the port genoa track, fixed after it tore straight out of the deck at 28 knots. Has not budged since the recore and remounting!
Might have to consider repainting the interior at some point as this is getting old.
A closer look: The tape was there to keep the epoxy from dripping, but leaving this piece in place is a tell-tale. As it is paper painters' tape, if it feels damp, you've got a leak and a sealing job ahead. Not damp so far after several drenchings of mid-summer intensity.
Will swim shortly, applying the ultimate field (stream?) test
The finished project looks good to me and packs down even better into the starboard cockpit locker than did its crappy forebear. I saw on a sailing forum an idea to get the ladder more vertical vis-a-vis the turn (in) of the hull by lashing crosswise a foam pad or a small fender under the ladder. This sounds like a smart (and cheap!) idea I will employ.
Cleverness courtesy of Cruisers' Forum's "David Old Jersey"
Once again, needful work on Valiente leads to applicable solutions (or at least, bad ideas probably avoided) on Alchemy.
Showing posts with label boarding. Show all posts
Showing posts with label boarding. Show all posts
Tuesday, October 29, 2013
Reboarder patrol
Please welcome new contributor Marc of s/v Alchemy (and s/v Valiente)! Marc 's two boats, one steel and one fiberglass, give him a unique perspective. For his first contribution to Small Boat Projects, Marc faces the reboarding problem: How to board the boat from the water...


Tuesday, June 18, 2013
New HF/SSB Backstay Offset
Paul on s/v Solace deals with a convenient but inappropriate hand hold...
Solace HF/SSB antenna cable ran down the backstay with a two inch off set as shown in the photo to the left.
The problem was, what to do about the cable as it ran pass the backstay turn buckle. Ordinarily, I might have fashioned something up to keep it tidy, but with the boarding ladder in the middle of the pushpit, people were constantly reaching up and grabbing anything to help themselves get aboard. Mostly they grabbed the back stay and HF cable. Eventually it became loose and pulled out of the deck fitting. (The ladder here is part of the pushpit, but when needed folds down and steps are formed over the railing.) Yes the back stay is right in the middle of the boarding area!
So I came up with another idea. I used two tubes. Pressure PVC pipe; one 50mm and the other 20mm. I made end caps which can be viewed here for the 50mm pipe and some 32mm for some shroud antichafe rollers. (Another project)
The 20mm pipe has some strategically placed holes placed in the tube along one straight line. These were big enough just to fit my pop riveter. The length was assessed to allow the tube to move up the backstay to gain access to the turn buckle. The 20mm pipe was pop riveted to the 50mm pipe.
The back stay was marked for it's present tension and the turnbuckle was then undone.
The first end cap was placed on the back stay and held in place with some self amalgamating tape. A small rope was thread through the 20mm pipe by which later we would draw the HF wire through.
The combined pipe was then placed over the back stay and the top endcap engaged into the 50mm pipe. A small hole was drilled each side and a small SS screw inserted through to engage and hold the top endcap.
The bottom endcap sat on the very bottom part of the turn buckle, just above the swivel. The inside hole here is large because the "T" bolt that makes the bottom part of the turn buckle is larger in diameter than the backstay cable. This bottom end cap does not slide up and down.
The tubing was slide up the back stay and the turn buckle re connected and tensioned. The top wrench, which holds the top swage at the turnbuckle and prevents the backstay from twisting, supports the tubing while tightening the turnbuckle. Once the turnbuckle is tensioned and the split pins applied, the tubing is allowed to to slide over the turnbuckle and engage the lower endcap. The same two holes with screws to secure the endcap were applied to the lower endcap as done for the top endcap.
The HF cable was then threaded through the 20mm tubing and attached appropriately.
Hint. As you undo the HF cable above the backstay isolator, place a small rope around the isolator so that later you can have a companion pull down on the back stay, which will help with re-connecting the turnbuckle. Also, if you buy pressure PVC pipe, it may have black writing on the pipe. A paint thinners on a rag usually wipes this off so you have a nice white tube.
How to stop the pipe from turning? I'm trying some heavy self amalgamating tape at the bottom end, which at the moment has a little give, but seems to hold everything in place. Another method might be to place a bolt through the 50mm pipe and through the turnbuckle openings.
To access the turn buckle again, it is a simple case of talking out the small screws at the bottom endcap and sliding the combined assembly (minus the bottom endcap which stays in place) up the backstay to gain access.
In the photo to the right you can see that there is just enough room to slide the 50mm pipe up the backstay. The HF wire is cable tied to the isolator and gradually moves away from the backstay until it enters the 20mm pipe.
The holes which were made for the pop riveter will later have some 20mm rubber bungs inserted to tidy the whole thing up.


Tuesday, August 30, 2011
Boarding pass please
Mike of s/v Chalice Is building himself a boarding ladder, from scratch. Mike is among the leaders in the "He who has the most tools wins" contest. And not only does he have them, but he clearly knows how to use them:
The new boarding ladder. Took me almost six months to get the hardware. Good thing I was in no hurry. I was glad to get it actually. Instead of a bunch of picture, I made a slide show. You can look at them individually on Picasa.
Friday, December 10, 2010
Accessing the Swim Ladder
Please welcome new contributor Joe, from s/v Assignment. Joe shows us how to improve access to the stern of a Catalina 25 from the water. It's a perfect small boat project!
When boarding after a swim on older Catalina 25s, you have to climb all the way up to the stern coaming, then swing your leg up and over the fixed rail. A little awkward, especially for geezer sailors.(Speaking as a geezer sailor, I'd appreciate this.)
A fix involves a hacksaw to remove the center portion of the rail and two 90-degree elbows. Then a short piece of lifeline with a pelican hook on one end and two fittings for the upright stanchions.
A discovery: Sawing through 1-in.-dia. stainless tubing isn't fun. That's when the trusty Dremel and its cutoff wheel comes in handy.
By the way, the pagoda-shaped solar lawn/walkway light has been mounted to the kickerpad for a couple of seasons now. It won't throw off enough lumens to qualify as a proper stern light nor anchor light, but it gives a little peace of mind when s/v Assignment is in its mooring field.


Subscribe to:
Posts (Atom)


