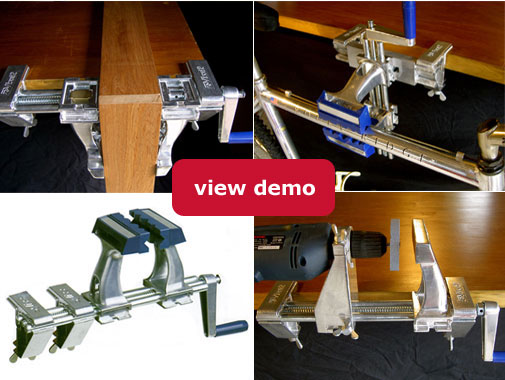
See Mike's original post for more information.The new tool in the shop. Small but very useful. I wished I bought this before. I got it on ebay ( of course), But actually came directly from the importer.
What is it already!!!
The Swiss made Zyliss vice. The z-vise2 actually.
Check it out for yourself.
http://www.homeshow.co.nz/zVise_overview.html
In the US.
http://www.advmachinery.com/p-105-z2-portable-clamping-system.aspx
Ebay will save you some money though. See this SEARCH.
Here I'm using it on the drill press.
From update-2-11-2011
Actually found a pic of one on a boat. Which is what I really bought it for. I wanted a tool I could use in the backwoods of someplace in the world. Mostly non-rusting magnesium or aluminum.
Monday, February 28, 2011
Here, hold this
I'm certain that you've said to someone, "Here, hold this." Well, what if there is no one there? Mike of s/v Chalice has a very good answer to this problem.

Friday, February 25, 2011
Serial maintenance
Today Steve of s/vSiempre Sabado takes us along as he starts a simple project to see if moving his mainsheet to the end of the boom would be practical. But as he demonstrates, one thing leads to another...
Today was a classic example of the "one thing leads to another" syndrome. Every boater is familiar with the syndrome. Well, maybe not Paul Allen or Ted Turner or any of those guys, but they're probably not reading my blog either.
Yesterday, Lulu took the canvas off the dodger to clean it up and make a few repairs. I've never quite liked how it fits since it's a little tall (the boom rubs on it when it's sitting in the gallows), and sits back a little too far (the forward pulley for the mainsheet rubs against the dodger).
Neither of these things would happen if we didn't have a mainsheet traveller mounted on the bridge deck. The traveller has been a vexation to me for a long time. It makes it impossible to sit on the bridge deck comfortably, it's in the way when getting into or out of the companionway, it puts the mainsheet right in the way when going forward from the cockpit, and it puts the mainsheet in the way of the companionway doors.
At our level of sailing (decidedly "non-performance"), the traveller is also not of much use to us. For awhile now I've wanted to move the mainsheet to the end of the boom to get it out of the way. I studied a bunch of photos of other Westsails to see the various arrangements and finally came up with something that I think will work for us.
So, today, I dove into the lazarette to get the handy billy that I had put together some time ago for ascending the mast if I didn't want use the steps for some unfathomable reason. For those who don't know, a handy billy is collection of blocks and line that can be used to lift heavy loads, among other things.
The reason I was retrieving it was because I was pretty sure the hardware and line would be just the ticket for rigging a boom-end mainsheet.
Once I unloaded the inflatable kayak, the Baja filter, a number of hanks of manila line, several canvas bags holding all sorts of goodies, and a couple of bagged sand chairs, I was finally able to grab the handy billy from where it was sitting on top of the battery box holding half of our house batteries.
Hey, you know..... now that the battery box is exposed, this would be a good time to relocate the batteries. Something I've been wanting to do almost since I installed them. It's just too hard to service them where they're at and I think they'll fit on the starboard side of the engine compartment alongside the starting battery.
Of course, before I move the batteries, I need to pull the starting battery out and clean the area up. I had a can of spray-on battery post protectant sitting alongside the starting battery. Sometime in the past year, the can rusted through and the whole little well that the battery sits in was coated with a thick layer of greasy purple gunk. Been meaning to clean that up for awhile, too.
The rest of the project was pretty straightforward: remove the house batteries, reroute the cables, make some tie-downs, and hook everything back up. BUT, while I was putting the batteries in place, I decided to move a bunch of the stuff that normally sits behind the generator somewhere else. Every time I pull the generator out, everything behind it just slides down and I have to screw with it when I put the generator away. So I got all that stuff relocated to the lazarette. While I was at it, I tied several hoses up out of the way.
While I was rerouting the cables, I was reminded that the vented loop on my raw water was adrift, and had been since I unhooked it from the bulkhead to make room for another breaker panel way back in Newport. It wasn't particularly dangerous since the hoses are stiff enough to keep it elevated and there's really no place for it to fall even if the hoses were supple enough to allow it. But, I still didn't like it and always meant to reattach it somewhere. Now seemed like a good time. So I moved some wires that were in the way, cut some wire ties that were holding assorted wires to the water hoses, and moved the vented loop to a spot on the side of the cockpit well where I could permanently attach it. All better.
After I cleaned things up and put my tools away, I noticed the handy billy sitting there. Oh yeah! I tried out the hardware on the boom, found an extra block in my rigging bag that matched perfectly and it looks like I have all the necessary hardware and line to be able to hook the mainsheet up from the end of the boom as soon as I get a couple of eyebolts or padeyes to use as anchoring points.
Not one of these things was on my list of things to do while we're at Marina del Palmar. But they're all things I've been meaning to do for a long time. And now they're done. I'm not sure why I even make lists.
PS: I know all the real sailors out there are probably going to give me crap about removing the traveller. Please save it. I don't know enough about the theory and use of the traveller to argue my side so I'm not going to bother trying. If it'll make you feel any better, I won't actually remove the traveller until I'm sure I don't want it, so I can always reconnect it if I want to. But I've got my doubts that I'm going to want to.<
PPS: for you non-boaters, a vented loop looks like this (this isn't mine as I had the engine compartment all buttoned up when I started this blog, so I just got this photo off the internet):
The vented loop is installed on any line that is bringing sea water into the boat. Without it, sea water could continue to siphon into the boat after the pump is turned off, or in the case of a leak or broken line. This could be very bad. So, a loop is run in the line well above the water line of the boat. A vent is installed at the top of the loop to allow air into the line and break the siphon.


Wednesday, February 23, 2011
Icebox
You probably thought this was going to be a galley-related post.
 Not so. This is the medicine cabinet in the aft head on Eolian. You can't see it, but the door is not ventilated - it has a mirror on it. And you may not be able to tell, but the space shares two surfaces with the outside world:
So, this is not a project, but rather a project *need*. This time I am soliciting advice from you, the readers of this blog, looking for ideas for insulating material which could be applied to the two outside surfaces. I have some criteria:
bob

- The back wall is the hull
- The top surface is the bottom of the side deck
So, this is not a project, but rather a project *need*. This time I am soliciting advice from you, the readers of this blog, looking for ideas for insulating material which could be applied to the two outside surfaces. I have some criteria:
- The installation cannot be permanent - there is wiring running up there, and I don't want to permanently cover it.
- The wiring running on the underside of the deck makes an installation tight against the upper deck difficult
- I don't want to cover the bottom end of the chainplate that is on the back wall.
- It would be nice if I could finish the insulation somehow (paint?)
- Whatever the material is, it has to go into the space thru the small door with the mirror
bob
Monday, February 21, 2011
Oooh, Shiny!

The size and spacing of the holes for faucets are standardized - it is very likely that a standard single handle control will drop right in where your two single handles are (assuming that is what you have).
The only hard part is making up the connections under the sink. But we are all boat owners here, right? So I know that you have a couple of extra joints in your forearms.
Thursday, February 17, 2011
If it's easy to do...
Please welcome new contributor Mike of s/v Chalice, a Cabo Rico 36 which he is putting through a full restoration. I'll bet that means he will be able to share a lot of projects like this with us!
A while back Livia shared with us a bit of philosophy that said, "Easy tasks get done." Mike's approach here puts keeping battery water levels into that "Easy" classification, so it'll get done.Single Point Battery Watering System
I have now installed the batteries. I wanted to use lead acid batteries to keep the cost down and the fact that they are a little hardier to erratic charging cycles. I have located them out of the engine room below the companionway steps. This means that they are a little harder to maintain. So I searched for a way to do this easier, enter the battery Watering System. I think every boat that has lead acid batteries should have this. Fill all your batteries from one source. They all fill to the proper level, and they fireproof the battery.
I purchased them here: http://www.janwp.com/
The system is created by these people: http://www.flow-rite.com/
From update 1-14-2011
From update 1-14-2011
From update 1-14-2011


Monday, February 14, 2011
Waste not, want not
The sheet arrangement on Eolian's staysail uses deck-mounted blocks. Blocks that rattle and thump on the deck when the sail is let out for downwind sailing. This is annoying and it damages the deck and the blocks.
In the finest of traditions, one day at anchor I made up these turk's head pads from pieces of line which had previously served as our lazy jacks. (I am embarrassed to show how dirty things are on deck. But spring is coming.) Aside from looking extremely salty, they do the trick nicely, and cost absolutely nothing.
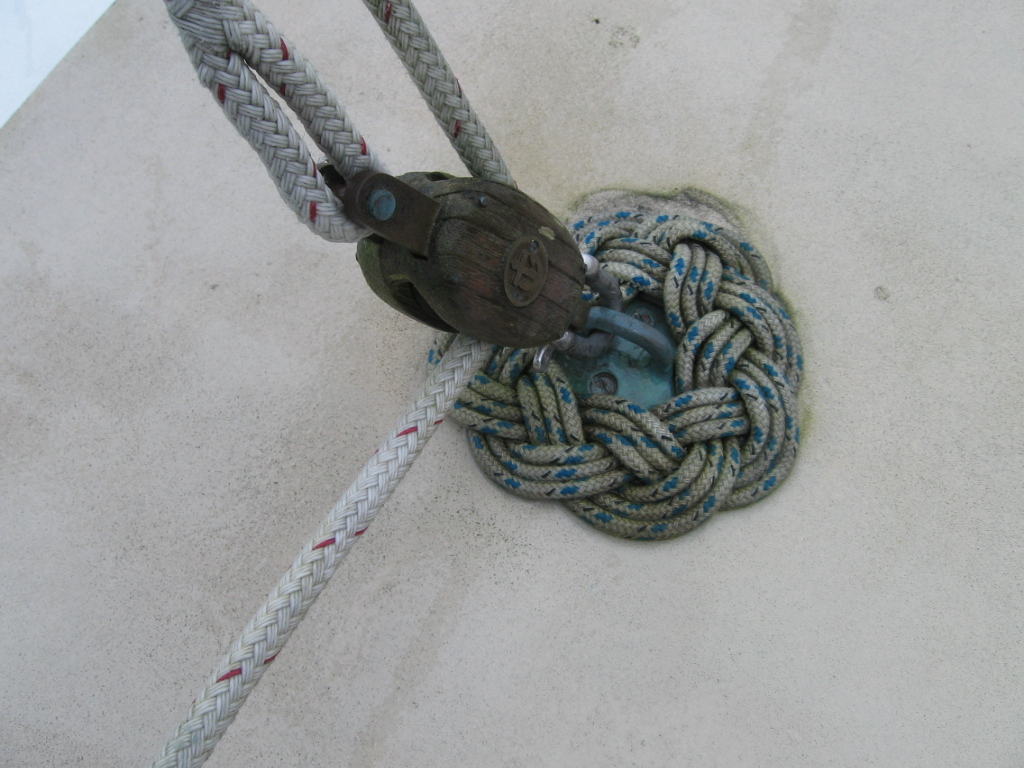 |
| (Why, yes - it is raining in this picture!) |
Wednesday, February 9, 2011
Pledge Drive
I continue to be amazed with the attention this blog is gathering - thank you for making this the 2,676,064th most popular site (up from 6,862,142 last June) on the entire Internet!
{cue confetti!}
But I can't keep it going forever without your help. There just aren't that many things on Eolian that are bloggable. For this to work out for all of us, everybody needs to contribute - think of this as a pot luck dock party.
Come on now. All of you have a small project of one kind or another that others would be interested in seeing. Contribute to the feast:
Every posting will feature a link to your article (if there is one) and a link to your blog (if you have one). In addition, all contributors will permanently have a link in the "Contributors" box on the right side of the blog. This ought to drive some of the traffic that this site is seeing back to your site. I will not take any recent posts (unless you tell me otherwise) - that way this site will not be in competition with yours. Instead, it will hopefully serve to "reactivate" some of your older posts.
But the most important benefit you'll get is the warm feeling of having helped someone thru a problem - one that you have solved. And we will all be the richer for it.
Pitch in!
{cue confetti!}
But I can't keep it going forever without your help. There just aren't that many things on Eolian that are bloggable. For this to work out for all of us, everybody needs to contribute - think of this as a pot luck dock party.
Come on now. All of you have a small project of one kind or another that others would be interested in seeing. Contribute to the feast:
- Write it up and send it to SmallBoatProjects at gmail dot com
- or -
- If you have already written it up on a blog somewhere and are willing to share, tell me where in the wide world of the Internet to find it , and I'll come and get it.
- or -
- Give me permission to "mine" your blog for projects. Anybody who is writing a blog about boating has numerous small projects buried in there. I'll ferret them out, if you let me. No, I won't put your content on here without your permission.
- or -
- Send me what you have, and I'll do the write-up, with full credit going to you as your project, of course.
Every posting will feature a link to your article (if there is one) and a link to your blog (if you have one). In addition, all contributors will permanently have a link in the "Contributors" box on the right side of the blog. This ought to drive some of the traffic that this site is seeing back to your site. I will not take any recent posts (unless you tell me otherwise) - that way this site will not be in competition with yours. Instead, it will hopefully serve to "reactivate" some of your older posts.
But the most important benefit you'll get is the warm feeling of having helped someone thru a problem - one that you have solved. And we will all be the richer for it.
Pitch in!
Monday, February 7, 2011
Keepin' it warm
(Originally published on Windborne in Puget Sound)
Speaking of tools... We were speaking of tools weren't we? Here is one which you should probably have on your boat:

Yep, a heat gun - kind of like a hair dryer on steroids. This is a serious tool - the air it delivers is so hot that it will set wood on fire - like all serious tools, you should have a care when using it.
And like many tools, when it is needed, it may only be needed for a few seconds, but oh, what a difference those few seconds can make.
Here are some of the things ours has helped with:
- Formica removal (at the nav station) - heat the Formica enough to soften the contact cement holding it to the wood.
- Head hoses - coat the outside of the fitting and the inside of the head hose with silicone and then heat the hose (carefully, slowly) until it is pliable. The hose then goes on the fittings *so* easily, and the hose clamps are much more effective at compressing the hose against the fitting.
- Heat a piece of 1" head hose enough to get it over a 1 1/4" fitting - this saved our bacon when an engine hose split under way.
- Heat large-bore shrink tubing for battery cables
- Soften varnish for removal. Every so often the brightwork demands that you start over with bare wood. There is a slip-on scraper that comes with the tool (it goes right over the air nozzle), but I prefer to use my own scraper.
Friday, February 4, 2011
Just like your refrigerator

You will not believe what a difference this small project will make. It sounds almost trivial, but it is a huge plus in making a boat comfortable for living aboard:
Put lights in the closets.
Boats are dark anyway. And the closets/lockers are even worse. Is that a light blue shirt or a grey one? Without light in the morning when you are getting dressed for the day, it can be really hard to tell. And in some weird way, having the lites in the closets is welcoming.
The lite you see above was purchased at an RV store (a great source of marine supplies that don't come with the 2X marine cost multiplier). They are 12V, and are meant to be screwed to the top edge of the closet opening. They have a button that, when depressed by the closing door, turns off the light. So that just like your refrigerator, when the door is closed, the light goes out. These are incandescent, but feel free to search for LED versions. Although given the length of time that these lights are on during any given day, the power savings from using an LED would be undetectable.
This really is one you just can't live without.
Wednesday, February 2, 2011
Moths? We got no moths.

You can get packages of 3/8" aromatic cedar tongue and groove closet lining at your local home improvement store. Since most boat hanging lockers are tiny by household standards, you won't need much. Then it's just a case of cut and fit. Well, finicky cut and fit.
You can install it with stainless finish nails if the substrate is wood, or adhesive if it is fiberglass.
Some hints:
- Before you start, be sure that the door is wide enough so that you can wedge your body in there far enough to reach all of the back wall. Or find a small child to do the work for you.
- Purchase the cedar lining and store it on the boat , unwrapped, for a week or so to equalize the moisture content of the wood with the boat environment.
- Do the back wall first, working from top to bottom. Your first board should be square with the two walls. But as you go down, it is likely that things will get interesting, since the wall is probably the inside of the hull or hull liner, and therefore is curved, and is wider on one side than the other. Make the boards 1/8" - 1/4" shorter than the space they go in, to allow room for growth due to humidity. The gap will be covered by the thickness of the boards on the sides.
- Next do the sides, making sure that the joints at the back wall are tight. At the ends behind the door, where they will be least likely to be noticed, again provide a gap for humidity growth.
- If you are using adhesive, you will only be able to do a few boards a day. Tape and wedges are your friends.
Subscribe to:
Posts (Atom)


