We have two hatches in our foredeck, which are unfortunately slippery to walk on when wet - thus they pose a significant safety risk. A quick elimination of the potential danger consisted simply in placing non-skid tape on.
If only all problems could be solved so easily!


3M Safety-Walk ™ has proven to work well on our staircase, so now it gets the chance to show off on the hatch too.
Friday, August 31, 2012
To go, or not to go
Lotte on s/v Lunde solves a slippery problem:


Tuesday, August 28, 2012
Hanging Locker Conversion, Part II
Rick on s/v Cay of Sea completes his conversion of a hanging locker into shelved storage space. This is Part II (you might want to read Part I first):
Now that I have experience with the fitting process, I was able to fit two more shelves and attach their supporting cleats, plus glue up the fiddles for all three shelves.
The shelves looked pretty rough, but sanding, a sealer coat of varnish, and cover coats of white paint made them look clean and ready for use. The inside of the locker will got fresh paint as well. There was a previously undetected, but large amount of mold stain inside the locker, which got scrubbed off with a brush and soap/bleach solution. A new coat of paint made an inviting place to stow clothes and linens.
That looks a lot cleaner than…
… this.
The shelves are 9 – 10 inches between levels. The top two will be for clothes stowage, and the bottom-most will hold towels and linens. There is a fairly large area beneath the bottom shelf that will hold something else as well. Meanwhile, I will need to arrange more effective hanging stowage for the few coats that we hang up.
Shelves!
Next project: Hanging space for coats in the back of the quarter berth area.


Tuesday, August 21, 2012
Hang Em' High
Drew over at Sail Delmarva has some dinghy hanging tips for us:
I always liked Clint....
How high does a tender need to be above the water? Surely this depends on the waters sailed, how far it extends behind the boat, and the motion of the boat. It depends on how well secured the tender is to the davits, in case it does take some minor hits.
Often, I see towering, high davits, with tenders swinging far below them. Sometimes it's coastal convenience; they hoist her up when off-shore. Too often, the tackle or attachment bridle were poorly conceived, pointlessly consuming critical space between the tender and the davits. Hoisting bridles are, well... dumb.
In my case, the tender is nestled between the hulls, only extending a bit beyond the sterns. This is typical on cats and makes carrying a tender safely easier. I've also taken steps to shorten the lifting tackle and adding a a bow spreader bar, such that the tackle is contained almost entirely within the tender, consuming no lift space.
An so I can hang her high without towering davits. Triced up, with cris-crossing lines underneath, she snugs up tight in the gap between transoms with no need to remove the engine or hoist her up into the wind. The aft edge is about 4 feet off the water, and top edge just above the deck, convenient for loading.
Very simple.
(The pictures are in the camera at the bottom of the Chesapeake. Squint like Clint and imaging a tender hanging 4 feet above the water. Imagine a spreader bar made from 1-inch x 1/8-inch aluminum square tube that clips the tender floor and D-rings on both tubes, and is clipped to the lifting tackle only 8 inches above the tender floor; you can't just clip the floor of a sport boat, because if the tubes go flat the floor comes out. And tricing lines, of course.)
Friday, August 17, 2012
Kickin' It
Over at Dock Six, Brian finds yet another source for marine hardware that does not include the marine tax:
In the spring of 2010 I installed Harken outboard stanchion blocks to run our furling line outside of the stanchions. It has proven to be a great improvement, eliminating obstructions on the already- too- narrow port deck of Whiskeyjack. However, true to Jones's 12th Law of Boat Maintenance (Any change, modification or improvement will require additional unexpected and/or unintended modifications, changes or improvements to other parts of the boat.) I now had a new problem to solve.
The realignment of the furling line and installation of a new cleat meant that the furling line now leads over the coaming, which wasn't good for either the furling line or the coaming.
With the furling line slack, you can see that the gelcoat has been worn away. I gotta do something.
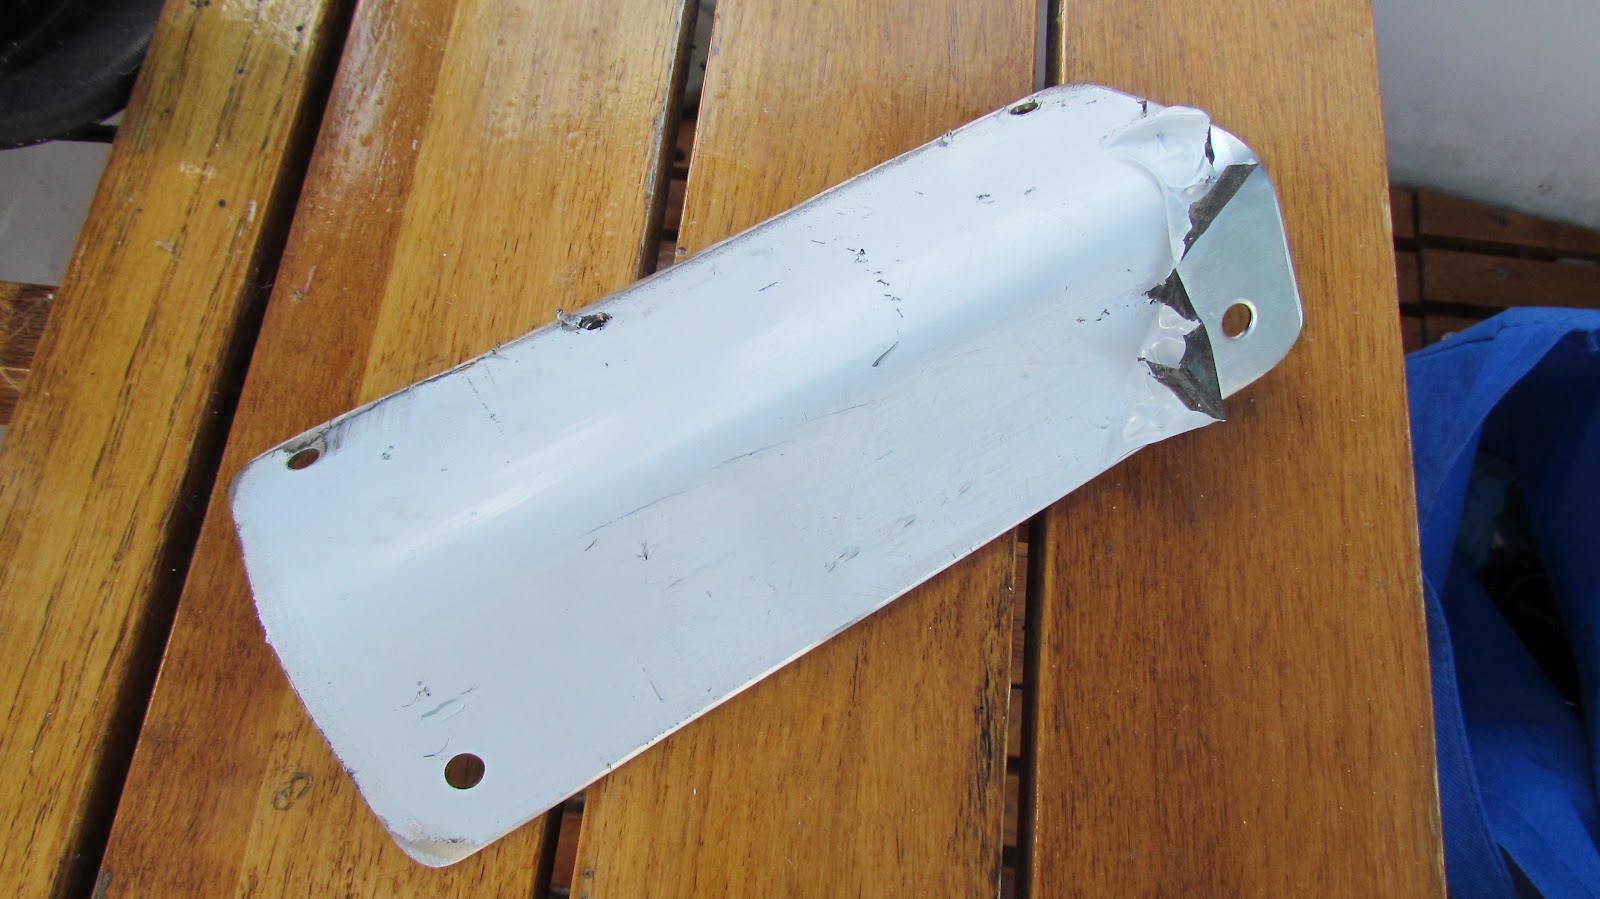
I went to one of my favourite local non-chandery chandleries, Stoney's Home Hardware and bought a stainless steel door kick plate, like this:

I cut off a piece, drilled some holes, radiused the corners and sanded the edges, then bent it to fit with the help of a couple of dock tread boards and some persuasion of the Topsider-clad foot kind.
When I was happy with the shape and the fit, I peeled off the protective wrap...
... and screwed it into place. Vwah-la, No more chafe and wear. Please admire the shine, and ignore the overzealous wrap around the cleat.
Total cost: $22.
Total time invested: 1 hour.


Wednesday, August 15, 2012
Interior varnish tip
If you have varnished surfaces in your interior, you have probably found that where they are commonly touched the surface has become gummy. I presume that this is due to skin oils penetrating the surface of the varnish.
I have tried to wipe this gummy surface off with paint thinner before recoating with varnish, but it was ineffective. Acetone was too effective, softening everything. And just recoating without removing the gumminess doesn't work either - the gummy surface prevents the new varnish from curing.
So what to do?
And then when wiping down the table after dinner one day, I made a serendipitous discovery.
The fiddles on our saloon table are one of these commonly touched surfaces, and had indeed become gummy to the touch. As I wiped down the table that nite, I had a brief moment of inspiration (a cosmic ray passed thru my brain?), and I turned the sponge over and vigorously rubbed the soft varnish with the scratchy side of the sponge. Amazingly, the gumminess was gone! In some places the gummy layer was deep enough that several round trips of damp sponge side followed by wet sanding with the scratchy side followed by damp sponge were required. But nowhere did I penetrate the varnish layer. Even if I had, as a typical zero-cost experiment, that would only have prepped the surface for recoating.
I have tried to wipe this gummy surface off with paint thinner before recoating with varnish, but it was ineffective. Acetone was too effective, softening everything. And just recoating without removing the gumminess doesn't work either - the gummy surface prevents the new varnish from curing.
So what to do?
And then when wiping down the table after dinner one day, I made a serendipitous discovery.
 |
| The ubiquitous scratchy sponge |
Thursday, August 9, 2012
WonderWash
How do you wash your clothes onboard? Some use a 5-gallon bucket and a plunger to do the work. Lotte on s/v Lunde shows us a more elegant solution to the problem:
A few years ago we got a bit of a gem costing nothing, but it is only today that I have consecrated it. Most of all, to test whether I should make an extra effort to find storage for it, but also because the towel stack was empty and the sun shone.[Editor's note: Apologies for my poor editing of Google Translate's translation from the original Danish.]

WonderWash is a hand-powered washing machine - a wash ball with crank if you wish - you can wash up to approx. 2 kg clothes at a time. Without using much water. Or soap. And no electricity.

It is super simple. By pouring in hot water, and attaching the screw cap, a small excess pressure will be built up as the air that is in the container is heated by the water and thereby expands. This pressure helps washing solution to penetrate into the fibers and there is only a need to rotate the crank handle for a few minutes before the clothes are ready to be rinsed.
It sounds promising and environmentally friendly - and I must say that after today's test I wish I could find room for the little laundry helper. I put in a little too much soap so I had to use some extra water to rinse with, but apart from that I can easily see the point. Not just for a boat, it would also suit perfectly if you do not wash so many clothes at a time and/or do much hand washing.
But despite the successful test, our WonderWash will have to return to its place in the shed because I simply cannot cram it into anywhere onboard.
If you want to see WonderWash in operation:


Tuesday, August 7, 2012
Something Free, Something Lazy
Over at Sail Delmarva, Drew has a tip for keeping your bowl fresh:
Free is always good, except this is not quite free.
Or rather, it is free if you use any sort of holding tank treatment chemical.
I've done all sorts of holding tank stuff for Practical Sailor Mag. Chemicals, hoses, vent filters. Fun stuff. And in the process, in addition to learning all sorts subtleties, I solved all of my own odor problems, save one; odor from the bowl itself. If I flush with seawater and leave it a few days, there's some stink; sulfate in seawater is converted to hydrogen sulfide by millions of wee bacteria. If I flush with fresh water, it's better, but not zero; I guess something sneaks back down the waste hose, or perhaps up the feed hose. And either way, the bowl tends to get ratty, as marine flush volumes are limited and the water isn't chlorinated. I hate scrubbing.
The free solution? Place a 20% solution of holding tank treatment in a spray bottle and mist the bowl down each day, or at least whenever you'll be leaving the boat for a while. This cleans the bowl, treats the water in the bowl, and treats the water in the waste hose, preventing stink. And since it's the same treatment you would be using anyway, just subtract this from the usual dosage.
I haven't scrubbed in months;
the treatment eats the waste off. Very lazy.
However, not all treatments work.
Less work. Less money.
- No blue sterilizing treatments, with formaldehyde and the like. Toxic, smelly, stain-prone, and well... gross. Too much like a portable toilet. Ban those from your boat.
- No bacterial treatments, like Bactank T3 or Happy Camper. They grow in the bottle and get gross. They are quite effective in the tank, just not for this.
- Pick an scent you like, preferably very mild. I like Forespar Refresh, Raritan CP, and Camco TST Ultra-concentrate. These are compatible with any type of holding tank treatment, including bacterial treatments.

Thursday, August 2, 2012
Hanging Locker Conversion to Shelves
Rick on s/v Cay of Sea sets about changing a hanging locker into shelved storage space. It's an interesting exercise in making things fit in the curved, not plumb, not level environment of a boat. This is part I:
Every estimate of time for a boat project should be trebled.
I began the conversion to shelves from hanging space yesterday. After 2.5 hours, I had fitted exactly one shelf – and it wasn’t finished, just fitted. I managed to cut and tack on a fiddle to the shelf as well, but it needs to be glued. Now it’s only screwed on, which isn’t very secure at all.
All By Eye
Nothing is square or level on a boat. You need to use a square for reference, and sometimes pieces that you cut should be square with themselves. But the installations are never square. Example: I measured and estimated by eye the even height for the first shelf from left to right (actually, fore and aft), then when I looked at the installed cleats (shelf supports) it didn’t look like it could ever possibly be level to the eye. But – it was. When I got the shelf itself trimmed to fit in the space, it looked perfect. Who could have guessed by looking at the cleats? Some combination of estimation, gauging by eye, and measuring produced the correct levels.
Do those supports (right and left) look level to you? I was certain that I would have to move one of them – but the shelf installed level. None of the lines in the locker are square-looking and level, so the view is deceptive. Why Doesn’t This Thing Fit Yet?
I made no fewer than 7 trips between the boat and my work area to trim the shelf so that it would fit the space. Side to side, front to back, and then trim the back side of the shelf to fit the curvature of the hull. Lots of trial, but mostly error. Then that last fitting, and it worked!
Too wide...
Trimming to fit the hull is an interesting exercise that I had read about, but never tried. You take a compass (you know, that thing you used in school with which to scribe arcs in geometry?) and place the pointy end against the hull. Press the pencil against the shelf you want to trim. Now keep the compass at a consistent level and in contact with both surfaces as you drag it along the width of the shelf (on the back side, of course). The result is a pencil line on your shelf that duplicates the curve of the hull in that place. It’s like magic when you cut the along the line and refit the shelf – and find that it matches!
Still too wide. And something else… ah, the right corner in back needs trimming.
Note the (very faint) pencil line
There. Now it fits. Space – The Final Frontier
This upper-most shelf is 23-26 inches deep (it’s shallower towards the bow, deeper towards the stern). If you measure your arm from the tips of your fingers to the arm pit, that’s about as far as you can reach. The space above the shelf is about 10 inches. That’s a humongous space on a boat.
The next shelf down won’t be quite that deep, as the hull curves in towards the keel the further down you move along the hull. However, it will still be 19-23 inches deep, which is still a lot of space.


Subscribe to:
Posts (Atom)


