Tuesday, August 25, 2015

How Much Is There?

This post originally appeared on Windborne in Puget Sound

I recently did a post which talked about establishing what the right amount of glycol in a holding plate solution was.  Well, OK, now that we know what we want to have in there, how do we determine what we actually have?  I suppose one possibility would be to simply empty the holding plate and refill it with a solution of known concentration, one that we just made up by careful measuring.  Yeah, that would work.

But what if we just want to add a little water or glycol to what we already have?  For that we would need to be able to measure the concentration in the solution. 

Hand-held refractometer
This is the tool for that:  It is a refractometer - it measures the refractive index of a liquid.

What is that?

All transparent substances slow the passage of light thru them somewhat - some more than others.  The refractive index is the ratio of the speed of light in a vacuum compared to the speed of light in the transparent substance.  So, if I tell you that the refractive index of a particular glass is 1.33, that means that, yes, light travels thru that glass only 3/4 as fast as in a vacuum.  You have witnessed refractive index differences when you, for example, mixed water and vodka, or dove in a place where fresh water and salt water are mixing (at Shilshole, for example).

But for our purposes, it is enough to know that the refractive index of a water/propylene glycol mixture changes in a predictable way with the concentration of glycol.  We don't even have to know the details of that change because the manufacturer has taken that into account in the preparation of the scale inside the instrument. 

All that remains is for us to obtain a drop or two of the solution and put it onto the prism covered by the clear plastic flap, and look thru the lens at the other end of the instrument, for a view like this:

Approximately 33% propylene glycol shown
But there is a catch (isn't there always?).  Before I sample the holding tank solution, I have to completely defrost the freezer.  If I don't, some unknown quantity of the water in the system will be frozen out, which would skew the results in the direction of increasing concentration.  So the refractometer stands ready for duty, waiting for a freezer defrost event.

Who knows when that will be?


Wednesday, August 19, 2015

LED Light Upgrade Project

It seems that converting your interior lights from incandescent to LED is becoming a popular project, and why not? Here, Rick and DAR of m/v September Dream show us theirs...
Now that the boat is back in the water, it's time to start taking care of some projects that I've wanted to do for a while now.  The first project is an upgrade of the interior lights to LED.

I'm finally getting around to completing the conversion of our interior lights from incadescent bulbs to LED bulbs.  Of course, this would have been a great project to have completed before we left for the trip, when saving amps would have been useful.  Oh well, better late than never... :-)

The first task was to source the replacement bulbs.  Primarily I just use google as my main research tool, but the Dr LED site (http://doctorled.com) is a great site with a lot of information on LED lamp replacement.

Most of the lighting (two double light fixtures in the salon, one double in the galley and two singles in the head) on the boat use a bulb with a model number of 1141 and a base of ba15s.  I found a number of different LED bulbs that would work as a replacement for the 1141 bulbs, but I chose the following from amazon;

http://www.amazon.ca/gp/product/B00DDOSNH2?psc=1&redirect=true&ref_=oh_aui_detailpage_o00_s00

Part of the reason I chose these bulbs was the price ($5.00 per bulb is pretty good), but also because of the colour.

When you look at LED lighing, you'll see references to 'cool', 'warm', etc.  This refers to the colour of the light given off by the bulbs.  Here's a good link that illustrates this;

http://www.seesmartled.com/kb/choosing_color_temperature/

We previously had two LED bulbs in the salon, one in each light fixture, so we were able to run low current with our lights.  These bulbs were quite blue though ('cool' white colour according to the colour temperature) and we didn't find they did that good a job providing usable lighting.  I decided to change to 'warm' white colour for the replacements.

The new bulbs in one of the salon fixtures

A nice 'warm' white colour

After replacing all the bulbs it was time to do a current usage test to see just how much of a difference LED lights can make.

Everything turned off


Current usage of the incandescent bulb


Current usage of the LED bulb

As you can see, the LED bulbs are a great deal more efficient than the incandescent.

I still have a couple other lights to replace the bulbs in.  We have two reading lights in the stateroom, and a couple side lamps on either side of the couch in the salon.  They have a different bulb, with a screw in base known as an Edison E26 or E27.  I've yet to pick a replacement LED bulb for these yet, but now that I see the other LED bulbs I picked up I have a reference for what the colour looks like.

Tuesday, August 4, 2015

Sewing Project: Shower Caddy

Livia and Carol cruising aboard s/v Estrellita 5.10b have a little project that any tropical cruiser is going to love...
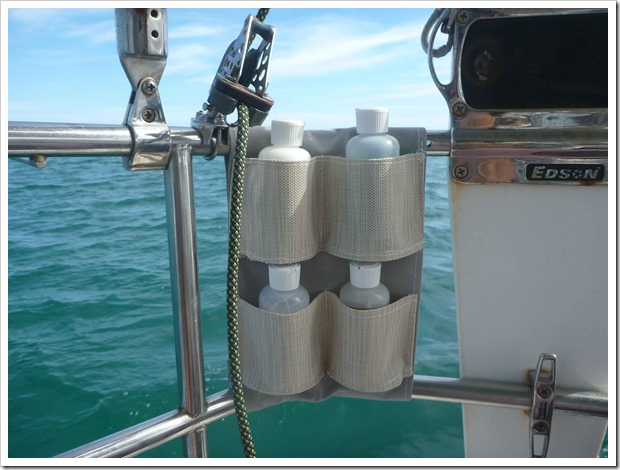
P1060542
So, perhaps a bit of TMI, but we are cockpit shower-ers. In close quarters with other boats we wear swimsuits or wait for dark, and when not in close quarters with other boats, as we like to say “What you see with binoculars is your own damn fault”.

P1060543After years of dealing with shampoo and soap bottles jammed into the small opening where our cockpit shower exits the cockpit combing, with our new sewing machine I made a caddy for our stern pulpit using Sunbrella, a UV resistant mesh product like Phifertex and some 2” velcro. I measured the distance between bars, added the circumference of the bars (twice) and velcro width (four times) and seam allotment (twice) and that was the length of the sunbrella fabric to cut. For the width I measured between our dinghy engine hoist and dinghy engine bracket (plus seam allotment – twice). After that I was really free handing the mesh and the pockets look a little lumpy close up. Good enough for us!

Inside the caddy fit 4 reusable squeeze bottles I picked up at REI.

Sometimes it is the little boat improvements that are the most exciting. Our cockpit transformation is 2/3 of the way done: cockpit cushions (check), shower caddy (check) and now we need new mesh pockets near the dodger to replace our shredded ones.

Related Posts Plugin for WordPress, Blogger...