Our dock neighbour and friend, also a veteran catamaran sailor who sailed from the West coast to New Zealand and back, parted with us a very wise advice few weeks ago. While filling his water tank he discovered that a fitting had broken during the winter and the entire content went into the front cabin. Not the most pleasant of Spring surprise though a hard reality. This is when he showed us his creative portable bilge setup. Luckily on multi hulls we have separated “water tight”compartments but not all are linked to the bilge pump, hence the need for this clever device! You can plug it as you need it, vacuum whatever needs to be done and then store it for the next event. As you can see on the picture below, yesterday while purchasing the replacement strainer screen for the water system, I acquired the entire elements to have my own portable pump.We have a similar system on Eolian, and it has served us well.
Here are the ingredients you will need:
I don’t have to teach you how to put it together, but for $30 it is a nice little system to have on board even just to empty the dinghy when you leave it out and it rain really hard. Not that we will ever do that around here, no.
- 15ft of bilge tubing,
- 30 ft of 16 gauge electric cable,
- one male 12 volt plug, one clamp
- and one rule 500 GPH bilge pump.
Wednesday, June 29, 2011
Moving water
Our friends on s/v Letitgo show us an easy way to move water from where it shouldn't be to somewhere else...

Monday, June 27, 2011
5200: Sailmaker's tool
3M 5200 sticks to everything, and is for all intents and purposes a tough, permanent adhesive - right? Can you think of a better sailmaker's adhesive? Livia on s/v Estrellita 5.10b shows us how in another in her continuing Haul Out series:
One of the things I wanted to do while the mast was off (and the sails were off as a result) was to examine all of sails.
I made it through the main, the jib and the genoa which, considering the path of the haulout, I’ll take as a success. Other than one known issue (below), the sail slides that I changed out, and some sunbrella stitching that needed touching up, everything looked great. All of the between panel stitching was intact, the head, tack and clew of the sails were in good shape and the “edges” (luff, foot and leech) were solid. In essence, what I did was to look at the general state of the Dacron (good) and then walk through every line of stitching looking for broken stitches (from chafe, UV or both). Our sails are double and triple stitched everywhere so a single broken stitch or a small patch in one line of stitching isn’t a big problem – although you have to ask yourself why it was failing in one area and see if there is chafe that should be attended to.
Speaking of chafe (*snort*), the leather chafe gear that I added to the jib 10 months ago looks good with only minor signs of wear – the wear meaning that it is doing its job.
We had two fairleads on the mainsail for our Dutchman system that had popped off. There are two halves, one on each side of the sail that snap onto each other through the sail, but ours are old and apparently too warped to stay snapped on. One departed when the monofilament line broke and one just popped off and sat flapping on the filament. We’ve had a number of people try to scare us about our Dutchman system – saying that if a fairlead failed the monofilament would saw a hole through our sail. I can see how that could happen but because we loosen our Dutchman when the main is up, it seems like that wouldn’t happen for quite a while and one would have a chance to notice it and fix it. We have no idea. However, our old main still has a lot of life in it. The Dutchman system is already cut into the sail and makes dropping and reefing the sail a cinch…so we’re keeping it. Someday, when we get a new main, we’ll have a decision to make.
")
The fairleads are ridiculously expensive and thankfully our cool local sail shop (Leitch & McBride in Sidney, BC – they’ve done several jobs for us including installing a third reef) had some used ones. Because the Dutchman system will be on our main until we replace it, I used some flexible, fast drying white 5200 and glued those puppies back together making sure that there was 5200 between the little snaps that connect the two pieces. With a little weight to make sure everything stayed aligned, it dried as designed.
")
5200 is a dangerous toy because it should only be used on something that will “never” need to come apart…for that reason this seemed like the perfect use. We want the fairleads to *never* come apart again.
")
")
")
")
")
")
")
Friday, June 24, 2011
No more Mr. Clean
Please welcome new contributors Christie and Matt aboard s/v Kaleo. As their first contribution, they offer us tips on cleaning supplies made from commonly available ingredients:
Who doesn’t like a clean house? Whether it be out to sea or ashore, we’ve found a few simple recipes that help us keep Kaleo shining inside from stem to stern.Editor's note: Please don't confuse washing soda (sodium carbonate, NA2CO3) with baking soda (sodium bicarbonate, NAHCO3). Tho the names and formulae are similar, they are very different chemicals. One is suitable for use as an eyewash (the bicarbonate) and the other could cause blindness if you get it in your eyes (the carbonate).
Yet you won’t find Mr. Clean or Windex lurking under our galley sink.
With just a few basic items that you most likely have on hand (water, vinegar, baking soda, tea tree oil), you can do almost all of your household cleaning, save money, and keep your home free of the toxins found in many store-bought cleaning products.
Here are a few recipes that will help you do most of your everyday cleaning:
General Surface Cleaner
Combine in a spray bottle, shake to blend, and use to clean general surfaces such as counter tops, sinks and the stove. Do not rinse.
- 1 cup water
- 1 teaspoon tea tree oil
Tea tree oil is antiseptic, germicidal, antifungal, and antibacterial agent making it a very effective surface cleaner.
Mold and Mildew Eliminator
Using the same recipe as above, wipe down surfaces in high-mold or high-humidity areas. Tea tree oil is a natural fungus fighter but if you encounter large amounts of mold, or black mold, however, call a mold-removal specialist.
Head (Toilet) Cleaner
Mix in a small spray bottle and use for head surfaces, the toilet bowl and wiping down the gel coat shower pan. If you’re concerned about the smell of vinegar, you can add a few drops of essential oil to your mix, but know that the odor of vinegar disappears as it evaporates.
- 50% water
- 50% white vinegar
In addition, about once per month we run a pint of undiluted white vinegar into the toilet, flush once and let it sit overnight to fight the salt water deposits that build up.
Glass Cleaner
Mix the ingredients into a spray bottle for an effective glass cleaner. It also works well on the chrome faucets in the galley and head and even on the stainless steel dorades and rails on deck.
- 1 cup rubbing (isopropyl) alcohol
- 1 cup water
- 1 tablespoon white vinegar
Trash Can Deodorizer
Mix the two ingredients thoroughly, ensuring all lumps are removed. Place a (fresh) piece of absorbent cloth on the bottom of the trash can and sprinkle this mixture over it. Change the pad and deodorizer every other week or so.
- 1 teaspoon tea tree oil
- 1 cup baking soda
- Oil absorbent cloth
A few other natural deodorizers
- Boil 1 tablespoon of vinegar in 1 cup of water to eliminate unpleasant cooking odors
- Baking soda is excellent for absorbing odors in the fridge or icebox
Laundry Detergent
First, mix the grated soap in a saucepan with 4 cups of water, and heat on low until the soap is completely dissolved. Add hot water/soap mixture to 3 gallons of water in the 5-gallon bucket, stir in the washing soda and Borax, and continue stirring until thickened. Let the mix sit for 24 hours and it’s ready to go. Use 3/4 cup per full load. You can store this in gallon jugs aboard and fill a water bottle to take to the laundromat.
- 4 cups of water
- ⅓ bar of natural soap, grated (this is where the scent will come from in the detergent, so go with something you like)
- ½ cup washing soda (not baking soda)
- ½ cup of Borax (20 Mule Team)
- 5-gallon bucket for mixing
- 3 gallons of water
- (optional) A few drops of scented oil such as tea tree or lavender which will overpower the soap (especially if you choose unscented)
Bug Trap – Not really a cleaning product but one we use when those nasty fruit flies visit.
Cut the top off a small plastic cup. Add apple cider vinegar and drops of dish soap. Place on your kitchen counter and within minutes the little buggers will be swimming. Apple cider vinegar attracts the bugs and the dish soap traps them on entry.
- 1/4 cup apple cider vinegar
- 2-3 drops of dish soap
Happy (and healthy) cleaning!

Wednesday, June 22, 2011
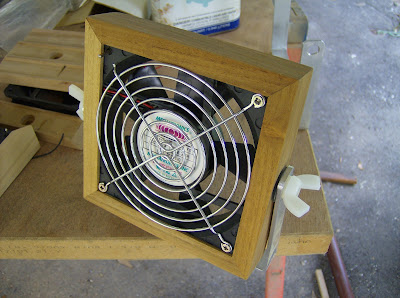
Man made breeze
Mike of s/v Chalice puts his considerable woodworking skills to the task of adding ventilation using muffin fans:
I needed a bunch of fans for the boat. If you have priced these recently you will see they are not cheap, price wise anyway. So I said " I think I'll make my own". Here is how I did it.
Find the fan you would like to use. I had 2 on hand, and found some more on Ebay.
From Update 6-8-2011
Measure it then figure how to mount it. I wanted a nice teak mounting to match the rest of the boat. I also built one with mahogany and sapele wraps. These I used a spray urethane on them. The teak ones I oiled.
So make the wood bits first. I used some scrap to test.
From Update 6-8-2011
The holes are for the swivel bolts and nuts. I used nylon bolts and wing nuts from Lowes and Home Depot. Add the rubber washer to hold it from turning. You do not need to tighten them tight as they hold real well.
From Update 6-8-2011
Glue them in with some epoxy (J-B Weld). Then run thru the router to clean them up.
From Update 6-8-2011
From Update 6-8-2011
Wire in the switch then glue them up. Give them a final sand then oil or add desired finish.
Also make Aluminum brackets.
Clamp available here.
From Update 6-8-2011
From Update 6-8-2011
Finished fan.
From Update 6-8-2011
You could make all the cuts for the wood on a table saw, but I used a router for the channel. Also the switch came from Radio Shack. I put it in one of the screw holes for the grill. Drill a half inch hole opposite to insert the switch. This hole is where the wires will come back out.


Monday, June 20, 2011
One stone, two birds
Please welcome new contributor s/v Peregrina! In one of those great but seemingly rare instances, we learn how a tool that you may (should?) have on board can serve an entirely different purpose.
I had one last cable to make up, but after three boats the tool had finally given up. I had just got done with a job on relatively mall gauge battery cables on the venerable GAUCHO, and one of the threads on the tool had completely stripped out. I was able to use my broken tool in the vise in my onboard workshop to make up one end of the 8 foot long 1/0 gauge cable that would run to the starter on PEREGRINA. It was easier to run the cable without the other end made up, and I was not sure of the actual cable length needed.
I had one last end to make, and I wanted this tool that I have used for so long in the tool chest. $30 later I have the new, replacement #2 size of the "swage-it tool" - but I have never used it as Nicropress intended - for swaging. The catalog says - For nicropress copper oval sleeves only. Do it yourself swaging! With just a wrench...
The old and new --
This is a rigging tool to swage wire around thimbles, but it is perfect for attaching tinned copper lugs to battery and other large gauge cables - and yes, with just a wrench.
I had tried using Ancor's Heavy Duty Lug Crimper with a hammer and it never worked for me, but maybe I just needed a much heavier hammer. I sold this expensive tool I thought the Nicropress tool might just might work. It did, and we have had a long relationship working on progressively bigger cables as the size of my boats increased - so much so that the internal threads on the tool gave out.
What is unique about this tool is you don't need a hammer, or a vise - you just need a wrench. Turn the two bolts to evenly bring pressure on the lug - I keep going until It is very hard to turn - and you have a very strong crimp. This means you can lead the cable as needed, cut to length, and without pulling the whole thing out - crimp on the lug.
For this job I put in two crimps but one would have been enough. The tool makes a nice job of it. Add some heat shrink tubing to keep moisture out, and you have a professional cabling job - using a wrench!
The finished cable end


Wednesday, June 15, 2011
Vinegar is your friend
On a boat that lowly cooking ingredient, white vinegar, can really turn out to be useful.
White vinegar is nothing more than a 5% solution of acetic acid (a weak organic* acid) in water.
As a general cleaner, you will find straight vinegar to be superior - it kills bacteria and other microbial life forms, and the organic nature of the acetic acid helps to solubilize dirt and grease. And it is completely natural. No rinsing is necessary.
Vinegar kills mildew and algae growing in or on surfaces by subjecting them to a low pH which they cannot tolerate. On Eolian, our worst examples are to be found on the underside of the bimini and dodger canvas in the cockpit. After a winter of being closed up, the colonies are especially numerous and colorful just over the vent in the galley ceiling. Sponge it on, and brush the cloth surface gently but thoroughly to break up the colonies. The vinegar itself calls for no need to rinse - unlike bleach, vinegar evaporates completely, leaving no residue whatsoever. However, the corpses of the dead algae and mildew left behind from the treatment will still be present; hosing down the surface will help to flush them away. We recently used straight vinegar to clean the sunshield on our foresail.
Most boat owners know that flushing a little vinegar from time to time will help to keep the head internals and the head lines free of carbonate deposits. Because it is acid, the vinegar dissolves them. But it is not a strong enough acid to damage the head internals, the plumbing, or your holding tank (unless perhaps it is an aluminum tank - but that would be a terrible materials choice for a holding tank). It works slowly tho, so it is best if you think about it as a slow-acting cleaner... Don't just pour it into the bowl and flush it away - it won't have had time to work on the carbonate deposits. Pour a pint or so in the bowl and let it stand for an hour or two to soften or remove lime deposits there. Then pump out the bowl (but don't rinse), moving the vinegar thru the head internals and into the joker valve and the first part of the plumbing. Let it stand for a few more hours. Then rinse the bowl with 4-5 pumps, which will move the vinegar further downstream in the plumbing.
And it is incredibly cheap - cheaper than bottled water**! We always keep a gallon or two on board.
*Not "organic" as in some vague politically correct term for food items produced without chemicals, whatever that means, but rather meaning composed solely of carbon, hydrogen and oxygen.
**Do not get me started on bottled water.
White vinegar is nothing more than a 5% solution of acetic acid (a weak organic* acid) in water.
As a general cleaner, you will find straight vinegar to be superior - it kills bacteria and other microbial life forms, and the organic nature of the acetic acid helps to solubilize dirt and grease. And it is completely natural. No rinsing is necessary.
Vinegar kills mildew and algae growing in or on surfaces by subjecting them to a low pH which they cannot tolerate. On Eolian, our worst examples are to be found on the underside of the bimini and dodger canvas in the cockpit. After a winter of being closed up, the colonies are especially numerous and colorful just over the vent in the galley ceiling. Sponge it on, and brush the cloth surface gently but thoroughly to break up the colonies. The vinegar itself calls for no need to rinse - unlike bleach, vinegar evaporates completely, leaving no residue whatsoever. However, the corpses of the dead algae and mildew left behind from the treatment will still be present; hosing down the surface will help to flush them away. We recently used straight vinegar to clean the sunshield on our foresail.
Most boat owners know that flushing a little vinegar from time to time will help to keep the head internals and the head lines free of carbonate deposits. Because it is acid, the vinegar dissolves them. But it is not a strong enough acid to damage the head internals, the plumbing, or your holding tank (unless perhaps it is an aluminum tank - but that would be a terrible materials choice for a holding tank). It works slowly tho, so it is best if you think about it as a slow-acting cleaner... Don't just pour it into the bowl and flush it away - it won't have had time to work on the carbonate deposits. Pour a pint or so in the bowl and let it stand for an hour or two to soften or remove lime deposits there. Then pump out the bowl (but don't rinse), moving the vinegar thru the head internals and into the joker valve and the first part of the plumbing. Let it stand for a few more hours. Then rinse the bowl with 4-5 pumps, which will move the vinegar further downstream in the plumbing.
The chances are excellent that the ID of your head pump is about the same as the ID of your head plumbing. So one stroke of the pump will move things thru the plumbing about the same distance as the length of that stroke, perhaps 6".I know this sounds tedious, but if you time things right in your daily living, it can work out pretty well. It is especially advantageous if you can get some vinegar into the head internals and the plumbing if you are going to leave the boat for a few days, thereby giving it lots of time to act.
And it is incredibly cheap - cheaper than bottled water**! We always keep a gallon or two on board.
*Not "organic" as in some vague politically correct term for food items produced without chemicals, whatever that means, but rather meaning composed solely of carbon, hydrogen and oxygen.
**Do not get me started on bottled water.
Monday, June 13, 2011
Upgrade to less power
Paul on s/v Solace instructs us on replacing fluorescents with LEDs.
Nicely done! And it does retain the original character - an important consideration for boats.
Original non working light
We have had a fluorescent light inverter/ballast fail on us and had a number of options to choose from. My first thought was to change the whole light structure to a more modern fitting, but was eventually convinced by my wife that to do so, was taking from the character of the boat. A new light could have been procured from the USA, but I was still looking for a better light that uses less power. Here's what I did to keep both the original light fixture, but upgrade the light that consumes less power.
I removed the light fixture and purchased a LED strip light that would fit the light fitting.
New LED lights ready to be fitted.
I removed the the two ends for the florescent tube to make way for the new LED strip. I applied double sided tape used to attach mirrors to walls etc, to secure the LED strip and the switch, to the old light fitting. It was important to keep the original switch as it contained the electronics which helps with the LED strip to function efficiently.
Removal of the florescent ends needed
New LED light fitted.
The refitted unit was wired so that the original switch on the side was the main means of turning the unit on . The inline switch supplied with the LED strip was left on and fitted inside the light fixture. My wife has declared the light very good, and now wants me to convert another light so she can do fine needle work.
Finished light. Time to complete was about 40 minutes and the LED strip procured locally in New Zealand for about $37USD


Wednesday, June 8, 2011
Cargo
Steve and Lulu on s/v Siempre Sabado use their macramé skills to control deck cargo:
I don't really like carrying stuff on deck. It cuts into the walking around room and is one more thing to fret about when things get rough. But, if you're going to cruise on a 28' boat, chances are some stuff will end up topsides. Things like extra diesel jerry jugs, extra anchors and associated rodes, the dingy, etc. Are big and can be lashed down pretty effectively. But what about the smaller stuff? The little one-gallon gas cans for the generator and dinghy, extra lines, extra fenders, kickboards, life jackets for the dinghy, etc, etc? On the trip down the coast all this stuff was lashed to the top of the sea hood (turtle) and alongside it as well, basically the area between the mast and the dodger. It was all lashed down with a spider's web of knots and actually made the trip quite nicely. But getting things in and out was always a puzzle. As soon as the load changed a bit, the knots had to be re-done in some new and creative way. There had to be a better solution.
One day while sitting outside trying to get my lily-white thighs closer to the color of the rest of my legs, it came to me: a cargo net! We used cargo nets made of nylon webbing a lot in the Navy for just this purpose. Well, we also used them as big bags to transfer loads from one ship to another but we probably won't be rigging any highlines for something like that. What I needed was a cargo net that I could drape over the deck cargo and then just have to lash one end down.
I had some nylon line I'd bought a few years ago for new halyards, sheets, etc. It's called Sta-Set X or something like that and is godawful strong. However, it's also godawful stiff and I hate it. But I'm not about to throw usable line away so I needed to find other uses for it. So far it had mostly just been taking up space in the lazarette. Oh, I did make two boarding ladders out of the stuff but I still had a lot of it, mostly in relatively short pieces. I figured that I could knot these together in such a way as to make a large-weave net about 3' wide by 6' long. This would be just right for covering the deck cargo.
I tied a cross piece to the boom gallows supports and tied a bunch of 21' long pieces, doubled, over this cross piece. Then, in good old macrame-er fashion, I started tying square knots. It was an unholy mess while I was doing it but, in the end it seemed to come out all right.
The port side is lashed to the handrail and the starboard side is held down by a trucker-style bungee cord. Most access is done via the starboard side although I can squeeze the lifejackets and kickboards in under the forward opening. The Sta-Set X doesn't hold knots very well which is why some of the square knots are somewhat misshapen. But, I'm going to shape them right and then lash them with some tarred marline so they behave. I also still have some whipping to do to the ends on the port side. I was going to do this before I put the net to use but, while trying it on for size, it worked so well that it's just been sitting there since. I'll get to these finishing touches but, like so many things, that's not likely to happen until mañana.
BTW: that white line at the top righthand side of the photo that looks like it's just standing straight out on its own? It's the bitter end of a piece of 3/16" cord that is holding the front corner of the cockpit shade to the shroud. The breeze is keeping it aloft like that.

Monday, June 6, 2011
Pledge Drive
I hope you have been enjoying the ongoing series of projects posted here.
This is your site. For this to work out for all of us, everybody needs to contribute - think of this as a pot luck dock party.
Come on now. All of you have a small project of one kind or another that others would be interested in seeing. Contribute to the feast:
Every posting will feature a link to your article (if there is one) and a link to your blog (if you have one). In addition, all contributors will permanently have a link in the "Contributors" box on the right side of the blog. This ought to drive some of the traffic that this site is seeing back to your site. I will not take any recent posts (unless you tell me otherwise) - that way this site will not be in competition with yours. Instead, it will hopefully serve to "reactivate" some of your older posts.
But the most important benefit you'll get is the warm feeling of having helped someone thru a problem - one that you have solved. And we will all be the richer for it.
Pitch in!
This is your site. For this to work out for all of us, everybody needs to contribute - think of this as a pot luck dock party.
Come on now. All of you have a small project of one kind or another that others would be interested in seeing. Contribute to the feast:
- Write it up and send it to SmallBoatProjects at gmail dot com
- or -
- If you have already written it up on a blog somewhere and are willing to share, tell me where in the wide world of the Internet to find it , and I'll come and get it.
- or -
- Give me permission to "mine" your blog for projects. Anybody who is writing a blog about boating has numerous small projects buried in there. I'll ferret them out, if you let me. No, I won't put your content on here without your permission.
- or -
- Send me what you have, and I'll do the write-up, with full credit going to you as your project, of course.
Every posting will feature a link to your article (if there is one) and a link to your blog (if you have one). In addition, all contributors will permanently have a link in the "Contributors" box on the right side of the blog. This ought to drive some of the traffic that this site is seeing back to your site. I will not take any recent posts (unless you tell me otherwise) - that way this site will not be in competition with yours. Instead, it will hopefully serve to "reactivate" some of your older posts.
But the most important benefit you'll get is the warm feeling of having helped someone thru a problem - one that you have solved. And we will all be the richer for it.
Pitch in!
Friday, June 3, 2011
Kool Aid to the rescue... again!
Kool Aid as a tool? Livia and Carol on s/v Estrellita 5.10b show us once again why they are the Kool Aid boat on the dock!
In addition to “what is that smell? where is that smell?” sometimes boaters get to play “what kind of water is that (salt or fresh)? where is the water coming from?”. We played that game in the Copeland Islands swinging at anchor.
The game is complicated when it is raining, the boat is humid and cold and thus condensation is running rampant and the water is pooling near a thru hull (one of the big holes in the hull of the boat). After the initial panic where you establish that the water is fresh (not saltwater) and coming from somewhere above the thru hull, you get to play “where is the water coming from?”.
After ripping apart the port bench and all of the goodies stored on and around it, we established that the water was coming from somewhere behind our water tank and didn’t appear to be coming from the condensation on the hull. Bummer – all signs pointed toward a leak in the port freshwater tank.
For the second time on our boat, Kool-Aid to the rescue! We put Kool-Aid (without sugar) into the port tank to verify the tank was leaking before we tried to remove it and fix the leak.
A few moments later as we watched the drip on a clean paper towel, we had confirmation. The drip on the right is a test drip and the drip on the left was from the tank.
After some wrestling, we removed the tank. Thankfully this is a fairly easy job on a Pretorien. Pretorien owners – if you remove a small piece of wood in the port locker at foot level just forward of the tank, you can undo the two forward bolts. With those removed, you can jiggle the tank off the aft bolts (to which we couldn’t find access to the heads, only the nuts) and pull the tank into the salon.
I (Livia) put my head on the floor and Carol lowered the tank over me until it dripped. After a few tries I was able to make smaller and smaller circles until we found a pinhole. Strangely to me, a pinhole leak looks exactly like someone jammed a pin through the tank. Weird, huh? We repaired it with some MarineTex we had aboard (thank you PO!).
")
")
The leak occurred where the steel touched the wooden ribs underneath it. An ideal installation would have the tank suspended so no water could pool. In one of his books, Nigel Calder recommended putting something nonabsorbent at that location if the installation had surface contact. We cut some ready-for-the-bin neoprene gloves and glued them to the ribs.
This will hopefully prevent future pinhole leaks…at least in the port tank. Thankfully it was sunny that afternoon because we had to wait hours for the MarineTex to cure with the entire boat piled with stuff including a 33 gallon water tank. Picnic on the deck anyone?
")
")
")
")
")
")
Wednesday, June 1, 2011
Cover the ugly Electric Winch
Paul on s/v Solace shows off his carpentry skills by making a below-decks cover for his electric windless, with some difficult corners...
We had a new electric winch installed as we moved to a roller furling boom. The electric winch was the same size as the old two speed, but the electrics protruded through the aft bedroom ceiling. Also, we had a ceiling light at the same location as to where the electric motor protruded through. My only choice was to make an enclosure for the electric motor and I took the time to also add a new low profile light to the cover box.
The cover box was made from Rimu, and while not matching the Cherry wood interior was close. We will have a Cherry wood one made when we can easily source the wood. You will note the angle at one of the corners on the cover box. This was placed on the cover to allow the door to the head, to swing from it's usual locked open position to the closed position. You can just see the opening door surround, to the left of the cover box. The light was placed and some strips of wood secured to the ceiling to give the cover something to screw to. For my wife and I, it is not a head banger and is no lower than the tops of the door openings. The Electric winch is a joy!


Subscribe to:
Posts (Atom)


