Most boat ovens are heated by propane and don't give an even distribution of heat. An idea heard from others was to place a pizza stone in the oven, which heats up and gives a more uniform form of heat distribution. We used a surplus pizza stone we had at home, and cut it to size so that there is about one inch of air space around the stone to allow for heat convection. The stone was cut using a masonry cutting wheel on an angle grinder and smoothed along the edges. The stone was then secured to the oven tray by four bulldog clips at each corner.
This prevents the stone sliding around while stored in the oven.
A ceramic tile can also be used for the same purpose, but we like the added bonus of having a pizza stone to do our pizzas on. Yum.
Friday, April 29, 2011
Better oven, better pizza
Boat ovens are not known for their even heat distribution. Paul on s/v Solace shows us a way to make an improvement on that:

Wednesday, April 27, 2011
Don't bug me
Paul on s/v Solace shows off his carpentry skills with a nicely made permanently-mounted screen for his hatch:
We had soft mesh covers, with bug mesh screen, made for the out side of our hatches. The problem with these was that when it started to rain we had to rush out side to remove them so we could close the hatches; otherwise the mesh would get stuck in the hatches as we closed them. So, having seen this idea on another boat, I copied the design to suit my boat. In essense, we could use the bug screens from inside the boat and close the hatches when it rains without stepping outside.
First, I made my wooden frame to match each hatch surround inside the boat. On the back side of the frame, I routed a 5mm groove in a square pattern. I used a glazing rubber which is 5.5mm in diameter with a hole through the middle. It also had a row of longitudinal ridges on the outside for gripping. This allowed the rubber to be compressed down from 5.5mm to about 4.5 mm. A polyurethane was applied to the frame, front and back.
I placed the mesh over the frame with about an inch extra on the dimensions for each side of the routed groove. Starting at one side, I pushed the glazing rubber into the groove with the mesh. Once done, I went to the other side and as I pushed it in, the mesh starts to tighten up. With the remaining mesh still exposed out of the groove, I ran a sharp blade along the edge, of the outside of the groove, to trim off the mesh.
Hinges were applied to the side of the frame, opposite the levers for the hatch. In the corners, to secure the bug screen up, a couple of aluminum triangular plates were secured with one screw and allowed to pivot to allow the fame to swing down on the hinges. Just above the closed frame, a strip of half inch x half inch foam strip was applied to the inside of the hatch surrond. This seals against the closed frame to prevent any small bugs getting down the side of the frame and prevents the pushing inwards of the frame.
Finished product. Note rain on hatch!


Monday, April 25, 2011
Music in Margaritaville
Steve and Lulu on s/v Siempre Sabado find a way around the "marine tax" on "marine" speakers:
Been trying to come up with some kind of speakers for out in the cockpit. Something that doesn't cost an arm and a leg (so Bose weatherproof speakers are out) but still sounds pretty good. Speakers have big herkin' magnets in them so a permanent installation anywhere near the compass was out. I've seen very nice installations under the dodger as well as mounted under the boom gallows. But, for one reason or another, none of these really appealed to me. Mostly it was probably because the weather-proof speakers they used are expensive and probably unobtainable in La Paz. I finally came up with a dirt-simple solution.
I bought a pair of 4-way, 250 watt car stereo speakers for the equivalent of about $20 US in one of the many stores in La Paz that carry such things. I cut a couple of holes in a spare lower drop board and mounted the speakers. Ran some wires to a stereo plug near the companionway. Now, when we want music in the cockpit, we just drop the board in place and plug them in. And, since they are pretty much a match for the speakers down below, I didn't have to make a bunch of adjustment to the fader on the stereo to keep one or the other set of speakers from being too loud.
Wasted away again in Margaritaville.....

Friday, April 22, 2011
Phew!
Over at Sail Delmarva, Drew has put up a post covering the installation of a home made carbon filter on his holding tank vent. I'd copy it here, but it is pretty long (Drew is nothing if not thorough!).
I highly recommend it to you.
I highly recommend it to you.
Wednesday, April 20, 2011
Battling Earth's most prolific residents
Single-celled life was here long before us, and will be here long after we no longer grace the surface of the planet. That said, we still want to reserve some small areas for our exclusive use. s/v Letitgo decides that their water tank is one such area:
Our second major undertake was to regain control of the fauna in our water tanks. Do you remember few weeks back our water filter under the kitchen sink? in this post http://svletitgo.com/2011/03/racor-filter-500ma-and-fuel-fixer-r2d2/. Well, during our trip this became a routine; we had to remove black then white, then translucent fungus! Luckily we were prepared and had gallons of fresh water for internal consumption! That being said when we arrived back at the marina we took drastic measures! Bleach was the solution, a real shock treatment, we are now happy to report success we drunk the water at lunch today and still able to write this post tonight.Unfortunately, this is temporary, unless you are filling your tanks from chlorinated city mains.
Ingredients for the cleaning of water tank:
- 1 gallon of bleach in each tank with ¼ left in them. Run all outlets don’t forget the deck shower until a nice clean smell of Clorox is present. Let it sit for 48 hours no hot water tank during that time.
- Go out for a sail in 18 knots wind with some nice waves and allow the boat to get a good shake. Then empty the tank put the valves on both at the same time, and why not empty the shower in the toilet and clean the holding tank at the same time. Listen for the water pump, clean filter accordingly.
- Get back to the dock, and start filling the tank with fresh water. Use my filtering devices (a beauty by the way) and start the same process to clear the taste.
- Clean your filter again and again, empty tank, refill with fresh filtered water and you are in business.
- Nice drinkable water on your boat. I told you it’s that simple, we have plastic water tank so this help, if you have aluminum be careful the bleach eat them alive apparently.
Monday, April 18, 2011
Shop envy
Sure wish I had a shop with a TIG welder and a bunch of stainless scrap like Paul on s/v Solace...
Nice!Those pesky dive tanks are never easily stowed on a sailing vessel and so I decided to have a suitable bracket made up. This one clamps to the lower railing near the stern and secures both bottles with velcro. I used a couple of Bimini clamps and had them welded to the stainless bracket made from scraps of ss left over in the workshop. All welding done with a TIG welder and I did my best to polish the stainless. I'm still learning on that aspect. Neat and tidy. Cost $0.00 but 8hrs of labor. Many thanks to Tim for his help


Saturday, April 16, 2011
Making progress
Jeff on s/v C'est la Vie is closing in on installing his rebuilt companionway stairs. It won't be long now...
Here is an image of my progress on C'est la Vie's companionway steps
Like so many boat projects this one has taken much longer than expected. Most of the time has gone to multiple coats of Bristol Finish in search of perfection. I did add non skid to the treads. The only remaining part of this project is to install the new mounting hardware used to attach the steps to the interior of the boat.

Wednesday, April 13, 2011
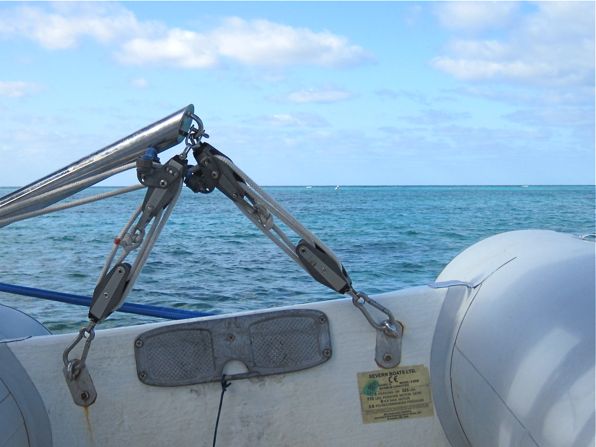
Bridle elimination
Mike and Rebecca on s/v Zero to Cruising have found that eliminating the bridle at the dinghy stern allows it to be hoisted a lot higher (and that's a good thing):
I’m not sure if I have written on this topic specifically but ever since acquiring our new (to us) hard-bottomed dinghy back in Florida, we have had a devil of a time getting it to ride securely on the davits. With the slightly-smaller Walker Bay inflatable that we used to have, we had no problems. In fact, with that dinghy, we never even removed the outboard when carrying it on the davits. Then again, we never sailed in these conditions, or these long distances either. Anyway, with the new one, let’s just say we have had issues. I do think we’ve got them sorted though, thanks to Brio.Now, would it be possible to hoist the dinghy stern like this, but using only one line? Something to contemplate over sundowners.
While anchored in Georgetown, we spotted another PDQ 32, s/v Brio, and took note of how they had their dinghy rigged. Coincidentally, they had exactly the same size and even the same brand of dinghy that we do. What we noted was that, instead of using one block and tackle attached to a bridle line to raise the stern, they used two individual block and tackles, each attached to the lifting points. With this arrangement, the dinghy can be lifted much higher allowing us to get it to sit up onto the edge of the stern. Now, because we only had two of these setups, we had to be a bit creative with some extra blocks we had on hand. It all worked out though and after testing it on the last few passages that we have been on, I rate it a complete success. We still do remove the outboard from the dinghy for passages though, storing it on the rail mount that I made. We also took Drew’s advice and use two dock lines to add extra security to the dinghy, pulling it in tight for passages. I now pronounce this challenge ’solved!’
Dual block and tackle setups allow us to get the dinghy nice and high
It’s always nice to have extra blocks on a boat.
Dock lines are used to pull it in tight.


Monday, April 11, 2011
Nothing is ever easy
Despite the best laid plans, sometimes things just go awry. Over on s/v Letitgo we have a recent example...
As we all know by now; on a boat things are never simple, one problem leads to another one and sometimes one can’t help an unscheduled trip up the mast…. And this is what happened yesterday when we installed our spinnaker halyard. It all started innocently with a reeve eye and a messenger line :
All went well my bowline held (thank you very much) and in no time I had everything in place, proud smile on my face! Then again, the messenger line was routed on the inside of the spreader so we had to come up with plan B. So a genius idea of mine: get a weight on the shackle and guide it with a line over the obstacle, well you can see how this is going to end at this point I am sure, it got all tangled up into the anti bird wire on the top of the spreader. As I am sure you can understand I needed a rescue for the messenger line, and *V* was to inaugurate the new bosun chair. But this time we had the camera up so we were able to take a few nice shots! As you can tell on the picture below I am scratching my head trying to figure how I am going to sweet talk my way out of that one! Though *V* loves being up there for some odd reasons….
Now you understand why a 15 minute job takes 1 hour, we call it boat time…. But now we look more like a real boat with the ability to raise a spinnaker, have a second line to go up and a spare shroud just in case.


Friday, April 8, 2011
Knotting fools
Steve and Lulu on s/v Siempre Sabado fell into a good deal on line, and then proceeded to put it to good use:
My big plan today was to make a swim ladder for getting back onboard after swimming or dinghying around. We had this old piece-of-crap swim ladder that hung from the gunwales. It had aluminum sides and hooks and plastic steps. We bought it second hand some time ago. While we were in Avalon back in early November, I stepped on it while climbing out of the dinghy and the step just snapped in two. I thought, "uh-oh, better cut back on the cheeseburgers a bit" but then, Lulu stepped on the next rung and it snapped as well. Now, Lulu isn't hardly big enough to snap her fingers, much less a swim ladder step. The plastic was obviously very rotten. So, yeah, I will have fries with that.
Anyway, we bought another POC ladder at Minney's in Newport Beach but have never had occasion to use it. We just step up from the dinghy to the boat and so far we haven't had occasion to actually swim from the boat. But I knew I wanted something better. I had some extra line and I remembered seeing a rope ladder in one of Hervey Garrett Smith's books. I dug through "The Arts Of The Sailor" but found nothing. Next I cracked open "The Marlinspike Sailor" and there it was on page 49. I broke out some old spare line and started tying knots.
The ladder itself went really fast. Splicing a lanyard on to the loop took way longer, mainly because the line I was using sort of tended to fall apart as soon as the strands were unlayed. That, and the fact that the twist held the line together tenaciously and it was like pulling teeth to open the strands enough to make a splice. But, soon enough it was all done.
The rungs are about a foot apart and, yes, they are kind of narrow. Smith maintains that the one-footed rung is the right and traditional configuration. He feels that a double-footed rung is unnecessary and will undoubtedly sag badly. Good enough for me. The large diameter rungs, made of soft dacron line, are very kind to bare feet. The lanyard allows it to be tied to whatever is handy and it's long enough to hang down into the water, making it easier to climb than if the first rung was at the surface. It also folds up to stow in a very small spot. I gave the POC ladder to a local Mexican guy who likes to get free stuff from the boats. He was welcome to it.
While I was making this ladder, Gary from s/v Megadon next door asked me if I wanted a fishing pole. Gary is getting ready to try to sell Megadon and he's pretty sure he's going to take a bath on the deal. So, he doesn't feel inclined to leave a bunch of stuff aboard for the next owner. So, he had this medium weight Daiwa graphite pole with a Penn 309 open spool reel that he was offering to give me. HELL YES, I want it! One of my jobs today was going to be going to the store (Ferre-Mar) and buying a fishing pole and reel so we'd be ready to haul in the lunkers up north this summer. Now Gary had saved me a trip and a considerable sum of money. Then he offered me a tackle box full of goodies. There are even lures small enough for our little lightweight "playing at anchor" rods that we brought from home. Combined with the stuff that we bought in Ensenada, we are pretty well set.< But it didn't stop there. Gary then asked if I wanted any line. I thought he meant fishing line and said "sure". Turns out he meant lines as in "sheets", "dock lines", "halyards", etc. Never one to turn down free line, I said, "You bet I want it. What have you got?" He proceeded to unload a box that contained a bunch of old braided dacron line as well as some 3-strand nylon. It was all too big for the fittings on our boat (megadon is a 53 footer) but I figured we could at least use it as dock lines or something. After I finished building a second swim ladder (just because I had the line and I could), I started contemplating all the line I'd gotten from Gary. There were two sheets of some sort, possibly for a spinnaker. It was the kind of old dacron that gets very soft and pliable. I thought, "This would make a great little mat to give Gary as a partial "thank-you". I measured the line out and it was about 65' long. Wasn't sure how large a mat I could make but I started working on a round one. It went fairly fast and, when I was done, I had made a round mat about 2' in diameter. The worn dacron felt very nice on my bare feet. Now I was getting a little more inspired. Maybe I should just make the rest of the old sheets into mats. There was some really pretty red line so I started working with it. It also was about 65' long but this time I decided to make an oblong mat. No telling how big it would be. An hour or so later, I had a mat about 15" wide by maybe 24" long. It fits perfectly on the side deck just forward of the sword mat. Not sure if that'll be its final resting place but it sure makes a nice welcome mat for now. I have enough line left to make at least 3 and maybe 4 more mats about the same size. There'll be one or two more red ones, a blue one, and a white one. Won't we be festive? And patriotic.
So, that's what I did with my day today.
And what was Lulu doing during all this? Well, first she cleaned house (boat). That's why I had picked today to finally go get the fishing pole, etc. I can't go below while she's cleaning and going to the store was a good way to make sure I didn't go below. Turned out not to be a problem. Then she took a nap to try to get over a nagging headache. Finally, she worked on, and finished, the first of her new macramed porthole curtains.
This is one of the ones in the V-berth (our bedroom). The ones in the saloon will be a little less densely knotted to allow a little more light through. But these are for privacy while still not completely cutting off all the light (and air).


So, there you have it. We're just a couple of knotting fools. Might even call us a couple of knotheads.
Wednesday, April 6, 2011
Transom lettering
When we bought Eolian, "Eolian" wasn't her name. Using John Vigor's Denaming/Renaming ceremony, we re-christened her to Eolian.
But before we could do this, there was a tiny detail: the name on the transom was wrong. So I scraped off the old name. When they made these boats, Downeast created, what appear to be from a short distance, carved name boards for the transom. But actually these are molded resin. I gave ours a fresh coat or two of paint, in a color that more closely matched our trim color.
 Then I paid a visit to Prism Graphics, folks who custom-cut vinyl graphics on Westlake Avenue here in Seattle. They were great to work with. They asked me to bring in a full-sized tracing of the name boards so that they could custom-fit the lettering to the actual boards. And they spent quite a bit of time getting it right. Thinking about how great it would look on the green, I chose simulated gold leaf for the material, and they left me with a print out to show Jane.
Applying the letters was easy. They come on a transfer sheet, which is stuck to the front side of the lettering. The transfer sheet keeps things lined up and in place, and allows transferring the entire design at once. Prism's directions said to use a spray bottle with soapy water to moisten the transom and the graphics before application - this allows you to adjust things, presuming that you don't lay the design down spot on the first time - and you won't. So, I boldly peeled off the backing sheet (lettering still stuck to the transfer sheet) and wetted the adhesive side and the name boards. A little adjusting (a dinghy does not a stable work platform make), pushing the bubbles out from under the letters, and it was time for a beer. After a while, you can peel off the transfer sheet (better to wait too long than not long enough).

Voila! Unfortunately, the simulated gold leaf was not a good choice. Because of the tilt of Eolian's transom, it is almost never in direct sunlight. The net effect was, that for almost all viewing angles and conditions, the lettering essentially disappeared. (When the sun did hit it tho, it was spectacular!). Sadly, this would not do.
So I returned to Prism, and asked them to recut the letters, this time in white. This was not difficult for them, since the design is just a small computer file they now had on one of their systems. In white, the name is visible regardless of the sun angle.

Monday, April 4, 2011
Implosion prevention
What happens if your holding tank vent gets clogged? It could be a bug building a nest in the vent fitting out on the stern. Or it could be "stuff" pushed up into the vent by overfilling the tank (oh, there's enough room for one more flush, isn't there?). Whatever the cause, having the vent line blocked is a problem. If it is almost blocked, then you will probably be unaware of it during normal head usage, because the rate of inflow is small. Ah, but during pump out, when the flow rate is much, much higher, problems can occur. How to protect your boat from this event? Paul on s/v Solace has this helpful tip for us:
While pumping out my holding tank, I heard a crackling sound of fiberglass. Stopping the pump out, I noticed the holding tank was starting to implode and the fault was a blocked vent line. To prevent a disaster happening in the future, I installed two Tanksavers from Sealand. These offer a one way valve which will open if it detects too much vacuum inside the tank. With those big dockside suction units, this could be the one thing that could save your tanks.
A three inch hole saw and a Tanksaver kit from sealand costing about $20 is required.
Find a flat surface on your holding tank top surface and drill the 3 inch hole. Push in the rubber ring and then coat the valve insert with dish washing liquid and push in. That's all there is to it. Just a ten minute job on each tank.
Hole drilled and rubber insert placed
Finished product


Friday, April 1, 2011
Hi-tech splicing
Carol and Livia on s/v Estrellita 5.10b are replacing their running backstays with hi-tech line. Let's tag along as they splice it up...
 |
| Carol playing splice. |
We've been working hard for about two weeks now and our boat doesn't come out of the water until tomorrow. We have another solid two or so weeks of work before we get to scoot North.
Non-boating friends - this one is just going to be boring. See you next time.
We are converting our running backstays from wire to a hi-tech core dependent line (D2 for the rope people). We needed to shorten them because they are long enough that when we stow them at the shrouds with the block and tackle still on, they bang on the deck. While we were shortening them we thought we would change to synthetics rather than wire so we could further minimize banging and because synthetic line is sexy.
Spliced eye with d-ring & stemball
Carol used the Marlow splice book (instructions also online) and a set of splicing tools to create 4 eye splices - a set on each running backstay. These connect via a d-ring to a stemball fitting which fits into cups in our shrouds.
In process
A big thanks to Lauren of SV Piko and Ken of SV Seeker (both sister ships) for advising us on this process.
I then took the splices and finished them off with a half-hitch style whipping from the Samson instructions.
Finished except for trimming tail
All in all, they are not as aesthetically perfect as if done by a professional but as far as we can tell in this type of splice, pretty isn't the same as functionally strong. In fact, Carol moved a large cement block, on accident, while pulling on the splice.


Subscribe to:
Posts (Atom)


