Thursday, November 27, 2014

Thanksgiving

In America the last Thursday in November is set aside for giving thanks for all that we have.

Those of us in the boating world have things to be thankful for that the average American can only vaguely understand...
  • The quite peace of an anchorage at dawn, coffee in the cockpit
  • The look of filled sails against the sky
  • The feel of a boat as it slices thru the waves, propelled only by the wind
  • The stark beauty of a rocky islet topped with a cap of evergreens
  • Gulls (no, really - they are the most accomplished and graceful fliers ever)
  • A nite sky filled with an infinity of stars
  • Sleeping to the sound of water gurgling against the hull
  • And... sunsets
 I am thankful.

Tuesday, November 25, 2014

Preparations for Ascending the Mast

Climbing a mast is arguably the most dangerous thing you can do on a boat. Before you take on this task, you should go over the task(s) to be accomplished at altitude and make detailed preparations. Rick on s/v Cay of Sea shows us how:
I installed new deck hardware back in May of this year in preparation for a rigging project.  The original idea was to ascend the rig, drop the headstay to the deck, build a new stay then climb the mast again and install it.  But there were things to do before I would go up the mast, and one of them was replace the worn out deck hardware through which the line passes.

The second item in preparation was to replace the halyards.  I researched the ageing characteristics of the StaSet X line that I use for halyards, and it was obvious that the line was plenty strong, even after 7 years’ service, to support my weight.  But I wanted a comfort factor that the old line wasn’t going to provide.  New line for halyards was called for.  The final crippling of my standing rigging as a result of having the steel wire come out of the spreaders kicked me out of procrastination mode, and I ordered the line.  About the same time, I noticed an area of chafe where the main halyard passes over the masthead sheave.  So it was time to replace halyards, and now I have no guilt over being wimpy about going up the rig with new line.

300 feet of 5/16 Sta Set X.

I ran the new line up the mast today.  I sewed the new line and old line together at the ends, then covered the seam with duct tape, so it wouldn’t catch in the sheaves at the masthead.  When connected and smooth, I simply pulled on the old line until I had new line in my hands.

Tools for installing new halyards: sail repair needle, heavy nylon "squidding line," and duct tape.  A pocket knife is useful too.
Tools for installing new halyards: sail repair needle, heavy nylon “squidding line,” and duct tape. A pocket knife is useful too.

Line ends sewn together.  This makes a strong attachment that won't let go.  I wouldn't trust tape alone.
Line ends sewn together. This makes a strong attachment that won’t let go. I wouldn’t trust tape alone.

Seem covered with duct tape.
Seam covered with duct tape.

Tomorrow is the day, at least for Part I.  I spent an hour today figuring out exactly what I’m going to do up there, organizing supplies, tools, and procedures.
Supplies
DSC_3607
Seizing wire, spreader boots, rigging tape, ring and split pins, deck and steaming bulb, 2 halyards, 2 new blocks.

New 70' halyards.  Had to measure 4 times before I started getting the same length of line consistently.  Then cut entire length (140') in half.
New 70′ halyards. Had to measure 4 times before I started getting the same length of line consistently. Then cut entire length (140′) in half.

Tools
Essential tools.  Piece of material under the pocket knife is emery cloth for polishing 12vdc light contacts.
Essential tools. Piece of material under the pocket knife is emery cloth for polishing 12vdc light contacts.

Canvas buckets to the rescue:  Tool bag on left, supplies on right.
Canvas buckets to the rescue: Tool bag on left, supplies on right.

Order of Work
  • At spreaders:re-slot cap shrouds and wire/seize in place
  • install spreader boots
2.  At Steaming/Deck Light
  • Replace bulbs and test while aloft
3.  At masthead
  • Attach new blocks, tape shackles/circular retaining pins
  • Rove new line through blocks.
  • Use one new line as temporary headstay
  • Attach other new halyard to harness as safety line (another deck helper tends this line)
  • un-attach old spin halyard
  • un-attach furler/headstay and lower to deck
  • Check fit of old (original) stay to hardware for match
    • pin size conflict at stemhead leaves doubt that masthead hardware matches
  • Visually inspect all fittings
4. Descend to spreaders and inspect all fittings.

Already done
Un-attached furler from stemhead, and secured to rail.  Attached old spin halyard to bow pulpit for temporary headstay.
Old furler secured to pulput, removed from stem.

Final Photo - is this where we got the term "poop deck?"  Birds have been doing me wrong!
Final Photo – is this where we got the term “poop deck?” Birds have been doing me wrong!

Friday, November 21, 2014

Sail Struggles

Walt and Kathy of s/v Suppose put their Sailrite LSZ-1 to work making sail modifications. [Sailrite LSZ-1 - don't leave home without it! -Ed]
In January 2013, we made the decision to modify our sail plan and brought the main and genoa sails to Lubbock. We ripped and picked the seams that attached the sacrificial sunshade and the furling wire on the genoa. The main sail lost its battens.

 In June, we purchased a new Sailrite LSZ-1 industrial sewing machine. This heavy-duty machine allows us to modify our sails, make protective covers and a large sun screen, and to reupholster seat cushions.


Because the genoa (140%) is our largest sail and had the most extensive modifications, we started with it. Oh, ambition! It has been a frustrating but satisfying exercise. Here are those modifications:

Triple stitch the broad seams. The broad seams are the ones that go across the body of the sail. Because the Sailrite does not do a true triple stitch (three small stitches to form each leg of the zigzag), we opted to reinforce the seams by adding another row of zigzag stitching. The greatest challenge of sewing on sails is the shear volume of cloth involved.
Replace furling tape with hanks. Many sailboats use furling systems to dowse their head sails. Our previous two boats had such systems, and we quickly became dissatisfied with them. On both boats, we had furler issues such as jamming that would be incredible issues at sea. For Suppose, we have opted to convert the genoa to an old school hank-on sail. To do this, we replaced the furling tape with a bolt rope on the leech edge of the sail. Then grommets were installed behind the bolt rope and the hanks were "seized" on the bolt rope.
This bolt rope bears all of the tension load when the sail is hoisted rather than the sailcloth. For this reason, Kathy created eyesplices around metal thimbles at both ends. The leather goes around the rope first to protect it from the chafing of the metal thimble. Then, the rope is spliced to hold the thimble in place.
Hand-sewn leathering prevents chafe while the webbing secures the thimbled eyesplice at head (top) of the genoa foresail. The contraption on my hand is a sailmaker's palm to prevent me from impaling my hand with the large needle needed to pierce the numerous layers.
One of three needles I broke or bent while hand sewing the leather chafe guards.

Wednesday, November 19, 2014

IKEA stuff for Boats?

To do any fun cooking aboard, you need to have at least a basic assortment of kitchen tools (See?  This is a manly post - it's about tools!).  And more to the point, you must find a way to store them.  And there's the rub - there's never enough space for all your tools.  Aboard s/v Dulcinea, John found a solution, at IKEA of all places:

Dollar conscious IKEA Bling!

I have always had this annoying problem in the Galley... I had spatulas, serving spoon, Pasta Rake and so on, but they were just too big to fit in the Drawer.  So I stowed them under the stove, but that wasn't working out too well either.  they were hard to get to under there, and they seemed to always slide out onto the sole (floor) on a good starboard heel. I was also bothered by all the wasted space behind the stove... at least 8 to 10 inches of usable space...

Enter IKEA.  When he found out I had never been to this superstore before, My Brother in law took it upon himself to hijack me on the way back from Bellevue to take a look-see..... Wow, they had a LOT of cool stuff there.  I saw a closet organizer I really wanted, but it was too big and too much ($1500) to consider purchasing that day... but they did have something for Dulcinea that might ease my Galley Woes....


OK... I know what you are thinking.... what the .....? a towel bar?  well it is a bar, but it is for the Galley.... just the thing to organize my utensils that won't fit in the drawer.... watch closely!

Now this is a very simple install... 4 small screws hold the bar in place.  But.... NOTHING is simple on a Boat... First, I had to remove the stove so I could install this baby. I didn't want to completely disconnect the gas line or power, so I sat it on the sole...

the small space the stove fits into... with the stove on the floor in front

Next I had to put myself in the "Backwards cramming into impossibly small space" Boat Yoga pose, to awkwardly drill into the counter, and then put screws in to anchor the bar in place


My torso crammed into the small space


The only place for my legs was on top of the  stove and the Galley Counter...

Then, while in this really uncomfortable position, somehow measure, drill holes into but not through the counter, then screw in some small S/S Screws to hold the bar in place.  I was originally going to mount this to the back (really the port side), but why drill any more holes into the sides of your boat than you have to? 

about an hour later, the bar is secured
Now it was time for the Test... I also bought S hooks with the bar, as well as a little cup that hangs on the bar.  I put them on and hung some stuff... looks pretty good!

The test hang....

Finally, I had to consider that this is a Sail Boat, that, when underway with the sails up, will not stay level.  I didn't want all that stuff banging around back there, or falling off when in a steep heel, so I found a use for some really small Bungee cords I had laying around....

.... And a Bungee cord shall secure them....

Now, to put the stove back and see how it all fits...

all stored away... in some previously unused space!


My Initial impressions are that this will work well!  I will let you know more after I try it out on some extended trips...

OH!  and the best part of this whole thing was the price!  I got the Bar, the hooks and the hanging cup,  all for about 5 bucks!  with tax!  And Dulcinea gets some IKEA bling!


Tuesday, November 11, 2014

Bomar Cast Aluminum Hatch Rebuild

The hatches on s/v Painkiller needed attention.  Ken tackles a complete rebuild head-on:
After seeing the replacement cost of these old style offshore hatches we actually went and bought three, one step down, Bomar replacements for just over a $1000. After getting the new ones back to the boat we took a closer look at them side by side with the old ones. Wow! We brought the new ones back for a full refund. Let's keep the old ones and rebuild!


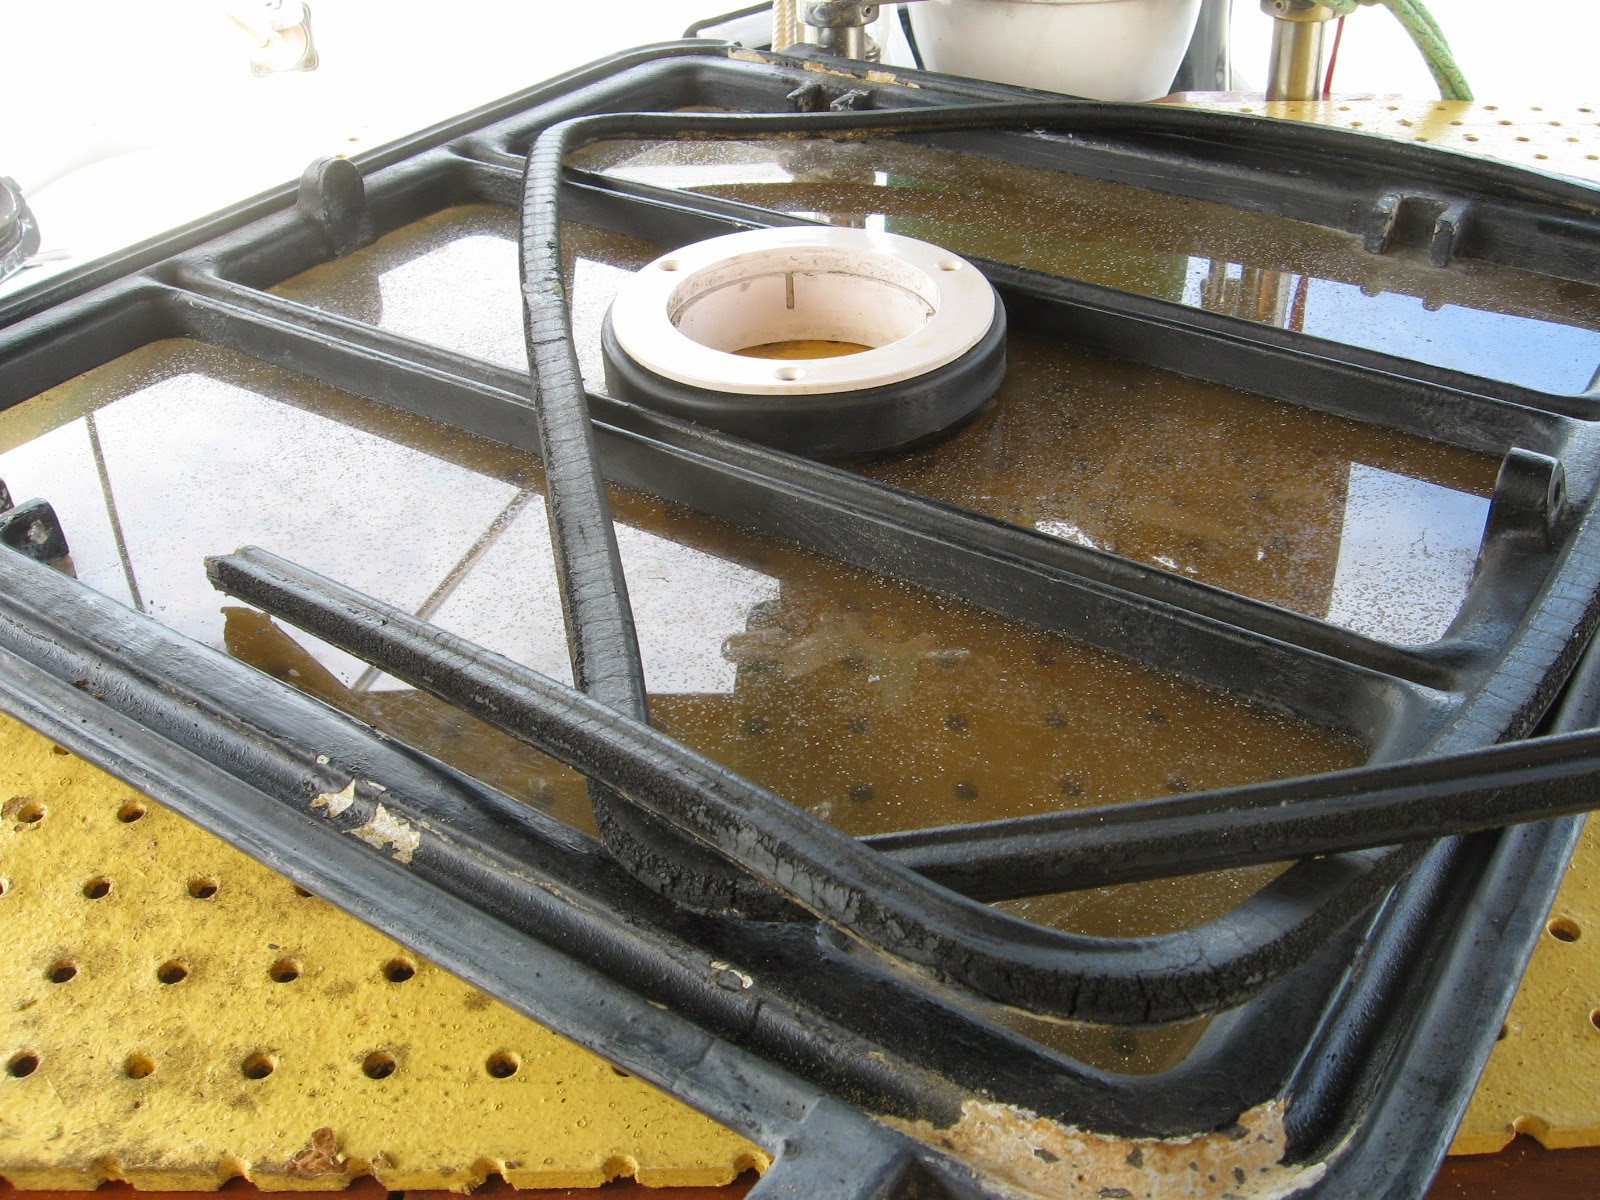
Once started,  the old lenses came right out. A couple of these were leaking and it seemed to me that the lens were at one time cut too big and not given enough room to expand and contract. Should be (I think) about an 1/8" per foot of lens, 2' hatch=1/4". Google it, find out for yourself.


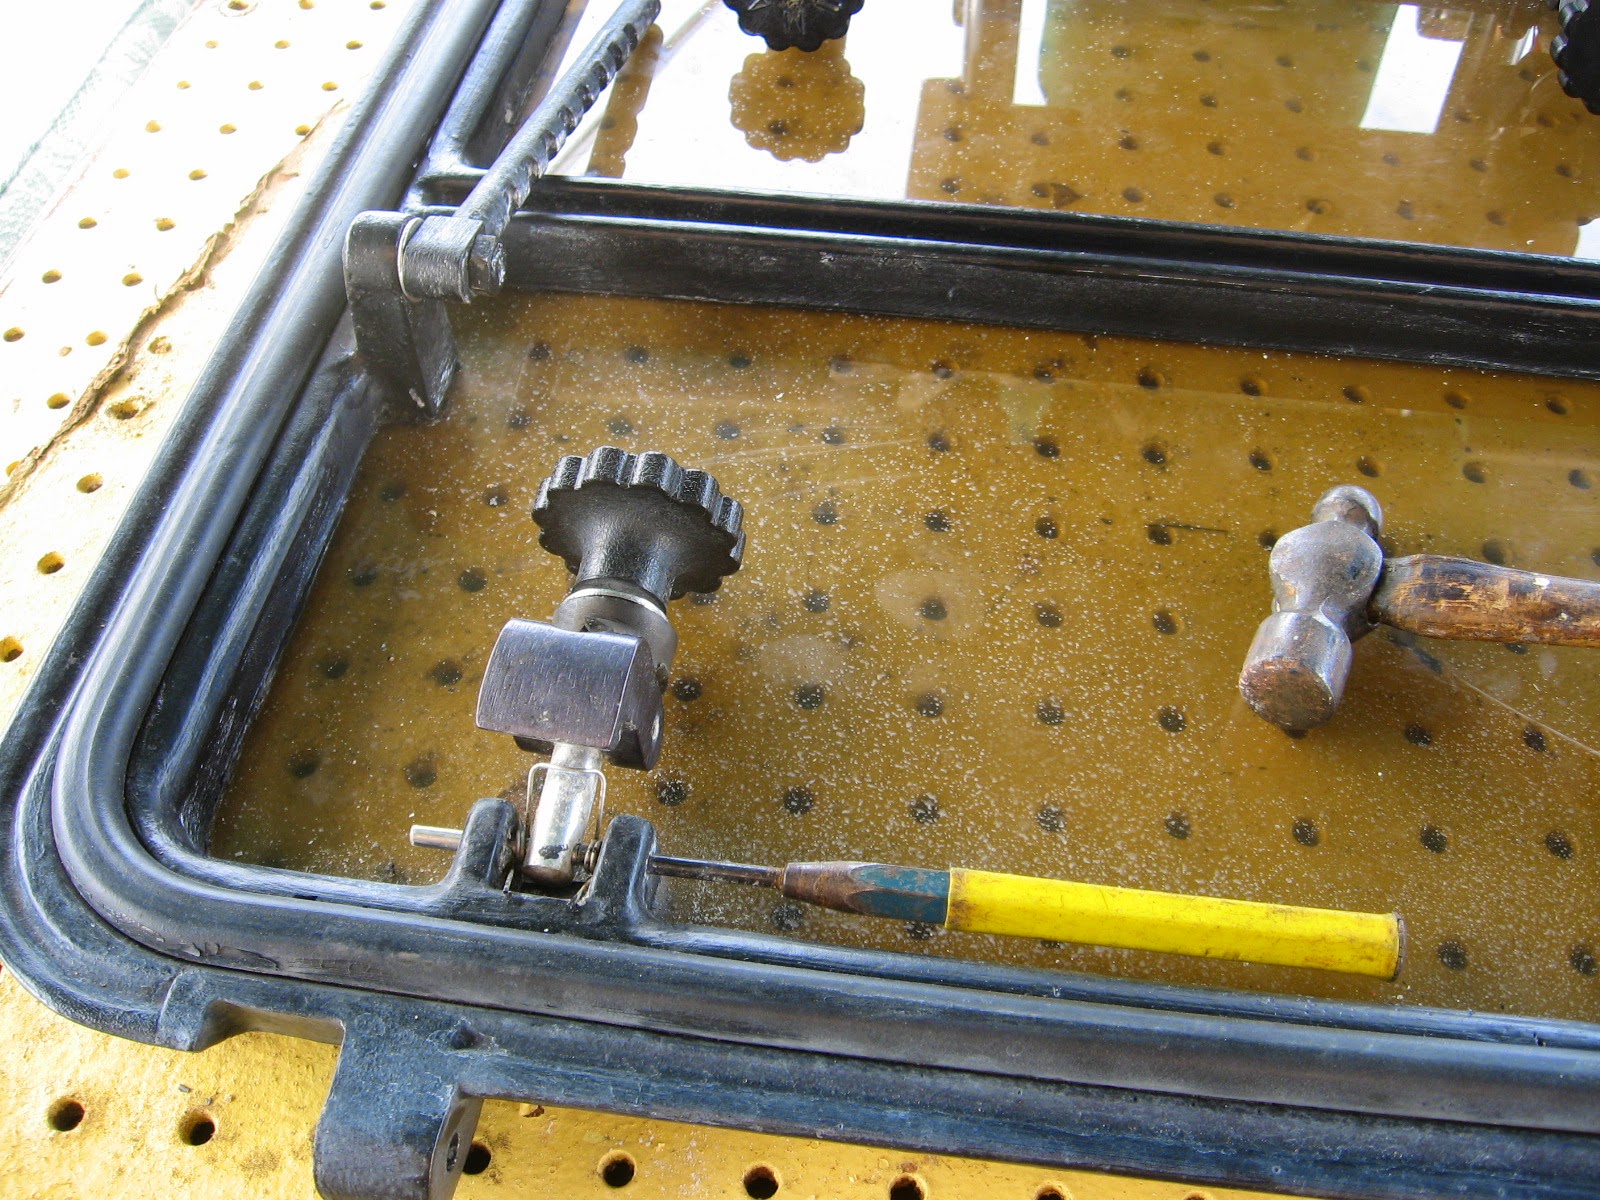
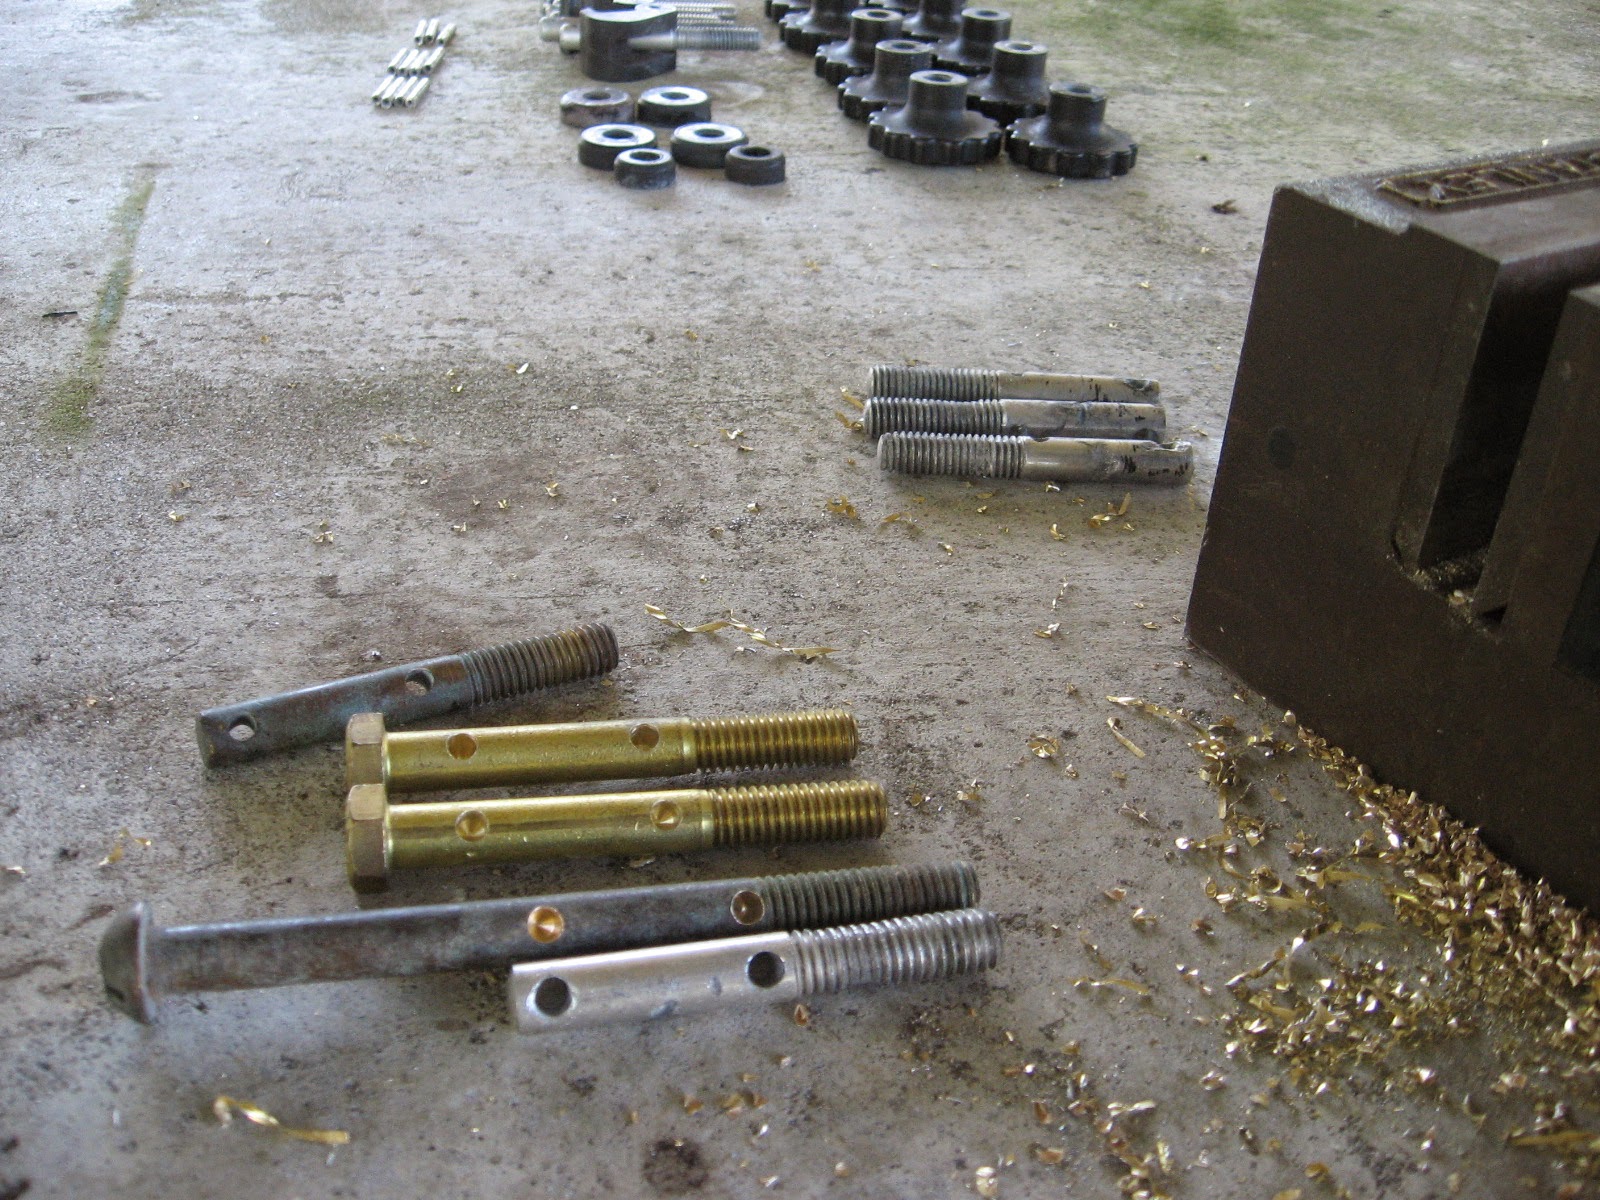
The dogs came out just as easy with an 1/8" punch and small hammer.


Very simple construction, a shaft, a dog, couple of pins and a tightening nut.


Old dry gasket material just as easily came right out.


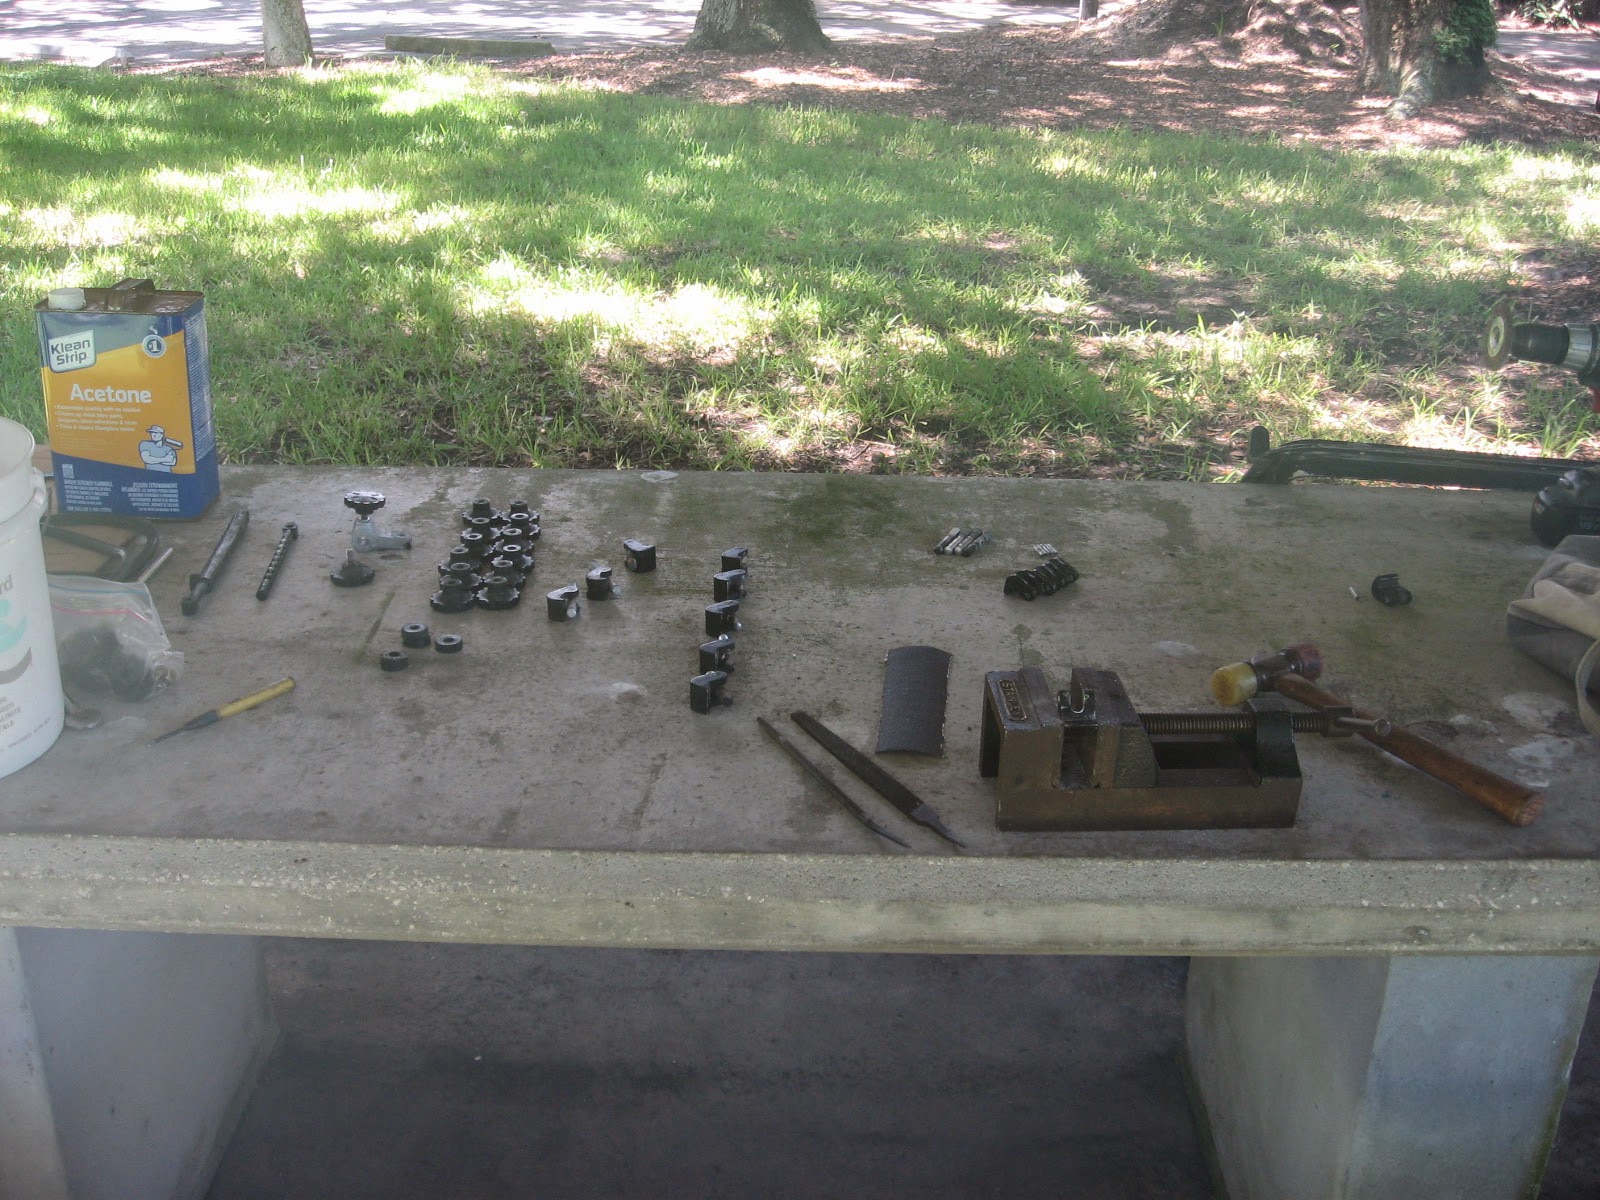
Lots of wire scraper, wire brush and sandpaper cleaning  of all surfaces inside and out, it's kinda therapeutic for me, I just love making things better!


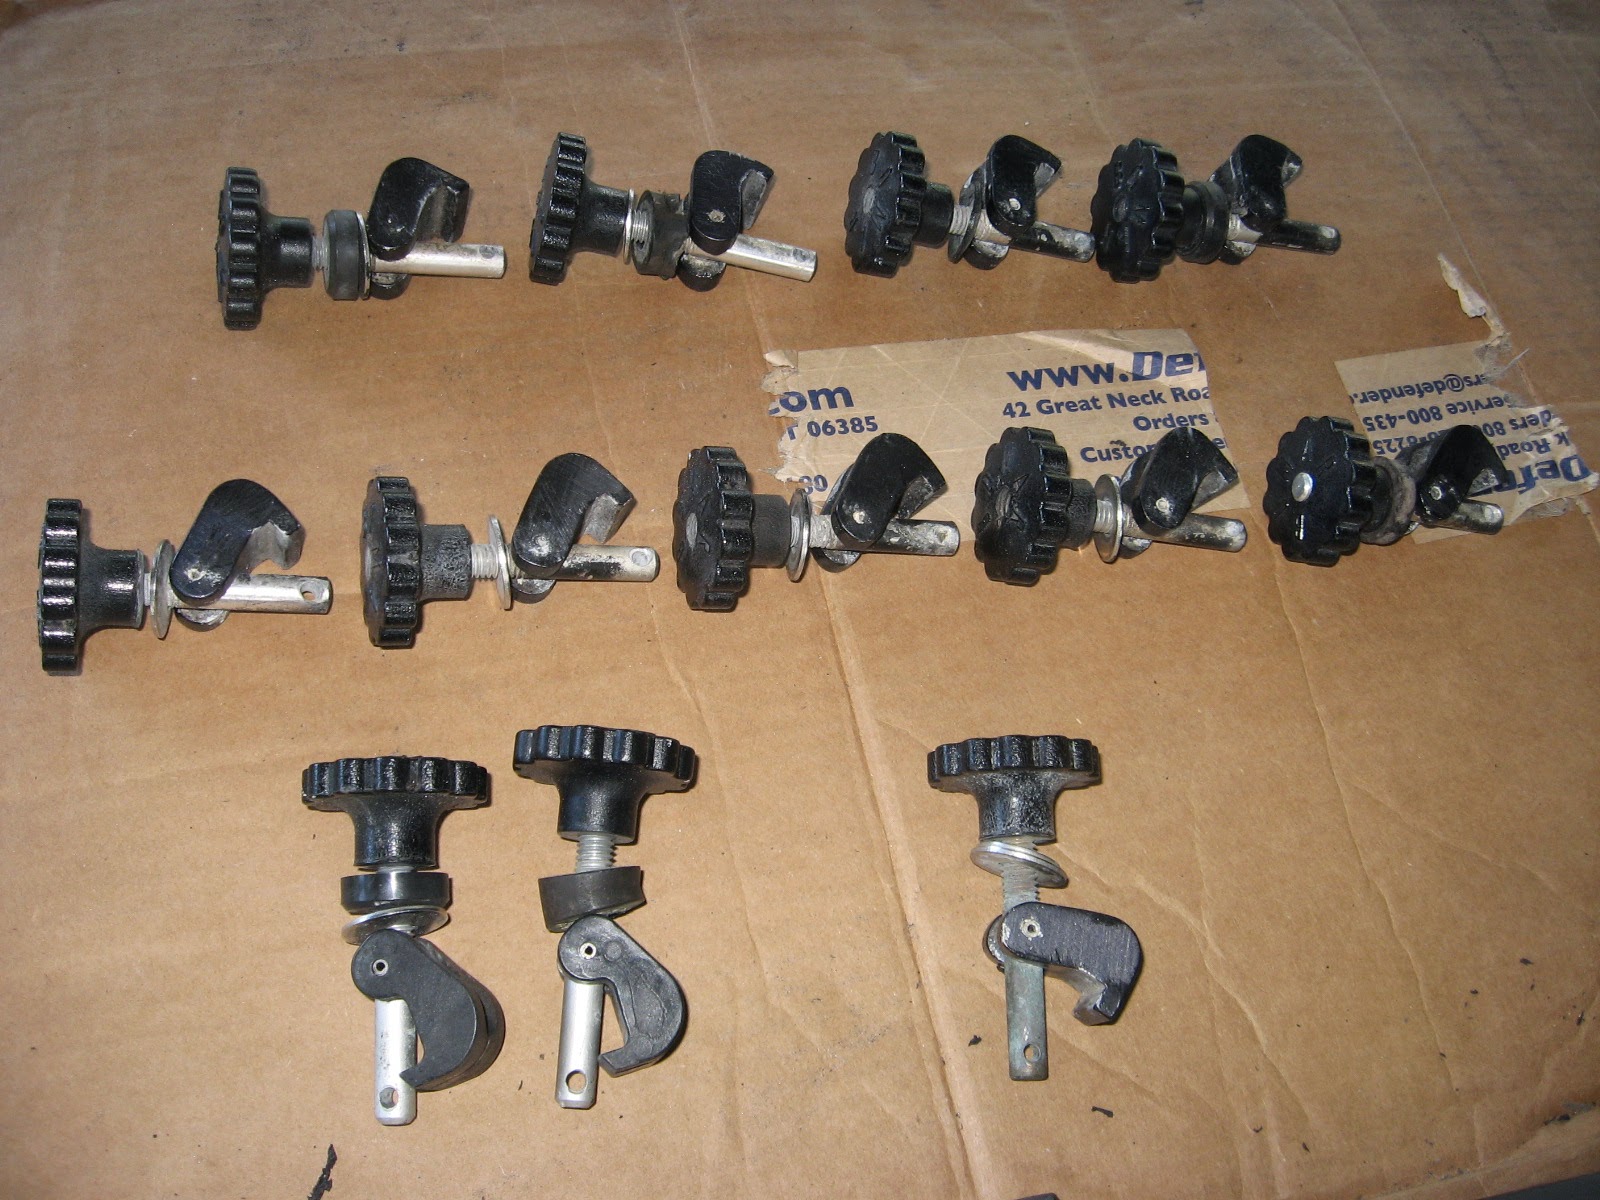
Sorting through all the dog downs, deciding what is worth keeping and or repairing and how many "new" complete kits to buy.


I filed and tuned up most all the dogs, had to make a few new shafts with material I had at hand ...


... to give me one hatch with 4 new bronze and brass studs, one hatch with original aluminum studs that were in good condition and one hatch with all new kits at $35 a kit. That's the one in the galley, used the most.


Using an old lens re-cut for more clearance, with a router I traced the new stock for a proper fit.


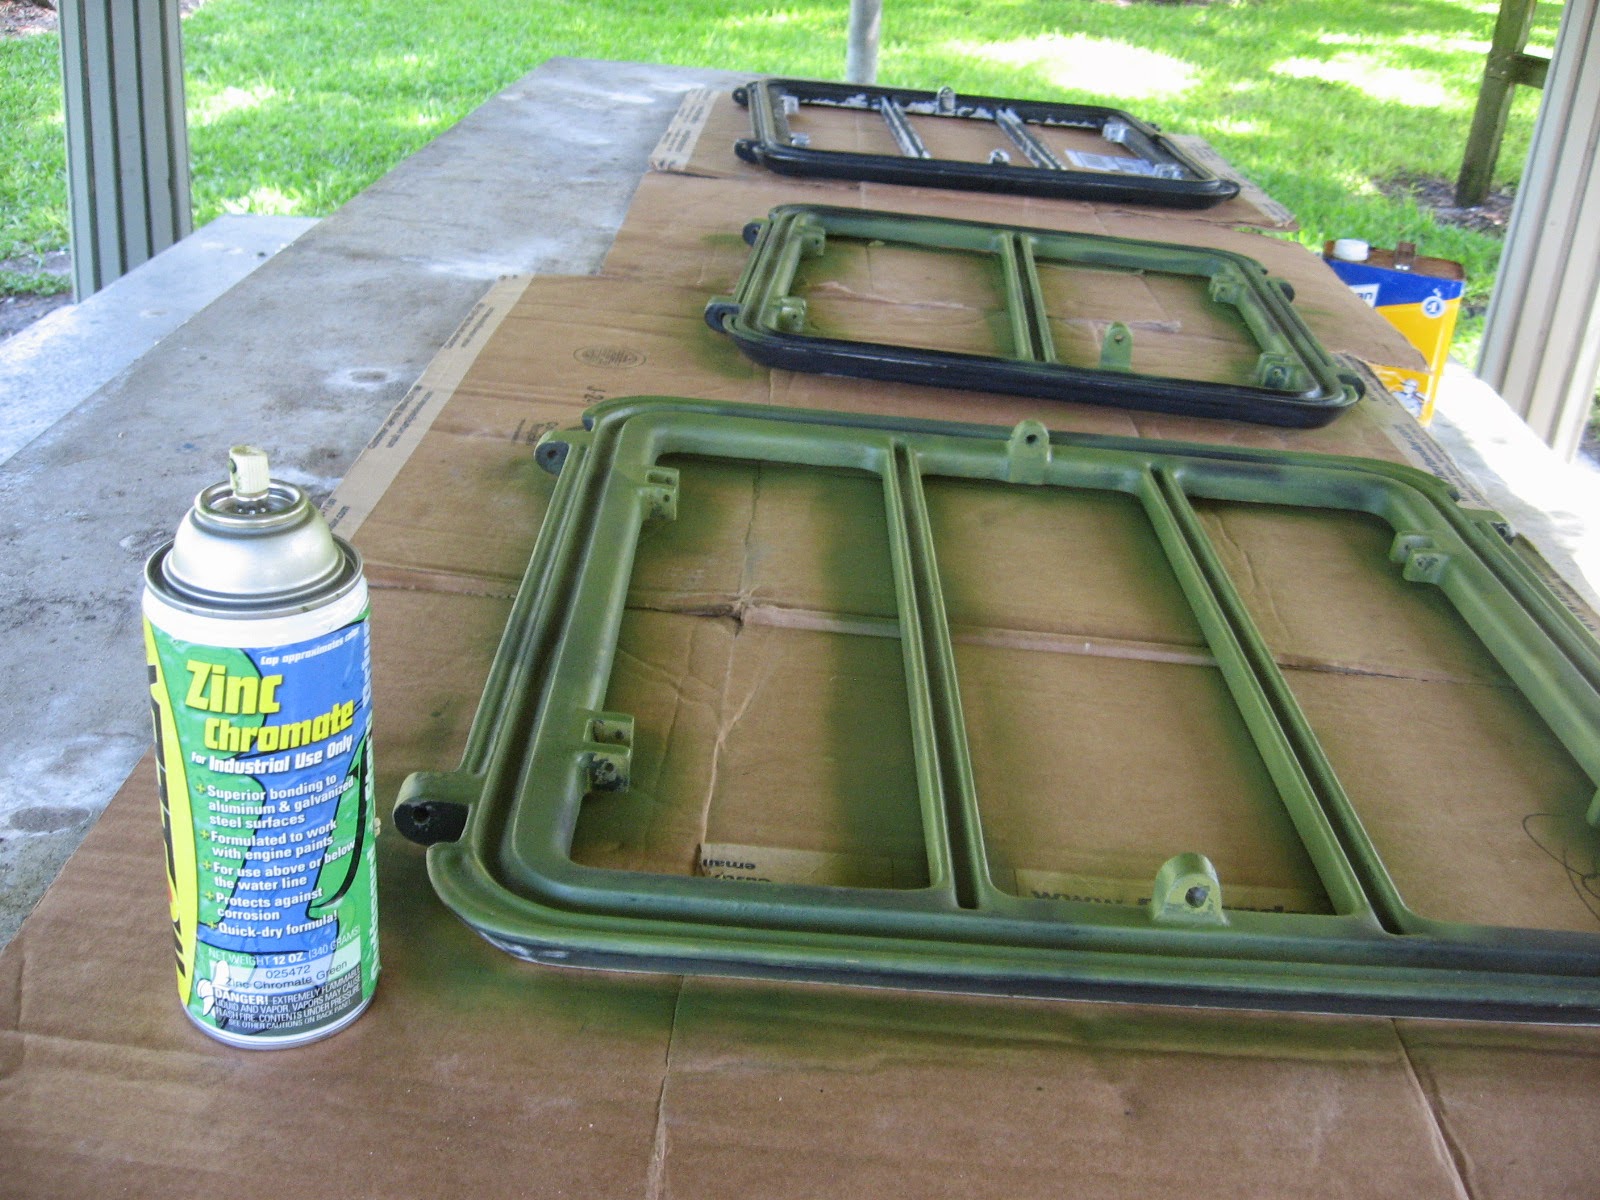
Zinc Chromate for the bare aluminum and a couple of coats of paint, let dry for a few days and...


... mask everything then...clean, clean and be careful of even your fingerprints as handling the new lens ...


... lay on the goop for a waterproof shiny new hatch.

I didn't get any pictures of laying in the new gasket. it went simple enough after a thorough cleaning and then clamping the hatches in place for a couple of days.


A total of about $100 per hatch, what's not to love about that?
Related Posts Plugin for WordPress, Blogger...