Remember my post about wanting to have a dry bilge? Well, we ultimately decided to go the route of installing a couple of sump boxes to deal with the air-conditioners’ condensation. We selected this one[Tho not clean enough to drink, the condensate from the air conditioner would be an ideal source of ion-free water for battery maintenance. -Ed]and Michael brought two of them with him when he arrived on the 15th.
I am 80% of the way through installing the first of the two. Here are the steps I have taken thus far:
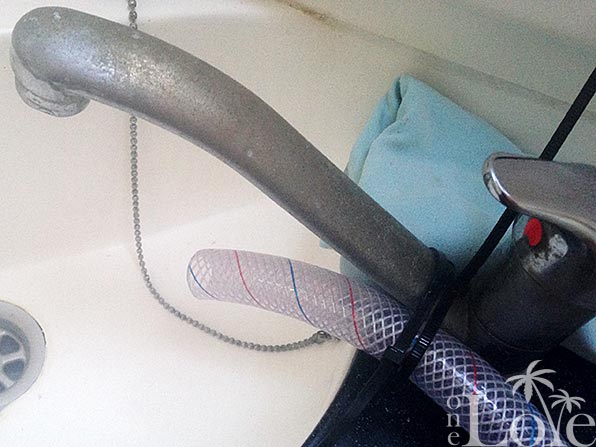
The next step is to permanently connect the outlet hose. My plan is to T it into the sink drain hose. In order to do that properly, I’ll need to place a non-return valve (check valve) in the outlet hose, just before the T. This will prevent any water draining out of the sink from finding its way into the sump box’s outlet hose*. Unfortunately, the chandlery will not have the check valve I need until some time tomorrow. Until then, we’ll be living with a hose zip tied to our sink.
- Before getting started, we dried and cleaned the bilges.
- I then ran a line from the AC unit’s drip tray outlet down into the bilge to see if it would gravity feed the water where I wanted it to. I put a short length of hose into a plastic container. We ran the air conditioner and it fed the water as I had hoped. I was surprised at how quickly it filled the container!
- Before doing any actual plumbing and electrical connections, I wanted to test the unit to ensure that it worked, and also to ensure that it would pump the water high enough to exit where I planned to dispose of it. We tested this by taking the sump box out into the cockpit, connecting a hose to the outlet and filling the box with water. While Rebecca held the hose in the air, I applied temporary power to the pump using a 12V plug and alligator clips. It worked as we had hoped.
- The next step was to attach the inlet and outlet hoses. We had already made one trip to the chandlery to purchase parts for this (hose, clamps, fittings). This particular box has multiple inlets of various sizes. The strange thing (to me) is that you need to saw off the end of the inlet that you want to use! It seems to me there could be a better solution but it is what it is, I cut it off.
- I temporarily positioned the box in the bilge, a location which is at a lower level than the AC unit. This allows the condensation water to gravity feed into the box, as tested earlier. I connected the sump pump’s power leads to a bus bar in a nearby junction box which supplies 12V to the electric bilge pumps. The outlet hose I simply ran into a nearby sink. We tested the operation of the unit in this configuration and it worked perfectly. The AC unit ran for some time and the bilge remained dry as we had hoped.
*Alternatively, I guess I could route the sump box outlet hose so that it feeds down into the drain hose. Gravity should then prevent the sink water from making its way into that hose.
Notes: I also want to plumb our refrigerator’s drain into this sump box. The sump box that I’ll be installing on the starboard side will have to deal with the condensation from both the salon AC unit, and the starboard hull’s AC unit.
Thursday, January 29, 2015
Dry Bilge
Mike and Rebecca on s/v One Love really want a dry bilge. And air conditioning a boat in the tropics was working against that goal. I am also an advocate of the incremental test/installation process that Mike used. Here's what he did:


Tuesday, January 27, 2015
Winterizing A Marine Head
I know it is a little late for this year; this is the result of my policy of not putting up anything here that is less than 30 days old - i want to drive traffic to your site, not take it away. But then for next year...
Rick over on s/v Cay of Sea shows us how he decommissions his head for the winter. This process has the added benefit of making a thorough internal inspection a part of the process:
Rick over on s/v Cay of Sea shows us how he decommissions his head for the winter. This process has the added benefit of making a thorough internal inspection a part of the process:
Warning: Graphic dirty pictures featured in this article
There is no way to eliminate the “disgusting” quotient when talking about toilet disassembly, and the only way to illustrate the process without bringing in yucky images is to use squeaky clean new parts. Well, I don’t have those on hand right now, but I do want to write a timely post, so please bear with me. If yucky toilet parts make you queasy, perhaps you should skip this article.
Last summer, returning from the annual Watkins Rendezvous, we had an unexpected marine head failure (it was practically new) which is chronicled here (about 2/3 through the article). After that experience, I determined that the way to avoid any subsequent failures was to disassemble and rebuild the head yearly, and not leaving propylene glycol (antifreeze) in it. I’ve also stopped using strong cleaning chemicals in it, as these often deteriorate the rubber parts. A mild dish soap solution cleans it fine, and since we flush with fresh drain water from the lavatory, it doesn’t develop the characteristic marine head smell.
Upon disassembly last winter, I determined that the rubber interior parts were nearly new and did not need replacing. As I inspected them this year, I decided to replace them, as they are looking a little worse for wear. I think they are still serviceable and I’ll keep them as spares, but will replace the large flapper valve and the joker with new parts. Similarly, I’ll disassemble the pump and replace the valves and seals.
Today, I simply dismounted the pump assembly, drained the system, and plastic-bagged the old joker and flapper valve. As a bonus to do this in 35-degree weather, the screws that hold the assembly together were easy to remove – surrounding material (plastic) is slightly smaller in the cold, therefore the tension on the fasteners is less. First, I donned latex gloves, then soaked up any remaining water in the toilet with wads of paper towels, dropping them directly into a lined waste basket. Used nearly a roll of paper towels.
I removed the flush water outlet hose first, then disconnected the joker valve housing and removed the joker. Following that, I removed the four screws retaining the pump on the assembly, then drained any remaining water. Finally, I used my heat gun to warm and soften the white sanitation hose for the flush water inlet. This was probably the hardest part, as it was cold and took 5+ minutes to get it pliable enough to work off of the fitting. Here are few photos:
The whole process, including preparation (need to have your supplies and receptacles ready to minimize the mess you make) was about 45 minutes.
Reassembly will take slightly longer.


Thursday, January 22, 2015
Rusty Hinge Replacement
This post originally appeared on Windborne in Puget Sound
You may remember that one of the early projects we did on Eolian was to rebuild the refrigerator, from the hull out. As a part of that project, I discarded the original door and replaced it with one that I got at the old Doc Freeman's for $10 because the decor panel was damaged. I replaced that panel with a sheet of black Plexiglas (thanks Clear Cut Plastics), and remounted it on the original hardware.
Perhaps that was a mistake - reusing the old hinges. But at that time I did not know the marine supply business in Seattle nearly as well as I do now. The reason that this was an issue is that the old hinges were very rusty. I cleaned them up as best as I could, but they were always ugly, even to this day.
The ugliness finally got to me, and I sought out new hinges. Well, it turns out that I almost waited too long. Tho the refrigerator is a complete custom built-in, the door (and hinges) were from a Norcold unit. I thought that all I would have to do is order new hinges from Norcold.
BZZZZT!
Not a chance. That door and those hinges have been out of production for a long long time, and nobody had any left in stock - not even Fisheries.
But, as it turns out, one of the businesses in Ballard sells Norcold: Sure Marine. Sure Marine is one of those great places, a little off the beaten path, at the very, very end of 28th street in Ballard. No, they had no hinges in stock, but Graham found a set of used ones in near-perfect condition in the back somewhere. Woo HOO!
One of the last remaining vestiges of Malolo is now gone.
You may remember that one of the early projects we did on Eolian was to rebuild the refrigerator, from the hull out. As a part of that project, I discarded the original door and replaced it with one that I got at the old Doc Freeman's for $10 because the decor panel was damaged. I replaced that panel with a sheet of black Plexiglas (thanks Clear Cut Plastics), and remounted it on the original hardware.
Perhaps that was a mistake - reusing the old hinges. But at that time I did not know the marine supply business in Seattle nearly as well as I do now. The reason that this was an issue is that the old hinges were very rusty. I cleaned them up as best as I could, but they were always ugly, even to this day.
 |
| Ewww... |
BZZZZT!
Not a chance. That door and those hinges have been out of production for a long long time, and nobody had any left in stock - not even Fisheries.
But, as it turns out, one of the businesses in Ballard sells Norcold: Sure Marine. Sure Marine is one of those great places, a little off the beaten path, at the very, very end of 28th street in Ballard. No, they had no hinges in stock, but Graham found a set of used ones in near-perfect condition in the back somewhere. Woo HOO!
 |
| (Almost) new and shiny! |
One of the last remaining vestiges of Malolo is now gone.
Tuesday, January 20, 2015
Oar locks
No, not the bronze things that the oars rest in on the thwarts... Over on s/v Painkiller Ken has been very busy. What I've included here is only part of his original post - you should go see it. Here Ken makes a device to ensure that his oars do not go astray while he is away...
Need to secure the oars from theft so I went on to build a home made version of Edsons oar clamps that cost a wee too much money.
I think this lock is going to be down right pretty when it's set on the thwart of that Dyer. Below is the the new future mast and boom to said Dyer dingy because .....I have a few things in the kettle these days.


Tuesday, January 13, 2015
Creating the Right Tool for the Job
My father encouraged me to always use the right tool for the job. But what do you do when there is no such tool? Well, then you make one. At least that's what Jeff on s/v Pilgrim does.
(Jeff and Anne are completely reconstructing Pilgrim, virtually from the hull out - most of their work is far too extensive to include here, but I encourage you to visit their website to see it.)
(Jeff and Anne are completely reconstructing Pilgrim, virtually from the hull out - most of their work is far too extensive to include here, but I encourage you to visit their website to see it.)
Any wrench large enough to fit the packing nut on Pilgrim’s possessed a handle too long to fit into the tight confines of the hull.
Looking down the rudder shaft at the packing nut.
Deep gouges along the upper edge of the nut indicated a hammer and cold chisel were used to tighten the nut. Curiously no such evidence of similarly brutal tactics use to loosen the nut are evident. Could it be that Pilgrim’s rudder packing is original?
Rather than attack the nut with hammer and chisel, I elected to create the proper tool for the job.
Creating a plywood template of the ideal tool for the job.
Using 1/8” luan plywood and some trial and error I created a pattern for the ideal M382 rudder post packing nut wrench. Once satisfied with the design, I transferred the pattern to a fresh piece of plywood
Transferring the rough, initial template to a fresh piece of plywood.
A query around the commercial fishing fleet portion of the boat yard yielded a free piece of sufficiently sized 3/8” steel.
Next stop Lindow’s Machine Shop on Hwy 70 outside of Beaufort, NC. Yup that is right... a straight up plug for Lindow’s. Fred Lindow, owner and sole employee, has many years of personal experience on sailboats. He does excellent work at reasonable prices. Fred transferred the template to the metal, and then used a band saw to cut out the wrench.
Wrench clamped in vice while I clean up the rough edges with a file.
Back at the boat yard, I cleaned up the sharp edges with a file and applied a few coats of red paint.
Ready to remove the nut.
Now possessing the right tool for the job it is time to remove the packing nut.
Happiness is having the right tools for the job.
The short wrench handle and awkward body position limited the torque I could physically apply to the nut. Ultimately removing the nut did require striking the handle of the wrench with a mallet -far preferable to further damaging the nut with blows from a cold chisel.
Removing the old packing material.
Using a combination of picks and a small flat screw driver, I excavated decaying, flax packing from the nut. Based on the condition of the packing material I would not be surprised if it is from the original 1979 construction. I have little doubt it was leaking when submerged.
Close up of gouges along the upper edge of Pilgrim's rudder packing nut.
A few minutes with the bench grinder’s wire wheel and the packing nut cleaned up nicely. Despite the deep gouges along the upper edge, I do believe it remains serviceable.
Next step is to lift the boat high enough for the rudder post to clear the hull. Hmm – I wonder how much that rudder weighs?
Our Rudder Repairs and Modifications Photo Album contains additional images and notes from this ongoing project.


Thursday, January 8, 2015
A Magnetic Personality
This post originally appeared on Windborne in Puget Sound
Like the rest of the country, the Pacific Northwest has been experiencing unseasonably cold temperatures of late (well, ok - for us, 32° is unseasonable). And of course you know what this means... our heating system failed. Just like roof leaks only appear when it rains, heating plants never fail in the summer. Oh well.
The first clue was that the thermostat display was completely blank. Well, and the boat was cold, too. Some back and forth with Marinaire, the heat pump manufacturer (great customer service, by the way), disclosed that there was a fuse on the main circuit board - a fuse hidden beneath a blue vinyl cover. Yep, it was blown. When it was replaced, the replacement blew immediately as the fan and circulation pump tried to start. Blowing a couple more fuses revealed that the problem was the circulating pump - the pump that provides sea water to the heat pump. (It is by the chilling of this sea water that the heat pump produces heat.)
Here's the pump after I pulled it out:
Yup - the shaft seal failed and sea water was trickling back along the shaft and into the electric motor. Bzzzt!
So I bit the bullet and ordered a new pump. This one has a magnetically driven impeller - that is, there is no shaft seal. The motor drives a cup-shaped magnet; the pump body extends into the cup but has no opening. The impeller has an imbedded magnet, and is thus driven by the motor without any mechanical coupling and without a shaft seal. As you might expect, this kind of pump is more expensive. But the technology is worth it.

As a bonus, the pump body itself (the white plastic portion) is considerably larger than in the old pump, and is much more substantially made. The inlet and outlet are larger as well.

Since the pump is physically larger, it wouldn't fit where the old one had been. So there was some fooling around involved in finding a location that...
Based on the appearance of the discharge water stream, I'd estimate that this pump is delivering twice as much water as the old one, even tho both are rated at 500 GPH.
The boat is warm! And now I expect to be able to forget about this pump for a long while, just as I have been able to with the refrigeration circulating pump.
Magnetic personality? I must have one. Can I make a recommendation here? Avoid sea water pumps that have shaft seals wherever possible. Like the cosmetic ad says, they're more expensive, but you're worth it.
Like the rest of the country, the Pacific Northwest has been experiencing unseasonably cold temperatures of late (well, ok - for us, 32° is unseasonable). And of course you know what this means... our heating system failed. Just like roof leaks only appear when it rains, heating plants never fail in the summer. Oh well.
The first clue was that the thermostat display was completely blank. Well, and the boat was cold, too. Some back and forth with Marinaire, the heat pump manufacturer (great customer service, by the way), disclosed that there was a fuse on the main circuit board - a fuse hidden beneath a blue vinyl cover. Yep, it was blown. When it was replaced, the replacement blew immediately as the fan and circulation pump tried to start. Blowing a couple more fuses revealed that the problem was the circulating pump - the pump that provides sea water to the heat pump. (It is by the chilling of this sea water that the heat pump produces heat.)
Here's the pump after I pulled it out:
 |
| Salt water short-out |
So I bit the bullet and ordered a new pump. This one has a magnetically driven impeller - that is, there is no shaft seal. The motor drives a cup-shaped magnet; the pump body extends into the cup but has no opening. The impeller has an imbedded magnet, and is thus driven by the motor without any mechanical coupling and without a shaft seal. As you might expect, this kind of pump is more expensive. But the technology is worth it.

As a bonus, the pump body itself (the white plastic portion) is considerably larger than in the old pump, and is much more substantially made. The inlet and outlet are larger as well.

Since the pump is physically larger, it wouldn't fit where the old one had been. So there was some fooling around involved in finding a location that...
- was below the water line as far as possible - centrifugal pumps are not self-priming,
- was not actually on the floor of the bilge compartment, since that would promote rusting of the motor base,
- did not interfere with access to the nearby battery,
- minimized the required plumbing changes,
- and finally, did not block the access door you see in the background to the right.
Based on the appearance of the discharge water stream, I'd estimate that this pump is delivering twice as much water as the old one, even tho both are rated at 500 GPH.
The boat is warm! And now I expect to be able to forget about this pump for a long while, just as I have been able to with the refrigeration circulating pump.
Magnetic personality? I must have one. Can I make a recommendation here? Avoid sea water pumps that have shaft seals wherever possible. Like the cosmetic ad says, they're more expensive, but you're worth it.
Tuesday, January 6, 2015
Galley Gear Review: Nice Nesting Pots and Pans
Over at Liebster-winning Dock Six, Brian reminds us of a marine truism: "No boat is ever big enough." And he has a solution for it:
No matter how big the boat, every boat is too small.
Especially the galley.
When it comes to boat galleys, to paraphrase James T. Kirk...
Space is the final frontier.
NextBoat*'s galley has more storage capacity than Whiskeyjack's galley, but "more storage capacity" is a relative term. That is like saying that your humble scribbler here is taller than the average 9 year old child.
That doesn't make me a giant.
Ergo, maximizing space is paramount. The more stuff you can fit into the existing space, the more comfortable your life in aforementioned space.
Hence my interest in a set of nesting cookware.
Every year at the boat show I look for a deal on cookware. I like the quality of the Magma set...
image courtesy of Magma
...but I don't like the inventory- there are four pots, but only one pan, in the 10 piece set. Those of you who have read any of the Two-Burner Tastiness recipes understand that I'd rather have two pans, and one less pot, but that isn't an option.
So, my search continued.
Until early this summer.
Wandering through the camping department of my local Canadian Tire, last June, I made an impulse buy.
(why am I not surprised? - ed.)
I had just picked up the bottle of lamp oil I needed, and on the shelf right beside the lamp oil was the camp cooking gear. There were the usual speckled enamel suspects, the stuff that looks rustic and rugged, right up until the moment you actually use it, but in the midst of the sea of stamped-in-China-great outdoors-nostalgia-ware was a SALE ! tag, under a carton of cookware that looked...different.
So I bought it.
Yeah, I'd never heard of "Lagostina" either.
No, those not-shrimp, not-prawns, not-crawfish, not-lobster things? Those are LaNgostinOs.
Which can be cooked in a Lagostina pot.
Here's the deal: Lagostina is an Italian firm that has been manufacturing stainless steel cookware for decades. Their "Campeggio" line is their, as the name implies, line of camping cookware, but while it is compact in size, it is not compact on quality.
These pots and pans are constructed of 18/10 stainless, with three ply (stainless steel/ aluminum/ stainless steel) bottoms for even heating. fold down the handle on the large stock pot and ...
Keep going and in rapid succession you get...
Two, count 'em, TWO pans...
...Two stock pots...
...Two lids that fit both pots and pans....
... and a grip-anywhere, go-anywhere insulated pot/pan handle that is both ambidextrous and has hooks for removing hot pot lids, like when you are steaming Langostinos.
Both pots are graduated, which is a nice touch...
...for measuring the exact amount of liquid for boiling langstinos
Also included is a mesh carrying bag... that was promptly repurposed forother uses aboard.
After 5 months of use, both SWMBO and I can confirm, we LOVE this stuff.
All pieces heat evenly, the bottoms don't warp when warm, the handle is substantial, the construction is solid, the non-stick is real non-stick, and, most importantly...
... These were the ONLY pots and pans we have used for the last 5 months, and we haven't needed to buy more. Cooking for 2-4 on a 2 burner stove? This is all you will likely ever need. It is all we have needed.
Here's an example:
Cracker crusted pork chops, "Booker T" mashed potatoes and peaches and cream corn- two burners, three pots, from one nesting cookware set.
Oh, and a bottle of Ramblin' Road DPA.
Surprisingly, although less than half the price of the smaller one-pan Magma nesting set, the Lagostina cookware comes with a 10 year warranty, compared to the Magma's I year warranty. I am impressed. Retail price at our local Canadian Tire Store was $119.99 cdn.
The only challenge is where to find it outside of the Canada.
Or Italy.
If anyone wants a set, let me know. I'll pick it up for you and ship it out- for actual cost.
Thanks for checking in, and please,
"Talk the Dock!"


Subscribe to:
Posts (Atom)


