Thursday, February 27, 2014

(Almost) New mast

Scott runs a website dedicated to Downeaster yachts - a noble undertaking.  As such, he receives submissions from others; what follows below is one of those submissions.  Although I have received permission from Scott to mine his site for content, I may be on shaky ground reprinting other's submissions (if you say so Scott, I'll take this down).

Hammerite is a company that has made a living by producing paints that, when dry, look like a hammered metallic finish.  There are two things interesting in this article:  First, this is a smooth Hammerite paint; second, the result looks like a fresh bare aluminum mast.  Read on...
Mr Charles McGrory of Glasgow Scotland recently contacted me to comment on the site and offered up some projects he has done on his boat. He has an Ohlson 38 he has restored and this was one of his projects to brighten up his mast by painting it. Over the next week or so I will try and put up a nice project he has for a watch standing seat in the companionway.

From Mr. McGrory:
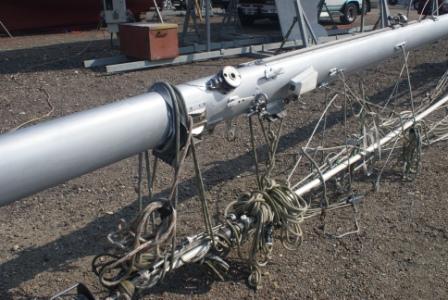
When I bought my boat in Oct 2010 ,the mast was very badly weathered. I considered having the mast stripped and then painted with Awlgrip. I thought about a new mast but Sailspar in England kindly told me that the original mast would be of much thicker section than the masts of today.  And a new mast of thinner section would be approx £5000 without the tangs etc.  I did not strip the mast at all. I had this tip from another Ohlson 38 owner who is near Ipswich; he guards his privacy so I can’t mention his name. He touches up his 30 yr old mast with a Hammerite Smooth spray can. My mast was ghastly as you can see.

I tried the Hammerite Smooth spray can just for the hell of it; could not look any worse, and could see a big improvement but the paint was showing weeping run marks from too heavy a shot of aerosol;  I quickly changed to a normal can £20 and a hair brush. I had so little faith that it would work, it was all just an experiment, anything would look better. However, in one warm sunny afternoon I did the whole mast which was down for the boat going into the paint shed. What a difference!  It just took a wee bit care to not paint over ropes, shrouds etc. I painted all the way to the masthead crane.

The professionals in the paint shop who had quoted me ££££ for undressing the mast, Awlgrip etc later said it was fine (well almost) and next time to use a foam brush to avoid any texture from the hair brush.  I was so satisfied that it was so quick and cheap. To be sure I can see the brush texture in some places – invisible at any distance. The coating without any primer – just a light prior washing off of any grit – has stayed on and seems tough enough. I expect that with ropes etc slapping it will thin out where the ropes rub but the foam brush touch up will be fine. I still have half the can of Hammerite Smooth.

Mast before painting.

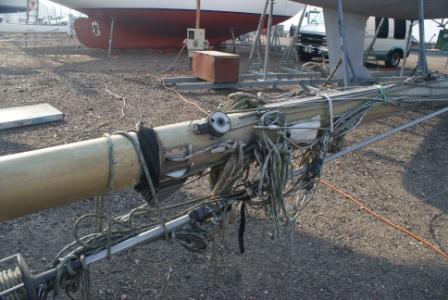
Mast After Painting
Mast After Painting

I want to thank Mr. Charles McGrory for submitting his write up of this project. It is a nice product and idea for an inexpensive but durable update to an old mast to make it look better and give it some additional protection.

You can find Hammerite Paint here.

Tuesday, February 25, 2014

Cheap Boat Keeping

Extracted from a larger post at Sail Delmarva, here are some thoughts from Drew (I especially like #2, because I'm just too good at #3):
At first glance, without my glasses, this WW II poster bothered me.

Most of use would rather put money in our 401-K or the kids' college fund than pour it in the water. I spread my maintenance funds thin as paint, using every trick I've learned over the years. It helps that my dad is a painter (watercolor artist, but also a house painter in college), my grandfather was a mechanic, and I've tinkered since I was a kid and worked around chemical plants for years. Perhaps some of these ideas will be of use to others.
  1. Use your engine. Never let it sit for over a month in the winter; the lube needs to circulate and the electrics need to dry. Run it enough in the summer to turn the fuel over a few times each season; we change the oil twice each year, so why would we expect the gasoline to last longer? Engines don't wear-out so much as deteriorate from disuse. I've done lots of fuel testing in my "real" job, so I'm neither quoting from a book nor guessing.
  2. Cleanout every locker twice each year. You'll find stuff and reduce repeat buying. You'll gain space and stow things smarter. You'll save weight and clutter by pitching old rubbish or at least taking it home. It will remind you to maintain a few things. Remember, carrying junk costs $20/pound.
  3. Save bits and pieces of materials. Some aluminum or FRP plate, a bit of stainless tubing, some left over wire, scraps of good wood, a bit of gasket material, and leftover old fasteners; never old junk parts, but bits that might be found in a hardware store or West Marine. Keep it neat.
  4. Learn sail repair (hand work). A stitch in time saves nine. Really.
  5. Find a good thrift store, one that carries some marine stuff but doesn't realize it. Small towns near the water. Also a great source for Gore-Tex foul weather gear; mostly the sorters don't know the difference between a worthless windbreaker and the real deal.
  6. Stay at a working marina. Often 1/3 the price of a recreational marina.  Also look for houses with a few unused slips out back, or maybe a rusted up marine railway.
  7. Use a good 2-year bottom paint.
  8. Learn painting and composite repair. Really, you can be very efficient with these things, given the proper tools and some practice. I figure I save a good $100/hour pre-tax; I've learned speed and quality over the years.
  9. Get a book book on marine wiring. Buy a good ratchet crimper. I'm an engineer by trade, which is a good start. However, even if you only apply your knowledge to troubleshooting, it's a blessing when somewhere remote. Do professional quality work the first time or you'll lose reliability, endanger your boat when you're away, and mostly do it over some day.
  10. Anchor out. Even if it means adding solar and upgrading a few things, you can save $50-$150 per night. Enjoying increased freedom is priceless.
  11. Waterproof grease. Electrical connections and anything that comes apart. Teflon pipe dope is good too, particularly where aluminum meets stainless.
  12. Watch chafe and wear. Lines--running and mooring--can last for many years if you don't let them rub or slap.
  13. Stay in the water all winter. Of course, this depends on the area--not practical in the Great Lakes--but for most of us it's a great saver. The season can be stretched, and the boat suffers less disuse, the hauling and storage fees go away.  You will need a good 2-year paint.
  14. Learn small engine repair. They're really simple. Even if all you learn to do is change plugs, rebuild a carburetor, and change the impeller, there's real savings and less chance of being stranded. You'll need some tools and parts, of course.
  15. Fish! It's free and nothing is better.
In 25 years of boat ownership, I've only used contractor services for:
  • Major sail work and new canvas.
  • Hauling.
As a result, I know my boat inside out; that's a good feeling and an important part of seamanship.

Thursday, February 20, 2014

Pledge Drive

I hope you have been enjoying the ongoing series of projects posted here.

This is your site.    For this to work out for all of us, everybody needs to contribute - think of this as a pot luck dock party.

Come on now.  All of you have a small project of one kind or another that others would be interested in seeing. Contribute to the feast:
  • Write it up and send it to SmallBoatProjects at gmail dot com
- or -
  • If you have already written it up on a blog somewhere and are willing to share, just tell me where in the wide world of the Internet to find it, and I'll come and get it.
- or -
  • Give me permission to "mine" your blog for projects. Anybody who is writing a blog about boating has numerous small projects buried in there. I'll ferret them out, if you let me.  No, I won't put your content on here without your permission.
- or -
  • Send me what you have, and I'll do the write-up, with full credit going to you as your project, of course.

Every posting will feature a link to your article (if there is one) and a link to your blog (if you have one).  In addition, all contributors will permanently have a link in the "Contributors" box on the right side of the blog. This ought to drive some of the traffic that this site is seeing back to your site.  I will not take any recent posts (unless you tell me otherwise) - that way this site will not be in competition with yours. Instead, it will hopefully serve to "reactivate" some of your older posts.

But the most important benefit you'll get is the warm feeling of having helped someone thru a problem - one that you have solved. And we will all be the richer for it.

Pitch in!

Tuesday, February 18, 2014

The new Brasso

This post appeared originally on Windborne in Puget Sound

The old standby.
 Everybody knows Brasso, right?  That stinky stuff that you can use to almost magically return corroded copper, brass or bronze to a mirror finish...  you know.  The chemical engineer in me wants you to know that the stinky part is really an important part of the magic.  See, there is this thing called the copper-ammonium complex; it makes copper much, much more soluble in water than it would be without the presence of the ammonium ion.  It is this highly increased solubility which helps to remove the surface oxidation, in concert with the fine abrasives also present, and your elbow grease of course.

Well, recently the old can we had here on Eolian finally ran out, and I was forced to buy another. 
I wasn't really surprised when I found that it now comes in a plastic bottle instead of a steel can. 

But I was sorely disappointed with what is now inside the container.  It seems to be far less effective, and the abrasive is considerably coarser than it used to be.  It takes a lot more elbow grease, and due to the coarser abrasive the result is no longer a mirror finish.  Like so many things, the formula was changed - in 2008 - to make the product comply with the new U.S. volatile organic compounds law.  More, it turns out that the version of Brasso sold in other countries is completely different than the current USA version.

So can any of you UK readers of this blog confirm that this is the good old regular, highly effective, formula? 

Does anybody have a can of the old stuff they would want to sell?
Tuesday, February 11, 2014

Hookers for Splicing

Crossover noun \ˈkrs-ˌō-vər\: when skills from a field are applicable in another, unrelated field.  Livia, living aboard s/v Estrellita give us an example:
P1020421If you crochet or knit, consider doing the splicing for your boat.

Anyone can splice, but if you are a crocheter or a knitter, it is as if you have already completed a rigorous pre-splicing bootcamp, and are primed and prepped to become an above average splicer.

Reasons why hookers are ready to splice:
  1. P1020425
    You already know how to read complicated verbal directions with poorly drawn diagrams and translate them into actual products. If you can take something like "dch ch 2dch" and create a popcorn stitch then you are ready to take a rope manufacturers splicing directions and run with them.
  2. The tools are simpler versions of ones you already know how to use with precision. If you can wield a crochet hook in one hand while keeping tension with the other, or suspend an entire sweater on the tips of two pointy sticks, fids will be child's play.
  3. You know to read the entire set of directions before actually doing anything. You check to make sure you have all of the tools and supplies indicated and that you won't be surprised when you reach step 10 and realize you should have done something differently at step 2.
P1020426Tip: Many people are turned off by splicing because they try their first splice with a bit of old yacht braid they have laying about. Old yacht braid ranges from extremely difficult to splice to impossible to splice depending on how far gone the cover is.

Do yourself a favor and buy a piece of brand new line for your first project. My advice is to buy a length of rope of the correct size for a dockline (don't forget to add extra length for the splice) and use that as your first project. Or if you want something super easy, pick a spectra/dyneema splicing project – even easier than yacht braid.

Online splicing directions are everywhere but you can try here or here. We have this basic set of fids which works very well and seems to cover the sizes of lines we use commonly.

Thursday, February 6, 2014

Seacock Rebuild...(getting it apart)

You know those big bronze seacocks... do yours seal properly?   Are yours leaking out the shaft at the handle?  Can you even turn the handle?  If not, don't throw out that giant expensive chunk of bronze - you can rebuild it!  Ken on s/v Painkiller shows us how:
You need a big wrench and you need a vise, other than that....it's a piece of cake.

 Get the drain plugs out.
 Get the handle off.
Get the stem retaining busing out.
 Technically the stem could be pulled straight out now, but after 33 years it's real comfy and does not want to do anything other than move in the one direction it's been been doing for all those years, open, closed.
Place hose barb elbow in the vise.
Do the big wrench thing.
Now place the large ball retaining bushing in the vise good and tight and do that big wrench again with gusto. You may need a lot of gusto here unless you have a proper vise as I did not.
Almost there...
Get good pair of vise grips on the flat of the stem and wiggle it straight out. If it's a tough one, you can use a screwdriver to pry the vise grips as you pull.
There you have it.
A repair kit comes with a new ball, two ball seats, and two o-rings. After you pry out the old seats, clean it up really good install the seats and reassemble in the reverse order. 
I got this many apart in one day.

Tuesday, February 4, 2014

Got Rope?

Boaters are frugal. Most boaters, that is, and virtually all cruisers. We never throw anything away (which is a discussion for another time). But this means that we make use of EVERYTHING. Drew, over at Sail Delmarva has an example of something that is now in it's third incarnation:
I've had this 30-year old anchor rode hanging in a tree for 15 years, serving a second life as a Tarzan swing. I've got a Kevlar genoa sheet with a shattered core, no longer trust worthy for anything critical.

The rope ladder was a simple project. I've wanted something that was compact, couldn't harm gelcoat, and could be used climbing in or out of the tender. This took about 20 minutes and about 30 feet of line (2x the length + 3' for each rung). A fun night-before Christmas project, complete across my lap, with a glass of hot tea at my elbow, while watching The Polar Express with the family.

The door mat required 100 feet of 1/2 inch line and about 2 1/2 hours to complete. The knot in the middle is rather a lump underfoot, but it looks very traditional. The wrap and sewing took the real time. I soaked it with the borax/washing soda/baking soda anti-mildew blend when finished. My mom thought it a charming gift; since we had enjoyed it on the boat and in the backyard for many years in previous incarnations, it has history with her children and grandchildren.

And 2 lumps of old rope were thus consumed. Good.

Related Posts Plugin for WordPress, Blogger...