Tuesday, February 24, 2015

Cable Neatenization

This post originally appeared on Windborne in Puget Sound

Is that a word?  I don't think so, but I'm using it anyway.

When last we spoke about the mutiny of our Radar Officer, I had gotten the new radar working in the cockpit. But the cables, tho strung to near their final location, were looped from inside the cockpit coaming in a decidedly NOT ship-shape manner. I mentioned that I had ordered a cable grommet - well that grommet has arrived, and it was time to finish up the installation.

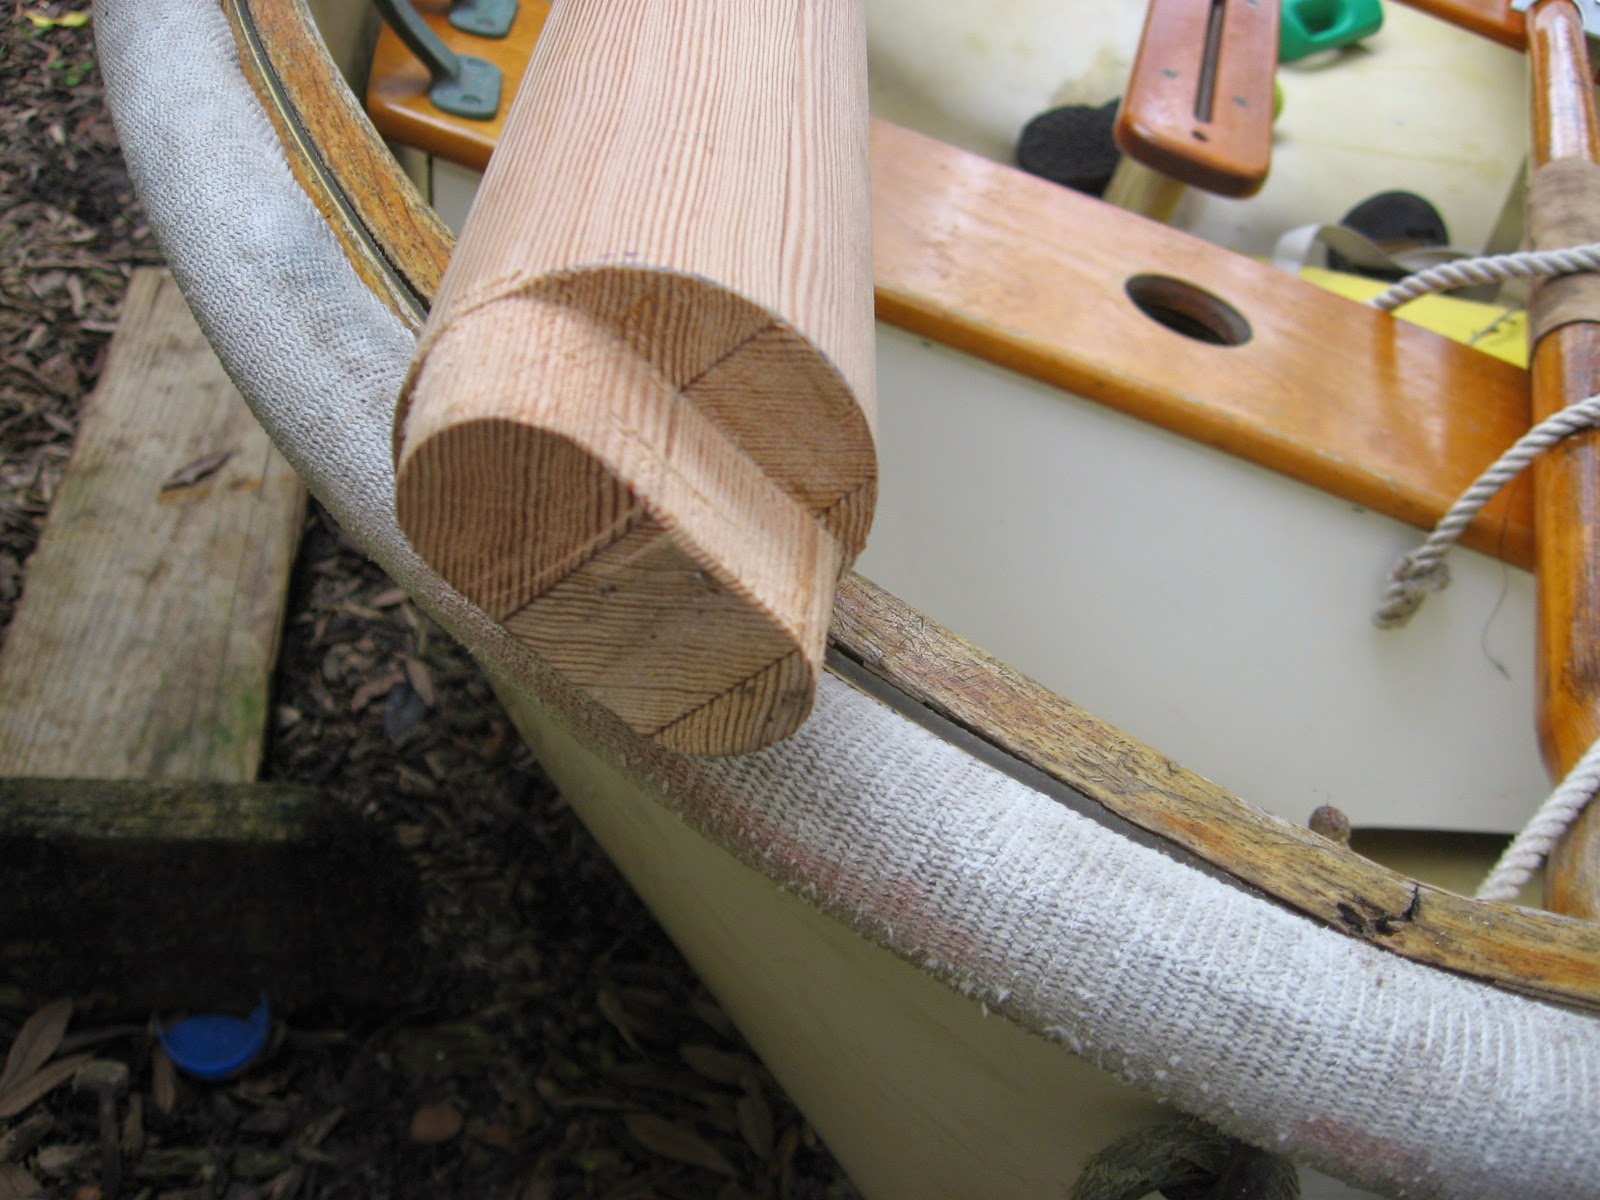
All I had to do was make a 2" diameter hole in the top surface of the coaming.  How hard could that be?  I got out my trusty drill and a 2" holesaw and went to work, expecting to take maybe 15 minutes.

Getting thru the teak coaming cap was a piece of cake.  And I knew that the actual structural fiberglass construct was under the teak.  What I did not know was that it was a full inch thick of solid fiberglass - Downeast certainly cannot be faulted for skimpy construction!

My poor holesaw was really not up to the task.  The narrow slot that the teeth made did not clear itself of fiberglass dust well, meaning that as the hole deepened the dust accumulated...  and melted.  Stopping frequently (after maybe 10 revolutions of the saw) and vacuuming out the debris, followed by picking off the melted and now solidified resin from the teeth of the holesaw made for very slow going.  It was a two-beer hole. 


But patience and perseverance won out, and eventually the coaming was breached.   Yes, you can see that I drilled some holes down thru the saw cut in an attempt to provide a chip clearance path.  It helped, a little.  But I had to keep clearing out the holes too.  Like I said, two beers.


And there is the finished product.  Looks pretty good, doesn't it?

When the radar unit is dismounted and stored down below, the cables go back thru the grommet, inside the coaming where they are protected from the weather.  I will eventually re-route the GPS cable to this grommet too, but that means re-making more than a half dozen connections.  A good task to do while at anchor on a quiet sunny day next summer.

Oh, and the old radar unit has sold.


Thursday, February 19, 2015

Boo Boo's Spars

In which Ken of s/v Painkiller constructs spars for a Dyer dinghy on a park picnic table, using only hand tools...
All I want for Christmas is a Dyer sailing dingy, I said out loud half in jest to a friend at the marina, he got on his phone and I heard him say, "you still have that Dyer dingy for sale, how much? He looked at me and said $300 about 4 miles from here. I told Vicky and off we all went. A 1991 Dyer Midget sailing dingy minus the lower mast section, the boom and sail and oar locks. It came with the upper yard (to the mast), the complete rudder, daggerboard and a set of oars. I snatched it.


Once I glued up some straight grained fir that I bought at the local lumber store I brought it to shore to my makeshift shop, the concert picnic table behind the cruisers lounge and laundry. After squaring up the stock for the round mast with hand planes I drew out a taper for the upper two thirds of the mast.


With this very crude but simple jig I was able to draw lines that tapered the "square" to the desired top dimension, 1 3/4". The base is 2 1/2"


Next is to cut the corners off, making 8 sides to the spar staying away from the lines. It was very tough using a jig saw for this operation, but a man's got to use as best he can what a man "has" to use.


Certainly not the greatest bench, but enough. The scenery was excellent and the distractions from cruisers were many, but I got by.


I then carefully planed all eight sides to an even width right to the lines. This gave me the taper I wanted and much closer to the "round" I wanted. I'm sure I could have come up with a way to draw lines on all eight sides again for a perfect 16 sided spar but I chose to knock down the 8 high spots by eyeball with the hand plane.

It was definitely close enough with 16 sides to dig right in with the truly grunt hand work, sanding against the grain with a cut opened belt sander pad. I think it was 50 grit.


Then of course some proper sanding down with the grain to bring to finish.


With the fitting and shaping of the mast step I was ready to move onto the rectangular boom.


My crude but effective set up to use a round-over bit for the boom and an evening beverage for a good day work.


The oak jaws on the boom were pretty straight forward other than I had riveted the end prior to getting the bronze fitting, which is held in place with nothing "but" the rivet, so I had to re-rivet twice.


Prettying it up with the leather work and we are just about done. I also made a couple of teak cleats for the mast and boom, threw on a few coats of varnish ...


... spliced some rope work to complete the running rigging. I had bought a new sail from Dyer along with the proper bronze fittings I was missing, but they sent me the wrong part which caused a very long delay leaving me frustrated not being able to set the sail.


The parts finally came in and I hurried to rivet on the yard hook strap eye with the two inch copper nails.


Christmas came very late for me this past year but worth every minute I had to build the missing parts.

Tuesday, February 17, 2015

Dual Purpose

On any boat, even one as large as a Lagoon 46 catamaran, space is a limited and valuable commodity.  Wherever it is possible to make one thing serve two purposes is a big win because the same storage/volume/space is used for two different things.  Here, Mike and Rebecca on s/v One Love turn a single-use piece of furniture into dual-use:
The list of things that we don’t like about the Leopard 4600 is very short, and we just made the list one item shorter. The large stock salon, while perhaps good for inside dining, got very little use by us, at least for that particular application. In the warm Caribbean, almost all dining on One Love, and on our friends’ charter boats, is done outside. The table is so large that it makes it difficult to access the under-seat storage that is so important for us. It also requires someone to kind of scoot around if they want to sit on the rear side. All in all, it was an undesirable thing for us, and one that we wanted to get rid of.


Many of our friends with 4600s had already done away with the table, replacing it with a store-bought coffee table or ottoman. While they all look great, we wanted something a bit more custom to work with our Engel cooler that, up till this point, we kept under the dining table. Enter Puerto Rican Danny, a local wood worker. Over the past couple of months, Danny took our suggestions and crafted for us the table that you see in the photos below. It fits perfectly over our cooler and as you can see, the top lifts up to give us easy access to it. He also did a great job of matching the wood and design to One Love’s interior.

Ventilation for the cooler is obviously important so he left spaces at the bottom and below the table top to allow air to flow in and out. If we determine that more air is necessary, we’ll cut a vent in the rear. At this point though, it does not seem to be warm inside the box. Another thing I had him do was have the fiddles, the raised edges around the table top, not go all the way to the corners. If you’ve ever had to get crumbs off of a table with fiddles before, you’ll understand why I had it built this way.


Wednesday, February 11, 2015

Nano-tech Experiment #3 (and reports on #1 and #2)

This post originally appeared on Windborne in Puget Sound

This is the third experiment with the Rustoleum nano-tech product called "NeverWet" - a super hydrophobic coating that can be applied from a spray can.  (Experiments #1 and #2 are here and here.)
For this experiment, we will be seeing how long the retained air film persists, and if the nano-coating has any anti-biological properties in sea water.  I think it might, since the retained air film could make barnacles and such uncomfortable, or might even prevent them from touching and attaching to the actual surface.  We'll see. 
 

Here's what I did:
  • I took a scrap of fiber-reinforced ABS plastic (left over from the refrigerator refurbishment) and masked off one side of it.  The other side got the NeverWet treatment.  I suspended it (from the hole you can see, partially covered with blue tape) in the water off our finger pier at Anacortes on December 21, 2014.  The finger pier is a floating one, so the coupon will never be exposed to air, except when I lift it up for inspection.

Report on Experiment #1


Experiment #1, as of Dec 2014
Experiment #1 began more than a year ago, in October, 2013.  For this test, I applied the NeverWet to our canvas sea hood. All was well until Nature's own nano-tech (pine pollen) arrived on the scene.  It coated and buried the NeverWet, and allowed water to once again wet the surface.  In an attempt to remove the pollen, I gently wiped part of the surface with a sponge damped in soapy water.  As you can see, that portion of the surface never recovered its hydrophobic properties.  Whether it was the mechanical action of the sponge or the surface tension-destroying property of the soap, I will never know.  But the portion of the sea hood that did not suffer from pollen accumulation or the soapy sponge is still every bit as water-repellent as ever.  From this I can propose that the coating is not strongly affected by UV.

Report on Experiment #2

Experiment #2 began in April of 2014, when I applied NeverWet to our dinghy propeller. It was amazing to see that the submerged prop looked like it was made of polished silver due to the thin layer of air it retained while submerged.

We used the dinghy normally for the entire 2014 season, giving no further thought or special attention to the prop.

By the end of the season, the nano-tech coating had ablated off the outer 1/2 of the propeller blades, but was still active on the inner half.

From this I conclude that NeverWet is not suitable as an anti-barnacle coating for boat props (guess we're still stuck with Barnacle Ban), but it could likely serve well on things that do not suffer from the abrasion of high-speed turbulent water contact.

The Future

It is the results of Experiment #2 that led to Experiment #3. Experiment #2 showed that the air film persisted while submerged over periods of days, and even in the presence of extreme turbulence. Will it be retained for months on end? And if indeed the retained air film is effective at retarding or preventing biological growth, NeverWet could serve for difficult-to-protect items such as depth sounder or speedo transducers.  And if the price could be gotten down low enough, perhaps NeverWet could even serve as a bottom paint alternative (for sailboats at least).

Thursday, February 5, 2015

Dry Suit. The Ulimate in Foul Weather and Survival Gear?

Now here is a great idea from Drew over at Sail Delmarva - It might not keep you warm enough in the Bering Sea, but then how many of us are sailing there? And as Drew points out, the safety gear you are wearing beats the heck out of the best safety gear in the world stored in a locker...
Better than a Survival suit? That is the question Practical Sailor Blog asked this month. Conventional survival suits are so ungainly that sailing is impossible and they are not donned until the boat is headed down, often too late. A dry suit, on the other hand, offers the same or better agility and livability than conventional foul weather gear, with complete cold water protection (except for the head and hands). Since it can be worn while sailing, it offers protection you are more likely to have on.

But that isn't why I bought mine. Kayaking is one of my favorite activities, and once the water temperature drops below 60F, it become more and more difficult to dress safely. While I have never capsized (other than white water) on open water, there is always a hypothermia risk. Additionally, I think the dry suit will make reboarding from the water easier, because you avoid heavy, soaked clothing. Instead, you gain significant all-over buoyancy.

Not me. I'm much better looking. Demonstrating the conversion from stand-by mode to fully sealed.

A favorite feature, and one that makes this suit (Ocean Rodeo Ignite) particularly suitable for sailors, is the standby mode. The pants are supported by suspenders and fit well, with attached socks. As shown in the above photo, the pants can be pulled up and the jacket zipped without put the head through the neck seal and zipping in, giving great ventilation. Converting to full seal takes only moments.

There are wrist seal, lotsa pockets, and a fly. The fabric is like a heavy duty 3-ply Gore Tex and seem very durable. The entry zipper is across the shoulders and doable alone (many drysuits require help). They are cut for athletic builds; if you've been hitting the pasta a bit too much, have very large shoulders, or shoulder mobility problems, go up a size; I am near the upper limit of height and weight for the medium (5'8" x 165#) and the fit was spot-on with my typical cool weather dress (long johns, fleece pants, shirt plus fleece sweater). With 2 thin fleece layers, 32F water is pretty tolerable (but the fit through the shoulders is more snug), and I've even done a little bottom cleaning like that. However, I strongly recommend trying the suit with the layers you intend to wear. Fortunately, getting out is easier than getting in, so you won't get stuck!

Note on trimming seals: the wrist and neck seals on dry suits tend to be one-size-fits-all, which is to say they are probably too tight unless you are built like a stick. In fact, over tight neck seals can inhibit blood flow to the head, which is bad.  I found the wrist seals fine, but the neck seal was miserable. Trim one ring at a time with very sharp scissors, leaving no jagged areas that could stat tears, until the seal is snug but acceptable, your adam's apple can move, and blood flow seems normal. Divers keep them tighter than kayakers and sailors should. Seals are replaceable, but with care last a long time.

And when you peel it off... You're dry!

Tuesday, February 3, 2015

New Year Gear and Tool Review: Bonding with Bondic

If you go to a modern dentist, you are probably already familiar with UV-cured adhesives.  I have never seen them available for the consumer market.  But Brian over at Dock Six (in Canada...) has...
"Now you oughta make it stick together..."
                                   -Wilbert Harrison


As you know, Constant Readers, I basically have three modes- building stuff, breaking stuff, and sailing.

(No, Smartass Reader, "drinking and eating" is NOT a mode.  It is an integral part of the Three Modes.)

Intrinsic to successful functioning in any mode is the necessity to keep things from falling apart all around, you...

  .... and putting them back together when they inevitably do.

Thus, I am always looking for better, faster, easier, stronger ways to build what is needed and fix what is busted.

Which is why I have an assortment of tubes and vials and bottles of various adhesives, of varying efficacy,  taking up real estate on my workbench and locker space aboard.  By and large, my go-to solution for most bonding jobs is epoxy of some sort, but one challenge with epoxy is that it has a LONG cure time, which makes it unsuitable for quick, clamp-free fixes.  Even quick curing epoxy isn't all that quick.

Cyanoacrylate, the Krazy Glue-type stuff, IS instant, but that presents it's own brand of problems, because once two objects are stuck together they are stuck, like, NOW.  No repositioning, no time to get your fingers out of the way, or your sleeve, or to remember that you're working on a freshly refinished uncovered table...

What if there was an epoxy that had the fast cure time of cyanocrylate, but only when you wanted it?


Enter Bondic.

The  folks at Bondic describe it as "the world’s FIRST liquid plastic welder."  There's all sorts of super-secret proprietary sciency stuff involved that makes it unique  but basically it is an ultraviolet cured adhesive.  What really makes it unique is how it works.

The Bondic kit consists of an adhesive cartridge and a 6 volt UV light..... packed in a cigar sized shiny case.


packed in a cigar sized shiny case.


It's as foolproof as an adhesive can get- clean the objects to be bonded, and sand shiny surfaces- this stuff likes a little "tooth, just like glue....


apply a bead of Bondic to one surface, by gently squeezing the cartridge, just like glue...


Then, here's where things get different. Shine the UV light on your work for 4-8 seconds...


BOOM!  Cured, like a true believer at a tent revival.


Because of the fast cure time, Bondic can also be used as an effective filler for small jobs, applied in layers, curing each layer.  Busted the corner of your cell phone case?  Sand,  apply Bondic, cure, sand, apply Bondic, cure, sand, apply Bondic, cure, etc.  as needed.

Downsides?

Because of the application system and UV light size, Bondic is best for SMALL jobs.

And not many of them.  This review almost exhausted the cartridge.

Tensile and shear strength is not Bondic's, er, strong point.  I bonded two scrap pine battens...


Then pulled them apart...  easily.


I then tried again, thinking that a thicker layered "fillet" might be more effective...


... it is...but not much.  The battens still came apart easily.

Bondic IS waterproof, but, just like epoxy, it is sunlight sensitive- outdoor applications will need to be topcoated

It's not a great structural fastening adhesive, but it has potential for effective, quick small repairs aboard- broken sunglasses, cracked vhf radio housing,  broken tangs on light lenses,  that sorta stuff.

Cost?  The kit cost about $20, refill adhesive cartridges are about $12, a replacement UV light about $7.

Not cheap, but cheaper than a new Otterbox for your iProduct.

Bondic likely won't be the first adhesive you reach for, but it might just be what you try when nothing else will work.


Talk the Dock!
Related Posts Plugin for WordPress, Blogger...