Like most boat owners, Rick over on
s/v Cay of Sea is a jack of many trades. Here he is working on his sailmaker badge...
The lesson here is that a sail’s stitching should be repaired before it becomes a tear in the sailcoth.
I just learned that lesson.
I’ve known for the past few sails that there was a section of stitching near the clew of the main that needed re-sewing. Yeah sure, I’ll get to it. Eventually. During a day-sail last week, eventually became immediately, as the foot of the sail tore out around the broken stitches for a length of about 12 inches. I pulled down to the first reef to finish out the sail, and took the sail down the next day to fix it.
I could have done this by hand with my Speedy Stitcher, but I have access to a marina neighbor’s heavy-duty sewing machine. It was time to give it a try.
Forthunately, I’ve watched my wife sew long enough and asked her enough questions to understand what has to happen with the machine – the concept of the locking stitch, what the bobbin does, what effect the tension knob has, and why a sewing machine is threaded the way it is – so I was able to figure out how to thread and adjust the machine, and how to refill the bobbin with a little trial-and-error.
I cut a patch to sew down over the tear, placed over the carefully positioned section for repairing with the help of double-sided sewing tape, and began to carefully feed it through the machine. Four times! This is a straight-stitch-only machine, so I had to make sure I had sewn down all the edges and fully supported the material surrounding the tear.
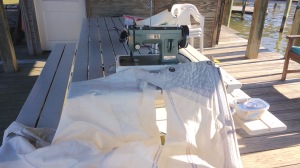 |
The machine is made by Thompson – heavy, strong gears and body allow it to punch through many layers of cloth.
|
In the photo above you can see the patch applied – it’s to the left of the seam opening – through which daylight is pouring! I repaired this open seam, and inspected the rest of the sail as well. I restitched down the entire length of the leach, as much of the stitching was weak or missing, and reenforced a few other places too.
 |
Here’s an image of the repaired sail in use. The repairs aren’t beautiful, but they’re strong. And it looks like I need to adjust the wrinkles out of the trim too. . .
|
I discovered yesterday that I missed one weakened seam just above the first reef point – and it began to open up in the brisk breeze. I dropped the main as soon as I noticed it (see – I’m learning) and finished out the sail on jib alone. Today, I’ll take a closer look at it. This one may be small enough to repair by hand. If not, I’ll bring the machine down to the boat, simply pull the foot of the sail off the outhaul, and repair it right there on deck.
Finally, during a walk today through another marina in my neighborhood, I came across this beautiful lapstrake dinghy and though you would enjoy a photo of it.
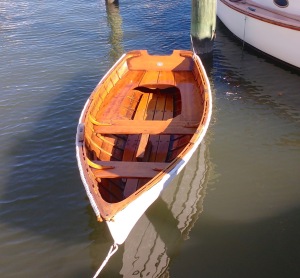 |
Tender to s/v Hesper, featured in this post. |


No comments:
Post a Comment