I'm not clear why a boat made in Canada came without the most basic provisions for winterizing.
______________
The Head
Since I stay in the water all winter, I need to be able to winterize every hose. During the coldest weeks I flush with a weak glycol solution, so the down stream portions are no concern. I pump-out before it gets too cold for the stations to close and generally make it until they thaw. However, the suction side presents a problem. Additionally, I've had occasional trouble with sea grass fouling the intake valve on the head pump. Two years ago I installed a simple Y-strainer, which solved the clogging problem, but it was very difficult to clean; the lid would stick and the location and leverage were terrible. About a year ago I replaced the intake hose, upgraded the strainer (also a freebe) and moved it to a more convinient location in the holding tank compartment, and added a glycol addition fitting. No more clogs and 5-minute winterizing.
To winterize the sea cock side:
To winterize head side:
- Place the head pump in the locked position.
- Clean the strainer, if you think it's due.
- Open the sea cock.
- Open the blue valve and add ~ 1 quart of glycol from a jug on deck (it also has a drain valve).
- Close the sea cock.
Why red instead of pink? I use ethylene glycol (EG) antifreeze on the head system:
- Open the blue valve.
- Unlock the head pump and pump until you see red.
- Close the blue valve.
- I get it for free (we make it).
- The affect on the sewage plant is less than for propylene glycol (pink non-toxic, AKA PG) because less is needed (PG is less effective, on a percent basis) and they biodegrade at the same rate.
- Ethylene glycol is NOT more toxic to fish or the environment. It is only more toxic to mammals. Don't take my word for it--read the MSDSs.
- The head side is most certainly not potable!
- EG is less harmful to the hoses than PG. Just a little, but that is one of the reasons propylene glycol is not favored by automotive OEMs.
The Pressure System
Adding just a few valves made this into an easy one-gallon job. 15 minutes, tops.
Only non-toxic propylene glycol on the potable side, obviously.

- Pump the tank empty. Remove what remains by bailing with a cup or with a shop vac. No glycol in the tank.
- Close the valve to the left of the strainer.
- Open the valve to the right of the strainer and place the hose in a jug.
- Open every tap on the boat, both hot and cold, and let run until glycol comes out. Have a jug handy to catch any extra.
- Once the jug runs empty (most likely before you are finished), let it blow air through the pipes for just a few minutes. Open every tap you have winterized and catch what comes out. It will be enough for the rest of the boat. Don't forget the transom shower.
- Close the glycol valve.
- Remove the strainer, clean, and put a little glycol in it. Yeah, I could just leave it off, but I know I'll forget in the spring and get a slight flood.
After reading Mike's link, I figured I should add these. I've also posted winterizing stuff here.
Shower Drain
I guess I might as well mention this, while on the topic. Pour about a quart in the drain and pump.
Sinks
They're all hose and drain anyway. Skip it.
Engines
They drain if raised.
_______________
The previous owner blew out lines and disconnected lines. I spent a season chasing leaks in connections that had been opened too many times and replacing cracked fittings on the water heater that didn't quite drain. This is MUCH better. The only thing lazier would be wintering in Grenada....
Thursday, October 18, 2012
Making winterizing easier
Do you live in a climate where you need to winterize your boat? Thankfully, here in Seattle, if you live aboard winterizing is pretty much synonymous with addressing deck leaks. But if you do need to winterize, Drew over at Sail Delmarva has some suggestions to make this annual task easier...


Tuesday, October 16, 2012
Hanging in there
George on m/v Grace (across the dock from us here on Eolian) has solved the problem of what to do with your kayak when at the dock. His solution keeps the barnacles off the bottom and yet makes the kayak easily accessible for quick use.
 George built a kayak sling - using two wood slats and a sheet of some kind of plastic. The kayak hangs suspended out of the water, yet securely cradled.
 Here's a detail of the attachment of the plastic sheet to the wood slats. You can see that George cut a saw kerf in the slat and slipped the end of the sheet into it. What you can't see in this picture is that there are a series of screws driven crosswise thru the slat and the sheet, pinching the sides of the slat on the sheet.
Its a simple solution that does the job well.
George built a kayak sling - using two wood slats and a sheet of some kind of plastic. The kayak hangs suspended out of the water, yet securely cradled.Its a simple solution that does the job well.
Thursday, October 11, 2012
More solar power
A popular mounting location for solar panels is on top of davits. Here, Brian over at Dock Six makes some very minor modifications to the davits (which he also made!) to mount a new solar panel:
After several seasons of stalwart service, all-weather exposure, and an occasional dunking, Whiskeyjack's little 15 watt solar panel had finally tapped out. We had been planning to install a second 15 watt panel and a charge controller this winter, but the demise of panel #1 altered our energy management plan, our timetable and our budget.
It's time to explore the options.
Fellow blogger Dan Kim has written an excellent overview of solar options here:
Sailing Dog's Solar School
So, since he has done all of the heavy lifting, research-wise, I don't have to. Cool.
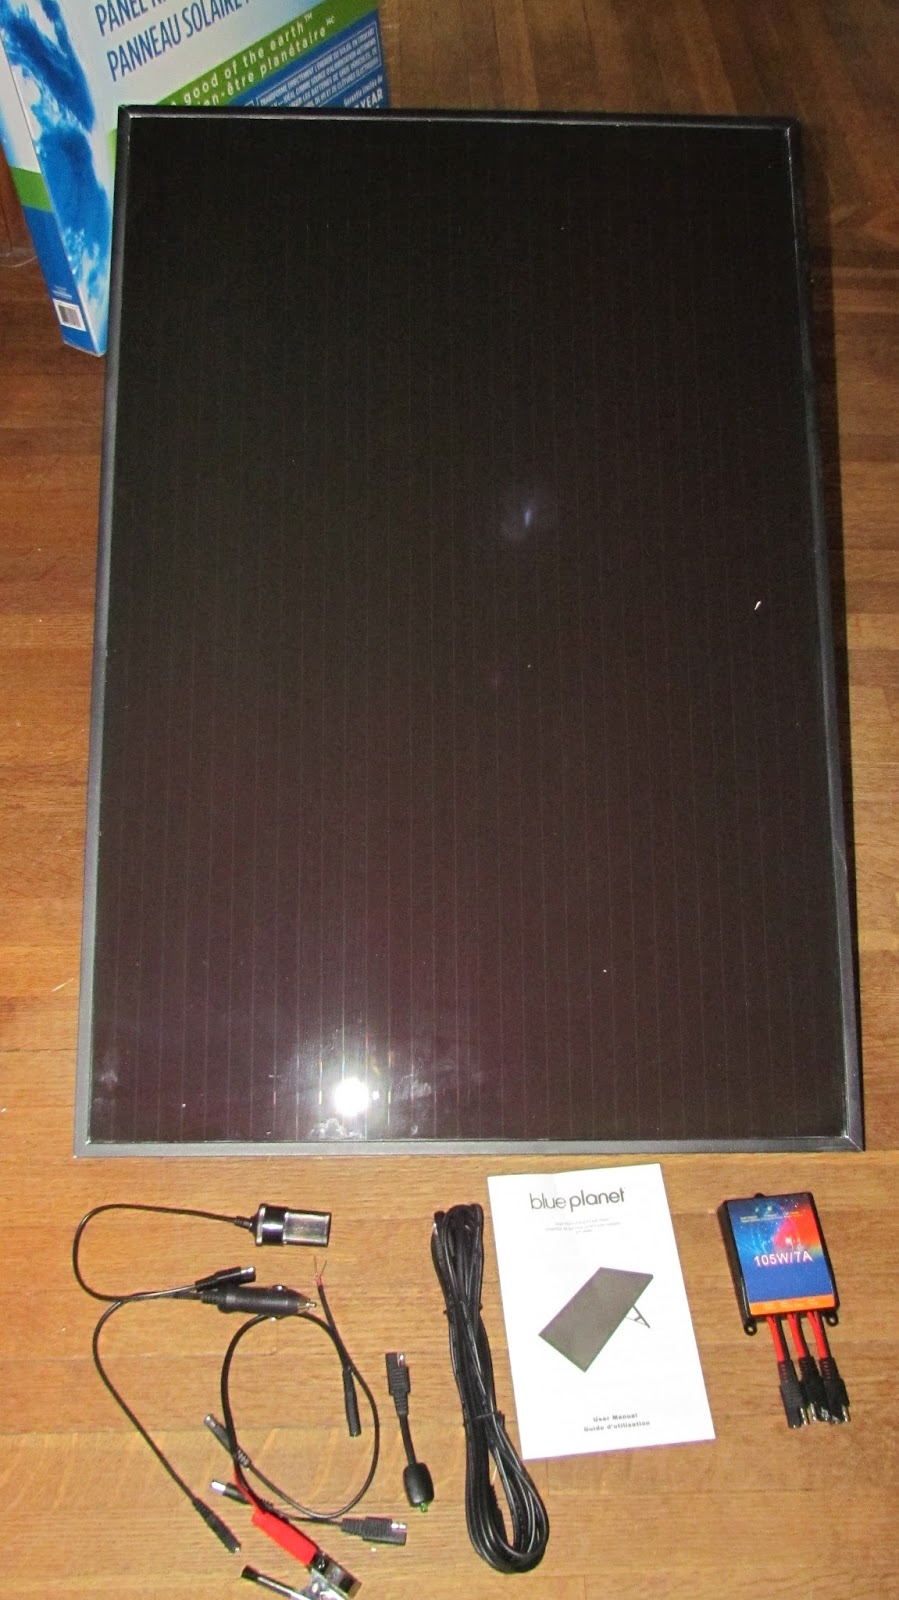
After weighing all of the options, including power output, weight, dimensions, delivery time and budget, we purchased a 40 watt amorphous panel/charge controller kit from our local Canadian Tire Store . It was on sale for $149.99 (50% of the regular $299 price tag), putting it over the "Low-Buck" threshold, but still inside our solar power budget.
Opening the box, I unpack sufficient cabling, an aluminum-framed panel approximately 3' x 2', a sufficient assortment of connectors, and a rudimentary (but sufficient) charge controller, and sufficient installation instructions.
Nothing impressive, nothing that screams "secret awesome deal!" Sufficient value at a hundred- and- a- half bucks, but not worth twice that price.
Installing the wiring and the charge controller took about 20 minutes. Figuring out why the battery wasn't getting a charge took twice that time. Turns out one of the sufficient number of connectors was insufficiently soldered. With that problem solved, the panel took up temporary residence atop the bimini while a permanent location was pondered.
Last week, I finally had the necessary convergence of available time, available parts, flat water and an empty neighbouring slip to finish the job. Earlier than I am normally ambitious, I cast off lines and warped Whiskeyjack out, around and back. Below, you can see the panel lounging on the bimini, and also it's new home- atop the davits.
First, another tie bar had to be installed, but only after carefully scattering an assortment of tools on the Dock, largely out of the way of the work area....
A few minutes of cutting and caulking and drilling and screwing had the additional tie bar in place.
After some measuring and remeasuring and some more drilling, this time into the frame of the panel, u -bolts were installed and nuts snugged down and the panel was firmly attached to its new home. The panel can be removed along with the tie bars for winter storage by simply undoing four machine screws and disconnecting the cabling.
The wiring was routed and secured and a shakedown cruise was taken.
Nothing fell off. Mission accomplished!
So far I am satisfied by the result. I'll keep you updated on performance over the next few seasons.
Total cost, including tie bar materials: $194.37
Total time: 3.5 hours.
Total tools sacrificed to lake: 1 hex key.


Tuesday, October 9, 2012
Dual purpose tell tales
Jeff on s/v Ces't la Vie solves a common problem with roller furling headsails - it's a simple and ingenious answer...
Seeking a break from the work in the engine compartment, I looked to the sails for a diversion. We added a roller furling 130% genoa last fall and are very pleased with the increased performance and ease of use.
After using the sail for one winter, I realized two shortcomings. First the only tell tales on the sail were aligned vertically with along the luff. Unless the sail was fully extended no tell tales were visible. When sailing to windward I rely heavily upon the forward sails tell tales to trim. Secondly, with our roller furling sail there was no way to quickly judge the percentage of sail aloft. "Did we unfurl a 80% jib or a %110 genny?"
With the sail off the foil for storm season the time is right to remedy the issues. By strategically adding tell tales I hope to kill two birds with one stone. C'est la Vie's "J" (the distance from her mast to forestay along the deck) is 184". Thus the foot of a 100 percent sail on C'est la Vie would measure 184". Each time we roll out or roll in 18.4" along the foot of our sail we are altering the sail area by 10%. Ok this is Jeff logic so someone out there is welcome to correct me if my logic is flawed.
To provide an indication of the amount of sail out I placed new tell tales at 37" increments (18.4" x 2 = 36.8" rounded up) back from the original tell tales along the luff of the sail. This will allow us to estimate sail area via the tell tales placed at 20 percent intervals.
Fully unfurled equals 130%. Roll in to the next tell tale equals 110%. Roll in halfway to the next tell tale and we have 100% aloft. Or perhaps more importantly if we roll out to the first tell tale we have a 70% head sail aloft. You get the idea? I placed three new tell tales along the lowest level and two at the second tier.


Thursday, October 4, 2012
Sealing Bomar hatch leaks
Eolian does not have this kind of hatch. But if your boat does, then Drew over at Sail Delmarva has these tips for you:
A wet bunk is just too much like camping out, so last weekend I fixed a few nagging leaks. Nothing, until a torrential down pour strikes, and then more than you want to deal with, several dripping at once. A few lessons learned:
About 20 minutes each. A little hard on the fingers, so do only a few each day. Not bad.
- Clean the sealing area. Particularly on the sloped hatches over the aft cabins, most leaks are actually caused by trash caught in the gasket area. Simple hose out and wipe with a cloth periodically. You may not need a new gasket.
- Replace the o-rings in the latches. Very easy and the cause of most minor leaks. Only a few minutes and no easy way to it screw up. If you decide to replace the gaskets, you need to remove the latches for working room anyway. Additionally, the increased pressure on the latches caused by new gaskets is know to cause leaks when old o-rings are recycled, so just replace them now.
- Defender sells the gasket material for the low-profile hatches used on the PDQs. You buy it by the foot and cut to fit, so there is less waste and it is cheaper than West Marine if you are doing several hatches.
- Standard "Goop" is a suitable adhesive for the Bomar gasket material (gluing the ends together--they are not glued in place). Trim with a razor and press the ends together. Close the hatch to dry (wax paper on the rim). The instructions said Super Glue, which is neater, but I was out. I have used both before (making o-rings at work) and they both work.
- Place the cut on the down-hill side. Obviously.
- If you ever replace the lenses, don't get sealant on the gasket. The sealant should only be between the lens and frame on the edge, and not much excess below the lens. Center the lens first, then inject the sealant, rather than placing the sealant and then dropping the lens in place.
- Try to place the gasket under slight compression; they shrink over time and will tend to pull away in the corners. No doubt you figured this out.
- Lube with water and a trace of dish washing soap to make it easier to slide in. A dull dinner knife tip can help shove the tab in the last bit.
Tuesday, October 2, 2012
What to do with a retired sail? Part II
Jeff on s/v C'est la Vie continues with Part II of his project based on an old sail (you may want to read Part I first):
After viewing a couple free how to videos on zippers from Sailrite, I installed a 60" zipper into the side panel of the future paddle board bag.Jeff refers to the videos available at Sailrite - I can't recommend them highly enough - they are excellent.
Next my attention turned to handles / lash points on the top and bottom of the bag. Concerned that the forces on the handles could cause the sailcloth to rip, I installed re-enforcement patches along the inside of the bag at the handle attachment points.
Using a zigzag stitch to avoid weakening the sailcloth, seven patches were sewn at 12" intervals along the mid-line of the bag.I then flipped the bag and utilizing the patches attached a continuous piece of one inch webbing to the outside of the bag.My next challenge is to create a slit in the bottom of the bag to allow the skeg to remain in place while the board is stowed in the bag.


Subscribe to:
Posts (Atom)


 Posts
Posts


