Most sailors regard standing rigging with a kind of religious awe... that only wizards of the fourth class are allowed to make modifications to it. But not Rick aboard
s/v Cay of Sea... But it does require attention to detail. Here Rick tackles creation of a new forestay:
Well, not from scratch exactly. I purchased the end terminals and wire and assembled the stay, which is definitely more expensive than having a stay made up by a rigger with swaged terminals. However, as I gradually replace rigging wire, I want to replace each piece with shrouds and stays that I built with Sta-Lok fittings. I want the knowledge and skill required to re-rig without having to hire out work to a rigging shop, and the expensive terminal fittings are reusable.
I learned some interesting things during a phone call to riggingonly.com. Tom was very helpful and knew all the products, sizes, and orthodoxy like the back of his hand. I had questions for him regarding sizing of eyes and pins, because what I found on my rig didn’t make sense:
- 1/2″ eye at the masthead
- 7/16″ stemhead pin hole on bow chainplate with 1/2″ toggle on the old Harken furler (which I did not reinstall)
Why were they different? Tom suspects that when the boat was built, the rigging contractor didn’t talk to the builder or designer, so there were some missed cues and make-dos. Tom feels like the rig should have been designed with 3/16″ wire – and most of it was – except for the forestay and backstay: these are 1/4″. Apparently 1/4″ wire typically called for larger 7/16″ eyes, but the boat was already built with 3/8″ chainplates. . . so there was a make-do fashioned, and it turned out okay – after all, the rig has stood without mishap for 34 years as designed. Best rigging design, however, matches pinhole with pin size exactly. Why 1/2″ eye at the masthead? Not sure. It didn’t match anything up there (7/16″ toggle and pin). And it turns out that simply using a different toggle to up-size the was the wrong approach too. Not knowing that, I asked about reusing the toggle, but Tom said different wire size required a larger turnbuckle, and a different sized toggle. Not only do the pinholes and pins have to match exactly, so do the toggles for the same reason: point loading or stress risers where the size is mismatched will weaken the ultimate strength of the stay or shroud at the terminal fitting. Instead of the mismatched pins and eyes, I will now have 7/16″ pins and eyes at the mast and stem on new 1/4″ wire.
Assembling the stay was fairly straightforward. I installed the eye fitting on one end of the wire after reading the instructions several times, plus consulting other on-line resources.
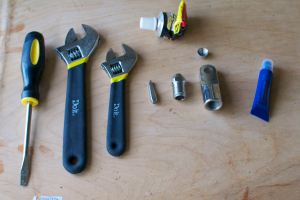 |
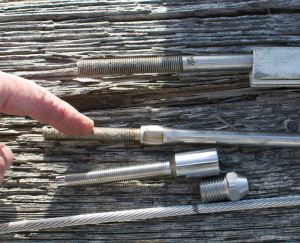
Tools and materials needed for installing Sta-Lock eye. Pretty simple stuff.
|
 |
Push male threaded body onto wire, then unlay the outer strands of the wire.
|
I’m realizing now that I didn’t take enough photos. . . that’s the danger of being a reporter/blogger and project doer at the same time – I get too involved in the project to take the correct kind of photos to complete the sequence. The next photo should have been of the wire loosely unlayed around the cone. Unlaying the wire isn’t easy. It’s stiff and stubborn, and you don’t want to completely bend it all out of whack – you will have to relay the wire around a small conical fitting that slides over the core of the wire, so it’s best to keeps the general direction of the lay of the outer layer.
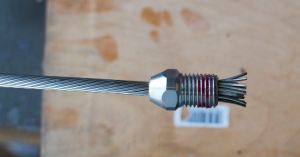 |
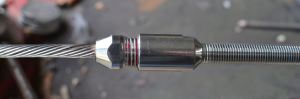
Here you can see the re-layed wire around the cone and the fitting slide up towards the end of the wire.
|
There is a slot in the cone that allows it to compress as the body of the fitting is screwed on. It must remain clear of the outer strands – that is, a strand shouldn’t lay right into the slot, because that will keep the slot from compressing closed.
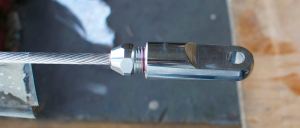 |
The body has been filled with sealant (Boatlife polysulfide caulk), and the threads of the body are treated with Lock-tight to prevent galling and secure the fitting against working loose.
|
After I had the eye installed, I could measure against the two old forestays I had, so as to cut to proper length.
 |
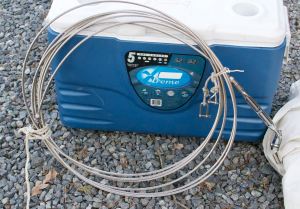
All three nailed to the covering board on the seawall bulkhead. The wires are then straightened and stretched to length, and I marked the new wire.
|
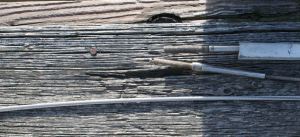 |
There was an inch discrepancy between the two old forestays. I split the difference with the new one.
|
 |
Carefully comparing lengths and judging how much wire will be inside the body of the fitting.
|
 |
Assembly of the turnbuckle stud-end of the wire.
|
 |
Finished wire, ready to install on rig.
|
Altogether, this took about two hours, because I didn’t know what I was doing. Had I to do many more, I would have gotten a lot quicker. I am also confident in the strength of the fitting. The design is such that is impossible to pull the wire out of the fitting. It just can’t happen. I think the most difficult part is unlaying, and re-laying the wire to properly form around the cone. But it’s not hard, just a bit fiddly.
And then there was a follow-up post, where Rick's attention to detail caught a subtle problem. This may be
the most important part of this post - taking the time and attention to say, "Hmmm... something doesn't seem quite right." This is where the person in a hurry would have produced a disaster down the line. But not Rick:
I was dissatisfied with the second fitting I installed. For a reason I couldn’t understand, the stud end of the fitting wouldn’t accept as many threads as the eye fitting had. Here are photos to illustrate:
|
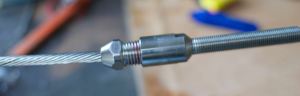
Here’s the eye fitting. Only three threads showing after assembled.
|
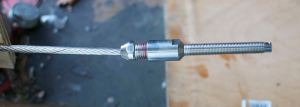 |
Here’s the stud end. 5-6 threads showing. That means only 3-4 were captured. I was uncomfortable with that, especially since the other one assembled so smoothly.
|
I took the fitting apart and reformed the uneven threads around the cone. Reassembly was not really any better. I took it apart again and looked into the other end. There is a “former” that inserts into the female side of the fitting. That former was skewed to one side, which prevented the end of the cone-shaped wire side to seat evenly and snugly. After a few more minutes of prying the former around with a tiny screw driver, I captured the stud into the vice (with wood blocks to keep from damaging the stud threads), and gently tapped the high side of the former with a mallet/screw driver. It unjammed immediately, and I was able to seat symmetrically into the bottom of the female side. Here’s a photo of the former from StaLoc’s website:
 |
You can’t see it in this photo, but there is a hole in the middle of the bottom of the cup, which is where the core of the wire lands.
|
This shape fits perfectly into the bottom of the female-threaded side of the fitting, and “forms” the wire around the end of the cone insert. Once I had the former seated, the fitting went together perfectly.
 |
Here it is, replete with sealant squeezing out the top, and red Locktite on the threads. Note that there are only 3-4 threads showing between halves of the fitting.
|


No comments:
Post a Comment