Tuesday, August 16, 2011

Better living thru chemistry

While Jane was Back Home Again In Indiana, I decided to tackle a pretty disgusting task: cleaning out the shower pan in the aft head.

After living aboard all these years, I am embarrassed to admit that all I have ever done was to clean off the hair catcher. And slowly but surely the pan got dirtier and dirtier. Despite bleach dousings, a layer of hair, bacteria, and what Joe of s/v Tropic Star once termed "human chutney", all in a matrix of soap scum had built up in there

I attacked it first with a scraper, then with a variety of products designed to remove soap scum. Without much luck. Finally I settled in with wet/ dry sand paper - but even that didn't work well - the gummy deposit slowly rolled up in little balls.

While frustratedly sipping a beer, it came to me: work on the other end of the molecule! Soap scum is the insoluble calcium and magnesium salts of long chain organic acids. All of those water-based household products work on the tiny acid/salt end of the molecule, and further require a chemical reaction with it to work effectively. I wetted a rag with mineral spirits and simply wiped the scum off! The mineral spirits dissolved the scum by dissolving the long organic end of the scum. Really, it just wiped off.

With a clean surface, a coat of Brightsides urethane enamel spread cleanly without fisheyes, and really spiffed it up.


This post originally appeared on Windborne in Puget Sound.

Thursday, August 11, 2011

Who is that masked man?

Please welcome new contributor Bob of m/v Brave Spirit!  Bob is a wood worker.  One of the things I have noticed about wood workers is that they seldom like to build one-offs.  It seems that the first step in many wood working projects is the construction of templates and jigs - so you can do it again.  In fact, wood workers are tool makers - a high profession.

So how does that tie in here?  Well, Bob had stripped the teak caprails on Brave Spirit down to bare wood, and was faced with masking off 34 stanchion bases, first for polysulphide sealant, and then for varnish.  But unlike you and I, Bob set about this the way a wood worker would.

He made templates for cutting the masking tape.  First he cut holes in a sheet of 3/16" Plexiglas that were slightly larger than the stanchion bases.  And then in a second sheet of Plexiglas, he cut holes of a size to accommodate the stanchion pipes. 

It works like this:  stretch a couple or three pieces of masking tape over one of the large holes.  Using a sharp knife, cut out the masking tape circle against the edge of the Plexiglas.  Now, what you have still on the Plexiglas is a perfect form for masking off the caprail for application of the polysulphide.  The masking tape circle that you cut out?  Well, that gets centered over one of the small holes and gets its center cut out, making a donut perfectly suitable for masking off the stanchion base itself.  Like this (only in this picture, Bob has already applied the polysulphide and pulled the tape off the caprail):

But there's more.  Bob bought some cheap plastic scrapers and re-contoured them to make the polysulphide fillets clean, even, and identical:


Now that's what I mean when I say that wood workers are tool makers!

Tuesday, August 9, 2011

Knee-deep in *what*?

It's not a pleasant task - Jane is reluctant to do it. It's not that you have to actually come into contact with the stuff... but still.  On Eolian, our holding tank is polypropylene - it is translucent.  We can check the level by shining a flashlight thru a corner of the tank, revealing, well let's not talk about it. s/v Letitgo has addressed this issue head on (oops...) with a nice solution that I am going to propose to Jane for Eolian:
Do you sometimes feel overworked?  This is how it feels in our household lately, especially when this Sunday we decided to get going and give it a good push on two projects.

Did you say messy boat! It got to the point that when we had one of our neighbour come and say hello we couldn’t sit anywhere.
On my side, I tackled the holding tank monitor: One tank was clean and empty, the other one was not.  I made my usual assumption that two hours should be sufficient!  But as usual that was wrong!  For it took closer to four hours before I was entirely done…

The first hurdle is that you need to find 12volt nearby, then a spot to put the screen itself and then easy part - the install.

To top it all up, in the middle of all this we made a run for the pump out and cleaned the second holding tank.  We can now say we are all pretty and shinny inside and out.  Yet, another system we have learned to know well.

Once calibrated and tested we reassembled the starboard side and are happy to report no leak, even the vent line is working as planned. I have included these two pictures for future reference, and to show how beautiful 2 clean holding tanks look like. We have to have something to show for all that hard work.


Now we just need to receive the red magic plug and we will be firing on all “cylinders”.
There are several types of these units out there on the market (don't neglect to check out the RV versions, if you're doing the research).  This one is the Practical Sailor pick, according to s/v Letitgo.

Friday, August 5, 2011

Captain hook

I have tagged this with the 'carpentry' tag, but given the quality of the other projects with this tag, it hardly qualifies.  Nevertheless, it did involve wood working.  Wood butchery, actually.

If you follow our sister blog, you might recall that a year ago we broke our boathook in an attempt to moor at Flagler State Park on Marrowstone Island.

Yes, I know that an entire year has elapsed.  I have no (believable) excuse for the delay.  So I am not going to try to make one.  I am a slacker.

The end of the mahogany pole had been formed to fit the inside of the old bronze casting (the actual hook).  However it was soft (Huh.  Maybe that's part of the reason it broke...), and didn't really fit the inside of the new casting, so I cut it off and got a fresh start on sound wood.

Shaping the end to fit the inside of the casting was not complicated, and no fancy tools were used - I did this on the dock using a wood chisel.  It took a while and raised some blisters on my fingers, but in the end I got a nice snug fit.  People have a tendency to presume that power tools are required for this kind of thing.  Not so - remember all the wonderful wood work that was done before real power tools were invented.  But I freely admit that having some kind of giant pencil sharpener would have been a great boon to my fingers, and to the clock.

The casting is retained on the wood pole by means of a single screw, inserted into the side of the casting.  In order to make the attachment a little stronger, when I drilled the pilot hole into the wood for the screw, I allowed the drill bit to pass part way into the bronze (but not thru it) on the far side of the countersunk hole.  Then I chose a screw long enough to pass thru the wood and engage that hole on the far side of the casting.  In this way, the screw is supported on both ends against a pull on the casting.

Since there was rot on the old end, I decided to seal this one off tightly using epoxy.  I mixed up some and applied it to not only the wood end, but I also pushed some into the screw pilot hole.  I didn't want this to be an entry point for water, and thus a starting point for rot.

In the picture, you see things just after assembly with the uncured epoxy;  the tape is there to keep epoxy off of the outside of the casting.  A fresh coat of Interlux Brightsides white completed the job.

Now that I have a boat hook again, I will finally have the means to try out the Happy Hooker!

Wednesday, August 3, 2011

Hatch: finished.

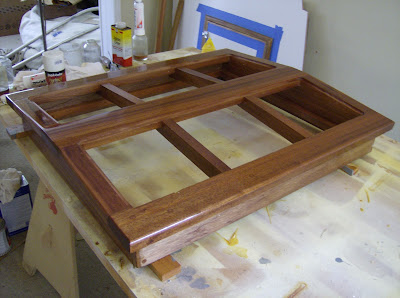
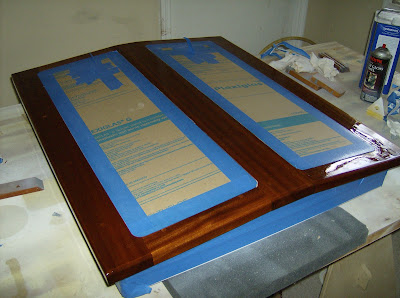
Mike of s/v Chalice gives us a guided pictorial tour of the beautiful new hatch he built from scratch:
Finished aft hatch. A lot of work but it's done.
From Update 3-15-2011


Painting and varnishing.

From Update 3-15-2011


From Update 3-15-2011


From Update 3-15-2011


From Update 3-15-2011


From Update 3-15-2011


Installed. Ignore the dirty deck. Still to be delt with.

From Update 3-15-2011

Monday, August 1, 2011

Teak Cockpit Floor for $145

Drew over at Sail Delmarva has been working on his PDQ 32 again. Here he shows us how to make a teak cockpit floor for $145 and an hour or so of your life...
Perhaps just over an hour at the boat and an hour at home. I'll explain.

Shoal Survivor came with Dri-Deck in the cockpit; certainly durable as hell, functional... and ugly. More than that, we found it exceptionally painful on bare feet and when kneeling to do anything engine related (lock down, pump primer, check the oil) or locker related. I saw the snap-together tiles installed in a Gemini and thought "that's just plain obvious." He had used tiles from IKEA, but I opted for teak from a different source. Much the same, but perhaps the teak will last longer.

So, instead of doing real carpentry, I cheated by using these.

There is still plenty of carpentry to do; of the 17 tiles required, only 4 in the center require no trimming. All of the edges need to be trimmed at a 45 degree angle to allow for the radius of the floor mold. All of the corners are radiused with a hand grinder to match the corners. Of course, it doesn't fork out evenly, so the last column and row must be trimmed. With all of this trimming, a few screws will be cut off and some additional screws added. Nothing difficult. Do avoid working in real cold or real heat and sun; the plastic underlayment works most easily at moderate temperatures. Too cold, it is brittle, too hot it is softer and may warp.

The screws are steel and must be replaced; and hour of pre-work with a rechargable drill. 400 - 1/2-inch #6 brass screws are required. Give that the cockpit is well protected we expect minimal maintenance, but we'll add some fresh pictures to this post in a year or so.

But we love the result. It seems cooler, because we can go barefoot and because it is cooler than FRP. It still drains and we can still lift it for cleaning. And it looks yachty as well, a nice deception.
Related Posts Plugin for WordPress, Blogger...