
A couple of years ago we added some shelves to C'est la Vie's main cabin - photos from shelf project. During the installation, I had visions of adding a wooden bar across the front of the shelves to keep the contents from evacuating during rough conditions. Since the installation the bars have never materialized and fortunately we have met with only a couple of evacuations. Dings on the cabin sole from large dry boxes flying off the starboard top shelf serve as evidence of the danger of flying dry boxes.
The solution came to me while sewing straps for the foredeck awning. The most time consuming aspect of the solution was running to town for the supplies...
Rather than the wooden bars envisioned, we can use webbing. We will be giving up that traditional nautical look, but the creation & installation is much less time consuming and the straps can be easily stored out of sight when not underway.
I sewed the buckles to the webbing to create a more clean look.
On the opposite ends I used a slider buckle rather than sewing. The slider buckles will allow the straps to be easily removed for cleaning or aesthetics. Next step was to install the stainless steel footman's loop (does anyone out there know the origins of the name?).
A bit of measuring and a visit to the hot knife completed the installation....
now back to loading the boat and closing down the basecamp.
Friday, December 31, 2010
Soft sea rails
Here's an innovative solution for keeping things from flying around down below in a seaway. Jeff from s/v C'est la Vie shows us a new way to address the problem:


Wednesday, December 29, 2010
Little bumpers
 You've seen these little stick-on bumpers, haven't you? If not these, then surely something similar. They are like duct tape - they have 100's of uses, especially on a boat.
 |
| stop doors from rattling |
Here are some ways I've used them:
 |
| to protect woodwork (the bumper's down there in the lower right) |
 |
| as a cushion between the head lid and the wall |
Monday, December 27, 2010
Something is happening in the solar cell world
Quick - what is the cost/watt for solar panels?
Most of you would have answered with a number between $7/watt and $10/watt. And although the cost has been falling over the years, it has been falling slowly.
What would you say if I told you it was now possible to buy solar panels for about $2/watt? You can, even with free shipping, if you do some judicious eBay shopping.
And if you consider yourself to be a handy person, here's a killowatt of solar cells which only need to be corralled up into panels, for only $0.35/watt. Let me say that again: $0.35/watt! (Well, no. You can't have that one, 'cause I bought it. But there are more...)
It is getting easier and easier to justify solar power...
Friday, December 24, 2010
Joyous Christmas!

From the crew of Eolian to you and yours,
Joyous Christmas!
(And let's all pray for peace on Earth)
Wednesday, December 22, 2010
What's in the lowest part of the bilge?
What's in the lowest, most inaccessible part of your bilge? Your bilge pump and switch, of course. On December 13, Jeff from s/v C'est la Vie penned this description of his journey into the nether regions of his boat.
While awaiting out the frontal passage we tackled projects… laundry, cleaning the bilge, servicing the lower bilge pump switch, and replacing a section of exhaust hose.At least we are prepared for it here up north...
Issues with lower bilge pump switch first appeared during our Wilmington to Abacos crossing. Due to a build up of bilge sludge the switch would not turn off once it was activated. This resulted in some long run times for the pump. Our shallow draft, full keel hull design makes it very difficult to access the lowest section of the bilge. Wisely the last owner installed an excellent pump switch -the ultimate bilge switch - and located the filter and pump remotely. This set up is ideal for servicing the pump and the filter, both located in the starboard cockpit locker. During the six years we have owned C’est la Vie this is the second time I have pulled the lower bilge switch for cleaning. The previous cleaning was done in conjunction with replacing the shaft so there were fewer obstacles in the way (i.e. the exhaust system, water lift muffler, and shaft were all out of the way.)
I went into the project with some idea of the difficulties of reaching the switch. Accessing the switch required removing a number of cooling hoses, the air filter, and the diesel fuel return line. With these obstacles gone and after much squirming, cursing, pleading, and bruising of my upper torso; I was finally able to remove the switch. Expecting to find a hearty coating of oily muck, even I was astounded at the degree of gunk built up on the switch.
Based on the contents of the switch I became determined to dredge out the lowest reaches of our bilge. Anne assisted me in creating a scoop out of a measuring cup and bamboo skewers. The very same bamboo skewers that worked so well to clean out the tubes of our heat exchanger in summer 2008. A hour of effort resulted in the collection of one handle of a screw driver the metal portion long ago succumb to rust, one wooden scoop, one zip tie, numerous washers, the stainless screen off our scrum box, and nearly a quart of oily muck.
Did we mention it is cold here in Miami? Low temps in the 30’s with wind chill readings in the 20’s… in Miami? Cannot imagine what the rest of the country must be experiencing.


Monday, December 20, 2010
Recapturing space

It's a good space - it is deep - deep enough to store rolled up charts (and various tubes of caulk, it turns out). But the Previous Owner did not complete the work. He left the opening as a roughly rectangular raw cutout in the fiberglass. Aside from the appearance issues, the raw edges were tough on your hands or arms if they contacted them, and there was nothing to keep the contents in the space!
So I cleaned up the edges of the hole and enlarged it a little, and then fitted a pre-fabricated teak door and frame into the opening. After varnishing, it looks to be an integral part of the boat. I installed the door with the hinges at the bottom - that way, the door does not interfere with access to the space when it is open.
(By the way, you're looking at the only section of flooring on the boat which has not yet been refinished)
Friday, December 17, 2010
Better than factory
Please welcome a new contributor, Paul from s/v Solace. Paul was dissatisfied with the original packing gland on the rudder shaft on Solace, and so he engineered an upgrade using modern materials:
Nice work Paul!
The packing gland on the rudder shaft of my Hylas 44 never did prevent water from coming into the boat; with rate of about a drop every 10 seconds, I wanted something drier; like no water ingress.
First I removed the rudder quadrant to access the packing gland flange and cleaned up both the removable flange, (top left in photo below) and the area to be resealed (left).
I obtained a double lipped seal with stainless steel spring for my shaft which was 2.25 inches. Measuring the flange which used to press down on the packing gland, (and now inverting that flange) the sleeve measured three inches. So a seal of 2.25 ID and 3.00 OD would do it. Then I obtained a reinforced hose of 3.00 ID. I used a silicone hose but you could use a good quality rubber hose.
Next, some hose clips and gasket maker and lithium grease. I used a silicone RTV type gasket maker for motor vehicles.
Having removed the packing gland material, I started to assemble my new shaft seal. I only had about 2.75 inches of shaft to work with placing the seal on and the up turned packing gland flange took most of that.
I applied grease down the shaft where the packing gland use to sit and gasket maker to the surface of the flange where the upturned packing gland flange will bolt to.
Grease down shaft &
gasket maker applied
Slid the flange over the shaft and mated the surfaces and secured with the four bolts.
As the bolts tightened the RTV squeesed out and I left this for 24 hours to set.
After the RTV had set, the hose was placed over the flange and I applied grease to the seal and inside the hose, pushing the grease as far down as I could get it. Then I cleaned out the surface area to where the seal would sit. This is going to have some of your favorite sealant applied here for the seal. Without the sealant, the seal will tend to slip out of the hose when pressure is applied to the hose clamp.The lower hose clamp was applied and I used my RTV sealant to the OD side of the seal and the ID of the hose. I slipped in the seal to the hose and applied the hose clamp loosely and left for 24 hrs to set before tightening a little bit more.
Grease applied before seal
Finally, everything was reassembled and the boat placed back in the water. I now have a very dry rudder shaft. Now, if I can just get rid of the rain water that comes down the mast.
Costs; $30 for the seal; $18 for the hose; grease and gasket maker $20. Hose clips I had already.
Paul
Finished product
s/v Solace


Nice work Paul!
Wednesday, December 15, 2010
Lethal spices?
Livia onboard s/v Estrellita 5.10b is trying to keep her spices from killing her:
Sadly, I have found that the Velcro is always stronger than the adhesive, so that eventually the velcro tabs pull off. We need stronger adhesive or weaker Velcro, I think.
Just to show you the kind of inane details I'm working on right now, I thought I would share this:
We wanted to keep our spices above the stove where we could see them and thus, use them. In the event of a major shake down of the boat (like tilting over so much that our mast smacks the water), we thought it was a bad idea to have glass missiles bottles flying everywhere. We considered a retaining line or cloth and, although those would work, ultimately decided to change over to plastic shaker bottles.
Something you can find easily at a container, dollar or kitchen store, right? Of course not. At least not in Victoria.
After wasting too much time visiting stores refusing to admit that I couldn't find them locally, I ended up ordering a bunch online. Then we busted out the label maker and voila, non-deadly spices. Just in time to house the collection of yummy spices we bought in Bahrain. Sometime, over beers, I should tell you the story of what it is like to carry a very large bag of fragrant powder in your carry-on bag from Bahrain, through Kuwait, into Washington DC and Seattle and then across the border into Canada.
I have some velcro that I was going to put on the bottom of the jars to keep them from sliding around but I haven't figured that out yet. Another thing you think would be simple, right?

Sadly, I have found that the Velcro is always stronger than the adhesive, so that eventually the velcro tabs pull off. We need stronger adhesive or weaker Velcro, I think.
Monday, December 13, 2010
Not quite a nuclear power plant, but...

I have found it useful to have a conceptual diagram of Eolian's fuel system, laminated and posted near the valving. Along with labeling the valves, the diagram helps to keep me from (but, sadly, does not prevent) making a valving error.
Friday, December 10, 2010
Accessing the Swim Ladder
Please welcome new contributor Joe, from s/v Assignment. Joe shows us how to improve access to the stern of a Catalina 25 from the water. It's a perfect small boat project!
When boarding after a swim on older Catalina 25s, you have to climb all the way up to the stern coaming, then swing your leg up and over the fixed rail. A little awkward, especially for geezer sailors.(Speaking as a geezer sailor, I'd appreciate this.)
A fix involves a hacksaw to remove the center portion of the rail and two 90-degree elbows. Then a short piece of lifeline with a pelican hook on one end and two fittings for the upright stanchions.
A discovery: Sawing through 1-in.-dia. stainless tubing isn't fun. That's when the trusty Dremel and its cutoff wheel comes in handy.
By the way, the pagoda-shaped solar lawn/walkway light has been mounted to the kickerpad for a couple of seasons now. It won't throw off enough lumens to qualify as a proper stern light nor anchor light, but it gives a little peace of mind when s/v Assignment is in its mooring field.


Wednesday, December 8, 2010
Caveat emptor
Everybody knows that application of label "Marine" to something seems to mean that you can double the price. Now, there are items for which a higher price is appropriate. An example: a marine alternator - a specially manufactured version of an automotive alternator, made in limited quantities (by automotive standards anyway) to be able to safely run in an enclosed engine compartment which could contain gasoline vapors. But how much more is justified?
Bob, over at Boat Bits has been decrying the cost of self-steering gear (we're all anxiously waiting to see your design, Bob).
And now Mike from Zero to Cruising brings us a couple of real-world examples where ingenuity trumps chandlery prices:
 This "rail lite" was offered for $29.95. Obviously this is nothing more than a typical "solar patio light" with the bottom spike replaced by a cap, and with a cheap plastic clamp.
 Harbor Freight sells this set of 10 nearly identical copper-colored stainless lights for $34.99. Buy the set, take off the bottom spikes and find your own cheap plastic clamp, or just use zip ties. And then give 9 of them away to your friends at your anchorage.
The bottom line is, that while some marine-oriented items are justifiably priced higher than their non-marine equivalents, many manufacturers seem to take advantage of this and mark up everything with a marine label. Or even apply a marine label solely so that they can mark up the price. They get to do this, of course. Our response should be caveat emptor - the challenge to all of us is to apply critical thinking and ingenuity to avoid being taken in by the marketing.
Bob, over at Boat Bits has been decrying the cost of self-steering gear (we're all anxiously waiting to see your design, Bob).
And now Mike from Zero to Cruising brings us a couple of real-world examples where ingenuity trumps chandlery prices:
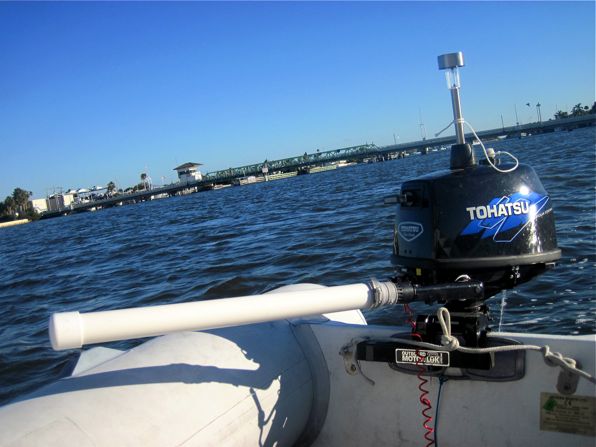
While shopping online and at the usual chain-store chandlery, we found:Mike's example of the dinghy running light brought to mind something I saw in a flyer I received recently from a large, nation-wide marine chandlery...
* Tiller extension: $15.00 to $60.00!
* Portable stern light: $35.00 to $40.00!
* Our tiller extension: $5.00 (piece of schedule 40 PVC, end cap and rubber connector with clamp)
* Our portable stern light: $5.00 (solar patio light, rubber stopper thing, sticky-back velcro)
 This "rail lite" was offered for $29.95. Obviously this is nothing more than a typical "solar patio light" with the bottom spike replaced by a cap, and with a cheap plastic clamp. Harbor Freight sells this set of 10 nearly identical copper-colored stainless lights for $34.99. Buy the set, take off the bottom spikes and find your own cheap plastic clamp, or just use zip ties. And then give 9 of them away to your friends at your anchorage.
The bottom line is, that while some marine-oriented items are justifiably priced higher than their non-marine equivalents, many manufacturers seem to take advantage of this and mark up everything with a marine label. Or even apply a marine label solely so that they can mark up the price. They get to do this, of course. Our response should be caveat emptor - the challenge to all of us is to apply critical thinking and ingenuity to avoid being taken in by the marketing.
Friday, December 3, 2010
Through hull removal
For today's post we go to Erick, whose boat s/v Windsong is on the hard for an extensive refit. Erick shows us an easy way to remove an old corroded thru hull.
One of the things I knew about Windsong when I first saw her was that all of the seacocks needed to be replaced ASAP. They are very old-school style Groco seacocks and all have corroded to the point where they are inoperable. What does that mean? If a hose were to leak, I would not have had a way to shut off the thru-hull and the boat would probably sink unless the hose or seacock was plugged.This is certainly easier than the process I used in 2008 when we replaced 3 of Eolian's thru hulls. Thanks for the tip Erick!
Seacocks are meant to be the #1 insurance on the boat against sinking, and I didn’t have that insurance for the entire time I owned the boat in the water. Since I started the bottom job I have been contemplating how the heck to get the seacocks and thru-hulls off the boat. They were so corroded that unscrewing the thru-hull from the seacock was impossible. I spent many months contemplating my approach and did as much research I could on the subject. Unfortunately there aren’t many articles written on how to get this job done on old, corroded equipment. There are plenty of articles on how to take apart modern seacocks, but non on how to tear apart old ones with no hope of reuse.
I did, however, find a few blogs and forum posts from people who just cut the thru-hulls up with a Dremel or some other tool to help remove them. But with my limited experience in doing things like this, I really needed a step by step instruction on how the heck to do that. After some creative thinking and experimentation, I finally figured out how to do it and here I will show my process.
Here are the seacocks in the head with hoses removed. One is the sink drain, another is for the head itself, the other was unused with no plumbing coming from it.
Here are the thru-hulls attached to these seacocks
Each seacock has two bolts that go through the hull that needed to be removed. My dad and I began this job back in May by removing the hoses to the seacocks and the bolts that go through the hull. Once we reached that point, we were stumped as to how to remove the thru-hull from the seacock. So after my research I took a stab at cutting the thru-hulls to remove the mushroom head so I could just pull the seacocks out from the inside.
I removed the three thru-hulls from the head seacocks before I got down there with the camera, so the sequence below shows the thru-hull from the galley sink. As you can see, the two bolts are still attached so I wasn’t able to actually remove that seacock until I get a second hand, but the process is still shown.
First, using a cut-off wheel on my Dremel tool, I made a series of cuts to create some pie wedges. For the bigger thru-hull in the head, I needed to make a few more slices.
In my research I learned that bronze is a pretty soft metal, so cutting and bending is quite easy. In this next step, I hammered a scraper/chisel under one of the slices and pulled down to bend the slice outwards a little bit, enough to fit the back of a hammer under the slice.
With the hammer under it, pry the piece right off. The pieces pried off surprisingly easy.
Repeat the process for each slice until all you have left is a the clean shaft of the thru-hull in the hole.
At this point I went inside and removed the seacock by just pulling it out. One seacock just fell off after cutting the mushroom, one needed to be pried off with the back of the hammer, and the other just needed some muscle to pull out. Here is the head area with all removed:
Outside:
Inside (thats a flashlight in the middle):
Old seacocks. You can see how corroded they are, no hope for the valves to turn. They are not the newer style Groco seacock with a locking nut on the base.
After figuring out this process, removing these things is a piece of cake. I’ll need some help to get the remaining seacocks unbolted, but I am no longer worrying about the process when comes time to start fairing and repairing the bottom.
I’ll be using these articles as reference to install new thru-hulls and seacocks (links):
Seacock and Thru-Hull Primer
Replacing Thru-Hulls and Seacocks
Seacock Backing Plates


Wednesday, December 1, 2010
Taking the strain off the gooseneck

Now this is not a big project, but it is one that should pay some big dividends.
Some years back, the gooseneck on Eolian's mizzen boom broke while we were under sail in a blow (things never break in light conditions, only when they are heavily loaded). Although the root cause of the failure was corrosion, the corrosion was in a crevice which probably was the result of fatigue or overloading.
Take a look at the sheeting arrangement on that boom. See how the downward pull of the sheet is carried by the gooseneck?
Simply relocating the turning block to hang from the shackle (holding the coiled line in the photo) takes the strain off of the swivel.
Pretty simple, eh?
Monday, November 29, 2010
Trapping the cold
Warm air rises, right? And, well, cold air sinks.
Does your refrigerator or icebox have a drain? If so, what is keeping the drain from draining away the cold air?
You need a trap. And as a shipwright I know frequently reminds me, drainage holes on a boat should always be sized "to pass a soggy Cheeto." Here is my answer, made up of plumbing fittings and plastic hose.
 |
| Bigger than a soggy Cheeto |
Wednesday, November 24, 2010
Giving thanks
The fourth Thursday in November is set aside in the US as a day of Thanksgiving. Those of us who live on boats have a lot to be thankful for.
We will be spending the next few days with our whole family, so brief post today.
From the crew of Eolian to yours: Happy Thanksgiving!
We will be spending the next few days with our whole family, so brief post today.
From the crew of Eolian to yours: Happy Thanksgiving!
Monday, November 22, 2010
Into the modern world

You've probably seen these on packaging or elsewhere - it is a 2-D barcode. Because it is two-dimensional, it can encode far more information than the one-dimensional kind (like the UPC codes you see on virtually everything now).
In the modern world, there are apps for your smart phone that can interpret these symbols using the phone's camera. If you have one, try it! This one encodes a URL for a website.
If you are making boat cards, you might want to consider putting one of these symbols on the card somewhere (I put this one on the back of ours). By doing so, you eliminate the need for reading tiny type and remove the possibility of making a typo. You can find any number of online apps for generating the QR code of your choice - just Google "generate qr code".
Saturday, November 20, 2010
Leave something behind
Business folks do it, because it works. When they meet someone, one of the first things they do is exchange business cards. Because th card helps jog the memory, and because it contains all the important contact info.
Why not boaters too? Many do, including us. Avery makes some very nice pre-perfed business card stock that will go thru your printer, and with the right template in you word processor, you can print 10 at a time.

When I first started doing this years ago, I made all 10 on the sheet the same, like business cards. But then I thought, "Why?" Now, I make them all different - its more fun that way.
It's a great little inside project for a crummy weather day.
Wednesday, November 17, 2010
Don't leave home without it
Anyone who hacks on cars knows that a coat hanger is nearly the equivalent of duct tape - the things you can fix with a coat hanger are almost innumerable. You should have a few on your boat too.

Ah, but add this tool (featured on Craft a Craft), and the list grows even more, perhaps especially for boats. Because with this tool and an old coat hanger, you can make a hose clamp, custom-sized to the application.
Well, OK, you really should use the stainless wire that ClampTite sells - it *is* stainless, and it is specially selected to work with the tool. But in a pinch, you really could use a coat hanger.
Now there's another thing I need to have onboard Eolian.
He who dies with the most tools, wins.
Monday, November 15, 2010
Lilies to guard the liquor
As a part of the larger project to refurbish the starboard side of the saloon on Eolian, the revamp of the liquor cabinet doors qualifies as a "small" boat project.
Originally, the doors were made with the ubiquitous teak louvers, but I wanted something a little fancier. So for my first ever stained glass project, I decided to make something to fill the 5x7 inch opening in newly-made doors. I originally considered something using beveled glass (and I may yet go back and do it), but I settled instead on a *very* stylistic representation of Calla lilies. Each one only took 3 pieces of glass, none of which were fiddly or delicate.
 When I made them, I cut a 3/8" rabbit in the back of the doors, so it was easy to mount the glass panels by just bedding them in some polysulphide. To keep from having a tremendous mess with the polysulphide (this stuff seems to go everywhere as soon as you open the tube), I masked both the door frame and the edge of the glass before applying it. Then, after smoothing it but before it had begun to cure, I removed the tape.
I still wonder about the beveled glass tho...
Originally, the doors were made with the ubiquitous teak louvers, but I wanted something a little fancier. So for my first ever stained glass project, I decided to make something to fill the 5x7 inch opening in newly-made doors. I originally considered something using beveled glass (and I may yet go back and do it), but I settled instead on a *very* stylistic representation of Calla lilies. Each one only took 3 pieces of glass, none of which were fiddly or delicate.
 |
| Kind of looks like martini glasses too |
 When I made them, I cut a 3/8" rabbit in the back of the doors, so it was easy to mount the glass panels by just bedding them in some polysulphide. To keep from having a tremendous mess with the polysulphide (this stuff seems to go everywhere as soon as you open the tube), I masked both the door frame and the edge of the glass before applying it. Then, after smoothing it but before it had begun to cure, I removed the tape.
I still wonder about the beveled glass tho...
Friday, November 12, 2010
Uses for a baby bath?
Lotte over at Reiter's Bureau has found new uses onboard for something from an entirely different original application...
And there is a "side story" to this. Lotte says:
I have bought baby items. Not because there are babies in waiting, but because I have found the most ingenious baby bathtub, which I'm sure is going to become our friend. It's brilliant because it folds. And because it does not contain phthalates, PVC, Bisphenol-a (BPA) or other nasty stuff.Some the best things on boats are "re-purposed" from an entirely different field. This is another of those.

My plan for the purchase is that it can be used to collect water when it rains, and (and here is where "foldable" really stands out) to bring ashore when shopping for fruit and vegetables. Everything must be washed before it is allowed to come aboard. There are two really good reasons. One is that vegetables coming from the ground (potatoes, parsnips, carrots, sweet potatoes, kasava, ginger, etc.) will keep longer when they are clean of soil residues. The second compelling reason to rinse thoroughly (but gently) is that we can thereby minimize the risk of insect eggs, and especially cockroach eggs, aboard. Not to mention spiders, cockroaches and other unwelcome guests who already have hatched.
Flexi Bath is a Danish invention and the main target group has basically been parents living in apartments or other housing types where there is so little space that the storage of a traditional baby bath can be a challenge. I imagine that it is also practical to carry on trips, to the cottage and the beach. The bathtub has won numerous awards, including the Formland Prize last year, which is not surprising considering the craftsmanship and materials. You can watch a presentation video here and also read more about the product and the idea behind here .

I know that many have bought the Flexi Bath to use it as a plant container (the drainage hole in the bottom comes in handy in this case too) and my own use of it is indeed far from bathing babies too - now we are even considering if we need one more, so that we also have a bowl for fish, laundry or similar uses. For $39.99 (to find a store near you: http://www.easywalker.nl/usa/flexibath_dealers.asp?prov=&Submit=View) it's more or less just the matter of choosing the color that holds us back.


And there is a "side story" to this. Lotte says:
I recommended the flexibath to Boatmama: http://boatmama.blogspot.com/2010/05/eating-beets-and-bath-in-cockpit.html who of course uses the tub for what it was originally meant for. After this I wrote an email to the two guys who invented the tub, suggesting boat people as a target group for advertising (since this tub is absolutely brilliant for plenty of things on a boat) - and they got so pleased with this email, that they sent me another tub for free. So now we actually carry two tubs aboard Lunde, one for the "clean" jobs, and ond for the more "dirty" ones (fish and the like) - thanks to the blogosphere and the willingness to share ideas. - Which is also why I like your blog so much!*blushes*
Wednesday, November 10, 2010
Obsolete is still good

Why not mount them on the shop roof, and with one of those cheap grid-tie inverters now available, let them pay back part of the energy deficit of the kegerator?
Monday, November 8, 2010
Liquid antenna

If there is one thing cruising boats have plenty of, it is sea water. Everyone uses it as the ground or counterpoise in their antenna systems. But could you use it to make the antenna too? Sure!
Subscribe to:
Posts (Atom)


