
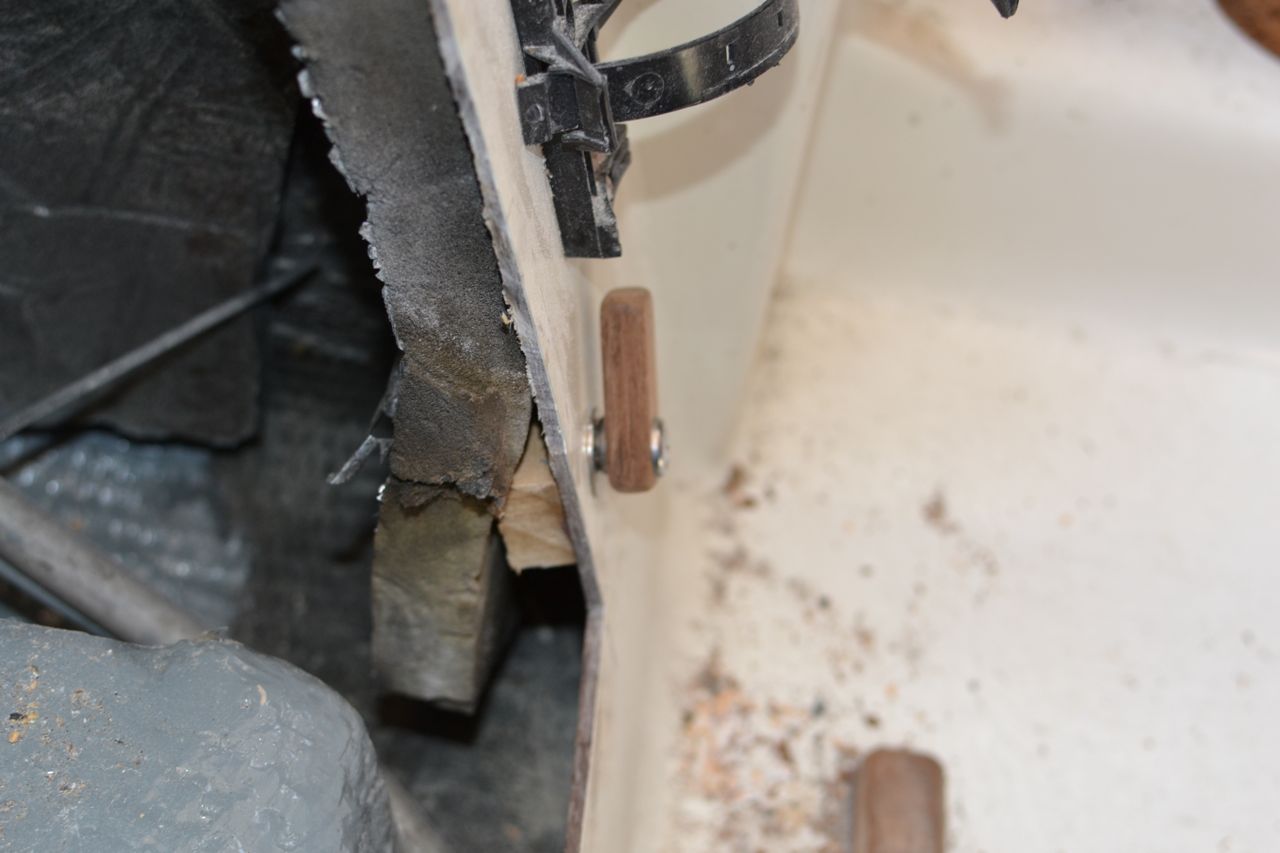
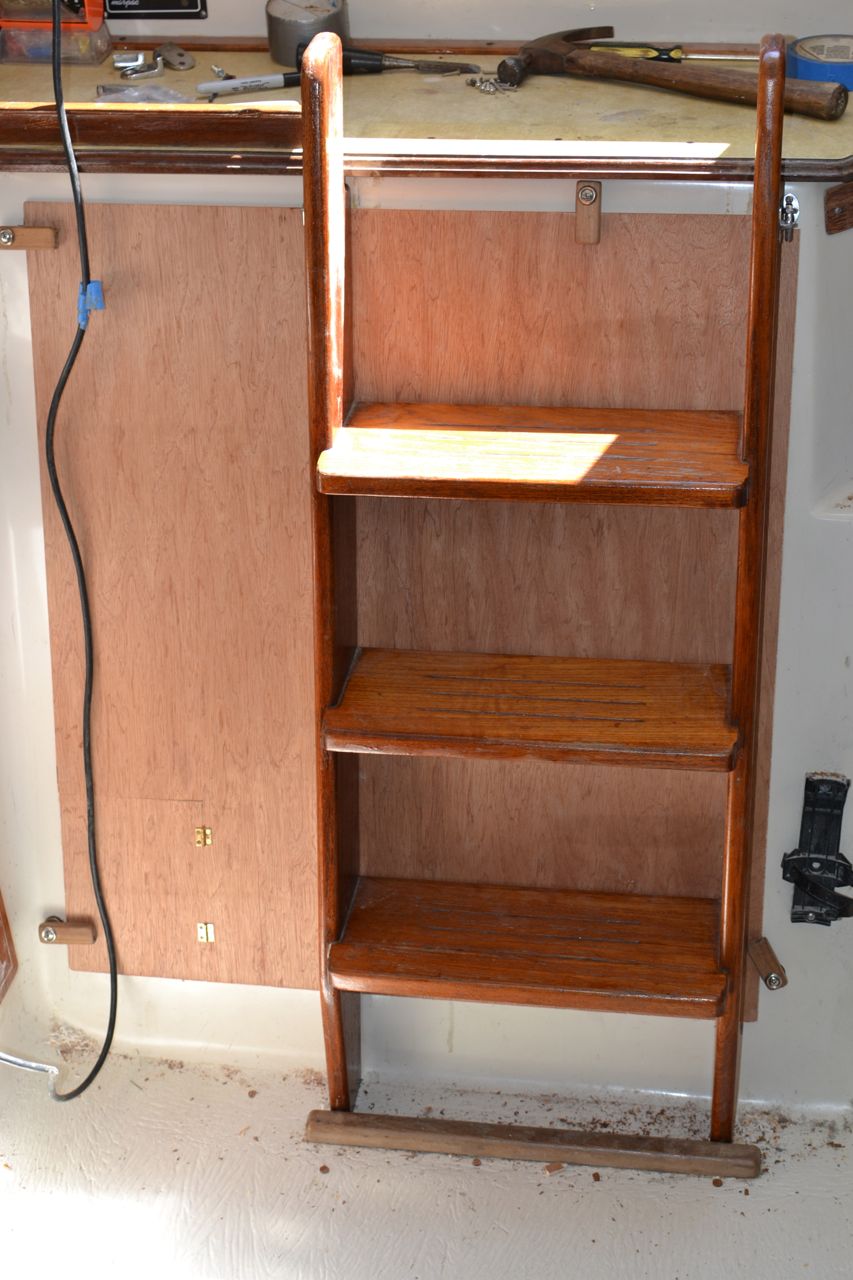
I had a lot of time for this project today, and finished the construction phase. Actually, with some time spent over the last several days, I managed to design and install the turn buttons, and locate and install the ladder hardware. Here is a photo – which doesn’t really do justice to the amount of time that went into the these two little accomplishments:
You will have to click and enlarge
in order to see the turn buttons
on the corners and the hooks
mounted just under the counter top.
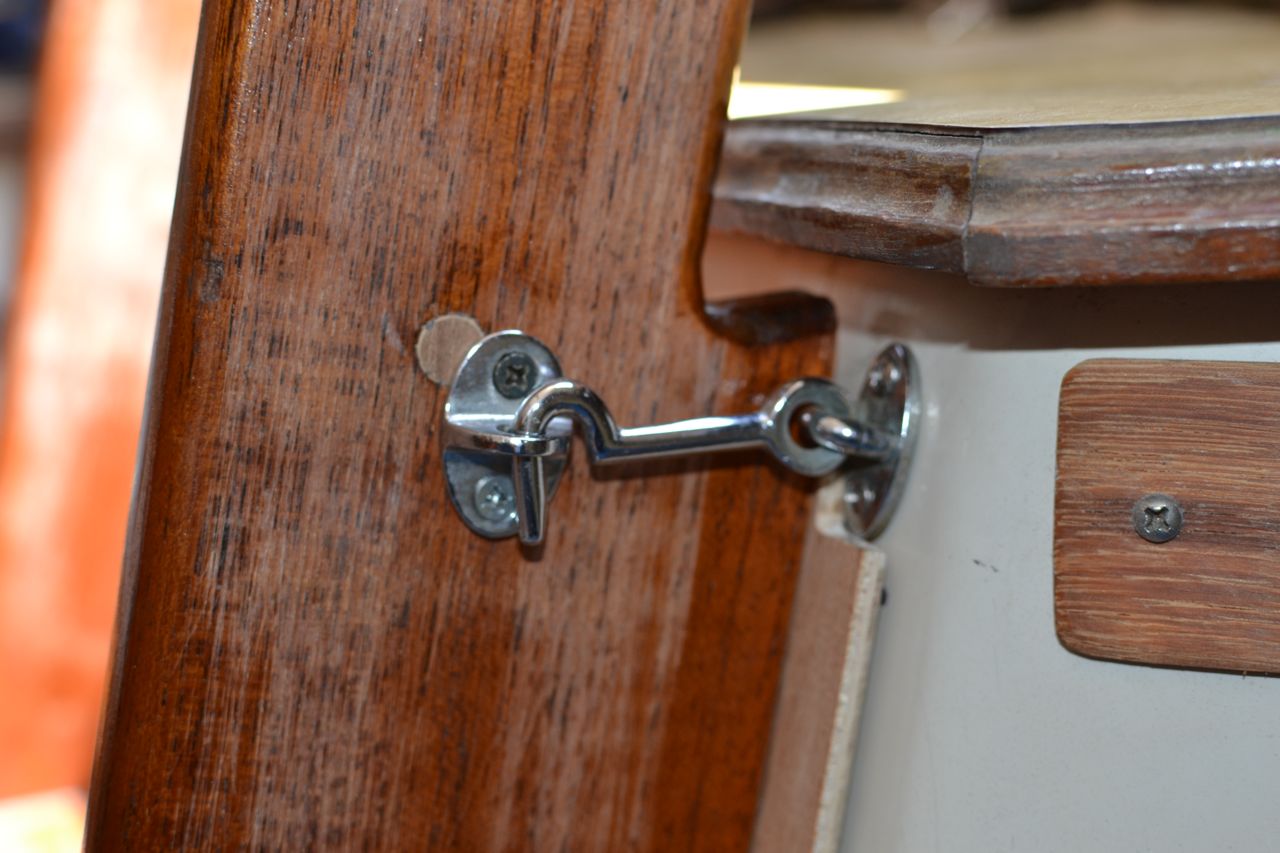
I ended up using some hook-and-eye hardware that my boat neighbor gave me as it was more heavy-duty and of “marine” grade. I mostly used it because of the heavier gauge material of its construction. The turn buttons were made of some teak decking scrap left over from another project. It took a bit of fiddling to get the spacers right between the facing surround and the turn buttons. Without the spacers, the buttons wouldn’t ride up onto the compartment cover.
Hook attached to a pad-eye.
Spacer between facing surround and turn button.
The next step was to install the eyes to secure the ladder, but first I had to fix the holes through which the clevis pins were passed in the old system. Here are a few photos of the holes being bunged and hardware installed.
There were four bungs like this because the plugs
weren’t long enough to fill the two holes front-to-back.
The bung is trimmed and sanded flush,
and the eye installed on the ladder.
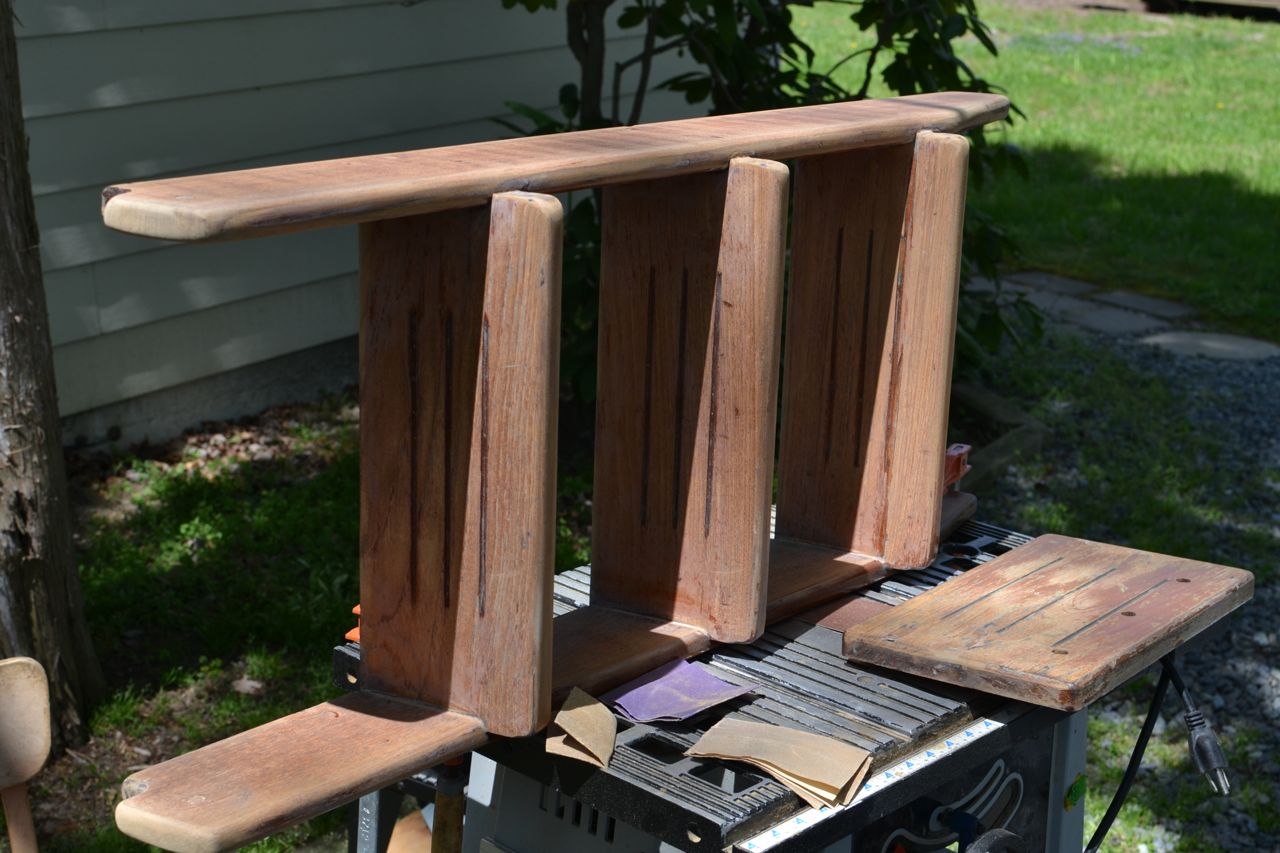
With the holes bunged and the hardware located on the ladder, it was time to refinish it. I sanded it all smooth and removed all the old varnish. I also trimmed the top of the ladder uprights even with the counter top. Having them extend above the level of the counter looked like a trip hazard to me.
Ladder trimmed and sanded smooth.
I trimmed about four inches off the top of each upright.
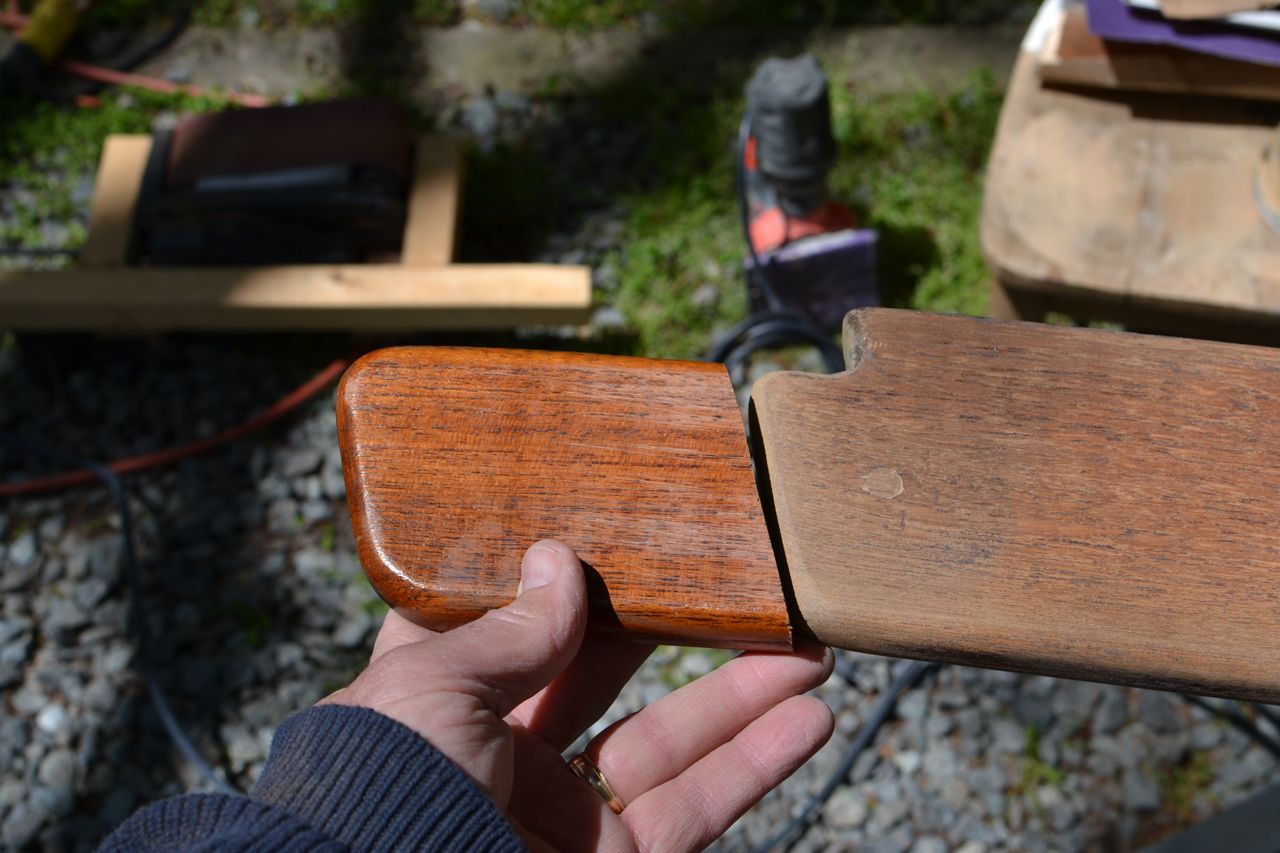
I also repaired the top step that was mounted on the counter top. The wood split out when I removed the old bungs. I repaired it with epoxy, bunged the old mounting holes, and sanded it smooth.
Bunged.
Repaired and bunged.
Clean and ready for varnish (sorry about the shadows).
Compartment cover and ladder in place.
This is before trimming the ladder tops.
I spent the rest of the afternoon sanding and varnishing with a sealer coat. I also sanded and sealed the teak trim around the counter top. It was in terrible shape and has bothered me for years. This is finally the right time to clean it up.
Thursday, June 27, 2013
New Engine Compartment Cover: Complete
Over on s/v Cay of Sea, Rick has finished constructing his new engine room cover. This is Part II of a two-part series - you can see Part I here.


Tuesday, June 25, 2013
Inflatable Rehabilitation
Unlike diamonds, inflatables are not forever. But with a little attention, they will last quite a while... Drew over at Sail Delmarva gives us some inflatable maintenance tips:
When I bought the boat I honestly did not expect the tender to survive more than a season or two. She was 10 years old and faded, and didn't hold air too well. It was just a matter of time. As it turns out, Hypalon is surprisingly durable stuff and 5 years later she's going strong... with some rehab.
This time it was a bit of peeled rub rail and a wear patch that was starting to go through. A bit of heavy wader patch material (2 layers this time) and some 3M 5200 and she's right as rain. The masking tape is simply the most practical clamping method, since the stuff cures slowly. Is there a faster cure cement? Sure, but I don't keep it handy since it cures in the tube, it seems, certainly if you open the tube. I have used 3M 5200 before for wear patches and gluing bits down. I wouldn't use it for patching a hole, but it does well for mechanical purposes. The rope scrap is in there just to apply clamping pressure to the edge.
(How is the tender supported in the air with the lifting tackle removed? The tricing lines, of course.)
Other repairs over the years?
What's next? I'll touch-up over these patches and perhaps re-paint in 2 years. I have a replacement seat I found that I need to pop in (same free source as the replacement floor).

- Replaced lifting spreader (plastic replaced by aluminum).
- Replaced floor. Fortunately for me, a demo with defective tubes (but new floor) was pitched, that only needed trimmed for length.
- Repairs to flow followed by replacement of floor.
- Lubing valves. A few drops of glycerine in the valves restores them to like-new performance for 6 months. Ever since I learned that trick she has held air just fine for a month at a time.
- Paint. I figured even if the paint didn't look that good, it would serve as sun screen. I'm more about function that appearance.
- A rub rail on the stern.
- Cut off the bow handle. It snagged when lifting.
- Added rod holders. Handy for numerous long items.
- Added fuel filter to outboard. I really do want it to last, as you can't buy 2-strokes any more and the 4-strokes are huge. Started using Biobor EB (top performing corrosion inhibitor).
Some day, a replacement will be in order. Will I go bigger, an RIB with enough motor to scoot? I don't think so. While that is without question the right answer in some locations and for some people, for the Chesapeake with her soft beaches, short runs, and flat harbors, I think I prefer light weight and super-shallow draft to something beefy. I might go 6 hp, up from 3.5 hp, but that's it. light is nice.


Thursday, June 20, 2013
Rebuilding the Butterfly Hatch
Erick continues his complete rebuild of s/v Windsong - a project that in no conceivable way could be considered a "small" boat project. But this portion of the project does, and it showcases the kind of work Erick is doing:
Downeasters come with a neat little butterfly hatch over the main cabin. The “doors” or flaps or whatever they are called have some glass in them to give the cabin some light. Unfortunately, my hatch leaked pretty badly as the sealant in the glass had faded away over time. Like everything else on Windsong, that means a rebuild is in order! This was no way near as painful of a rebuild as the companionway hatch. The most difficult part of this was separating the glass from the wood, as it was all held together by sealant/adhesive and I had to be very careful taking it apart to preserve the wood. The pictures and captions below can tell the story.
The hatch before taking apart.
Weathered wood, crappy glass that leaks, the usual..
Another view pre-disassembly
Completely disassembled, cleaned and sanded.
Notice how the flaps come apart into a few different
pieces of wood. There are grooves that the glass rests
in on the pieces, filled up with sealant to adhere
it all together and seal up.
The wood got the Cetol treatment, same as the
other hatches – 3 coats of Cetol Natural Teak,
2 coats of Cetol gloss using a 3M scrub pad to
“sand” it down between coats.. It seems that in this
picture, I was getting the Sierra Nevada treatment.
All put back together. I used Sikaflex 295UV for the
sealant, testing it and it’s primer out before I use it
on the large cabin windows. I replaced the glass
with tinted acrylic.
Hardware installed, weather stripping as well
Interior view. 


Tuesday, June 18, 2013
New HF/SSB Backstay Offset
Paul on s/v Solace deals with a convenient but inappropriate hand hold...
Solace HF/SSB antenna cable ran down the backstay with a two inch off set as shown in the photo to the left.
The problem was, what to do about the cable as it ran pass the backstay turn buckle. Ordinarily, I might have fashioned something up to keep it tidy, but with the boarding ladder in the middle of the pushpit, people were constantly reaching up and grabbing anything to help themselves get aboard. Mostly they grabbed the back stay and HF cable. Eventually it became loose and pulled out of the deck fitting. (The ladder here is part of the pushpit, but when needed folds down and steps are formed over the railing.) Yes the back stay is right in the middle of the boarding area!
So I came up with another idea. I used two tubes. Pressure PVC pipe; one 50mm and the other 20mm. I made end caps which can be viewed here for the 50mm pipe and some 32mm for some shroud antichafe rollers. (Another project)
The 20mm pipe has some strategically placed holes placed in the tube along one straight line. These were big enough just to fit my pop riveter. The length was assessed to allow the tube to move up the backstay to gain access to the turn buckle. The 20mm pipe was pop riveted to the 50mm pipe.
The back stay was marked for it's present tension and the turnbuckle was then undone.
The first end cap was placed on the back stay and held in place with some self amalgamating tape. A small rope was thread through the 20mm pipe by which later we would draw the HF wire through.
The combined pipe was then placed over the back stay and the top endcap engaged into the 50mm pipe. A small hole was drilled each side and a small SS screw inserted through to engage and hold the top endcap.
The bottom endcap sat on the very bottom part of the turn buckle, just above the swivel. The inside hole here is large because the "T" bolt that makes the bottom part of the turn buckle is larger in diameter than the backstay cable. This bottom end cap does not slide up and down.
The tubing was slide up the back stay and the turn buckle re connected and tensioned. The top wrench, which holds the top swage at the turnbuckle and prevents the backstay from twisting, supports the tubing while tightening the turnbuckle. Once the turnbuckle is tensioned and the split pins applied, the tubing is allowed to to slide over the turnbuckle and engage the lower endcap. The same two holes with screws to secure the endcap were applied to the lower endcap as done for the top endcap.
The HF cable was then threaded through the 20mm tubing and attached appropriately.
Hint. As you undo the HF cable above the backstay isolator, place a small rope around the isolator so that later you can have a companion pull down on the back stay, which will help with re-connecting the turnbuckle. Also, if you buy pressure PVC pipe, it may have black writing on the pipe. A paint thinners on a rag usually wipes this off so you have a nice white tube.
How to stop the pipe from turning? I'm trying some heavy self amalgamating tape at the bottom end, which at the moment has a little give, but seems to hold everything in place. Another method might be to place a bolt through the 50mm pipe and through the turnbuckle openings.
To access the turn buckle again, it is a simple case of talking out the small screws at the bottom endcap and sliding the combined assembly (minus the bottom endcap which stays in place) up the backstay to gain access.
In the photo to the right you can see that there is just enough room to slide the 50mm pipe up the backstay. The HF wire is cable tied to the isolator and gradually moves away from the backstay until it enters the 20mm pipe.
The holes which were made for the pop riveter will later have some 20mm rubber bungs inserted to tidy the whole thing up.


Thursday, June 13, 2013
Cabin sole refinishing: Complete
On s/v C'est la Vie, Jeff and Anne complete the job they started in Part I (This is Part II of a two-part series). I think it looks really good, don't you?
Ahhh... to bask in the satisfaction of completing a long standing boat project. With the installation of trim around the cabin, we can now proclaim the cabin sole refinished. Here are some before and after pictures.
Looking forward from galley - BEFORE
Looking forward from galley - AFTER
Looking aft from main bulkhead - BEFORE We will share our impressions of the Lonseal Marine Flooring as time progresses. So far we are pleased. Today, while installing the quarter round I dropped a drill with a counter sink bit on the floor. It struck with the bit angled at the floor and left no noticeable marks. Score one for Lonseal!
Looking aft from main bulkhead - AFTER
Painting the cabin trunk and refinishing the cabin sole are two of the three projects that were on our original project list when we purchased C'est la Vie in 2005. The final project remaining from our original list... paint the decks.


Tuesday, June 11, 2013
New Engine Compartment Cover
Over on s/v Cay of Sea, Rick has been busy constructing a new engine room cover. Today we see how he constructed it (and thanks for the shout-out Rick!). This is Part I of a two-part series - watch for Part II later.
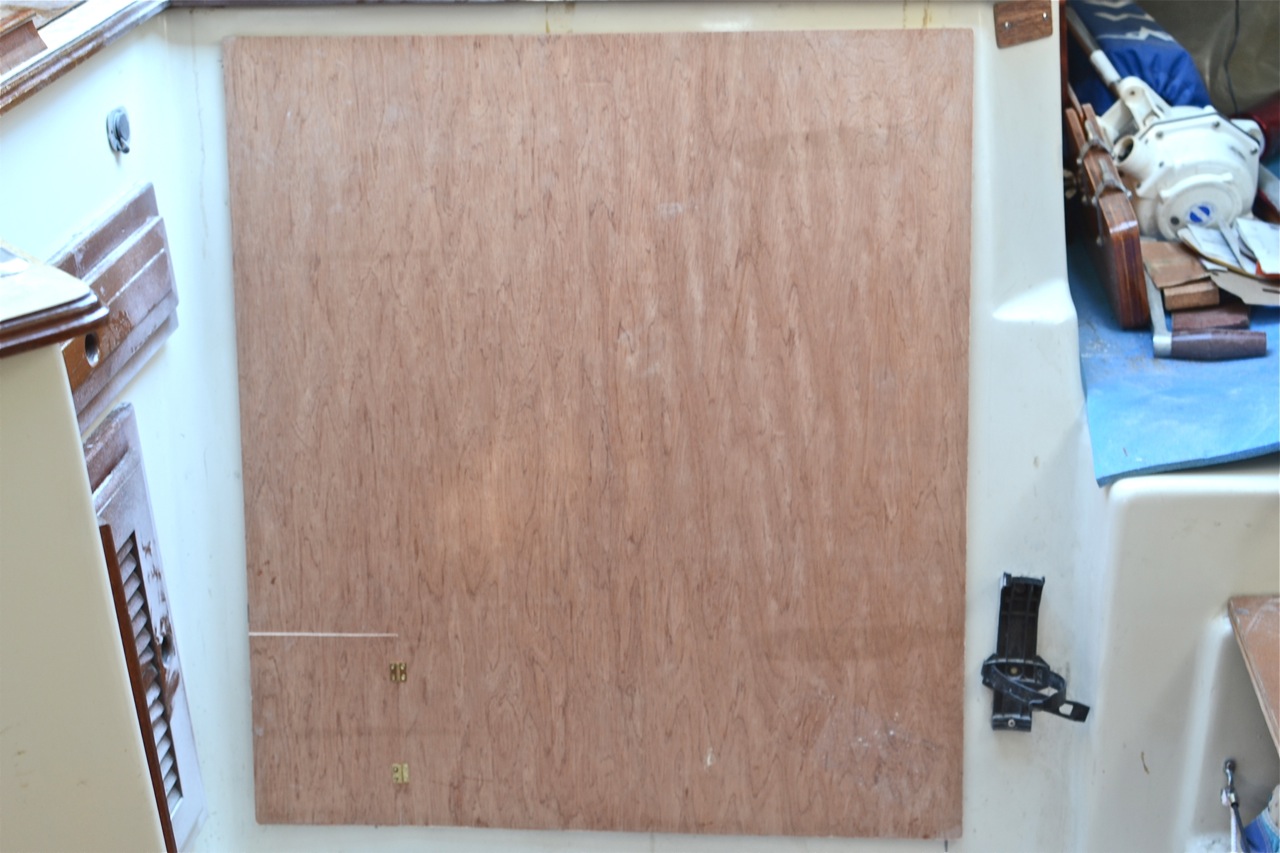
The old engine compartment cover doesn’t fit since I enlarged the compartment access. Motoring across the creek from the boat yard underscored for me how important it is to have that hole covered up, preferably with a cover that would absorb engine noise. My goal for the engine compartment cover was just this – fill the hole, muffle the noise.
First, a photo of the old cover for reference:
Nothing special, really. The 1-inch mylar-backed
foam insulation that covers the back of it is in
bad shape. I was never happy with how the edges
sealed the air space, and the door was difficult
to get my hand through.The old cover fit okay, but was never flush to the outside of the compartment. So there was open air space around the edges, which let out more sound. Even when I installed weather-stripping, I couldn’t get it to close all the way. Reaching through the door to operate the raw water seacock was uncomfortable, etc., etc. I wanted to make a new cover that didn’t have these little annoyances.
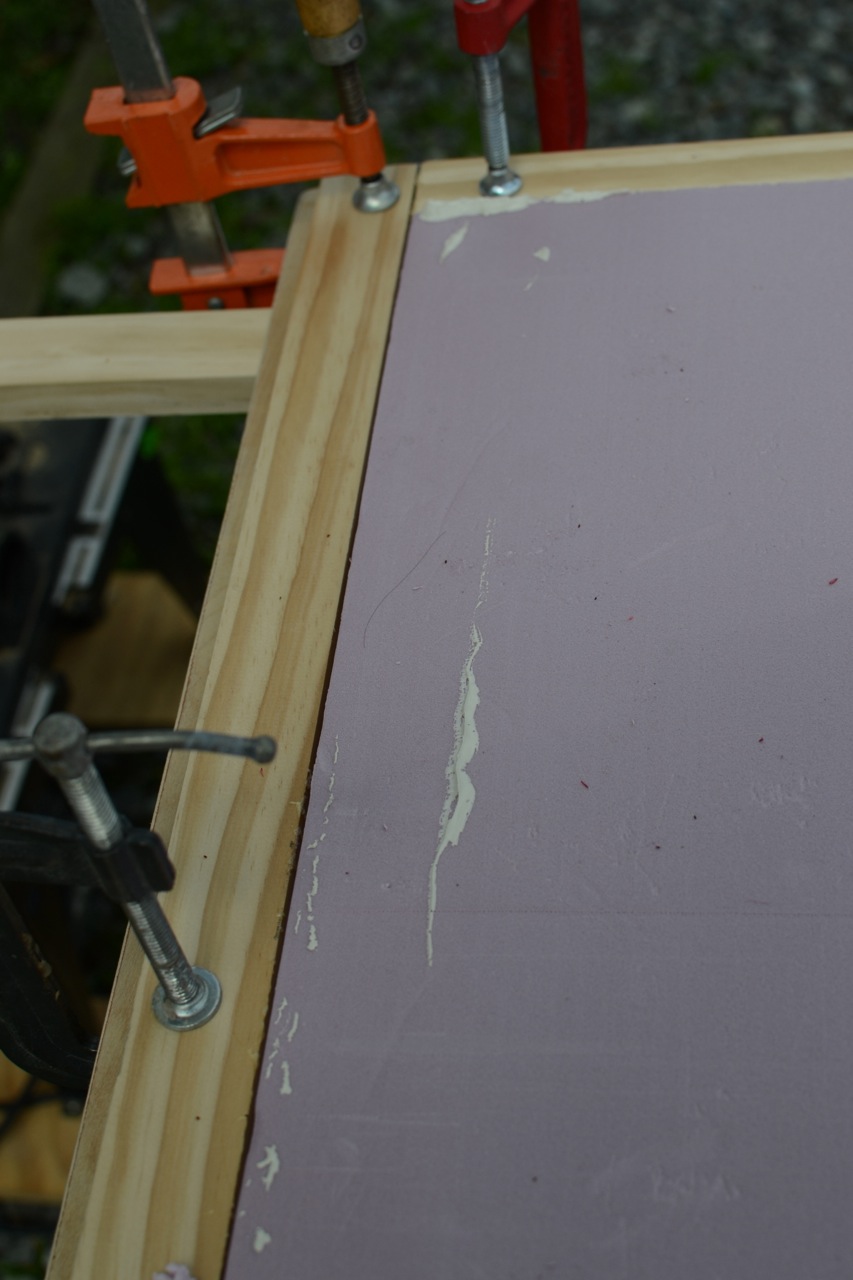
I began with a 4′x4′ piece of “underlayment,” which is just a piece of 1/4″ ply with one good side. The grain is fairly even, and its color is closer to mahogany than birch ply, which starts out a lot lighter in color. We have a 4-door sedan (Nissan), and it was a bit of a puzzle to get it into the car for transport. Wish I owned a small pickup . . . I also bought some 1″x2″ for framing out the panel, two 2′x2′ squares of pink foam board for insulation, two rolls of aluminum tape, a tube of construction grade exterior adhesive (like Liquid Nails), and two small brass hinges w/fasteners.
I carefully measured the opening, and cut the plywood to exceed the dimensions of the hole by 5/8″ all around. Then I carefully measured the panel and marked it for the framing– too big! I made it exactly 5/8″ smaller than the outside dimensions of the ply, and my test fit (of course) revealed that the inside frame was exactly the same size as the opening – duh. I knew there was something wrong with that when I did it. Fortunately, I just had to remove an 1/8 inch more material in the engine surround, and the panel fit perfectly. It took 10 extra minutes, and I was back on track.
I cut the pink foam board to fit inside the frame, and applied the construction adhesive.
I used the entire tube. No reason not to.
The frame is glued only – no screws.
I almost had enough clamps!
Foam set into the adhesive.
You can see the door cut-out, which was foamed separately.I set moderately heavy things on top of the foam, and went inside for lunch, waiting for the adhesive to cure.
Of course, the first time I laid in the foam,
I put it wrong side down. It cleaned up easily. . .
Moderately heavy things pressing the foam
into the adhesive.
This is the door section with its own modestly
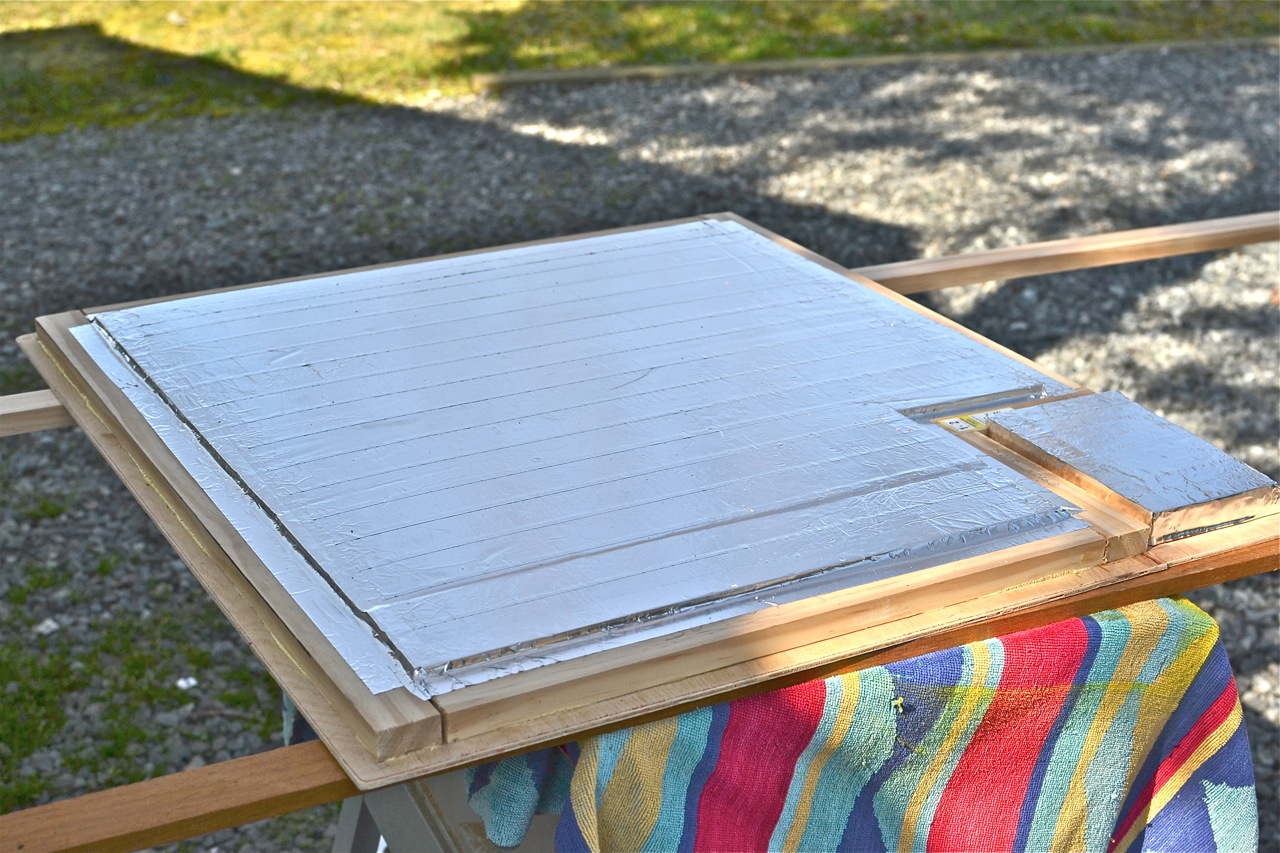
heavy thing pressing the foam down.After lunch, I taped the entire surface of the foam with aluminum tape. I need to pause here, and acknowledge Robert Salnick for the information about this stuff – it is a great product. He featured it on his blog not long ago, and I was taken with the idea of applying a metallic surface to an otherwise non-metallic material. This foam was the perfect place for it. The tape adds density (sound deadening), moisture resistance, and fire resistance. And the sticky back is very sticky. I taped all the foam surfaces with it, and taped down the perimeter to the inner frame.
In progress. The tape has a peel-off backing,
and comes in rolls of 30 feet.
The old cover featured a frame around the perimeter with mitered corners. I left the frame off the new cover. I didn’t see that it added anything substantive. I saw a photo of my friend’s Watkins 27 (thanks again, Jim Brewer) who had omitted the frame from his. I thought it looked clean and simple, and I adopted the idea. After installing the tiny hinges and seacock access door, I took it down to the boat for a fit. Here are a couple of photos:
I may fashion a turn-button to keep the door closed tightly.
Three coats of varnish will darken the material
and make it blend with the rest of the
interior woodwork.There are a few more items to finish. I will secure this cover at the corners with screws. Like the original cover, this one doesn’t lie flush and tight against the surround either. A screw in each corner will pull it down tightly. I’ll install weather-stripping for a gasket all around. I also need to reinstall the top teak tread/step directly to the counter, trim the top of the ladder, and refashion how it secures to the counter. Then all of it gets new varnish to look fresh.


Thursday, June 6, 2013
Refinsihing the Cabin Sole with Lonseal
On s/v C'est la Vie, Jeff and Anne thought the cabin sole was looking poorly, and used a novel approach to spiffing it up. This is Part I of a two-part series:
When does a project actually begin?
I maintain a project list in the form a a spreadsheet. The projects are assigned a 1 through 5 priority, with 1 being the most urgent need. Refinishing the cabin sole rose a number one priority after enduring rough crossing from Wilmington, NC to Green Turtle, Abacos in which the varnished sole became wet and resembled a ice skating rink (see Happiest Thanksgivings To All.) Did the project begin when it rose to the top of the list?
Last spring on our drive north to drop our car in Beaufort, we stopped by Seafarer Marine to pick up Lonseal Flooring and adhesive. I felt sure that during hurricane season while hauled out in Beaufort I would get the new sole installed, but then the engine haul out consumed my fall. (see Success C'est la Vie's Engine Is Out.) Did the project begin when we purchased the materials?
In February of this year I announced to the world on this blog that the cabin sole refinishing project was underway (see Refinishing C'est la Vie's Cabin Sole.). I pulled the flooring out of storage, removed the tiny quarter round trim, and ripped up some of the old veneer. In the process I realized the interior brightwork had lost its luster. Recognizing the mess that sanding all the interior wood would create, I put the sole project on hold. Did the project begin when I shared it with the world?
I can now stand before you all, two and a half years after the project rose to a top priority, one year after purchasing the materials, and over one month after a false start and confirm that the cabin sole project is underway.
The Lonseal Flooring is a textured, flexible, mat approximately 1/8" thick.
Seafarer sold it by the linear foot off a 6 foot wide roll. We purchased 8 feet (48 square feet) and a gallon of the 2 part Lonseal adhesive #300.
Lonseal Flooring laid out atop a 4'x8' work bench
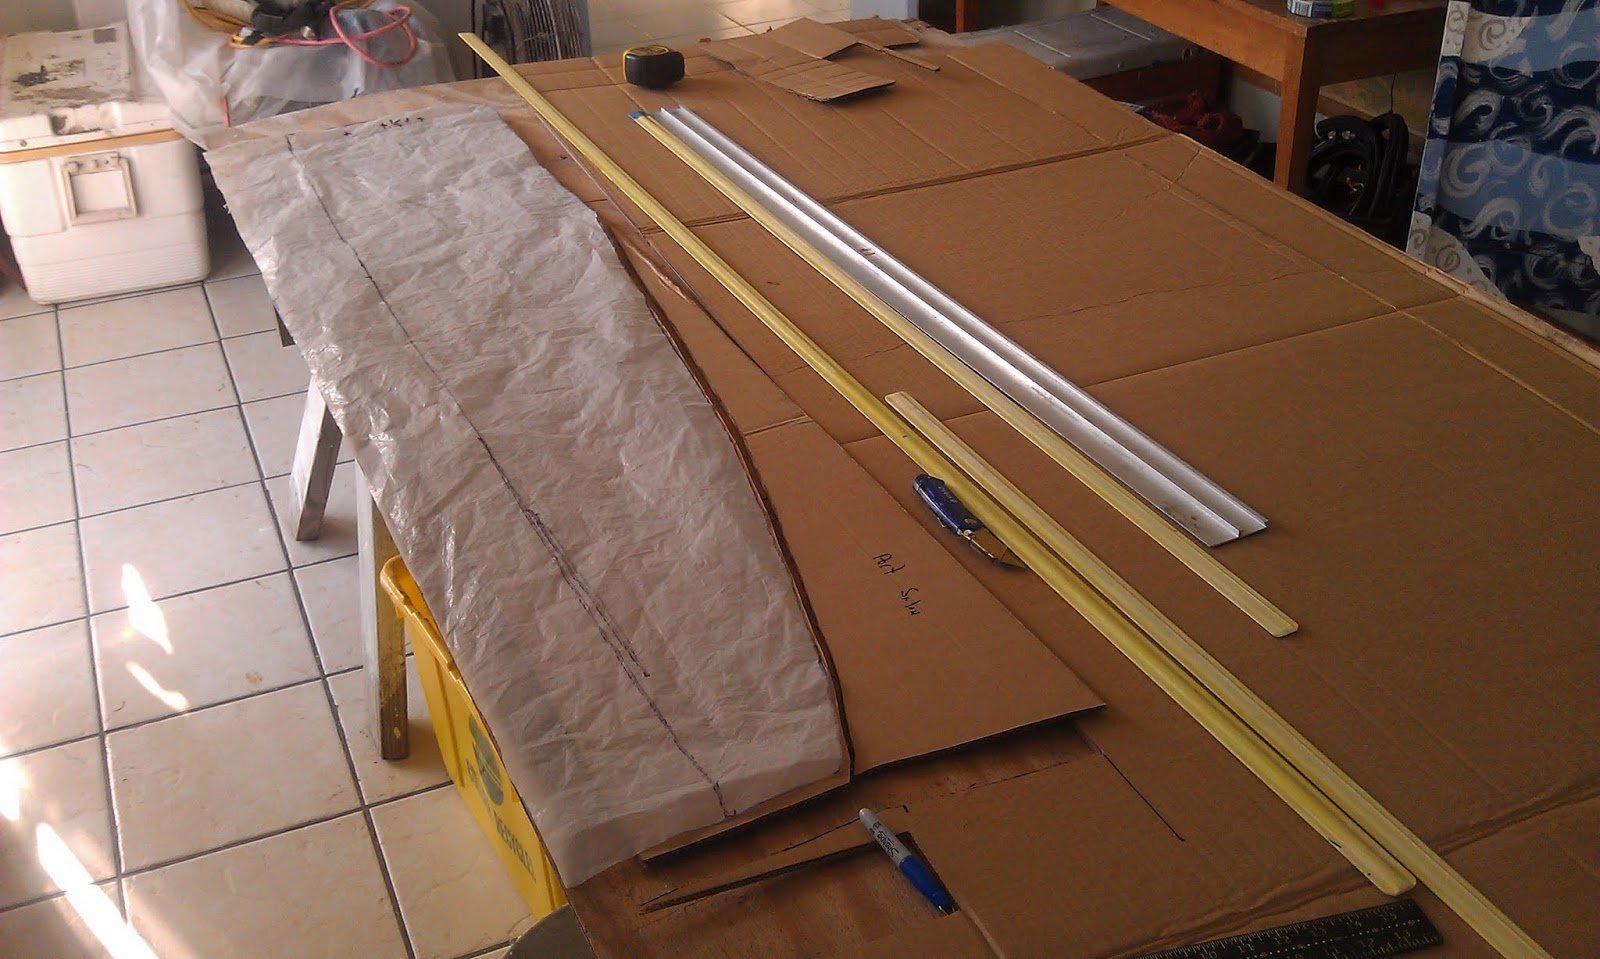
Initially I planned to create cardboard templates of the cabin sole, but some of the complex joints proved difficult to capture in cardboard. Based on past successes with plastic sheeting as templates when sewing, I switched materials.
using plastic sheeting to trace out cabin sole sections
The plastic proved ideal for capturing the shape of the floor sections, but less effective than cardboard to test fitting all the pieces. No problem... I transferred the plastic patterns to the cardboard.
The cardboard provided stiff templates that I could piece together for test fitting on C'est la Vie's sole.
Once satisfied with the fit, I removed the center panels from the boat and together with the cardboard reconstructed a portion of C'est la Vie's cabin sole atop the Lonseal.
test fitting cardboard templates in C'est la Vie
Laying it out in this manner allowed me to ensure the holly strips would line up well along the length of the galley and salon. The material proved relatively easy to cut with a razor knife and straight edge.
using a razor knife an straight edge to cut the Lonseal Flooring
The curves were cut free hand. Some of the shapes. like the one below that fits around the galley sinks, proved quite whimsical.
I chose to begin the glueing with three of C'est la Vie's removable floor panels. This allowed me to work with the unfamiliar two part Lonseal adhesive #300 in a more ergonomic environment than the hull of the boat.
Albeit sticky and slimy at the same time the glue proved easy with which to work. It must be troweled on, but has a long open working time. The total dry time is 72 hours. Checking the work this morning 14 hours after application, I am pleased with the results.
gluing the new flooring down
(pssst: don't tell Anne I used her rolling pin.)
To Be Continued....


Subscribe to:
Posts (Atom)


