
Surely it appears I'm going overboard on this topic, but I love experiments.
If a carbon canister can reduce fuel loss and water gain in a tank, why not address the carburetor? Wouldn't this reduce gum formation and ease starting? And since it won't cost me anything but time in the shop, isn't it worth a go? Tiny carbon canisters have been fitted to California lawn tractors for some time, to meet stringent air regulations.
In automobiles evaporation emission systems tied the carburetor vent--back when we had carburetors on cars--to the main canister and flushed the system with intake air during operation. More efficient in terms of hydrocarbon destruction, but more complex and only effective if the car ran nearly every day. In fact, those systems did not reduce carburetor bowl evaporation, since they would never reach equilibrium. They actually drew gasoline from the bowl, much as calcium chloride draws water from the air. I've taken a different approach, since evaporation reduction is a primary goal, and that requires that the carbon reach equilibrium with the carburetor bowl while the engine is running, exactly the opposite sequence from what automobiles systems achieve. Since the carbon is saturated during operation--a warm engine encourages plenty of evaporation--when fresh air tries to enter the carburetor when it cools and at night, that fresh air will become saturated with gasoline vapors and will not contribute to further evaporation in the morning. This process of self-regeneration is about 65% efficient in reducing emissions for long time periods, according to EPA testing (page 5-120).
The carbon canister is above the in-line fuel
filter and is connected to the carburetor vent hose.Click to enlarge.
The canisters I installed are retrofitted from small in-line gas filters from the might-need box. Originally, they contained fritted bronze elements, which I had discarded (these were replaced by Raycor filters). I fitted each end with a carbon support screen cut from beach cat trampoline fabric. They hold 6 ml of granular carbon of a type optimized for low-flow gas phase hydrocarbon absorption. Though small, the carbon:gasoline volume ratio is much greater than used on tank vent filters, this is intentionally so; these will see much greater temperature operating temperature range because they are mounted beside the engine. Even the diurnal cycle will be greater, since the carburetor lacks the thermal mass of a fuel tank. They are NOT secured directly to the engine, as the high-frequency vibration is not good for the carbon. It is extended away from the carburetor, horizontally and slightly down hill, with 6 inches of hose to prevent fines from migrating back into the bowl. This is the existing hose, previously open ended and routed downwards between the carb and engine block.
What do I expect? Easier starting. Less idle jet gum formation and fewer stuck floats. I'll let you know.
___________________
Follow-up reports:
- Baseline, March 18. Both engines require primer to be pumped up if the boat has been help for a few days. Port requires 1-2 pumps of the throttle (Yamaha 9.9s have an accelerator pump). Starboard requires several pumps and several efforts, followed by an advanced throttle for a few minutes. Engines re-start within 18 hours, even if cold, with a single crank and idle well. Both engines are identical, purchased at the same time except for the carburetor; the starboard is a fixed idle jet US carb, and the port is Canadian with an adjustable idle screw.
- March 25. Easier starting after a week away seems to be confirmed. Both engines start on the first crank, without pumping up the primer or pumping the throttle. The starboard engine did not require the throttle to be advanced during warm-up and did not stall.
Showing posts with label fuel. Show all posts
Showing posts with label fuel. Show all posts
Tuesday, April 10, 2012
Carburetor Bowl Vent Canister
Over at Sail Delmarva, Drew continues to be busy exploring opportunities. What kind of opportunities? Well, the kind that help protect the environment and make your engine(s) run better in the bargain. And he is a dedicated experimentalist...


Thursday, March 22, 2012
Fuel Tank Vent Filters--Better Boat Keeping?
What's the problem with diesel stored in tanks? Moisture accumulates in the bottom of the tank due to the tank "breathing" with atmospheric pressure and temperature changes. And then this moisture supports colonies of bacteria who make that water acidic, corroding your tank, and when they finally die, their corpses either clog your filters (if you are lucky), or trash your injection pump. Over at Sail Delmarva, Drew is attacking this issue from the point of view of ethanol "enhanced" gasoline, but it applies just as well to diesel. Read on...
For all the talk and trouble water in the gasoline causes--far worse with e10--to me it's rather conspicuous by its absence that neither owners nor builders ever took a serious look at vent filters. Cars have had sealed tanks fitted with both pressure controls and filters since 1971. I considered this a few times--I've installed very large descant traps on very large chemical tanks--but figured if it was so against the conventional wisdom in the boating community, it couldn't be right. Funny.... That's not like me.
In a prior post I began a discussion of some testing for Practical Sailor. We've got two test boats going at this time. I've started monitoring the humidity inside and outside. Yup, it's drier inside the tank, after filtration. We expect some positives that should add up to a good value proposition for the owner:
It won't stop these things from happening in the carburetor, but it should significantly extend gasoline stability in the tank considerably. Preliminary calculations suggest at least double.
- Drier gas/fuel.
- Less evaporation, to the tune of $8-$12/year. The unit should last ~ 10 years without service, so that will nearly pay for it.
- Less loss of volatiles means better starting, particularly in cold weather.
- Less loss of volatiles means better resistance to phase separation/emulsion blobs. I have only been able to recreate true phase separation from atmospheric absorption if the ethanol evaporates after it is saturated, and I've tried many combinations. This is why we generally only see it in carbs (they're small).
- Less loss of volatiles mean less gum formation (better solvency).
- Less loss of volatiles is good for the environment. Yes, that counts.
- Less oxygen (less convection, more vapor space) means less gum formation.
But can we demonstrate how this actually effects the fuel over time on a small scale, in a controlled manner? Calculations only go so far, since water condensation and absorption, differential evaporation, and fuel oxidation work together in complex ways. Science project time.
One liter bottles with 500 ml e10, starting levels marked with tape. From left to right:- Plain 1/8-inch ID vent.- 10 ml silica gel descant- 10 ml activated carbon adsorbent
Actually, both carbon and silica gel are both adsorbents that pull water and organic vapors from the air. Silica gel (the packs you find in with your new DVD player) has a high affinity for water, while carbon has a high affinity for organic vapors. However, both adsorb reversibly; that is, if exposed to high temperatures and either clean air, or an excess of something else, they release what they have previously adsorbed. Carbon can be flushed by water vapor and air, while silica gel can be flushed with hydrocarbon and air. Both should have the effect of keeping the tank drier and reducing evaporation, adsorbing and desorbing with each day/night breathing cycle. Both should reduce oxygen in the tank. But how much?
Results in the fall. The long version will be in Practical Sailor.These things can't be rushed. I expect we are going to find the improvements are small and that a sailor won't "feel" any difference. But his engine will start a little easier, he'll buy a little less gas, and have a few less problems. The math works, it just won't be obvious, not like some new bit of deck hardware $100 he could buy. More like changing the oil; "pay me now, or pay me later."
But meanwhile, like the holding tank vent filter that I installed (and am very pleased with), I've got installed a carbon vent filter on Shoal Survivor and I'm not planning on taking it off.
-------
Note for the spelling or technically obsessed: sometimes I say absorb, and sometimes I say adsorb; both are correct. Alcohol absorbs water. Silica gel adsorbs water. The mechanism is very different and the reversibility is very different. This is the reason adsorbents are so useful.
-------
Although the test filters photographed above were fabricated from PVC, this is NOT safe practice for permanant installation. PVC is not highly resistant to gasoline vapors and the adhesive is quite vulnerable over time. While it won't fail in this laboratory setting, based on refinery expereince with PVC, the joits will fail if I add heat, vibration, and wait several years.

Monday, November 28, 2011
Clean fuel
Is your fuel clean? Are you sure? Really sure? Want to find out when the waves are sloshing it around in your tanks, stirring it up? Tho bugs and decomposition products can foul your tank with even the cleanest fuel, Steve and Lulu aboard s/v Siempre Sabado get a head start by making sure the fuel going into their tank really is clean:
The beauty of diesels is that they don't ask for much. Plenty of air and nice clean fuel is about it. The problem is that they are quite picky about their fuel being CLEAN!
The following is definitely NOT an original idea on my part. I blatantly stole it from my friend (that I've never met) Wojtek, who sails the Westsail 28 "Namaste". I recently did a blog where I was complaining about my over-the-top fuel filtration system and said I was going to get rid of the Racor 215R filter unit that I had been using as a secondary filter. Wojtek responded with the following comment:
Steve, if I can suggest, stick with this old Racor. You never know when you might need it but there is a better thing you can do with it.
I have reused my old Racor after installing dual primaries. It is sitting on the port side of the lazarette, coupled with a small electric fuel pump. Every drop of fuel that goes into Namaste's tank is squeezed thru the 2 micron filter. Have I mentioned that I haven't had to even flick to the second primary since the setup?
Cheers,
Wojtek
He then included a link to some pictures of the set-up he made for Namaste. Well, I know a good idea when I see one. So, instead of dumping the $110 filter unit and the $30/each filter canisters, I made a copy of Namaste's filtration set-up for Siempre Sabado.

Can't remember what I paid for the nylon cutting board that it's all mounted on but the fuel pump cost about $25.00, the hose was less than $3.00, the toggle switch and various fittings were in myjunk"good stuff" bins.
I transferred about 20 gallons of diesel to the main tank today using the filtration system. It takes awhile as the pump only pulls the fuel through the filter at about a liter per minute. But there was absolutely NO mess and I know that the fuel I put into the tank today is so clean that my 30 micron primary filters will pretty much have nothing to do.< Our usual practice is to take our jerry jugs to a fuel dock in the dinghy and then fill our main tank from the jugs. We haven't pulled up to a fuel dock since we were in Santa Barbara a year ago. The main tank is 39 gallons so, even if she was bone dry, it would only take 2 trips to the pumps to fill her back up. Well, then one more to fill the jerry jugs for reserve. Doesn't really matter how slow the filter/pump empties the jugs since we're not tying up a fuel dock while we're doing it. So, thanks, Wojtek for the idea and for the advice.
Monday, May 16, 2011
Endless hot water
Now there's something we'd all like to have... Paul on s/v Solace will have it now, even at anchor!
I am curious to find out how the propane usage will work out in practice.One thing lead to another with these boat projects. This blog is about linking three boat projects, and each one is worthy of it's own post. But for now, I'll give a precise of the events.
Firstly, in the shower cubicle of the boat, I had a cupboard with a large 12 gallon hot water tank that I wanted to replace with a washing machine. So I set about removing the HW tank and then installing the washing machine. Because the doors were only 18 inches wide, the WM had to be disassembled to get through the door and then reassembled in-situ. This may become another blog at some time.
Now, because I had removed the HW tank and our only method of heating water, I then set about installing a califont, or probably better known as a "heat as you go, propane water heating unit". This was a unit sold in New Zealand, but I have seen similar units sold in RV World in the USA. The igniter is powered by two "D" size batteries, and is small enough to install in boats and RV's.
I installed the unit under the aft vanity unit on a bulkhead. I have a means of varying the temperature output and have placed some blue masking tape for the shower temperature so that we don't need to use the mixer tap to get the temperature right. The ducting is 4 feet in length and vents to the bilge. Heat at the end of the 4 foot ducting is almost nil, and one can hold your hand over it easily. I saw many units installed on other boats with out the ducting to outside, and as others have said, "it's no worse than running the stove". Propane and co2 monitors are a safety measure. Now we have hot water on tap with no need to run the generator to supply power to the old HW tank.
Finally, when installing the propane califont, I had to install a propane hose to the unit. Initially, I "Teed" into the existing propane line with the one propane cut off switch to be used to supply both the califont and the stove. This however proved to be less than satisfactory, because the califont would remove some of the gas from the stove line while it was in use. This then made igniting the stove burners, a little more time consuming as we had to wait for the gas to flow back through the line to the stove.
The solution was to use another solenoid and regulator for the new califont and "Tee" in both solenoid/regulators to that "Tee". Each solenoid has it's own on/off switch.
New Brass T to Propane Tank
We also plumbed a hot water line to the aft of the boat so that we can have hot showers on the aft deck. We also think we will use less propane, than heating a kettle of hot water on the stove to do the dishes. I'll comment on that as data comes to hand.
The "T" also allows us to carry a spare propane tank to swap to when running out on the tank in use.


Monday, May 2, 2011
Generator extension: 4 easy steps
In a nicely layed out How-To, Chuck on s/v Sea Trek shows us a way to hook up a larger fuel tank to your Honda generator.
One of the pieces of equipment on our to do list is a generator. We much prefer to anchor out when cruising and at times we can get weathered in for days. During those extended stays we still like coffee in the morning, still have the need to recharge the batteries and like to watch TV. All of this uses power and we have been using our handy Honda 2000 portable generator until we can have a more permanent installation. The Honda will handle most of our power needs, with the exception of the air conditioning system. But that suits us just fine for now. One of the things I don't like to do is to fill the built in tank every day when the generator is in constant use and for long term when charging that batteries it might mean shutting the generator down, filling the fuel tank, and starting it again. It is also hard to fill the tank without spilling gas on the deck, especially if the boat gets waked. So, the need for a remote extended fuel tank. To build one of these only takes a few inexpensive fittings, a fuel tank and about an hour of your time, at the most.
The first thing that I did was to buy a spare cap for the built fuel tank in case I messed up doing this, or if I wanted to run without the extended tank. I found it locally for $15.00 from a Honda dealer in the area. Next was to get all of the miscellaneous parts. We decide on a 3 gallon tank instead of the larger 6 gallon since we don't run the generator that much. We already have a 3 gallon tank for the dinghy outboard so this could also be used as a spare. We also decided we wanted to be able to use the same fuel line as the dinghy outboard so we would not have to carry different fuel lines and again it could do double duty. To accomplish this we would need the attachment fitting that would be the same as on the one on the dinghy tank and on our Johnson Outboard. The two fittings totaled about another $15.00 and then another $4.00 for a brass hose barb. The plastic fuel tank was another $25.00. The assmebly was pretty easy.
Step 1.
Remove the inner workings of the fuel cap and drill out the center to fit the connector. Be careful to not drill the hole too large. It should be slightly under sized to allow the fitting to be screwed into the plastic cap.
Step 2.
Fill a thin amount of epoxy around the threaded base of the fuel line fitting inside the cap and screw on the female brass hose barb. Allow the epoxy to dry and then replace the rubber gasket inside the cap. The hose barb may or may not be needed but it makes the connection fitting stay in tight and I beleive it will help to draw the fuel into the generators built in tank.
Step 3.
Install the second connector fitting into the fuel tank.
Step 4.
Fill the fuel tank with gas, fill the generator built in fuel tank with gas, connect the fuel lines and start the generator. Be sure the vent on the fuel tank is open. That's it.
It is very important that the cap be completely sealed. If any air can leak at the cap, the generator will not pull fuel from the extended tank. As the vacuum builds up in the internal fuel tank for the Honda, it will pull fuel from the extended tank. Mark the generator tank so that oil will not get added to it by mistake like the outboard tank. The Honda does not require a fuel/oil mix. The Honda will now run for a much longer time and annoy your neighbors for hours.
There are many variations for doing this, using a 6 gallon tank, installing only hose barbs, putting an inline filter in the fuel line. But the basics are the same. This should work just fine for us until the permanent genset is installed.


Wednesday, January 5, 2011
Racor Redundancy
When we got Eolian, the fuel system was a bit of a hodge-podge.
There were the two main tanks, of course, port and starboard. And a 45 gallon day tank.
On the engine was the final fuel filter, a 10 micron one that looks like an oil filter. Next inline upstream was a Racor 900 gal/hr large filter. Upstream from that were a pair of steel canister filters - the kind where the bottom screws off, full of fuel, to change the filter element.
And valves. Enough valves to control a nuclear power plant.
After experiencing a few "unscheduled stoppages" (as the Previous Owner termed them), I tore into the system. Here is what I found:
 Next , I bought a second Racor 900 - yes, this is way, way more flow rate than our engine needs (we burn a little less than a gallon/hr at cruise), so the centrifugal water separating feature of the Racor was not really going to function, but the huge filter element would absorb a *lot* of gunk before blocking off. I liked that.
I installed the second Racor right next to the original, with valving such that I can switch filters while the engine is running. The valving will also isolate the clogged filter so that the element can be changed under way.
Finally, I installed a second fuel vacuum gauge in an easy-to-read location so that we can easily monitor the need for filter change-over.
(I also re-plumbed the entire fuel system, removing a third of the valves, but that's hardly a small boat project.)
There were the two main tanks, of course, port and starboard. And a 45 gallon day tank.
On the engine was the final fuel filter, a 10 micron one that looks like an oil filter. Next inline upstream was a Racor 900 gal/hr large filter. Upstream from that were a pair of steel canister filters - the kind where the bottom screws off, full of fuel, to change the filter element.
And valves. Enough valves to control a nuclear power plant.
After experiencing a few "unscheduled stoppages" (as the Previous Owner termed them), I tore into the system. Here is what I found:
- The 30 micron element in the Racor was clogged
- The steel canister filters had no elements in them
 Next , I bought a second Racor 900 - yes, this is way, way more flow rate than our engine needs (we burn a little less than a gallon/hr at cruise), so the centrifugal water separating feature of the Racor was not really going to function, but the huge filter element would absorb a *lot* of gunk before blocking off. I liked that.
I installed the second Racor right next to the original, with valving such that I can switch filters while the engine is running. The valving will also isolate the clogged filter so that the element can be changed under way.
Finally, I installed a second fuel vacuum gauge in an easy-to-read location so that we can easily monitor the need for filter change-over.
(I also re-plumbed the entire fuel system, removing a third of the valves, but that's hardly a small boat project.)
Monday, December 13, 2010
Not quite a nuclear power plant, but...

I have found it useful to have a conceptual diagram of Eolian's fuel system, laminated and posted near the valving. Along with labeling the valves, the diagram helps to keep me from (but, sadly, does not prevent) making a valving error.
Monday, October 11, 2010
How do you spot a *real* cruiser?
Mike, over at Zero to Cruising, tells us...
How can you tell a “real” cruiser from a recreational boater? You can’t tell by the fancy burgees (flags) in their boat’s rigging. Nor can you tell by the anchor on their bow (although a nice big one is a pretty good sign). We’ve determined that the best way to tell if someone is a (long distance) cruiser is by the fuel and water jerry cans carried on their deck. I remember hearing from someone that certain charter operations would actually tell their customers to find boats with jerry cans on deck and to anchor nearby them, assuming that they would know what they are doing!And I guess it should be added that we have two 5-gallon jerry cans of diesel and a 2.5 gallon can of outboard gas tied to our stern rail on Eolian. But no board. Is that close enough?
Before anyone pipes up and says something (John!), yes, we do have a sailboat, but we have (sadly) learned that relying solely upon the wind for propulsion could make for some very long days. Yesterday would have been a great example of this! Our boat carries 27 gallons of gasoline in its main tank and burns approximately 1 gallon per hour when running on 1 engine. Although we won’t be making any huge runs until we get to the Mona Passage between the Dominican Republic and Puerto Rico, we are getting ourselves prepared.
The typical method for carrying jerry cans on deck is to string a board between two stanchions and lash the cans to it. There is only one really appropriate spot on our boat for this and the span between the stanchions there is about 6 feet. Because I think that is a fairly big span and I wanted something strong enough to support the weight of 3 cans, we decided to go with 2×6s, but what material to use? After debating for quite some time and counting our pennies, we decided to go with cedar. We purchased one 14 foot plank and had it cut in half, rounded the corners on each piece and sanded them smooth. I purchased some U-bolts from the hardware store to attach the boards to the stanchions but before doing so, was chastised by our friend Kirk for cheaping-out and not buying stainless steel ones. So, I guess it’s back to the chandlery then.
Once the cans (4 fuel and 2 water) are all ready to be attached, the final thing we need to do is to protect them from the sun. We have heard that the UV damage can be serious so Rebecca plans to sew a nice Sunbrella cover for each of them. We’ll post some more pics when we get it all done and looking pretty.
Checking the placement for the cans. We’ll carry 2 gas and 1 water can on each side.
Fortunately our friend Kirk has a good selection of power tools to speed up the job.

Thursday, May 6, 2010
Labels are important!

I don't know what the fuel plumbing situation is on your boat, but I can tell you this: if the valves are not well-labeled, sooner or later, someone is going to operate the wrong valve. That could be you, in the dark, in a hurry, in a crisis. Of course, Murphy's law says that when the error is made, it will be at a time to have maximum consequences.
Here's a cheap and easy way to clearly label valves:
- Obtain some white (or light colored) shrink tubing of appropriate size
- Write the label text on a suitable length of the tubing with a sharpie (the permanent kind)
- Shrink it onto the valve handle. The text will shrink along with the tubing, and become darker. It won't rub off.
Of course, this won't prevent incorrect valve operation, but it will make it less likely.
Friday, April 23, 2010
Is my engine sucking air?
Project from Eolian, in 2000.
After suffering several "unscheduled stoppages", as the Previous Owner termed them, early in our tenure aboard Eolian, Jane became paranoid (rightfully so, based on our experience) that the engine was going to fail. She frequently went down below and pulled up the floorboard over the Racor filters to check the vacuum gauge. The more critical the availability of the engine became, the more frequently she was down below pulling up the floorboard.
Rather than being a problem, this pointed out an important fact: One of our critical pieces of instrumentation was in an inaccessible location.
 I procured another Racor vacuum gauge (one designed for panel mounting), and mounted it next to the engine hour meter on the panel adjacent to the companionway. I plumbed it direct to the inlet of the engine lift pump, by installing a tee.
 Here it is with the engine running under way, showing that there is no impending fuel filter blockage.
Perhaps the most important thing that I have come to recognize as a result of this little project is that an annoyance is really an opportunity to improve, in disguise.
After suffering several "unscheduled stoppages", as the Previous Owner termed them, early in our tenure aboard Eolian, Jane became paranoid (rightfully so, based on our experience) that the engine was going to fail. She frequently went down below and pulled up the floorboard over the Racor filters to check the vacuum gauge. The more critical the availability of the engine became, the more frequently she was down below pulling up the floorboard.
Rather than being a problem, this pointed out an important fact: One of our critical pieces of instrumentation was in an inaccessible location.
 I procured another Racor vacuum gauge (one designed for panel mounting), and mounted it next to the engine hour meter on the panel adjacent to the companionway. I plumbed it direct to the inlet of the engine lift pump, by installing a tee.
 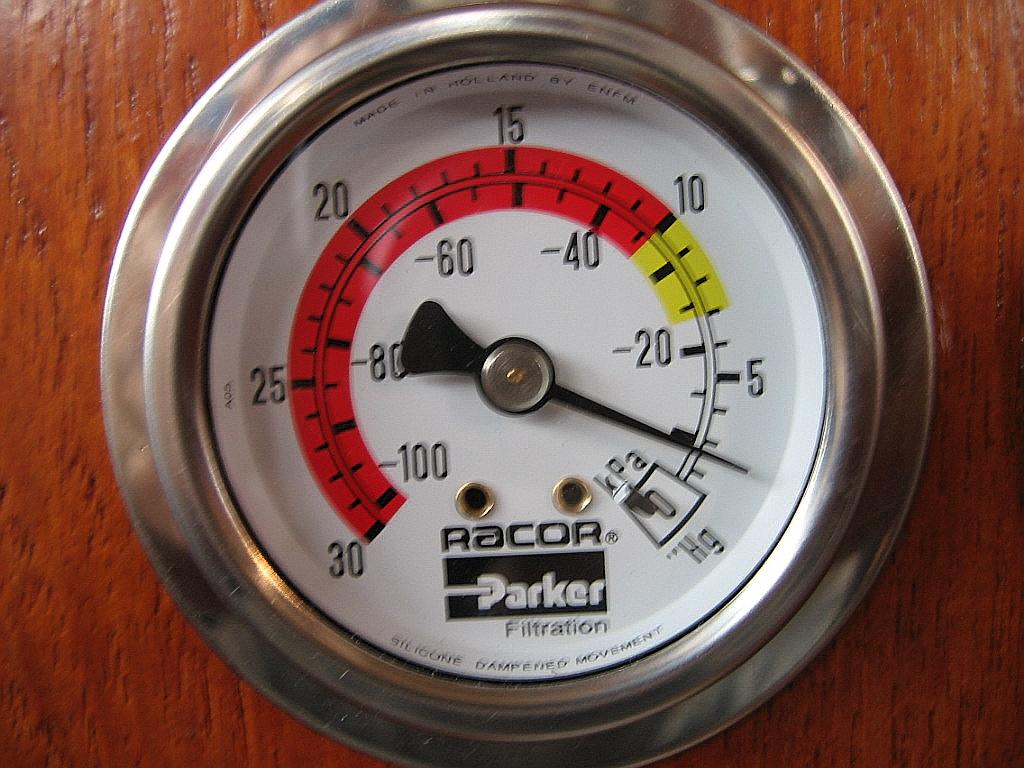 Here it is with the engine running under way, showing that there is no impending fuel filter blockage.
Perhaps the most important thing that I have come to recognize as a result of this little project is that an annoyance is really an opportunity to improve, in disguise.
Subscribe to:
Posts (Atom)


 Posts
Posts


