Merry Christmas and fair winds to all!
Bob & Jane


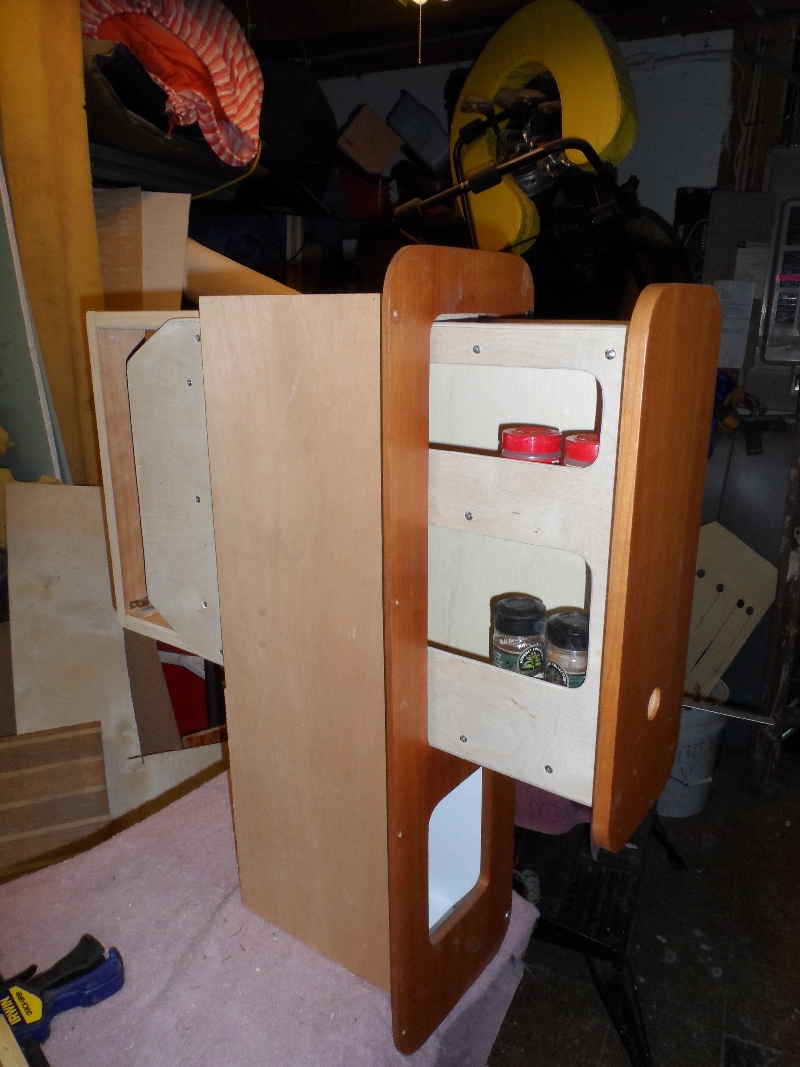
PDQ 32s factory equipped with Dometic dorm-style refrigerators are also equipped with a completely useless drawer to the right of the fridge. The openings are too small for medium adult hands to fully enter, severely limiting the size of objects that can be stored. Even spice bottles are too big, except for the smallest sizes. The drawer was deep--18 inches but only pulling out 8 inches--so any thing that did enter would slide to that back and never be seen again; remember, the openings won't admit a hand or wrist so you can't reach the back, even with a fork held by fingertip. The whole business is built of 1/2-inch thick lumber, reducing the 7 1/2-inch cut-out in the fiberglass to a mere 2 1/2-inch inside shelf width. Just pitiful. Down low, below the drawer, is a cubby hole that is handy enough for small items, in our case disposable table wear; I wanted to keep that, but I didn't want more cubby holes.
Though I could have scratch-built a replacement, matching the wood would be a challenge and I liked the outside look and fit. Instead, I took a few measurements and reasoned that it could be gutted, fitted with an improved drawer that would make a very usable spice rack, and that I could accomplish this in an evening.
The entire cabinet assembly is easily unscrewed and taken home, so that all work can be done in the shop. That helps. The drawer facing pops off easily with a few carefully applied hammer blows and a little wiggling with a wood chisel. Likewise, the stops in the back (to preventing the drawer from coming all the way out when pulled) popped right off. Both were easily cleaned of glue residue with a chisel.
I removed both sides of the drawer, leaving the top, bottom, front, and back untouched, with careful plunge cuts with a circular saw and some trimming with a saber saw. The sides are still attached to the shelves with a few spots of glue, but were pried out with very little effort. Likewise, without side support, the internal shelves were easily removed and discarded. The new plan called for only an upper and lower rather than the original overcrowded 3 shelf arrangement.
The new shelf is not centered; spice bottles come in 2 basic heights, so I made room accordingly.
I did not replace the original sides. The original drawer had ~5/8-inch clearance on each side, so I simply screwed new 1/4-inch birch ply sides to the outside, increasing the internal width of the shelf by 1-inch to 3 1/2 inches This is critical, as it makes the difference between a single row of bottles and a double row. I made the fiddles on the shelf a bit over 1/2 the height of the bottles to insure they cannot jump out in wild conditions, though they will simply end up in the large locker under the fridge if they do. With the larger cut-outs my hands fit easily. The corners of the cut-outs were made with hole saw and press (no center bit) and connected with a circular saw and saber saw and trimmed with a hand grinder. All of the screws are countersunk to avoid catching.
The original drawer did not pull out as far as it could; measurement showed that it could pull about 2 1/2 inches further without interference, so I repositioned the stops. This was easily done by extending the new sides back an additional 2 1/2" + 3/4" = 3 1/4" beyond the back of the drawer and attaching 3/4-inch cleats. Free additional opening space and less is lost in the depths.
Easy...ish and built from scraps. $4.65 for screws. I could have built it with hidden fasteners, but I liked the idea of being able to open it and change it, if I like. About 4 hours, but 3 of those were spend measuring an figuring. I could do a second in an hour. Isn't that typical?
More space, more function, no change in weight, and my wife is appreciative. I find the last of these most rewarding.
As prodigious as we are with rum consumption, we are as miserly with electrical power aboard Whiskeyjack.
We light the cabin with battery powered LED lighting which consumes a relatively small amount of power compared to traditional Edison-style bulbs, but LED lights have drawbacks not considered when we installed them.
For example, insects like them.
A lot.
In fact, a lot of little bugs like LED lights a lot.
(Yes, we have screened hatches, but that only keeps insects out that are already out when the hatches are closed- those insects that are in when the doors close remain in, swarming around the lights. It's sort of like a dance club at last call.... in reverse.)
The ambiance factor, or lack thereof, with most LED lighting is also not inconsiderable. The LED lights aboard bounce off the fiberglass overhead and fore and aft bulkheads, casting a dental-office style glare, hardly inducing one to curl up with the latest copy of Good Old Boat.
There are certainly alternative colour LED bulbs, in warmer and fuzzier hues, but retrofitting all of the panel-wired fixtures below deck is not an inconsiderable expense, and a project filled with trepidation. What if the bulbs we feel are bright yet warm, clear yet cozy in the store/at the show/ in the display/whatever feel different in the confines of our cabin? Most vendors have a "no return" policy on electrical stock, bulbs included, so I envision ending up with hundreds of dollars of perfectly good yet completely unacceptable lightbulbs occupying valuableboozespares stowage real estate.
And there is still going to be the infuriating infernal interior insect infestation in orbit around the aforementioned illumination.
So, it was time to suss out some alternatives.
image courtesy of amazon.com
Candles cast a warm glow, but lend little illumination, as evidenced by the small votive candle in the cockpit below. An advantage over fixed-site lighting, however, is the convenience of being able to move light from deck to Dock to cabin to cockpit. More flexibility in lighting means less lighting required on board, and less storage space dedicated to redundant illumination.
It got me thinking, though. Why not try going old school? We decided to explore the world of lanterns.
Traditional ship's lanterns....
... seem to fall into two categories:
Is there an alternative?
- More expensive than electrical light, more elegant, well built and provide adequate light, and
- More expensive than electrical light, more elegant, really poorly built and provide inadequate light
We decided to find out.
Low-buck style.
Here's the parameters:
Go.
- Non-electric light suitable for reading/working in the cabin.
- Portable- usable in cockpit, cabin, on deck or on Dock.
- Unattractive to insects
- Under $25.
First stop, Canadian Tire , where, for nearabout $17, I purchased a World Famous hurricane lantern, not exactly as shown, below.
When I purchased the lantern, it had a "World Famous" label attached to the chimney, which peeled off and fluttered to the floor when the lantern was removed from it's cellophane wrapping. The lackadaisical label was an accurate indicator of the quality of the lantern to which it was formerly attached. The price was cheap, and the product lived up to the price. Included was a business card-sized slip of paper with filling and lighting instructions printed in smudgy 6 point type. The lantern itself is about 12" tall, with a base diameter of about 5". The fit and finish appeared sloppy, an impression which was dramatically reinforced later.
Next, we paid a visit to our good friends at Lee Valley Tools and traded $19.95 for a Dietz "No. 80" hurricane lamp.
Wow. What a difference $3 makes. The Dietz lantern came in an honest-to-goodness box with the globe wrapped for protection. Included were lighting and cleaning instructions, wick trimming info and a short but succinct trouble-shooting guide. Compared to the World Famous lantern, No. 80 felt huge, standing 15" high with an 8" wide footprint. Fit and finish was better than expected, with decent plating on the burner, bails, globe plate and tank cap.
Price winner: World Famous
First Impression winner: Dietz No. 80
With the contestants chosen, it was time to get them ready for use. Both lanterns are kerosene fueled, so after a perusal of the filling directions, the lanterns were placed on the table and loaded with kerosene...
...sonofabitch!!!!!...
The World Famous lantern's instruction slip included the cryptic phrase "Do not fill tank more than half" There was no explanation for this fortune-cookieish bit of advice, and also no instruction on how one determines when the lantern is half full- there are no "fill to here" markings, and the small fill port is completely obscured by the spout of the kerosene container providing sustenance, so trying to eyeball the level doesn't work. So, in typical Dock Six fashion, I guessed.
And overshot the mark.
I discovered this fact when keroseneleakedSTREAMED out of the tank, not from the fill port, but from the tank itself. It turns out the tank has a large hole where each of the legs that hold the chimney are attached. I cleaned up the kerosene from the table top, aired out the cabin and turned to fueling No. 80.
Which was accomplished in an incident-free fashion.
Fueling Winner: Dietz No.80
With the candidates ready for action, it was time for the illumination elimination round. Time to introduce the incumbent to the festivities, the $2 LED lamp that hangs over the table, affectionately known as the " UFO Light"
Here's UFO in action:
Here is how a copy of Good Old Boat looks under the light cast by UFO. Lots of illumination, but lots of glare as well.
That is the current cabin lighting standard aboard. Let's see how our competitors compare.
With some fiddling, with both hands as the globe refused to stay raised thanks to the poor fit of the lifting bail, World Famous was persuaded to light, and with further fiddling, encouraged not to smoke (at least not until it's 18 years old and/or no longer resides in our house).
Illumination was provided, but, like every other aspect of this lamp, it was disappointing.
One can see that there is a magazine in front of them, one can discern that there are photos, one can read the title, but beyond that, gathering information from the page is a struggle. Illumination was spotty, with shadows and flickers
I briefly suspended the test to trim the flickering wick and wash the soot off the globe, hoping to increase the output.
The result?
Um, yeah.... no.
Right then, let's see what No. 80 brings to the table.
Definitely easier to light, requiring only one hand. Lift the globe, lock the bail, set the wick, strike a match, trim the wick, lower the globe, done.
The result?
Usable illumination. Warmer, brighter, over a larger area with no shadows or flickering. Not nearly as bright as UFO but easier on the eyes and bug-free!
Illumination winner: Dietz No. 80
Further testing in the cockpit on our last sail of the season earned compliments from Jack and Melanie on how well No.80 lit the cockpit, with none of the breeze induced flickering and relighting as was often the case with citronella candles, and no wax on the cockpit sole.
I think we might have a winner, with some improvement to the plan. A second lantern is needed to fully light the cabin, and lighting the v-berth with a lantern this size isn't gonna work, so there is no choice in retaining some LED lighting.
The "cozy" factor is not to be underestimated, however, and the consistent response is how much "nicer" the lantern light feels compared to the electric alternative.
We're gonna give it a long term test next season, and we'll let you know how it goes.
First off, the basic instructions came from one of our favorite books: “The Arts of the Sailor” by Hervey Garrett Smith.
You can also find the directions (including Hervey’s) on-line by googling “making baggywrinkle”. But, it’s a lot more fun to have a copy of Hervey’s book onboard.
First you have to collect a whole bunch of 5-6″ pieces of line that’s not good for much of anything else. We used the cut-off ends of the 3/4″ manila that we made our fenders out of. Lulu unlayed the line and then divided each strand into separate yarns.
Then you double a long piece of nylon line to use as a core and fasten it between two anchors. To get an idea of how long the core needs to be, a 4′ long piece of baggywrinkle, wrapped around a 1/4″ shroud, will end up about 1′ long.
Now you need to start making the individual thrums or rovings. Pass the yarn under the core piece:
And then push it up against the pieces you’ve already done:
Pass the ends around the outside of the core and down through the middle.
Then, you just tie one end on to the shroud and wrap the baggywrinkle around and around until you end up with a “brush”. Tie off the ends. Secure the knot with rigging tape if you’re insecure about the security of your knotwork, and then stand back and wait for everyone to ask, “Where’d you get those?”
There you have it.
 |
| Look for it in the insulation aisle |


Even though I have already devoted a couple of blog posts (1 and 2) to the subject of spice organization in the galley, you’d read here that neither of those ideas worked out so well for us. The solution illustrated below struck me as genius though. The plastic boxes originally contained Tic Tac candies and, in my opinion, are the perfect size for a boat. Maybe we should look for some of those when we head to downtown Port of Spain today?
By the way, relating to yesterday’s post, our vote for the island in the Windwards and Leewards with the largest number of good anchorages goes to… drum roll… Antigua! We’re definitely looking forward to visiting there again on our trip back north.