
We have two hatches in our foredeck, which are unfortunately slippery to walk on when wet - thus they pose a significant safety risk. A quick elimination of the potential danger consisted simply in placing non-skid tape on.
If only all problems could be solved so easily!


3M Safety-Walk ™ has proven to work well on our staircase, so now it gets the chance to show off on the hatch too.
Showing posts with label s/v Lunde. Show all posts
Showing posts with label s/v Lunde. Show all posts
Friday, August 31, 2012
To go, or not to go
Lotte on s/v Lunde solves a slippery problem:


Thursday, August 9, 2012
WonderWash
How do you wash your clothes onboard? Some use a 5-gallon bucket and a plunger to do the work. Lotte on s/v Lunde shows us a more elegant solution to the problem:
A few years ago we got a bit of a gem costing nothing, but it is only today that I have consecrated it. Most of all, to test whether I should make an extra effort to find storage for it, but also because the towel stack was empty and the sun shone.[Editor's note: Apologies for my poor editing of Google Translate's translation from the original Danish.]

WonderWash is a hand-powered washing machine - a wash ball with crank if you wish - you can wash up to approx. 2 kg clothes at a time. Without using much water. Or soap. And no electricity.

It is super simple. By pouring in hot water, and attaching the screw cap, a small excess pressure will be built up as the air that is in the container is heated by the water and thereby expands. This pressure helps washing solution to penetrate into the fibers and there is only a need to rotate the crank handle for a few minutes before the clothes are ready to be rinsed.
It sounds promising and environmentally friendly - and I must say that after today's test I wish I could find room for the little laundry helper. I put in a little too much soap so I had to use some extra water to rinse with, but apart from that I can easily see the point. Not just for a boat, it would also suit perfectly if you do not wash so many clothes at a time and/or do much hand washing.
But despite the successful test, our WonderWash will have to return to its place in the shed because I simply cannot cram it into anywhere onboard.
If you want to see WonderWash in operation:


Thursday, December 22, 2011
Green: gone!
Here's a tip from Lotte of s/v Lunde on cleaning corrosion from brass and bronze:
[Ed. note #1: Remember, when diluting acid, always add acid to water (A comes before W is the mnemonic to remember this). Never add water to acid! If you do, the heat released will be enough to boil the water and you will be spattered with a boiling acid mixture.]
[Ed. note #2: Always wear safety glasses when handling acid.]
[Ed. note #3: Apologies for my poor editing of Google Translate's translation from the original Danish.]
The fine hardware I have used for hanging of screens is so old that they are probably almost vintage modern. Three pieces were saved - to my great luck - in my father's rich hardware depot. Their origin is lost in the mists of time, but now they have new life on board with us.
First, however, a bit of old corrosion needed to be eliminated.
My best tip for this consists in first giving the object an acid bath, for example, in half acid/half water (really hot, so it goes faster). Do not leave them too long - just until bubble formation ends.
Then it is on to Brasso and elbow grease, though rarely is much of this needed after a tour of the acid.
The result you can see below.

Acid bath

Before and after the acid bath but before polishing Could it be any easier?

Once polishing with Brasso and you would almost think they came directly from the manufacturer


[Ed. note #1: Remember, when diluting acid, always add acid to water (A comes before W is the mnemonic to remember this). Never add water to acid! If you do, the heat released will be enough to boil the water and you will be spattered with a boiling acid mixture.]
[Ed. note #2: Always wear safety glasses when handling acid.]
[Ed. note #3: Apologies for my poor editing of Google Translate's translation from the original Danish.]
Monday, November 14, 2011
Visibility
Lotte on s/v Lunde hoists her new storm sails... her neon orange storm sails, that is. Why aren't all storm sails colored like this? If your boat is in difficulty requiring a rescue, it is likely that you will be flying your storm sails (if anything) - what a great attention-grabber!
(I really like the new paint on the bow, Lotte!)Pang-colored accessories
I actually really like the orange - but these rags, I hope not, we will need to flash too often.

One of the day's chores was to get hoisted storm sails to get measured the length of the neck, find shot points and otherwise just get an idea of how they should sit. For it should happen that one day they must be, there is a guarantee that the weather is bad snot. So we could put them both wearing seasickness, numb fingers and poor vision.

Thursday, November 3, 2011
How to: Make your own brass fittings
Having built her own screens from scratch, Lotte on s/v Lunde now makes the brass fittings for mounting them. Nicely done!
I know that many of you are choking with all this do-it-yourself (if you even still bother reading it). It was never originally thought that this blog would be a DIY / nerd blog, but at times it really is that which fills most of my life and ergo also what is most natural to blog about. And I would like to share some of the best tips and tricks that I have been fortunate to be enriched during the boat projects. Many of them I have not been able to google - it's about the tradition of craftsmen and other good people out in the physical world. [Ed: The best kind!][Editor's note: Apologies for my poor editing of Google Translate's translation from the original Danish.]
But hang on, it will not always be this way. For there are covers on hold.
However, I promised yesterday that I wanted to show how our mosquito nets are mounted. The criteria for mounting were:
In my father's rich stock hid some fine old fasteners. This was half of the suspension ready. But there were not enough fasteners to put on all four sides, and the screen would really like to be firmly seated regardless of whether it is removable or not. So we had to devise some sort of hardware that could meet those criteria.
- Simplicity
- fast service
- discreet
- and so it matches the interior

You will need a few strips of brass.
Cutting or trimming possibly out of a piece of old sheet or the like. It is obvious to recycle here.

Put the strip firmly in the vise so that it forms an angle at the end of the jaw (the part of the vise which clamps) of 45 degrees

Fold both ends of the strip over the vise using a sledge hammer or a large hammer

The bracket after the first bend. Next, scribe a line such that the distance between the line and the first bend corresponds to the thickness of what you want to hang up. The frame of the screens is 10mm and then the distance must be the same. Be sure to get stroke and bend to be parallel, otherwise it will mount crooked.

Tighten firmly so that the line is flush with the edge of the vise.

Fold against vise the jaws. Here I used an old cooper tool that can best be compared with a chisel which is flat at the end. But a piece of flat iron can also easily be used - or whatever you have.

After the second bending. Repeat on the other side of the bracket.

Drill holes for screws. Cut and sand the ends. Round off all edges with a file.
Eventually polish the brackets and they are ready for installation.

The bracket in place I've done a similar set of brackets, so the screens may be stored elsewhere (in this case on the underside of one of the top cabinets in forecastle) when not in use.

Mosquito net in operation. The two fasteners for easy and quick installation and removal.


Friday, October 21, 2011
Mosquitoes: No access!
How do you keep the pesky critters out? Lotte on s/v Lunde shows us how she builds custom-framed screens for Lunde's hatches:
[Editor's note: Apologies for my poor editing of Google Translate's translation from the original Danish.]
The mosquito net is finished. Below is instruction in pictures and text. If anything is unclear, just ask.I think that the idea of fastening the netting to the construction base instead of the slats is crucial. Otherwise, the slats would bow inwards, due to the tension.
You start, of course, taking aim. Here I would like to make a mosquito net with the target size 480 x 480 mm (external dimensions), but the method can easily be used to make a rectangular net too.

Slats of the correct length will be posted on a reusable base (here a blunt old tabletop), adapted in size. It is advantageous to let the base be slightly larger than the dimensions of the finished nets. Here is used forty slats 21 x 5 mm, depending on frame size and personal taste, you can use many other dimensions and wood types.

The joints are kept in position using double sided tape. Be careful not to use too much tape!

When slats are fixated on the base, put the net over and firmly attach to the base with a staple gun. It may be advantageous to have a helper to do this, because the net must be kept tight to get even and neat result. Here is spent brudetyl [Ed. ?], which is very dense, but you can also buy outright mosquito net.

Put a strip of glue in the middle of the slats around the frame and place a similar set of slats on top of it so that they are staggered in the corners. The trick is to use enough glue so that the slats are covered, but not so much that a whole bunch runs out. It will be impossible to remove from the net.

To fix the slats so they stay lined up, drive a little brad through the slats and into the plate. Here is used a total of eight brads (one at each end of each slat). Do not get too close to the corners, so you avoid splitting. Heads of the brads (use pliers or a cutter) are cut off and pounded in until they are flush with the slats.

Place a small piece of plastic (eg cut out of an old plastic bag) over the corners, so the glue does not ooze when the slats are put under compression .

Clamp the slats. To get an even pressure, pieces of wood are placed over the slats under the clamps.
Let the glue harden.

When the glue has hardened, cut the net off of the frame and staples. Then lift the frame gently off of the headless brads. Use, for example, a putty knife and push it under the corners, which are still held firmly by the double sided tape.
Cut off the excess net (and any glue) with a sharp utility knife.A voilá!

Fill the corners and the holes left by the brads. Sand and paint. It is possible to hang the frame by pulling a length of fine wire through the netting right in a corner, but be careful not to damage the netting. In this way, both sides can be painted simultaneously. Alternatively of course you could just paint one side at a time.
The mosquito net is finished and ready to keep the little blood-sucking and extremely rude intruders away. The frame can be mounted as desired, eg hinges and fasteners, or more permanently with screws. We needed a method that makes the screen easy to remove, so we can get to open and close the front door. The solution was another small home-made project that I will share with you soon.


[Editor's note: Apologies for my poor editing of Google Translate's translation from the original Danish.]
Monday, October 10, 2011
Chop chop!
Kitchen appliances that use 110V (or 220V for you Europeans) are problematic on most boats. And there frequently are not 12V versions. Sometimes the best answer is the 0V equivalent: a manual appliance. Lotte on s/v Lunde presents one here for our consideration:
[Editor's second note: Apologies for my poor editing of Google Translate's translation from the original Danish.]
[Editor's note: These can also be found at the American version of Amazon]I have for several years on land been very happy to have a hand blender. I blended very little with it, but chopped rather a lot. Lots and lots of onions. Garlic. Nuts. Parsley. Everything is smoked in the chopper, and I have therefore looked for a replacement for it. Not because it is dying, but because of course it requires 220V and on the boat we have 12V. Best of all, it would be if you could find one which did not use electricity because it can at times a limited resource - despite the solar and wind. Other things have a much higher priority in current accounts than just a kitchen appliance which really could easily be replaced by a knife (it's just much easier to use a hack! Especially in a seaway.).
The answer to my prayers was a manual food processor, a VeggiChop from Chef'n . And it really IS the answer.

It is powered with a pull ring like a few salad slings do.

I've now tested it with onions, garlic, ginger and various spices, and it is something close to phenomenal!
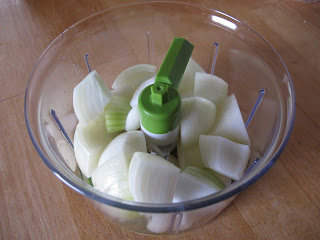
Five jerks on the leash and onions are ready.

If one goes on and pulls fifteen-twenty times, then you have something similar to puree. Wow!


[Editor's second note: Apologies for my poor editing of Google Translate's translation from the original Danish.]
Thursday, September 22, 2011
Slip Precautions
Lotte on s/v Lunde finds that a little sand, grabbed from a beach, is the perfect answer to providing non-skid properties to her foredeck. This is the same process which Downeast used on Eolian when she was manufactured, except that Eolian's sand is considerably finer: 150 grit (ascertained by comparing the non-skid with various grits of sandpaper).
(Apologies for my dubious corrections to Google's translation)
(Apologies for my dubious corrections to Google's translation)
I can attest that this process produces a very effective non-skid surface - considerably better than the "molded-in" non-skid on many production boats. And it is easy to renew when necessary, unlike molded-in non-skid.When we duly installed the new windlass, the initial steps involved in particular grinding the old deck paint off the part of the bow, where the game should be. Since then there have been painted by - almost - all rules of art. Just a small detail was missing. Slip resistance. For when that part of the deck gets wet, it becomes as smooth as a smarmy pomadeindsmurt eel. And it is simply too dangerous. So it was time to get the slip-resistant deck.
You can buy fine (and expensive) anti-slip compound in most well stocked chandlers - but at the Aero, there is a stretch of beach where the sand is just the right size to be used for the same purpose. In summer 2006 we sailed a trip to my native region - as well as updating, we took a trip to the beach in question with a colander. After having screened and sifted the sand, it was fresh and dried. And has consequently just been waiting to be used ever since.


The procedure is extremely simple: Spread the paint, sprinkle sand over. Let the paint dry. Paint again. And again. And possibly once more.
And then you can put another X on the TODO list.


Monday, March 28, 2011
All chain: bad.
Lotte of s/v Lunde tells why your anchor rode should not be chain all the way to the bitter end...
Apologies for my "improvements" to the Google translation from Danish
Oh yes, really. Everything has an end.
Also an anchor chain. Actually, it has two - on one end the anchor is mounted while the other is attached to the chain locker under the windlass, so it cannot be lost overboard by accident.
But the chain is not directly connected to the ship - as an intermediary between the chain box and chain sits a piece of rope. The famous 'bitter end' which has given rise to talk about ways to keep up / fight / lock / hang in until the bitter end - in the sense to keep going, until all possibilities are exhausted and there is no more to do.

Our bitter end with stainless steel shackles The advantage of a bitter end is that it is a lot easier to cut / chop than the chain if we were to get a situation where we have to let go the anchor in a hurry. The end is made long enough that it will reach the deck, so we do not need to first open down to the chain locker. We obviously hope that we never get there, where we must cut the bitter end. But it is good to know that it is there.

The bitter end attached to the chain locker (before loading the chain)


Apologies for my "improvements" to the Google translation from Danish
Friday, November 12, 2010
Uses for a baby bath?
Lotte over at Reiter's Bureau has found new uses onboard for something from an entirely different original application...
And there is a "side story" to this. Lotte says:
I have bought baby items. Not because there are babies in waiting, but because I have found the most ingenious baby bathtub, which I'm sure is going to become our friend. It's brilliant because it folds. And because it does not contain phthalates, PVC, Bisphenol-a (BPA) or other nasty stuff.Some the best things on boats are "re-purposed" from an entirely different field. This is another of those.

My plan for the purchase is that it can be used to collect water when it rains, and (and here is where "foldable" really stands out) to bring ashore when shopping for fruit and vegetables. Everything must be washed before it is allowed to come aboard. There are two really good reasons. One is that vegetables coming from the ground (potatoes, parsnips, carrots, sweet potatoes, kasava, ginger, etc.) will keep longer when they are clean of soil residues. The second compelling reason to rinse thoroughly (but gently) is that we can thereby minimize the risk of insect eggs, and especially cockroach eggs, aboard. Not to mention spiders, cockroaches and other unwelcome guests who already have hatched.
Flexi Bath is a Danish invention and the main target group has basically been parents living in apartments or other housing types where there is so little space that the storage of a traditional baby bath can be a challenge. I imagine that it is also practical to carry on trips, to the cottage and the beach. The bathtub has won numerous awards, including the Formland Prize last year, which is not surprising considering the craftsmanship and materials. You can watch a presentation video here and also read more about the product and the idea behind here .

I know that many have bought the Flexi Bath to use it as a plant container (the drainage hole in the bottom comes in handy in this case too) and my own use of it is indeed far from bathing babies too - now we are even considering if we need one more, so that we also have a bowl for fish, laundry or similar uses. For $39.99 (to find a store near you: http://www.easywalker.nl/usa/flexibath_dealers.asp?prov=&Submit=View) it's more or less just the matter of choosing the color that holds us back.


And there is a "side story" to this. Lotte says:
I recommended the flexibath to Boatmama: http://boatmama.blogspot.com/2010/05/eating-beets-and-bath-in-cockpit.html who of course uses the tub for what it was originally meant for. After this I wrote an email to the two guys who invented the tub, suggesting boat people as a target group for advertising (since this tub is absolutely brilliant for plenty of things on a boat) - and they got so pleased with this email, that they sent me another tub for free. So now we actually carry two tubs aboard Lunde, one for the "clean" jobs, and ond for the more "dirty" ones (fish and the like) - thanks to the blogosphere and the willingness to share ideas. - Which is also why I like your blog so much!*blushes*
Wednesday, July 28, 2010
Small details: thinking outside the box
Creative tool use always calls to me. Normally, when using a hole-saw, the hole is the desired end product. But in this project, Lotte of the Roberts 36 s/v Lunde, thinks outside the box, and sees the cutout as the work product, and the resulting hole as the waste.
One of our projects have included creating a "wet room" in the boat -ie. a place where we can hang wet foul weather gear without having itmaking anything else wet. For this to dry quickly hangers are betterthan hooks where the clothes get more folded. We’ve made somemodifications to the interior design, shielding the nav station fromthe “wet room” but when it was time to mount the desired hanger rod itproved to be difficult to find some suitable hardware for this purpose(which could pass quality control for both aesthetics, sturdiness andcorrect dimensions) - but what does a handy woman do then? She recyclesa piece of teak, who once served as a step in the old staircase (frombefore the installation of the new engine) - and by using two sizes ofcup drills, a drilling machine, a saw, some sandpaper, and six layersof varnish, the problem has been solved in true DIY style.Thanks to Lotte for becoming our third international contributor (and for the English translation!)
Two rings were made by drilling with the bigger cup first and thesmaller second. One ring was opened with two cuts so it becameU-shaped. Then sanding, making holes for screws and varnishing.
The rodis also recycled, bought at IKEA many years ago and now sawn in theright length to fit the space between the two walls. And yes, ofcourse, it’s stainless steel :-)


Subscribe to:
Posts (Atom)


 Posts
Posts


