
Decided it was time to refine my anchor snubber. For those who don’t know, the snubber is a piece of line that is stretchier than chain, used to take the strain off the chain and the windlass. The chain is let out, then one end of the snubber is either tied or hooked to the chain. The other end is secured on deck to either a cleat or a kingpost. Then the chain is let our further until the snubber is taut and the chain between the hook and the windlass is slack. Now, if the boat gets to hobby-horsing or dancing at anchor, when it comes up to the end of its tether, it stops softly as the nylon snubber stretches some, rather than stopping hard as it would if it came to the end of the un-stretchy chain. Much easier on equipment and nerves and lessens the chance of yanking the anchor out.
Anyway, my old snubber, while serviceable, was getting a little shabby looking. It was made up of two separate lines with thimbled eyes on one end. The thimbles were getting cock-eyed and the lines were different sizes. The arrangement of shackles to get these two eyes connected to one chain hook was a downright embarrassment. Time to straighten things up.
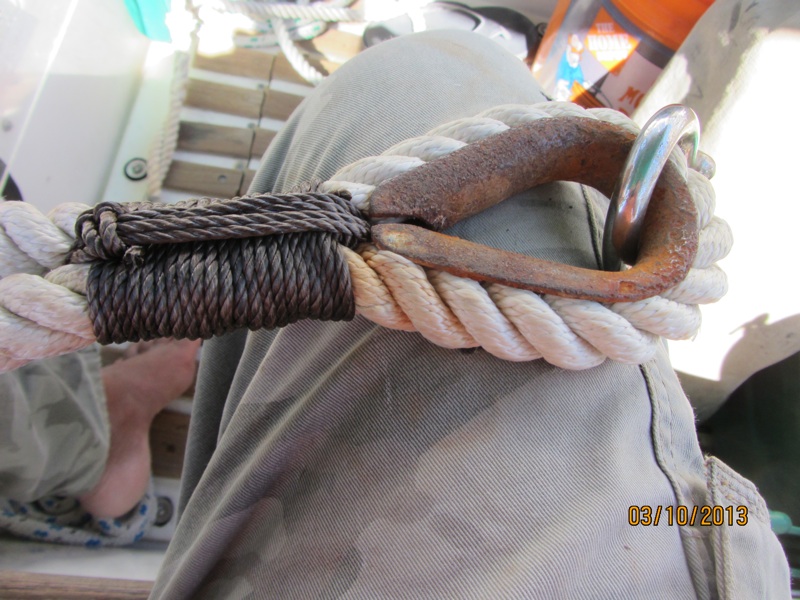
I started by finding a long enough piece of 3/4″ three-strand nylon in the lazarette. I middled it around a rusty, but still serviceable, thimble and then put on a temporary seizing using a doubled constrictor knot.
Next, I wrapped the eye using tarred nylon marline and removed the constrictor knot when I got close to the end of the wraps:
Passed the working end through the eye and pulled the other end to bury the crossover.
Made a few frapping turns to tighten the wraps and also protect them from chafe:
But, for real chafe protection, there’s nothing like old fire hose (Thank you, Silverton Volunteer Fire Department) which I sewed in place using waxed sail thread and also seized in place using a doubled constrictor knot backed up by a surgeon’s knot. Nothing like the belt and suspenders approach for peace of mind.
Add some more anti-chafe gear where the line will run through the hawse pipes and we’re good to go.
Thursday, March 28, 2013
Anchor snubber
Down in Mexico aboard s/v Siempe Sabado, Steve builds a new anchor snubber:


Monday, March 25, 2013
Nano-tech super hydrophobia
Saw this stuff over on Rhys' blog The World Encompassed:
Has anybody out there used it on a boat? Say, on canvas or Sunbrella?
Has anybody out there used it on a boat? Say, on canvas or Sunbrella?
Thursday, March 21, 2013
Non-skid
Is your non-skid tired? This can be a safety issue. Petr and Jana aboard s/v Janna face up to it and re-do the non-skid on their decks, and they have some tips for you:
Not much has happened in the last few days, i.e. nothing worth telling a story about. We were concentrated on one thing only (not to mention translating of course): creating a new non-skid deck.
We were little reluctant to get into it, because we knew it will be slow and nasty work. The first phase for sure, because first we had to sand the old non-skid, which on our boat is a molded gelcoat. It’s 39 years old and especially the front deck was almost flat and was turning into a dangerous skating rink when wet.
We are planning to paint the whole boat, step by step, but it was imperative that we do the non-skid before our crossing to the Philippines, because most likely we are up for a bit of wave action. The north of South China Sea is well known for it.
The whole boat will soon be white as a snow
Sanding the fiberglass is a nasty business, because the fine glass powder gets everywhere and when you get it on your skin it itches like hell. I wrapped myself as well as I could and Jana sealed herself inside the boat and worked on our next translation project.
First thing one has to do is to wash the surface properly, get the dirt and grease off, because experts say that you could work it into the fiberglass when sanding, which would prevent the paint to stick properly.
I spent the morning washing and waiting for the deck to dry. In the afternoon I sanded the non-skid on our deck. Took me about three hours. Not too bad. The next day I went over it again and fixed few spots I missed before.
Then we found out we have a problem. The deck was full of little holes, probably caused by improper wetting of the fiberglass mat when the boat was build. We had to fill these. Not to mention that the International boat painting guide suggests to seal old gelcoat using an epoxy primer, because it could contain microscopic holes which could trap moisture and result into blistering of the paint. We were lucky enough that they had stock of Interprotect in Kaohsiung. In the meantime we have filled the holes with Interfill. Then painted over with two layers of Interprotect and one layer of Perfection Undercoat.
Then the main step. Put on a coat of Perfection topcoat and disperse Intergrip into the wet paint using a sieve. There was naturally quite a wind so that plastic crystals were flying everywhere. Next you let the paint cure and vacuum the deck to get all the Intergrip that didn’t stick to the paint away. Or blow it away. We tried to brush it away too, but that does not work very well.
Finally we put another coat of Perfection and waited for the result. The next day we realized that the texture is actually quite coarse, too much for our delicate bums. Thus we put on another coat, which made it little better.
Few points for those that decide to follow the same path:
- Surface preparation is important. Interprotect will fill some tiny holes, but not very well. We tried to fill the holes that we missed when filling with Interfill as much as possible, but the hole usually remains visible. Next coat of Interprotect helps a bit and so does Prefection Undercoat.
- Intergrip is quite fine, you need a fine sive or it will just fall through. Also the crystals sometimes stick together creating much coarser “stones”. Had we realized that soon enough, we would have sieve them first. These are no good on the deck.
- Intergrip has to be spread very evenly and the cover should be a little thick, otherwise you’ll be left with spots where the Intergrip is sparse, which doesn’t look too great. We were worried that we don’t have enough Intergrip in the beginning and thus our deck does not have a very even texture. But it does not slip at all.
- Intergrip should be distributed as soon as possible, the paint dries quite quickly and then it doesn’t stick that well. We had about 25 degrees and we had to move fast.
- We used foam rollers which didn’t last very long. Regular hair roller worked quite well. But for topsides we will probably stick to foam.
- We also tried to mix the Intergrip into the paint and roll the result. It’s not very easy to work with it, but it’s possible to achieve quite good texture. Sieve is much better, even though it’s messy.
Getting ready for the itchy job
Deck sanded flat down to fiberglass and gelcoat
First coat of epoxy primer
Painting a hot surface is discouraged
We covered the deck with every piece of canvas we could find
Jana sowing Intergrip


Tuesday, March 19, 2013
Shortening oars
When first I saw this post, I read it as "shortening sails" - I wonder if you did too. Steve aboard s/v Siempre Sabado shows us some very proper and seamanlike oar maintenance:
One of the projects I did while we were waiting for the wind to die down was to shorten one of our sets of oars for the dinghy. We had bought a nice pair of wooden oars in La Paz which we used with the PortaBote. But when I tried using them with the Walker Bay, they were very unwieldly. I finally figured out that it was because they were about 6″ longer than the oars that came with the WB. So, I decided to shorten them to make them work better.
The first step was simply to saw off the last 6″ of the handle.
Of course, this removes the smaller hand-grip area of the oar. It would probably be useable this way but probably not too comfortable and definitely ugly. So, the next step was to shave the handle down to the proper size. I finally got to use the spokeshave that I bought several years ago.
Then the hard edges were smoothed down with the rasp:
And finally the whole thing was smoothed with sandpaper:
The traditional way to protect the oar where it’s in contact with the oarlock is to wrap leather around it and then sew it tight. However, I didn’t have any leather and I was pretty sure I’d never be able to sew it tight enough to stay put. So, instead I opted to wrap the shaft in nylon tarred marline. For finishing it off, I used the method where you wrap the line around a loop running the length of the wrap and then, pass the final wrap through the loop and pull the other end of the loop tight, burying the end of the loop and the last wrap underneath the turns. Just like you do when making a common whipping on the end of a line:
Well, I managed to get my wraps so tight that I ultimately had to use the staysail winch to pull the loop end back under the wraps:
Then I added a turk’s head to keep the oar from falling out of the oarlock,
The shaft on one of the Walker Bay oars was beginning to delaminate so I decided to wrap some line around it to at least hold it together until I could fix it. This got me thinking that maybe the oars I was working on could also use some wraps to guard against splitting at the end of the handles. I’d always heard that you could pull a constrictor knot tight enough to use it as a hose clamp. I decided to try it out. I wrapped the handles on the oars above and below the grip area using a doubled constrictor knot. Then I wrapped one end of the line around a marlinespike and the other end around a big old nail (spike) that I keep in my ditty bag. Using my feet to push and my arms to pull, I pulled that knot about as tight as it could possible be pulled without a winch. Then I cut the ends off close.
In this photo I’m actually wrapping the WB oars rather then my newly modified ones, but the knot and technique were the same.
A couple coats of varnish on everything and the oars were done.


Thursday, March 14, 2013
Hi-gain Wi-Fi
Nate installs a bazillion dB gain WiFi system on s/v Astraea :
Last August I purchased and installed a Wi-Fi system aboard Astraea called Wi-Fi for Boats. It’s a kit made by a cruiser computer guy that includes everything you need to get long-range Wi-Fi aboard your boat. I bought the system and tested it by installing it on the stern rail of Astraea.
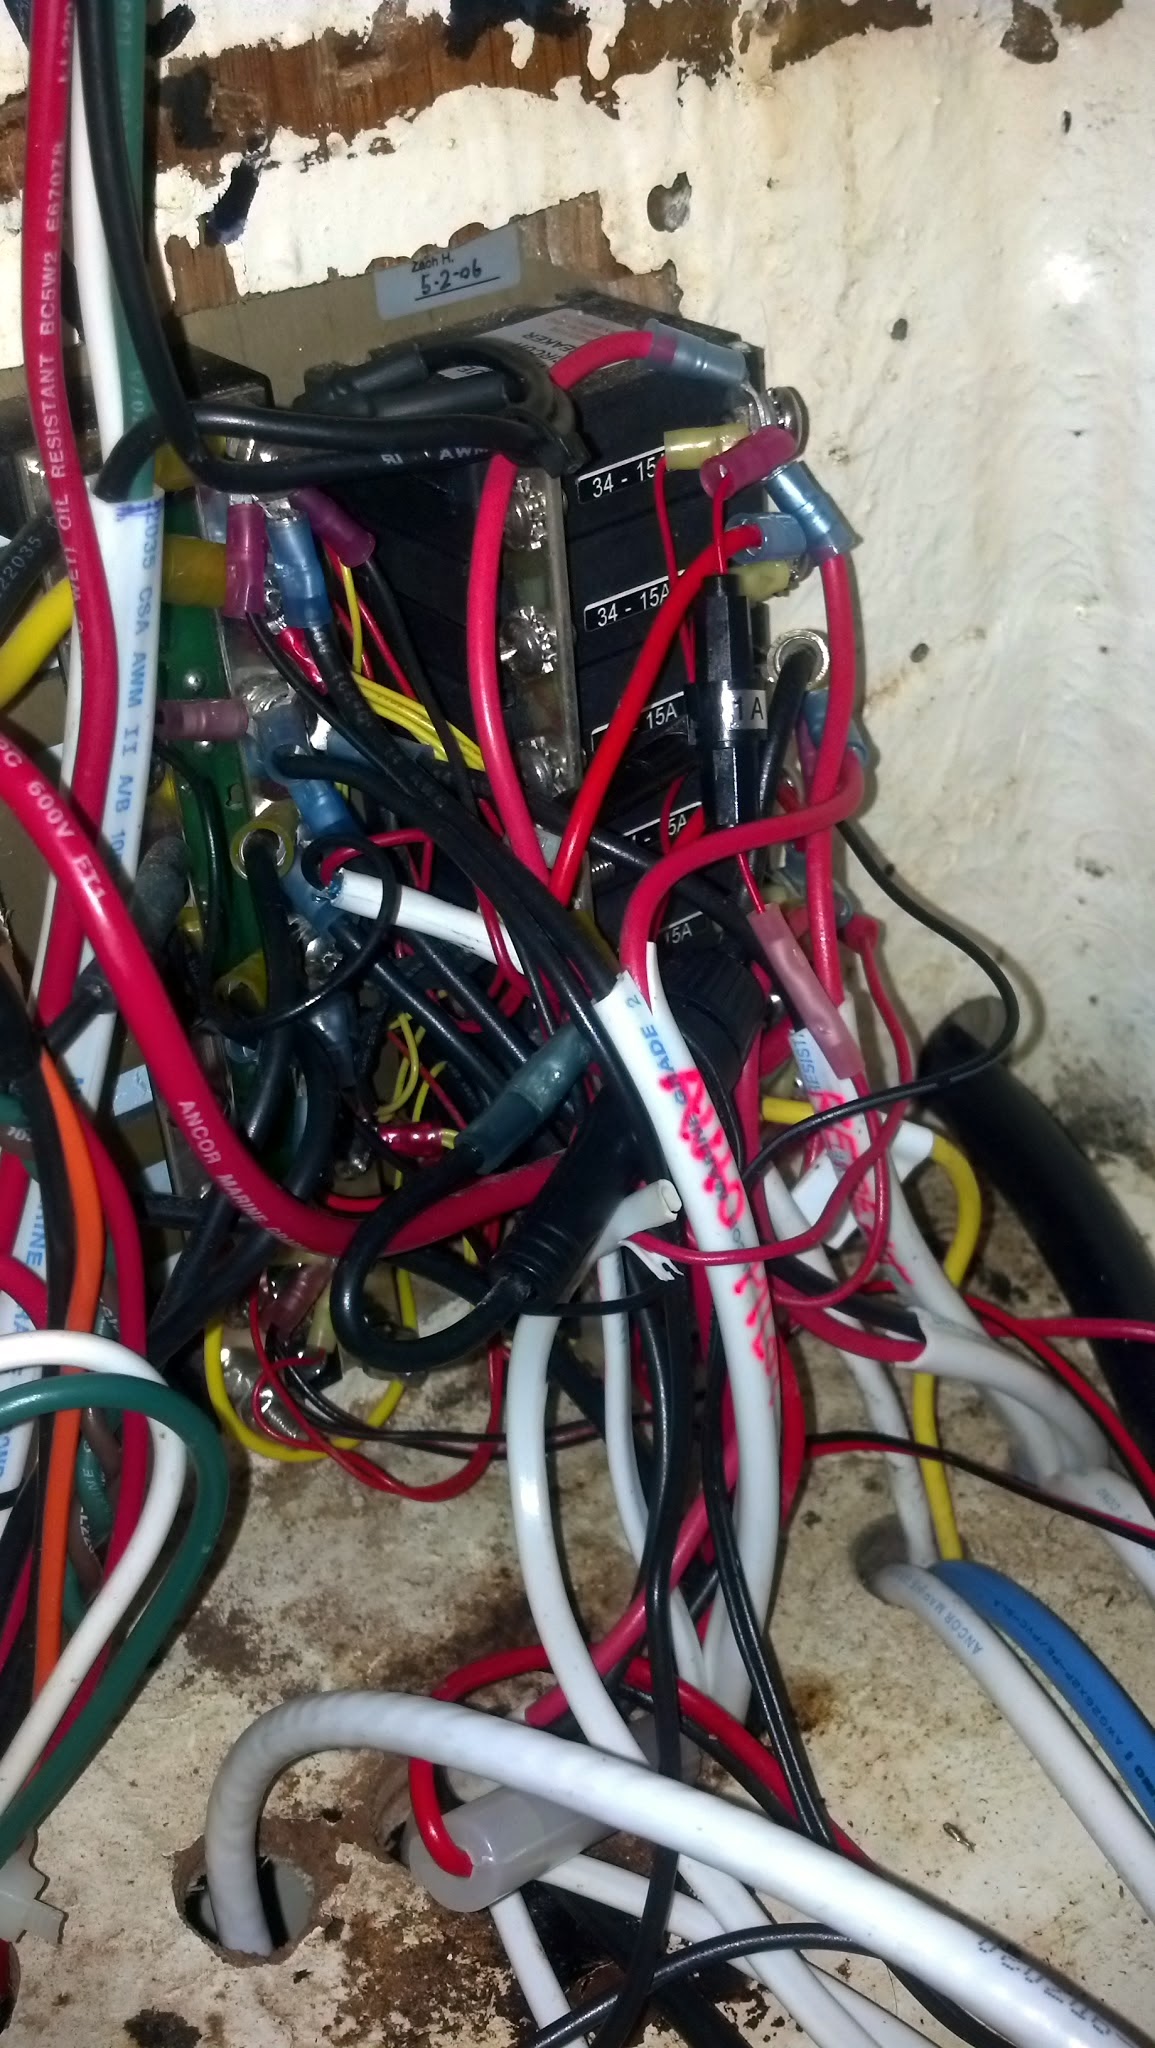
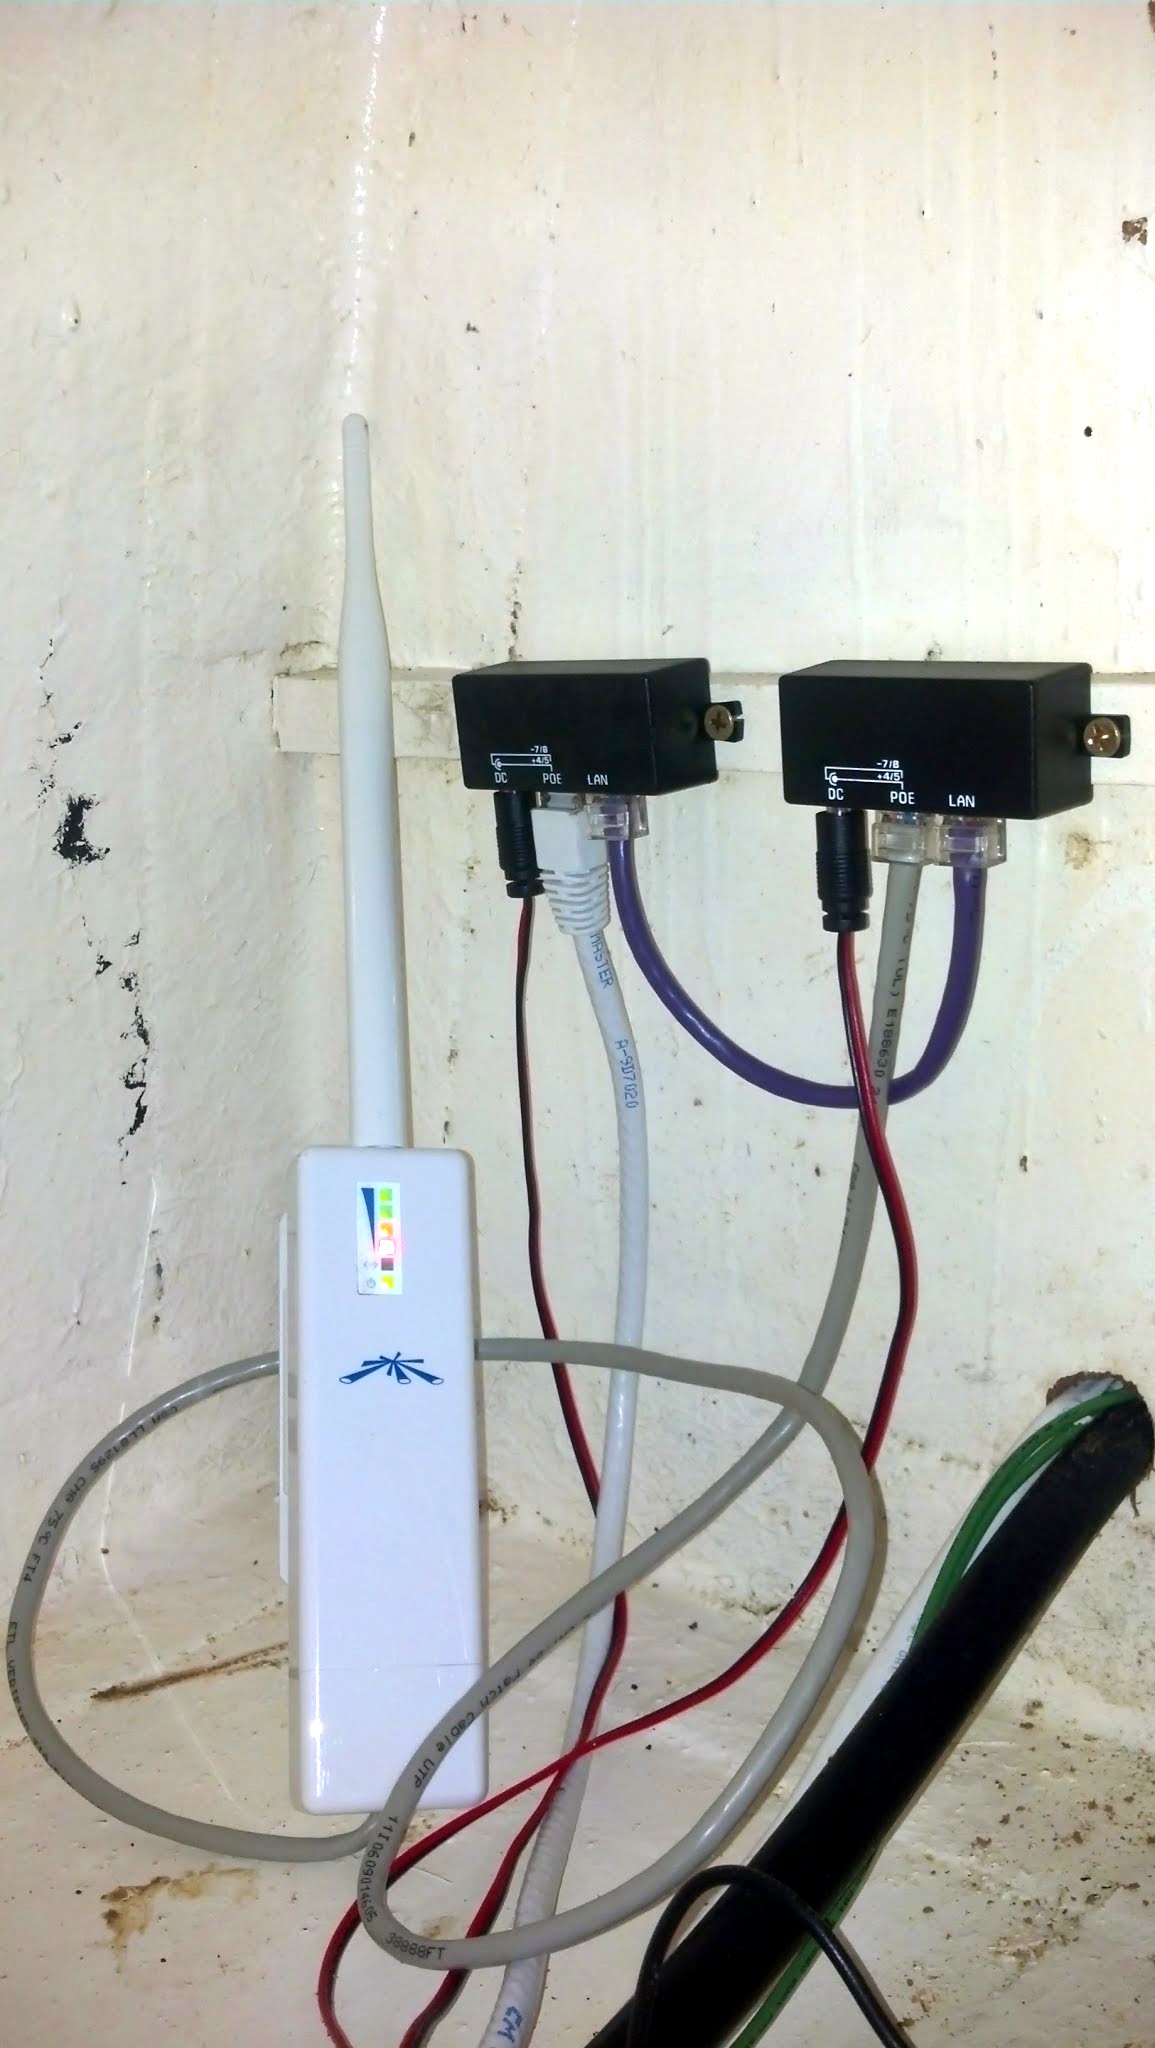
The system is pretty simple for a computer geek/boat nerd like me to install. All I had to do was wire in an extra circuit breaker in to my existing panel and plug everything in. The hardest part was running the wiring through the boat that goes to the external antenna.
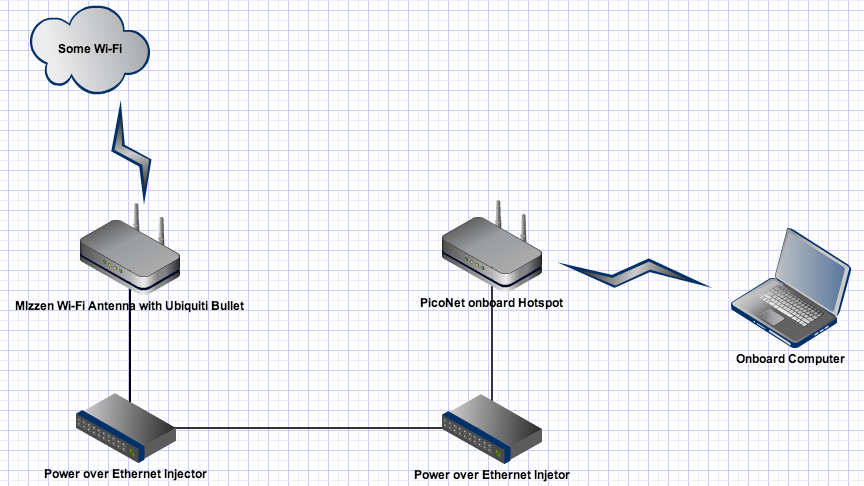
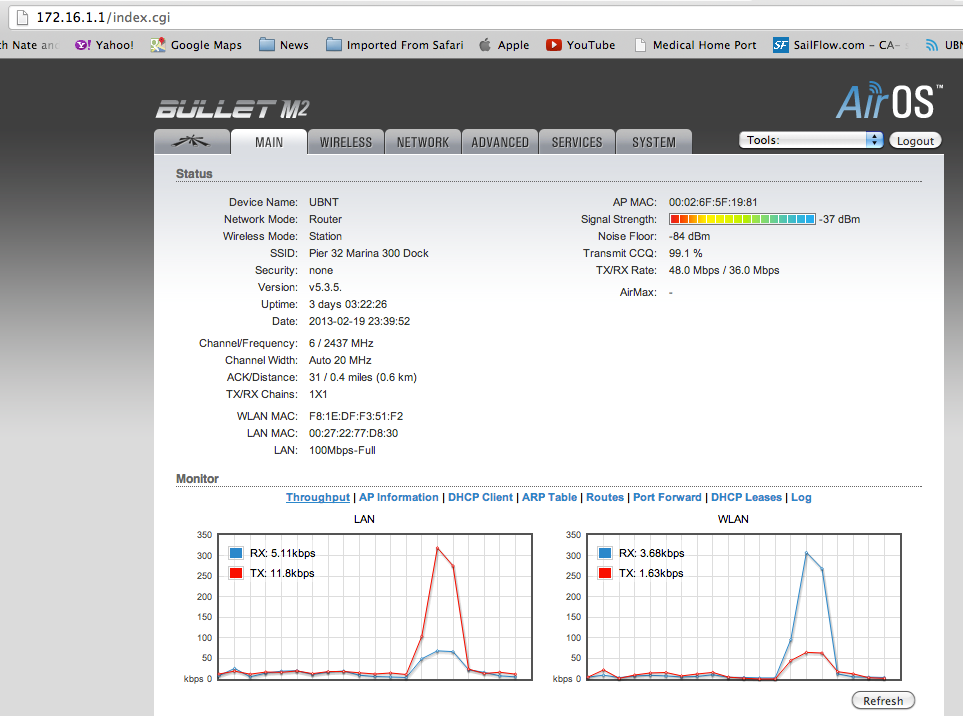
Here’s how it works. The Wi-Fi adapter on the mizzen mast communicates with a shore side station using it’s high gain antenna. That adapter is connected to a Power over Ethernet Injector bridge down in the cabin. The other Power over Ethernet Injector is connected to a PicoNet onboard hotspot that I connect my laptop to to blog about boating awesomeness.
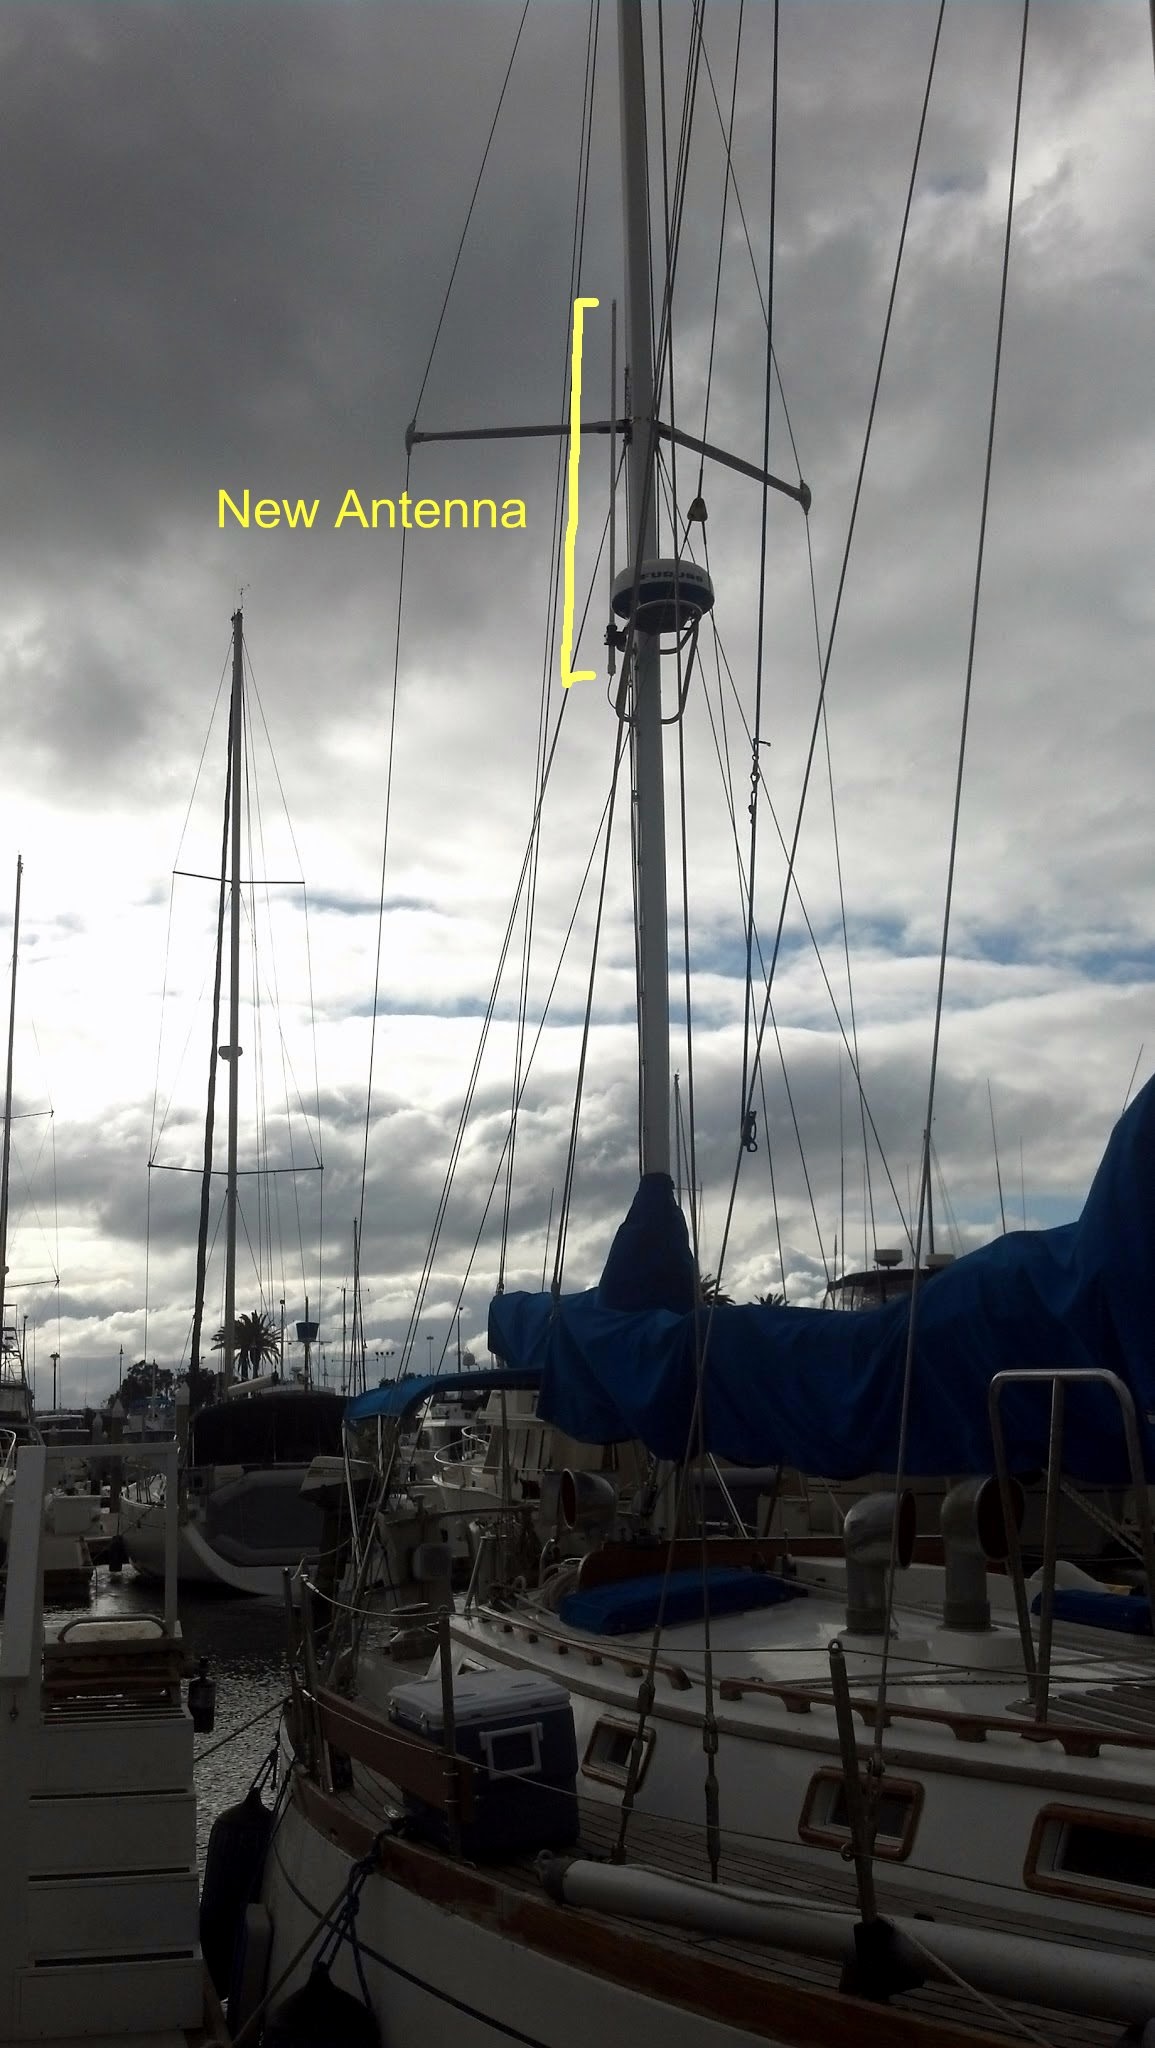
I rerouted the cable through the cockpit sole near the mizzen mast. I connected everything back together to test the system still worked, then went aloft and attached the antenna to the radar arch. The plan is to not use the radar when the Wi-Fi is in use, just in case it overpowers the little Wi-Fi system on the mast since they’re located so close together. The Furuno radar operates at 900MHz and shouldn’t interfere with the 2.4GHz Wi-Fi, but I don’t want to tempt fate and blow one or the other up, so we’ll only use one at a time.
If anyone in the San Diego area is looking to get a great Wi-Fi system installed I highly recommend Wi-Fi for boats. Dalton recently upgraded the system to use a different antenna to take advantage of the latest generation of Wi-Fi. The kit is DIY friendly, but if you need help installing yours I’d be glad to help, for a reasonable fee.

Tuesday, March 12, 2013
Crimpers: the Good and the Bad
Over at Sail Delmarva, Drew holds forth on a tool that should be in every boater's toolbox:
The second article I wrote for Practical Sailor was a 1-year salt environment chamber test of anti-corrosion greases and sprays, terminal blocks, wire types, and crimp connections. Over 300 crimps and 200 screw connections made for the test without a single failure or increase in resistance with time (some quick-connects failed). Credit goes to proper tools; ratchet crimpers make reliable connections time-after-time because they do not release until a preset compression is met. And tired hands.
Proper ratchet crimpers. Most are good, but skip Harbor Freight;
I looked at theirs and the action was sloppy. Required features
are adjustable tension (small wheel near hinge marked +/-)
and dies that make 2 crimps. Proper strippers are important too.
While it is certainly possible to use a knife,
with stranded wire it is important not to nick strands.
Today I faced a home repair task; an oven with a fried selector switch. After 40 years there was also some failed wire and connectors, so a dozen crimps would be required. I keep my good crimpers on the boat, so I pulled out a pair of cheap ones I've thrown away and then recovered from the can a few times. I've been meaning to pitch them for years, but I'm cheap and good ratchet crimpers cost. And squeeze as I might, I couldn't make a crimp that wouldn't pull of the wire if given a good forceful yank by a helper. Not good enough.
Gone for good this time.
Their very existence should violate the electrical code.
Home Depot and Lowes don't carry ratchet crimpers, only the plier-type, which I dislike very much. Electrical supply houses do, but they're not open after five. Advance Auto Parts carries a perfectly acceptable pair for $29.00, which is quite an acceptable price when you're heading out of town and your wife would like to have her kitchen put back together. They also get thumbs-up for quality, whatever that's worth. Not quite as nice as my Ancor crimpers (for 2.6 times the price) but very, very close.


Thursday, March 7, 2013
Square cut to Radiator Hose
Today, Paul on s/v Solace shows us a masterful way to cleanly cut heavy hose:
Sometimes we need to cut radiator type hose with a nice square end. Some of you know how hard that can be with the hose unsupported and cut with a hacksaw. Here’s how we do it. BUT, don't do this if the hose has a metal spiral inside. Your saw blade won't like it.
Take the hose and find a suitable piece of dowel to insert into the hose. It helps to have a firm fit and if your piece of dowel is slightly over sized, use a belt sander to take the end of the dowel down to a slight taper until it fits snugly into the end.
From my pictures you can see two hoses; one fitting inside the other. It was important for me to not only get both hoses cut square at the ends, but to also have both hoses cut to the same length.
Once the dowel was placed in the end. A line was marked and we used a table saw to cut the hose. Be careful not to cut fingers! Leaving the dowel in place in the end of the hose, we turned it over and repeated the process at the other end.
If you don’t happen to have a table saw, here’s another technique you can use. Once your dowel is placed, take a square piece of paper, and roll it around the hose so that one edge comes around and lines up with the same edge as it is rolled over the hose. This is to ensure the proposed cut line is square to the hose. Slide to desired position and with the paper firm and edge lined up, scribe a pencil mark around the hose on the paper edge. Remove the paper, and now proceed with a hacksaw to cut the hose to the line; rotating the hose as the hacksaw cuts into the wooden dowel. This is a better technique if the hose has the metal spiral "spring" inside it. The hacksaw will cut through that OK.
Thanks to Paul Gooch for his tips


Tuesday, March 5, 2013
Baby on Board
Scott and Brittany aboard s/v Windtraveler are re-embarking on their cruising life, with a new boat, and a new baby!. Here's one of the things that results from that combination:
So this is what they call "baby proofing"
Baby-proofing. It's a pretty big deal in a home and a huge deal on a boat. The funny thing is that boats are actually pretty well "baby-proofed" by design; all cupboards lock, there are very few (if any) outlets within reach, limited hard edges and corners (no coffee tables here), nothing heavy on walls/shelves that can fall on an unsuspecting child and few (if any) electrical chords running here there any everywhere like in a house. There is, however, one very big way a boat is not "baby proof": we are surrounded by water. Kind of a biggie there.
The number one rule on our boat is "stay on the boat". That might sound funny, but it is no joke. While we do have a number of safety features available in the event of a man overboard situation, we'd rather not use them. Truth be told, getting someone out of the water on a good day is hard at best, on a bad day it can be almost impossible. So, yeah, "stay on the boat" is rule numero uno. Keeping our baby on the boat? Well, I think it goes without saying that this is a top priority.
As such, we joined the ranks of thousands of boater parents who have come before us and installed lifeline netting which is the (unofficial) universal boat symbol for "Baby on Board" and the nautical equivalent of that famous car sign suctioned on rear windows across the country. Installing this netting might seem like a pretty simple and straightforward job, which is exactly what we thought too. Be warned: this is NOT a simple and straightforward job. It took Scott two full days to complete, one for each side, and it was way more work than Scott envisioned. Not hard, just...laborious.
Here are some detailed instructions on how to install this netting if you are curious. We didn't use wire along the bottom as the instructions suggest, but 1/8th diameter dacron cord purchased in 50 foot increments at West Marine (we also used this cord to attach the netting along the top lifeline as well). If we need to swap it out down the line we can, but this will work for now. The final product is awesome and we now have a boat that Isla can cruise around on with a significantly lower risk of falling overboard. And yes, she will be watched very closely any time she is on deck.
Securing the bottom line of the netting with double hitches to ensure it stays very tight.
Zip ties helped to keep the netting even and taught in between sections.
The top of the netting, attached with dacron cord
Starboard side So many of you have asked how we have "baby proofed" the boat for Isla; where she sleeps, eats, how she stays secure underway...etc. I am working on a post to share all those details with you so hang tight!
This boat screams "Baby on Board" and we're okay with that!


Friday, March 1, 2013
Wine rack
What are the essential boating fluids? Well certainly wine is one of them. Over on s/v Windtraveler Scott and Brittany put some under-utilized space to a more noble use:
Project completion on a boat is all about prioritizing, right? Well, we enjoy our vino. As such, one fun project Scott did in-betwixt bigger projects while we were still in Ft. Lauderdale was to make a wine rack for our galley. We have a wine "locker" to stow bottles in bulk, but I thought it might be nice to have a place to store open bottles where they'd be easily accessed and safe while underway. I told Scott my idea and showed him where I thought it could be installed, and he immediately got to work designing the rack with some scrap wood, a couple of dowel rods and two brackets. The next day, we had a custom-made wine rack that holds five bottles ready for action. Man do I love being married to a handy man!
Scott's hole saws came in handy yet again!
Taking the measurements so it fits just-so.
Isla likes to help mommy and daddy on projects.
Dry fit and more measurements
The finished product!
A couple of brackets, some press-fit dowel rods,
and some scrap wood and VOILA! Wine rack!


Subscribe to:
Posts (Atom)


