Wednesday, June 1, 2011

Cover the ugly Electric Winch

Paul on s/v Solace shows off his carpentry skills by making a below-decks cover for his electric windless, with some difficult corners...

 We had a new electric winch installed as we moved to a roller furling boom.  The electric winch was the same size as the old two speed, but the electrics protruded through the aft bedroom ceiling.  Also, we had a ceiling light at the same location as to where the electric motor protruded through.  My only choice was to make an enclosure for the electric motor and I took the time to also add a new low profile light to the cover box.
The cover box was made from Rimu, and while not matching the Cherry wood interior was close.  We will have a Cherry wood one made when we can easily source the wood.  You will note the angle at one of the corners on the cover box. This was placed on the cover to allow the door to the head, to swing from it's usual locked open position to the closed position.  You can just see the opening door surround, to the left of the cover box.  The light was placed and some strips of wood secured to the ceiling to give the cover something to screw to.  For my wife and I, it is not a head banger and is no lower than the tops of the door openings.  The Electric winch is a joy!

Monday, May 30, 2011

A very clever bug filter

Steve and Lulu on s/v Siempre Sabado have a perfect example of a Small Boat Project:
  • It is easy to do
  • It is inexpensive
  • It is clever
  • It solves a real problem
  • And it replaces an expensive "marine" solution
I love it!
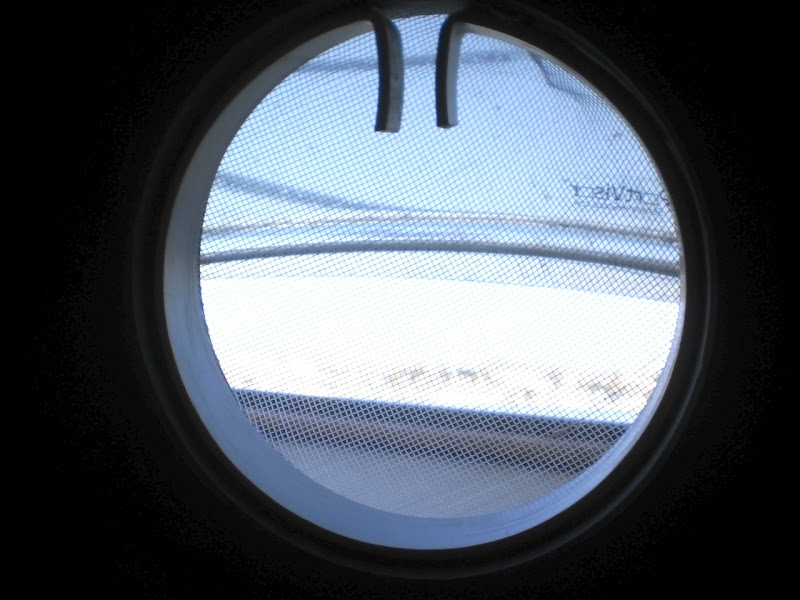
Since we're planning to spend our summer further north in the Sea of Cortez, we've been advised by many seasoned cruisers that we need adequate bug screens. Besides mosquitoes and bobos, we need to be able to keep bees and jejenes (no-see-ums) out of our living spaces. Lulu made a nice screen for our forward hatch and also included a screen in the wind scoop she made. She's currently working on the design for a screen for our companionway. We've been stymied, however, by trying to come up with a way to screen our round portholes.

We've tossed around a lot of ideas and even tried a couple. The simplest seemed to be to just use long cable ties to attach screen to the outside of the ports. Problem was, there's only a very small lip to attach to and it's hard to get the screens on, especially on the ports that have the PortVisors on them. And, the end product looked ugly as all get-out.

Some round ports are made for screens and have a little groove around the inside that a screen attached to a sort of wire snap-ring fits into. However, we don't have those grooves. I thought that the best remedy was to come up with something similar but flat, instead of round like a wire. Something that could be made smaller to fit into the opening and then would expand, holding the screen material in place. Sure, great idea, but what the heck can I use to do it?

I thought I'd hit on the perfect solution when we bought a mini-blind that we could cannibalize for the slats. Seemed like the slats would have just the right amount of spring to do the job. They didn't. The problem with them was that they were so thin that, when I tried to form one into a circle, it wouldn't stay circular but rather would bend into a misshapen triangle.

I toyed with the idea of having some sort of flat snap ring made out of metal, maybe stainless steel. Of course, I'd have to come up with a clear drawing of what I wanted but that shouldn't be too hard, should it? This looked like the most promising idea yet.

Then, one night it came to me. I got up and measured the inside diameter of the ports: 6" and 4". What if I got some 6" and 4" plastic pipe? The outside diameter of the pipe would be a little larger than 6" and 4" so. if I cut it, removed a little chunk and then pressed the ends together, it should fit inside the port and, when released, it's springiness should make it expand out to fit snugly. Yes?

Yesterday, I got 2 short pieces of 6" and 4" plastic sewer pipe and proceeded to saw rings 3/4"-1" in width.


Then, I cut through the edge of the ring but, instead of removing a chunk, I instead heated the pipe and bent the ends down, forming ears that could be pinched together to reduce the size of the ring for insertion or removal.


Lulu sanded the edges so they wouldn't snag the plastic screen.


Attached the screen using double-sided tape and then trimmed it to fit.


Squeezed the tabs together and tried her on for size:


Obviously the screen in these photos is not fine enough to keep jejenes out. But we didn't want to have super-fine screen in all the time as it severely restricts airflow. So, the plan is, when we reach no-see-um country, we'll simply lay a piece of the super-fine mesh screen over the existing screen and snap the ring back in place without taping the screen to the ring. That way it's still very removable.

Ahhh... One less thing to lie awake at night trying to figure out.

Cost of 2 pieces of pipe: 40 pesos (about $3.20)
Cost of screen: free at a boater's swap meet
Cost of tape: ?? we already had some on hand but will have to buy more.

And the beauty is, I still have enough pipe left to make at least another dozen frames for both sizes of portholes.

Wednesday, May 25, 2011

When you're hot...

Rather than just replacing it when it failed, Paul on s/v Solace hot-rodded his BBQ grill:

Original Magma BBQ
Some of us have BBQ's on our boats, which after time, seem to not perform as well when new, and in my case had an annoying feature. Mine progressively produced less heat and had  grill bars which allowed fluids to drip into a "catch tray" but often overflowed and dripped on my deck. In the end I couldn't bbq any way, because the heat from the element just seemed to die.

With the cost of new BBQ's being very expensive, I decided to rebuild the unit myself and hopefully save some money.

Two ring burner
So, first I "gutted" the heating element from the BBQ. Then I purchased a 5.5KW [that's 18,700 BTU/hr -Ed], two ring propane burner. This I purchased in New Zealand for about $30USD from a hardware store, but I remember that these where very common in the islands at most of their hardware stores. They use them to put large pots on to cook with.


Control valves for gas. Comes with burner.
Next I cut the end of the BBQ with a Dremel to open up to allow the valves of the burner to protrude through and allow gas hookup.

Next I purchased a BBQ plate with it's own raised ridges and channels for fluid to drain away from the meat. The BBQ plate was a generic plate and wasn't quite the right size for my Magma. I used a metal cutting wheel and cut to size. But to keep all fluids produced while BBQing, I welded a metal strip along where I had cut. The BBQ plate came with handles at the sides, which proved to be a bonus for handling the plate. Plate cost $15USD from the BBQ Factory Store.

Finally, I purchased a small 3KG propane tank along with a new regulator and hose. The tank had a bracket made for it so that it could be mounted on the railing close to the BBQ.

BBQ plate in place. Metal strip at front.

Finally, to "season" the plate, a coating of oil, was rubbed into the plate and the plate "cooked" to allow for the burn in. It is now important to heat the plate and then turn down the heat, because it actually gets too hot and burns off the seasoning. Cooking steaks is now a great success, with the steaks being seared on the plate with ease, rather than a slow broiling which use to happen. All guests have declared my BBQ steaks  to be wonderfully cooked.

All fluids seem to "evaporate", including fats, so it is important to spray periodically with oil to keep the "seasoning" up. Otherwise the plate will just turn rusty.

Bottle to BBQ
Cost for the BBQ mods. $45USD and about a days work looking in the stores and the workshop work. A small piece of scrap mild steel strip I had lying around and a welding machine was needed in addition to the dremel and steel cutting wheel on the angle grinder.

Monday, May 23, 2011

Dock steps from one sheet of plywood

Craft a Craft recently featured a step design which originated on the Make Magazine site (a good spot to haunt for ideas).   Although Craft a Craft was seeing this as part of a boat, I think it could be an interesting set of dock steps...
Visit - Single sheet steps

We've seen a variety of single sheet boats, where people see what kind of boat they can build from a single sheet of plywood or the like, but this is slightly different.  The plans are for a set of steps built from a single sheet of ply.

I don't know that in boat-building you are really desperate to save wood in building a set of steps, but the overall design, with the single "foot" treads looks like something that might be neat or useful on a boat.  It even has some good "included" storage areas.
one-sheet-staircase-00.jpg

Friday, May 20, 2011

You know you worry about it...

Paul on s/v Solace has a nifty way to monitor the temperature in his refrigerator and freezer.

We have recently changed our method (compressors and evaporator plates)  to our fridge and freezer. We wanted a reliable method to monitor the temperatures with out extra wiring. We have tried the manual thermometer, but found them less than satisfactory due to having to open up the boxes to read the temperature. We came across these wireless "indoor, outdoor temperature monitors" on ebay for a reasonable cost. This model has one LED monitor, with two sender units. It is able to monitor two temperatures at a time. We put one sensor in each box, and the LED monitor in the galley in a convenient place. They have been going two years with only one battery change. They measure about 2.75 inches square each.

Wednesday, May 18, 2011

Floating neutral

Have one of those seemingly ubiquitous Honda 2000eu generators? And does it successfully drive your inverter?  You're in the minority, apparently.  Over on s/v Letitgo, they have the solution.  And it's one time when a short is a good thing...
So far this has been one of my most frustrating item, I just crossed it off my list so it deserves its own post! Don’t you think?

I am really hoping that the knowledge I just gained will help others who have the same issues on their RV or Boat. It was a nonstop fruitless search to find a picture showing exactly what to do, so hopefully what is to follow will be of help to you!

What do we need to look for? What is the symptom? You will not see it, you will not hear it. The generator works perfectly, you plug it, and it works or so it seems… As when you put the fancy charger inverter from a boat, it simply doesn’t recognize the electricity produce as clean. So here is the problem: the setup of the Honda and lots of other generators as a matter of fact is a floating neutral, also referred as a floating ground (not proper apparently). Hence, something is floating and the device only recognizes 68 volts and shuts everything down. In the house your ground is linked to the main box to the neutral, well,  not on a boat. This is all done for safety purpose, which is completely understandable but it made me scratch my head for quite a while!

So solution: Which is actually against everything you learn in life so far- “short” the plug inside the generator or outside via a cable. The principal is the same, we will only use ours on the boat, so I did a permanent fix internally.

You will need the proper set of tool to crimp two cables, one about 3 inches and one 7 inches. Finish it with open U shape connector and you are ready.


Once you have those two, you will need to install them as per picture below. I have made a label to indicate that the output has been modified on the casing itself.


If you put a regular household tester, it will show that the neutral is open. But once you plug it on your regular R/V or Boat AC input, magically it registers 128 Volt and everything work like magic.


It took me a long time to really trust myself and my reading. I would like to thank Ron for his professional advice and hand holding during the entire process. You see for a “normal” human being to create a short in a plug is not natural at all.
Related Posts Plugin for WordPress, Blogger...