Tuesday, December 27, 2016

The making of a hard dodger

This is not an easy project.

It is well beyond the "small boat project" range. And yet, it is so well executed that I couldn't resist drawing your attention to it. Mike of s/v Chalice has tackled the creation of a hard dodger. And he has done it in yeoman fashion. Pay particular attention to the tools and tooling that he creates in order to do the actual project work:
  • A rib glue-up table
  • A buck for gluing up the roof panel
  • An adjustable jig to support the roof panel in place in the cockpit while supports are created
  • A rolling gantry (!)
Given Mike's proclivities, I'm sure that this is not an exhaustive list.  Tho creation of the tooling and tools took perhaps as much time as the project itself, the result shows that this time was well-invested.

Yeoman work indeed.

What follows is a combination of two of Mike's posts (I wish there was a third showing the completed dodger).

The Hard Top / Hard Dodger. *Part 1*

So here we go. This was spread over about a year. First I made the actual top piece, then the bottom rail was made right on the boat. Then I built the gantry crane to set the top piece up there and join the two together.

I started with a table to make the mahogany ribs that are internal to the top.

Made with OSB, filled with thickened epoxy, sanded, then clear coated with epoxy again to give a nice smooth surface then waxed about 8 times so the glue would not stick to the form.

From Update_July 20, 2016


From Update_July 20, 2016


From Update_July 20, 2016


From Update_July 20, 2016


From Update_July 20, 2016


Next a large form was made that matched the same curve as the ribs. I did not take pics of that part. I have a few of the actual glue up of the top piece.

From Update_July 20, 2016


From Update_July 20, 2016


There is a layer of 1/4" luan on top and bottom. Mahogany ribs with 1/2"foam panel between them with solid Mahogany about a foot around the edges.

I used plastic nails to nail the first layer to the form. This allowed easy removal and sanding. I used a cheap Harbor Freight 18Ga. nail gun. Worked great and saved about $300 from buying a Italian gun made for them.

Later I cut it to shape and glassed it top and bottom.


From July 21, 2016


From July 21, 2016


The Hard Top / Hard Dodger. *Part 2*


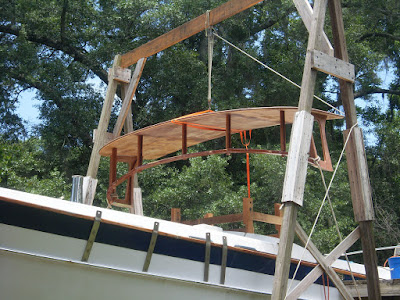
So now we have the top up on the boat. I built an adjustable jig to hold it so I could get the right height and location. Here are some pics with the process of fitting the top to the bottom rail I had made earlier.

By the way, this was the most difficult part.

From Update_July 20, 2016


From Update_July 20, 2016


Starting to look good. I think.

From Update_July 20, 2016


Looking lean and mean.
Dirty boat.

From Update_July 20, 2016


Ok now we have it together (barely). So let's lift it off and to the ground.

From Update_July 20, 2016


From Update_July 20, 2016

From Update_July 20, 2016


On the work horses for final assembly and finishing.

From Update_July 20, 2016


Sunday, December 25, 2016

Merry Christmas!


May the peace and quiet joy of Christmas be with you and your loved ones. Merry Christmas from the crew of Eolian!

Tuesday, December 20, 2016

DIY Drama - Big Hole in the Boat With a Storm Coming

A while back, Dana aboard s/v Rubigale (good news - s/v NoName is now s/v Rubigale!) had to deal with a problem while looking a storm in the teeth...

Being a boat owner without unlimited funds usually means learning to do many of the repairs yourself. As a brand new boat owner with no experience in this area, I have been chipping away at tackling things I have never done before. I started with my very first oil change, and with instructions, a hand pump and 2 hours, I managed it without incident. A few small woodworking projects  and installing blinds ensued, but nothing very exciting.

Weepy Barometer with Old Water Staining

Since our first big rain, several months after I bought the boat, I have known there were leaks on the starboard side. I usually found them coming from the headliner above the shelf behind the settee.  Three stubborn dribbles continued to occur with heavy rain, or water over the bow. Once I even saw water dripping from the screw hole in the barometer which is mounted above the other leaks, making me realize my problem was higher up.  I naively applied Captain Tolley’s Creeping Crack Cure to everything I thought suspicious. I re-caulked the toe rail with no effect. I had the mast boot replaced, which stopped the dripping into the head, but the starboard leaks remained. The base plates on the shrouds were re-bedded when the rigging was tuned and I hoped for the best. Just in case, I re-bedded the Charlie Noble, having seen water from there in a windy rainstorm. A scorching dry summer in Seattle didn’t allow me to test the changes for some time.

In early August we finally had some rain. Not the typical plant mister rain, but real rain. The three little rivers on starboard showed up on queue. The barometer cried. The chimney was dry, but it wasn’t a windy day. BUT! a new clue appeared. Drops of water came from one of the screws of the forward starboard aluminum window frame. BINGO!
Corrosion from the Leak


I had never re-bedded a window before, and I didn’t have the slightest idea what the internal anatomy of a window frame looked like. However, I had a friend that had just done this project on his boat and he emailed me detailed instructions. I bought what I was told was needed, and he even stopped by to make sure it was the same type of frame and prodded me to take the inner frame off to get a better idea.


Gap in the Sealant
Gap in the Sealant

Not only did it become more clear how the windows were mounted, and that this should be a doable project for me, but it was very clear there was daylight coming through the forward edge of the caulking and it was an obvious leak source.  It was also obvious that whoever had cut the hole for the window did not have the steadiest of hands. The cuts were undulating and erratic, and at one point the inner frame barely covered the cut.


Slow Process of Prying the Window Loose

My first job was cutting through the bedding compound from the inside, then going outside and trying to lightly pry the frame from the compound and the boat, millimeters at a time with two flathead screwdrivers. The top and forward edge (leaky side) came loose easily. The aft and bottom took forever. I was starting to sense the frame coming out as I could hear the bedding letting go slowly. I had a vision of a small victory dance on the dock with the window in hand.


CRACK!
CRACK!

Then I heard another sound.  CRACK might be the sound of victory on some circles (lumberjacks, chiropractors, gladiators), but it was not a good sound for me.  Yes, I cracked the glass at the one area that the wood pinched the frame inside. I got the frame out, cleaned it up, cleaned the old compound off the boat, and taped plastic inside and out. It was a weekend, and apparently no glass places were open. The drama was starting, because I was leaving (with the boat) for over a month in 15 days (10 business days), and most glass companies had shorter workdays than I did, so getting the glass there and back would be a challenge. I did research, left messages, called friends, went on rushed lunchtime field trips, only to be told “at least two weeks”.

I was starting to panic, but with some footwork help from my friend John, a place was found that could do the job based on the photos I texted him of the glass and the frame. It happened to be one of the places I called Saturday, but hadn’t yet returned my call. They gave an estimate based on the photos and size, and quoted a twenty four hour turn around. I drove the frame there on Wednesday (my day off), but wasn’t sure how I was going to get it back again in time since they were closed on weekends.  John agreed to take possession on Thursday, and the plan was to install Saturday. Then we got the forecast.
Summer Storm
Summer Storm


The storm was coming early Saturday, and it looked ugly. Rain and 25-35 knots of wind. It was great news for our wildfires, but bad news for a boat with a big old hole. I didn’t think the plastic on the inside and the shower curtain taped on the outside were going to make the grade. I was worried. John came through again and he and Lisa brought the new window around the time I finished work.

The job went faster with three pairs of hands. I grinded a bit off the areas that pinched and re-cleaned the surface. The window was dry fitted and the inside from secured lightly while the outside surface was taped off. The window came back out and the portion of the frame that fits against the hull was given a healthy bead of 3M 4000 UV. As John fitted the frame back in, I started re-attaching the screws on the inside frame loosely until they were all in, then tightening them all a little at a time like putting a tire back on. Finally after the screws were all tight, we got to work scraping off the excess sealant and cleaning any mess with denatured alcohol. Once that was finished, the tape came off, and the job was done.
Taping to Avoid a Mess

Applying the Sealant

Putting the Frame Together

At about 5 am the following morning, what was described as the strongest summer storm in Northwest history hit. Gusts of 40-50 mph were recorded.  It is being called a mid-latitude cyclone. Read more.

I awoke at 8am to a text…”how’s the window?”  Honestly I was afraid to find out, but the bilge pump hadn’t come on so I figured it couldn’t be too bad.  I crawled from the V-berth and inspected the window frame-dry. The three rivers that ran down the wall beneath it-dry. The barometer-weeping like a willow. Oh well, three out of four is pretty good in my opinion. The barometer leak will wait for another day. I have a few leads and a lot of work, but at least I didn’t have a huge hole in my boat during the biggest summer storm in Northwest history!
There's a Big Hole in my Boat!
There’s a Big Hole in my Boat!

Photo Credits: Lisa Mize – Sunrise Photography by Lisa

Tuesday, December 6, 2016

Lexan vs. Acrylic

This post originally appeared on Windborne in Puget Sound

If you are replacing fixed ports on your boat, you will be faced (or should be faced) with the choice between Lexan (a trade name for polycarbonate) and Plexiglass (a trade name for polymethylmethacrylate, aka acrylic).  Here are some features of each which might help you decide which to use:
  • Plexiglass is transparent to UV radiation.  That means that anything inside the boat will be subject to UV degradation if the sun shines thru the window.  That also means that UV radiation passes harmlessly thru Plexiglass without having any effect on it.
  • Lexan is opaque to UV radiation.  This means that it protects the boat interior from the ravages of UV.  But because the UV radiation is stopped by the Lexan, that means the Lexan is subject to the damage that it is preventing on the interior.  UV damage to Lexan causes it to turn yellowish brown and craze (millions of tiny surface cracks).  The effect is that your view eventually is destroyed:
    Lexan window after 7 years
  • Plexiglass eventually crazes too...  But after a much longer time period.  However it does not turn brown or discolor.
    This Plexiglass port is 38 years old.
  • Lexan is often touted as the "bullet-proof plastic":

    PropertyUnitPolycarbonateAcrylic
    Tensile strength σΜ at 23°CMPa 60-70 80
    Flexural strength σbB MPa 90 115
    Impact strength acU (Charpy) kJ/m2 35 15
    Sources:
    • Lexan 9030 Sheet Product Datasheet
    • Plexiglas GS Product Description

    In tensile strength and flexural strength Plexiglass is stronger than Lexan.  Plexiglass is weaker than Lexan only in impact strength (resistance to penetration by a quickly moving sharp object). 

    These comparisons are made on virgin material in both cases.  I have no data, but all that surface crazing has to act as stress risers and therefore crack starters - much earlier for Lexan than for Plexiglass.
  • Lexan is two to three times more expensive than Plexiglass.
  • Lexan is less scratch-resistant than Plexiglass
So, as in many things in life, the choice is not as clear (pun unintentional) as it might seem at first blush.  As the midway carny says, "You pays your money and you takes your chances."

I will say tho, that for Eolian, we have chosen Plexiglass whenever it was available.


    Tuesday, November 22, 2016

    Barbecue regulator tether

    Please welcome new contributors Rich & Jeni, who sail their Tayana 37, s/v Ramble On.   As their first contribution, here's a simple and effective (the best kind!) time and money saver:

    Sorry for the lack of a witty title; I just don’t have the energy right now.

    If you have a boat you probably like to be outdoors.  And if you enjoy being outdoors, you probably also like to cook outdoors.  Ergo, if you have a boat and you like to cook outdoors, then you probably have a barbecue mounted to your rail.  If not, you have no idea what you’re missing.  We cook outdoors a lot.  In the summer it helps keep the boat cool by not cooking inside.  Pretty much, if it’s not raining I’m Q’ing.

    Jeni and I were going to “Q” the other night, in fact.  And that’s why I have to say it was bound to happen eventually.  I’m actually quite surprised it didn’t happen sooner.  And if you have one of those cute little marine barbecues with the cheesy pressure regulator, if it hasn’t already happened to you it probably will.  When I pulled off the cover to warm up the grill, plop.  Glug, glug, glug.  Off popped the regulator, and straight to the bottom it went.

    “Hey, wanna order take out tonight?”

    In two days we had our replacement regulator from Port Supply and upon further inspection I realized a small tab in the casting.  I’m not sure if this was the manufacturers intention or not, but this appeared to be the perfect spot to crimp a stainless steel safety cable.  A trip to the hardware store and $4 later we were back in business.  A small carabiner on the other end clipped right into the rail mount handle.  It’s as if it was meant to be by design, even though the manufacturer makes no mention of it in its instructions, nor do they sell some overpriced version as an “accessory”.

    Needless to say, my regulator (and hopefully yours now) will not be going for a swim.


    Tuesday, November 15, 2016

    Re-bedding One Stanchion

    It's getting cold on the East Coast, so here's a post that Rick on s/v Cay of Sea did last summer. Rick always shows excellent attention to detail...
    I have been suspecting this particular stanchion as the source for leaks for quite a while. At one point 6 or 7 years ago, when we were in a shallower slip in this same marina, we had a super low tide. The boat grounded out and leaned over against the finger pier and, I think, slightly bent this particular stanchion. I’ve never re bedded any of the stanchions, so this was the original compound underneath. Stanchions are not designed to be pulled on, and certainly not designed to withstand having the weight of the boat push them into a pier, so I believe that is when it began to leak a good bit.  It may have leaked some before then.

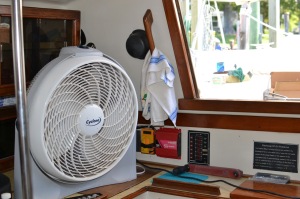
    Regardless, I decided that I wasn’t going to hide from the heat today, and ventured down to the boat with my large fan in hand. I set it up on the galley counter, and it made a huge difference in tolerating the heat today. I also put up all my hot-weather canvas and kept as much sun off the boat and myself as possible.

    Artificial breeze was critical today.
    Artificial breeze was critical today.

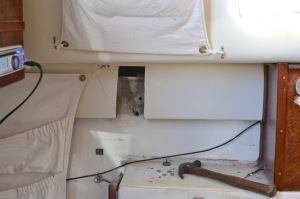
    The fasteners were impossible to access with the hull liner in the way. I’ve thought about this project for a long time, and had determined that the only way to gain access to the fasteners under the side deck was to cut a window in the liner. I had to remove the stove from this space, and the fold-up table it sits on/sits behind. I moved all the cushions to the v-berth to keep them out of the dust, then donned my respirator and started cutting. Took about 90 seconds.

    A 5-inch grinder with a cut-off wheel makes this so easy.
    A 5-inch grinder with a cut-off wheel makes this so easy.

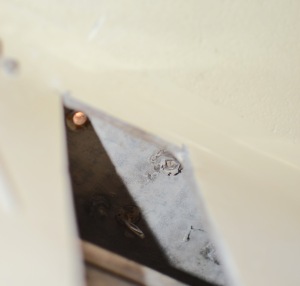
    This is the view up behind the window in the liner. I've already removed the fasteners and stanchion.
    This is the view up behind the window in the liner. I’ve already removed the fasteners and stanchion.

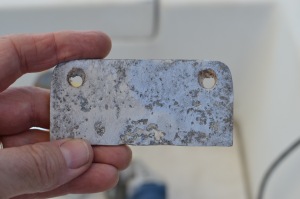
    The window made access easy.  I had the fasteners off and the stanchion removed in another 10 minutes. The caulking underneath was insufficient to begin with. I mean, there really wasn’t enough of the old compound down there to begin with.  I scraped it off and cleaned up the surfaces with a wire wheel. There are dissimilar metals involved, so there is also quite a bit of corrosion both on the spacer plate and the toe rail.

    Lots of pitting here. Aluminum against steel, with stainless fasteners, frequently dowsed with salt water.
    Lots of pitting here. Aluminum against steel, with stainless fasteners, frequently dowsed with salt water. . .

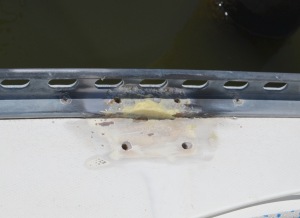
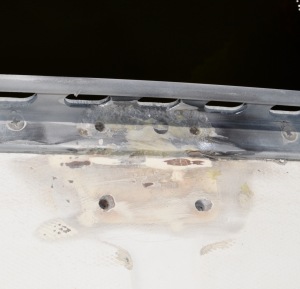
    I forgot to photograph the section of the rail before filling with epoxy. It was significantly corroded away, and I had to fill it to make a flat surface for sealing.
    I forgot to photograph the section of the rail before filling with epoxy. It was significantly corroded away, and I had to fill it to make a flat surface for sealing.

    You can better see the extent of the filled area in this photo.
    You can better see the extent of the filled area in this photo, now that the excess epoxy has been sanded away.

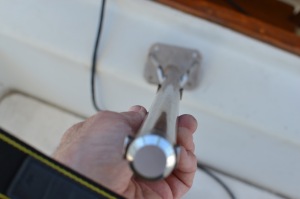
    I re-bedded the stanchion with butyl, after straightening the stanchion. I was not able to get it completely straight, but it’s much better than before, and I don’t think anyone can tell it was bent now.

    You can see a very slight bend to the left at the bottom of the stanchion. It was much more pronounced before I straightened it.
    You can see a very slight bend to the left at the bottom of the stanchion.

    I refastened the stanchion with lots of butyl between it and the deck, bedded the screw heads and tightened it down. I got lots of squeeze-out, which is good. That’s how you know you’ve used enough bedding compound. After that, I made a cover panel for the window in the liner. I had some fiberglass left from when I enlarged my engine compartment a couple of years ago, and it was the right thickness and color.

    Not a perfect piece, but it will be pretty much out of sight anyway.
    Not a perfect piece, but it will be pretty much out of sight anyway.

    I spent another 15 minutes picking up and cleaning up, but left most of the tools out for re-bedding the next suspect stanchion in my quest to stop leaks. Here’s a photo of the remounted stanchion. It used to lean inward toward the coach-roof, but it looks straight now.

    It' s the first stanchion forward of the blue cloth in the toe rail.
    It’ s the first stanchion forward of the blue cloth in the toe rail.


    Tuesday, November 1, 2016

    Bimini Roof Canvas Completed

    This post originally appeared on Windborne in Puget Sound

    Finally, I have completed the last of the three cockpit bimini canvas pieces:  the center section.  This panel is zipped to both the forward and aft roof panels, meaning that its size is completely dependent on the placement of those two panels; they had to be completed first.

    But because the old center panel had to continue in service until the new one was fabricated, the forward and aft panels had to be properly located.  In other words, because I did this work in sections instead of all at once, the new roof duplicated the old completely...

    Because the old center panel fit perfectly, rather than pattern the center panel with DuraSkrim I chose to simply roll out some Sunbrella and trace the outline of the old center onto it.  The size is not terribly critical; instead it is the zipper placement that is crucial.  That being the case, I did a lot of measuring and annotating on the old center panel:


    Again, placement of the zippers is what controls the fit here.  So I measured outside-tooth to outside-tooth at perhaps a dozen stations along the old panel.  Then, when applying the zippers to the new panel, I duplicated the station locations and ensured that the zippers conformed to the measurements.

    I have learned thru this project that zipper position in a lengthwise direction is also critical, especially when there are pairs spanning the length.  To make this work out properly, I followed these steps:
    • Locate the centers of both the old and new panels by folding in half, and mark them.
    • Install the old center panel, and transfer the center markings to the forward and aft panels.
    • Work on one edge at a time, I started with the aft edge.  Install one of the new zipper halves to the aft panel zipper.
    • Hold up the new panel, matching the center marks.
    • While continuing to hold the panel in place (you may need help here), make match marks on the new zipper half and the center panel an inch or three away from the center.
    • Remove the new zipper half from the aft panel.
    • Position the new zipper half on the new panel using SeamStick basting tape, matching up the match marks.  Note:  at this point, with no other reference it is not possible to exactly locate the zipper width-wise.  Instead, using another new zipper half on the opposite edge, simply ensure that zipper placement will allow both zippers to fall approximately equally on the fabric.  Exact spacing at the measurement stations will be established when the opposite zipper half is installed.
    • After sewing the first zipper half, take the panel out to the cockpit again and zip it up.  Install another new zipper half on the other aft panel zipper.
    • Pull the panel firm athwartship, and make match marks on the new zipper half.
    • Following the steps above, install the second zipper half.
    At this point, zipper installation is half done, with the attachment to the aft panel complete.  Complete the forward zippers in a similar fashion, with these two modifications:
    • When establishing the position of the first zipper half, match up the centerline marks as before.  But this time, slide the panel a little port and starboard, watching for wrinkles to form and dissipate.  You are looking for that placement where there are no wrinkles - it may fall when the centerlines are not quite matched up.  Match mark the zipper half and the new panel.
    • When sticking the zippers in place with SeamStick, be very, very careful to get the outside-tooth to outside-tooth spacing at the measurement stations the same as on the old panel.


    Ta DAAA!


    So, what did it all cost?  I'm afraid I can't be entirely accurate because I used some supplies from earlier projects.  But what I can do is to make an estimate on materials costs, based on the Sailrite catalog I have here on board (check the Sailrite website for current prices):

    Item Quantity Unit Cost Extended Cost
    Sunbrella, Erin Green, 46" wide 10 yd 16.95 169.50
    DuraSkrim 10 yd 2.95   29.50
    Binding tape, 3/4", Erin Green 80 ft 0.50   40.00
    Zipper, #10, 48" 6 7.50   45.00
    Zipper, #10, 60" 4 8.70   34.80
    Zipper Pull, #10 10 1.70   17.00
    Zipper Stop, Stainless 2 packs of 10 2.50     5.00
    Common Sense fastener, male 50 0.60   30.00
    Common Sense fastener, eyelet 17 0.195     3.32
    Rivet 100 0.15   15.00
    Seam Stick, 3/8" 1 8.95     8.95
    Seam Stick, 1/4" 1 6.95     6.95
    TOTAL

    $405.02

    I also bought some tools that, tho they were used in this project, will be used again in future projects.  I don't know if these should be charged against this project or not (you decide), but you should definitely have these tools to do the work:

    Item Cost
    Rivet Setting Tool Kit 89.00
    Common Sense Eyelet Hole Punch 69.50

    I did not include the cost of the thread because I bought a large spool years ago and have been using it since.  You definitely want the Teflon Tenara thread or equivalent - it will outlast your boat.  Don't settle for polyester thread.

    And finally, you need a heavy-duty sewing machine to handle this.  I heartily recommend the Sailrite LS-1 or LSZ-1 (zig zag - if you intend to sew sails).  They are expensive and worth it.  We got ours used for less than half the new cost.

    Tuesday, October 25, 2016

    Solar Power, And More

    We haven't heard much from Brian over at Dock Six. But he's been busy...


          "But where we are going, Oh it hasn't fully, fully been told..."
                                                   -Ruby Velle and the Soulphonics


    So, where were we?

    Right:  Boat is launched, boat is sinking, boat stops sinking, yadda yadda, Karma glides into her slip with no further drama.


    With one boat launched successfully, it was on to the rest of the fleet.   With a little help from the crew of  Boats....


    ...we got our commuter dinghy, Chameleon, to the marina and into the water.

    Then, we tackled Ereni, giving SWMBO's Bluenose a quick and dirty makeover... and a black nose in the process, to cover some of that quick and dirty.


      Ereni is due for some serious  hull refitting this winter-  the brightwork needs to be brightened, the hull needs to have some blisters ground/filled/faired, and then we'll refinish the deck and topsides.  But, we think we'll keep the nose treatment, and add some nose art- SWMBO and I agree we both kinda dig the vintage "rat rod' vibe.


    Over the two full years we've lived with, and aboard, Karma, we've developed a pretty good idea of our wants and needs, and have fulfilled many of them along the way...

    ... and created new ones.

    Our reefer install has been a well-received luxury, with an unintended consequence - power insecurity.

    We have 3 40w solar panels that live on top of our bimini, feeding a single Group 24 house battery and a Group 24 starting battery, also charged by the 35 amp alternator on the inboard diesel. Last season, this system proved sufficient....

    ... barely.

    If the solar panels underperformed for more than a day, some motorsailing was required to top up the batteries.  We were careful about energy usage, charging electronics only during the middle of the day, being judicious about illumination, vhf and instrument use, etc. and never really had a power crisis...

    But still....

    This season, I made the decision to add more power and more power storage. Here's the plan:  add another 100w of solar power, in the form of a semi-flexible 100 w panel installed on the dodger, then combine the 2 Group 24 batteries already onboard into a two battery house bank, and add a third Group 24 battery for starting, locating it just aft of the transmission in the engine bay. Next year, we will replace the group 24 house bank with a pair of 230 amp hour 6 volt GC-1 golf cart batteries, if we find that the 160 amp hour capacity of the house bank is not enough We decided to isolate the starting battery from the charging circuit- we opted to install a Xantrex Digital Echo Charge.


    To quote the manual:

    The Digital echo-charge automatically switches ON and OFF, charging a starter or auxiliary battery without affecting the main house battery bank. The maximum charge current is 15 amps when the starting battery is 1/2 volt to 1 volt DC less than the house battery...  When the input voltage is 13.0/25.5 volts DC or higher, echo-charge automatically switches ON. The LED glows a steady green. When the input voltage is lower than 13.0/25.5 volts, the echo-charge automatically switches OFF, and the LED blinks green. The output voltage of echocharge is limited to 14.4/28.8 volts. When it reaches 14.4/28.8 volts, the charge current will decrease, maintaining a float condition."

      So, I bought a bunch of obscenely priced cable, less obscenely priced wire, a battery and assorted electrical parts and pieces and tools and stuff and dug in, on the hottest day of the year....


      ... and everything largely went together better than I expected....

    .... once I pretty much gave up on the original plan.

    I cut and stripped and crimped new cable to wire the existing batteries in parallel...

     ...and that is pretty much where the original plan ended.


    A "semi-flexible 100w panel installed on the dodger" became a semi-flexible 100w panel mounted on the foredeck. temporarily laying the panel on top of the dodger and measuring output demonstrated that there was just too much shading for the panel to generate anywhere near it's potential output. Because of our boat's design, and our usage, the foredeck gets little traffic, so I decided to see if the "you can even walk on it' claims about semi-flexible panels were true.

       The install was pretty straightforward, once I wrapped my head around drilling 3/4" holes in the deck.  An hours worth of work saw two of the aforementioned holes drilled, some wires run, and the panel fastened to the deck with, and all fittings sealed with, 3M 4200.


    The new panel got a new charge controller, to complement the existing bimini bank charge controllers, then the controller output for both the bimini solar bank and the foredeck solar bank were driven to a distribution block and thence to batteries...

       ...Which were not happy at all.

        Note to self:  always check polarity before connecting 100 w panel to new charge controller.

        Then check it again.

        Then check it again.

        I didn't, and wired the panel to the charge controller backward, and didn't realize my error for 48 hours.

       I bought a new charge controller, and now the batteries happily charged away...  but wouldn't hold a charge.  Well, 5 year old lead acid batteries are due for replacement anyway, so "Next year, we will replace the group 24 house bank with a pair of 230 amp hour 6 volt GC-1 golf cart batteries" became "TODAY we will replace the group 24 house bank with a pair of 230 amp hour 6 volt GC-1 golf cart batteries."

       (Note to those of you playing along at home:  Golf cart batteries are about the same width and length as Group 24 batteries...but about twice the weight.  Getting them up onto the boat, then down into the boat, then down further into the battery bay, was an exercise, that in retrospect, would be less danger-filled if one is wearing steel-toed boots, not flip-flops.)

    So, new batteries go in, cabling is connected,  and power flows!  Meanwhile, it becomes apparent that "add a third Group 24 battery for starting, locating it just aft of the transmission in the engine bay." is a non-starter.  So, the new batery gets located slightly farther aft, under the aft cabin berth.  The Xantrex Echo Charge install was a breeze- the instructions were clear, the manual was well-written, and all of the supplied bits and bobs were of good quality.

      Was it worth it?

       Yep.

       We now generate more power than we can use  and store most days, and have had no problem keeping ahead of our loads even during our very hot July, when our refrigerator was running much more often than it's typical 30% duty cycle.

        As we have realized the need for more power, we also have been grappling with our need for more space. the S2 8.0C is a cleverly designed boat, pulling 26 feet of accomodations out of a 26 foot LOA hull...  but that means that on-deck and cockpit storage is  non-existent. Coaming pockets would be a big help for line management- sheets would no longer be all over the cockpit benches and underass, an uncomfortable proposition during a crash tack.  I did some measuring, found a pair of fire extinguisher pockets in the clearance rack at a local chandlery, and a little mahogany and varnish and cutting larger holes in our boat and screws later...


    Our cockpit is slightly more organized.

    Also seen in the above picture, behind the compact sportsdawg, you can kinda spy that scrap mahogany was also used to craft risers, to raise the height of the bimini slightly.

    Below, little has changed, other than cushions that are 1" thicker and comfier, and new Low-Buck back cushions and throw pillows have been added:


       We lucked out at our local grocery store (I shit you not- the grocery store)  and found outdoor furniture cushions and pillows in the right colours,  and amazingly, the right size, for half price.


        Life is good, and more comfortable than ever...and the sailing's not too bad either.


    Thanks for having a read.  Pass the word-  Please "Talk the Dock!"
    Related Posts Plugin for WordPress, Blogger...