Over at
s/v Cay of Sea Rick has an improved method for handling his deck-stepped mast wiring. Using deck-mounted connectors for this is a weak solution - Rick's is much better.
This topic arose recently on the Watkins Owners’ Group in Yahoo groups, and it is a particular subject of interest to me. After several difficult experiences with mast wiring and unstepping/stepping, I researched and found a fix which I implemented several years ago.
What We Need
Let’s define the requirement. The mast wiring connection with the wiring harness must be:
- completely water-proof and leak-proof
- corrosion-proof
- Very UV resistant
- fast and simple, because…
- you don’t want to have to figure out “how it goes” each time
- Your mast is suspended over your deck by the crane, waiting for you to complete your wiring hook-up (I have experience with this problem), or
- The yard crew is doing it, and if you aren’t there to supervise, they may not get it right, because they don’t understand how it’s supposed to work (I have experience with this problem too)
But what do we usually deal with? What is the operative word for most boat builders? Cheap. I hate to say it, but for most of us, that is what we have. A cheap fitting that was used by the builder because it didn’t take long to install and it didn’t cost much. They leak, corrode, and become brittle, and constantly introduce electrical problems with the wires up your mast. Your lights stop working, the radio will receive but not send, etc.
But even if you spend a lot of money on the fitting and it meets the above criteria, eventually UV will destroy it and the wires that attach, and you will have a problem. Sooner or later. When you begin to research through-deck connectors, or water-proof connectors, etc., you discover literally hundreds of products that are supposed to be weather-proof. Most of them are some variation of plastic connector with rubber or silicon seals that the sun will cook in about 2 years. If you are a boat owner who unsteps his/her rig each year, you will get failures sooner, just because you have to manipulate the fussy little connector more often.
Solution
My research led me to Tim Lackey’s web site and construction logs. Specifically, his solution for his Pearson Triton Glissando. This was so common-sense, so fool-proof, that as soon as I saw it I knew this was what I would do for Cay of Sea, and that it would always work perfectly.
My Implementation of Tim’s Concept
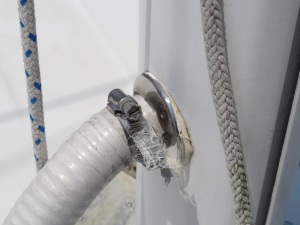
The basic idea, as you saw in Tim’s photos, was to pass the wires through the deck via a conduit. That means the wires exit the mast and pass through the deck by some means. Tim used (and I copied him) a one-inch stanchion base for the mast and a one-inch plastic/marelon through-hull for the deck. White sanitation hose is the conduit, connecting to the “flange” on the stanchion base, and the nipple on the through-hull.
That means a hole in the side of your mast (I have envisioned this for deck-stepped masts, but it should work for keel-stepped as well). 10-12 inches above the deck should be fine. If you don’t have a hole there, you have to cut or drill one large enough to allow the wires to pass through easily. I cut a one-inch hole. This matched perfectly with the stanchion base.
 |
| Stanchion base with white sanitation hose. The stringy bits are the
remnants of duct tape I used to cover the sharp edges of the hose clamp
end. Yeah, I need to renew the tape. |
The base was screwed on (need tapped holes for this, of course, to accept the screws) and sealed with polysulfide.
 |
| View from the opposite side. Unless your mast is perfectly flat on the
side, you will need the sealant to fill the area where there will be a
gap. |
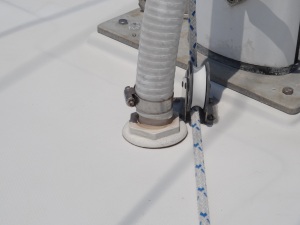
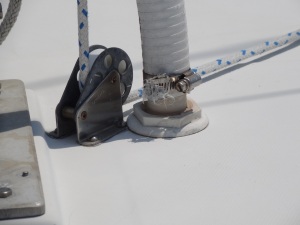
The through-hull is installed in the deck just like you would install it anywhere else. Use plenty of sealant.
 |
| It’s tricky getting the fitting to come through in the right place down below. Think it through carefully. |
 |
| The foot of this block interfered with the collar, but I used plenty of
sealant so there is no leak. I should have trimmed the foot of the
block, but it turned out okay. See what I mean about thinking it
through? |
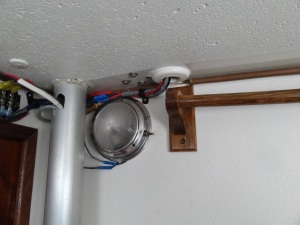
You can see the wires exiting the through-hull. You can also see the window I cut in the compression post. I filed the edges smooth. You can begin to see the terminal block on the left.
 |
| Wires exit the through-hull and the compression post, meeting at the terminal block to the left (outside the photo frame) |
 |
| The wires meet and connect. You can connect them at your leisure after the mast is stepped. |
The grey wire exiting the compression post and leading around to the bottom and left is the VHF coax. You can just see the gold-colored connector on the right, behind the compression post. This connector cost $10 a couple of years ago. It’s gold-plated and is reported to be the best connector on the market. I’ve never had trouble with this connection.
 |
| This final photo shows you the entire on-deck assembly. The white hose and through-hull lets it blend into the white deck. |
And there you have it. Neither the wiring nor the connections are ever exposed to the weather. The conduit doesn’t leak. Connections are easy and secure, and your wires can be attached with standard marine-grade crimp connectors. I use the wiring block because it is absolutely transparent: no confusion about which wire attached to which.


Fantastic post what a great solution. I need to adapt this for my own boat. However I also need to do something similar with the radio cable.
ReplyDelete