Way back when we were in Newport, Oregon, before we ever ventured down the coast to Mexico, I replaced the lifelines in the cockpit with rigid stainless steel rails. The main reason for this was so that we’d have something to mount our solar panels to. However, the added security of rigid rails helped to make the cockpit a wee bit safer. Gave us something to hang onto when the boat was rockin’ and rollin’, too.
Last summer, while we were cruising the Sea of Cortez, the solar panels were usually oriented in the horizontal position, the better to catch the sun’s rays. In the early mornings, I might lower them a bit to catch the rising sun better and, of course, they were set vertically whenever we motored anywhere as the engine-driven alternator was more than ample for keeping the batteries charged. Once in awhile, I’d come out on deck and notice that the previously horizontal panels were drooping a bit. I’d loosen the clamps, raise them back to horizontal and then tighten the clamps again. Later, I’d come out and find them drooping again. WTF? I’d loosen the clamps again, reorient the panels and then really reef down on the clamps. One time, right after doing this, I leaned lightly on a panel and it immediately drooped under very little pressure. That’s when I realized that the clamps weren’t at fault. Rather, the rail the panel was clamped to was rotating.
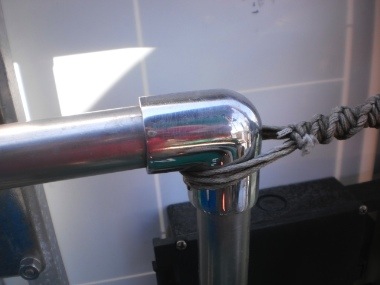
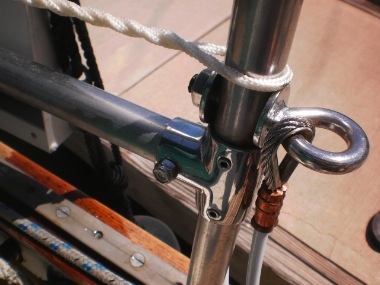
To give you a picture, here are what the fittings that hold the rails look like:
The only thing keeping the rails from turning inside the fitting is a set screw on each end. The set screw on the elbow is underneath. Even if the set screws are tightened down as tight as possible (considering the size of the 1/8″ allen wrench used, this isn’t really all that tight), it doesn’t take too long for the rail to start turning if it’s got a big enough lever on it. And the solar panels are pretty big levers.
Even worse than the solar panels turning, one time I got to looking at the rails and noticed that one end of the tube had almost completely backed out of the fitting. That could have resulted in, at the very least, the loss of a panel over the side and, in the worst case… well, let’s just not think about the worst case. Something had to be done.
The easiest and most obvious fix was to drill a little dimple in the tube (rail) so that the set screw would be able to burrow in and not just be jammed up against the side of the tube. I did this and it worked OK for quite awhile. But, over time the set screws must vibrate loose because eventually the tubes started turning under the weight of the solar panels again. Today I took the more serious step of replacing the set screws altogether.
I drilled a 1/4″ hole clear through the fitting and the tubing and thru-bolted the pieces together. I used a Nylock washer as well as Loctite to ensure the nut won’t come off of its own accord. Drilling through the stainless steel was a PITA but I eventually got it done.
Right now you’re probably saying, “Well that’s fine, Steve, but what the heck is that twisted nylon cord in the bottom picture about?” Well, I’m glad you asked. After I removed the set screws, I wanted to make sure that the tubes were seated all the way into the fittings. One way to do that would be to dig out my pipe clamps. Unfortunately, none of my pipe clamps are long enough to span the distance between stanchions so I’d have to clamp two of them together. Awkward but doable. However, you would not believe how much stuff has to be unloaded from the under-settee locker in order to reach the pipe clamps. And, since this was going to be a most-of-the-day project, all that stuff would have to sit out until I was done unless we wanted to unload and load the locker twice (we didn’t). Hmmm…. What would Popeye do in a fix like this?
I know! A Spanish windlass! Yes sir, that’s the ticket! So I strung a loop of nylon line between the stanchions, pulled it as tight as I possibly could using a trucker’s hitch, and then started twisting it up using my largest allen wrench for a handle.
Before long, that nylon was bar-tight. I gave the fitting a whack with the rubber mallet, heard a ‘pop’, and tightened the windlass a few more turns. I could tell by looking into the set screw holes that the tube was definitely seated further into the fitting than it had been before. At this point, I drilled my holes, inserted the bolts and released the windlass.
Life aboard is living large, in a small space. Every boat owner has found ways to make life in that small space easier, more comfortable, more convenient. The idea behind this site is to provide a place where these ideas can be shared amongst the boating community. To participate, send your contribution to SmallBoatProjects at gmail dot com.
Pages
▼
Tuesday, March 27, 2012
This is a safety issue
Are your bow and stern pulpits welded up, or are they fabricated using fittings? If the latter, then Steve on s/v Siempre Sabado has something important to tell you:


Another way to look at it, which I hadn't thought of before: Lifelines and there attachments are supposed to withstand 4,500 pounds (or something near that) in tension, and we take that seriously. Well, how could a system connected by set screws EVER be depended on at that load? Simply, it cannot and every joint in tension would need to be pinned with a 1/4-inch bolt. That would give approximately the correct strength in shear.
ReplyDeleteReally, the railing component manufacturers should put that little tidbit in the packaging.
Great write-up, Steve. Thanks
ReplyDelete