Pages

Thursday, March 29, 2012

Low-Buck Dinghy, part II

Over at Dock 6, Brian set out to design and build himself a beautiful stitch 'n glue dinghy, with design targets of:

  • under 25 hours total working time
  • a $250 budget

Did he make those targets? This is part II, following the previously published part I:

....continued  from the previous thrilling post.

Now, where were we?  Oh yeah.

here's the aft frame:


Damn, I'm good:


Now the part I have been dreading- installing the gunwales. The gunwales have to be bent around the top of chines, and I figured that if I made any major errors in construction, this is where I am going to find out, all at once, catastrophically- either the gunwale will snap ( no big deal) or the gunwale will cause the thin chines to buckle under the stress loading. I had originally planned to keep the gunwales simple, and just bend a 1x2" x10' length of pine, then cut off the excess. I started at the bow and was halfway to the mid frame, when I realized that the gunwale was too stiff. So, I ripped 1/8" off the thickness. Now it bends fine. I hung one of the scrapped temporary frames from the ceiling, and hung every clamp I own from it. Since I am working solo, I had to plan out what was gonna happen, and how I was gonna do it.


Alright, cross my fingers, lay a bead of glue on the port gunwale, and give 'er! shuffle, clamp, shuffle, clamp, shuffle, clamp..


Mission accomplished.

I figured would quit on a high note (and I am out of clamps), so I will get the starboard gunwale on tomorrow.

I had to buy the wood for the gunwales, and 1x3s for the frames, and I bought a bag of spring clamps ( As a thoracic surgeon once told me, you can never have too many clamps... and always make sure you have the same number after you close the chest as you did before,) so add another $44.56 to the total. ( Deduct $17.80 of that for the clamps, if you are just tracking the material cost.) Time for a beer.

It ain't finished yet, I still have lots of time to screw up and turn it into kindling. The upside is that it has kept me from getting even crazier than usual during the on-the-hard months.


Hours 11-17: Got the starboard gunwale installed, but didn't take a pic because it looks exactly like the port gunwale except backwards. For those of you following along at home who want the full effect, scroll back up to the port gunwale pics, and look at them using a mirror. With that quickly out of the way I set to work bulking up the midframe. The midframe thwart is critical, as it provides most of the support for the seats while rowing, I used a scrap of 3/4" marine ply in the center and 1x3s to run from chine to chine:


Now that I had support for the seats in the middle, I needed to actually build some seats. I ripped some of the offcut 1/4" luan into strips and laminated them together into four 1/2" thick slats, reinforced underneath by lengths of 1" x1". This will all be glassed and epoxy coated when I get to that stage.


And I continued burning through the last of the two sheets of luan I bought, and built the top of the stern seat box:


I flipped it over and fitted it...


...then realized I had some fidgety cutting and measuring to do. Or measuring and cutting, depending upon your desired results. So, rather than doing the math, I cheated. I grabbed my pattern gauge...


pressed it into the corners where the transom and seat meet, and traced the result onto the seat, then cut.


While I was waiting for the glue to dry on the stern seat blank, I bought some lengths of 1 x 4 to build the various cleats the hull needed. (Quick tip: think about the lengths of the pieces you need. Sometimes buying shorter pieces is cheaper than buying the same length of material in longer lengths. For example, I bought 4 4 foot long 1 x 4s at $2.77 each, which was 20% than the price of buying two 8 foot lengths.) I did some quick figuring, warmed up my saw and started cutting. Cut, cut, cut, screw, screw screw, glue, glue, glue, and the seat cleats are installed and the stern seat dry- fitted. The stern seat will not be fastened until I have filleted and taped the bilge.


This is how the seat slats fit: When rowing the seats run down the center of the hull from stem to stern, rather than the more traditional athwartship design. I did this for a couple of reasons: 1) It allows for the rower to move forward or aft to accomodate changes in center of gravity due to load out of payload or passengers, and 2) it allows some flexibility in centerboard placement, if I decide to go that way.


When sailing or motoring, reposition the slats like so:


Next, I need to finish installing the thwart outboard seat cleats, build some oarlock cleats and deck in the bow. Then, it is sealing time.

For those keeping score, here's the current build cost:

  • 2 sheets of 1/4" luan @ 14.70/sheet = $29.40
  • 3 8' lengths of 2x2 @ 4.30/ length = $12.90
  • 1 bottle of Gorilla Glue $5.95
  • handfull of screws @ 3.75/lb. $1.00 (approx.)
  • Assorted scraps and off cuts from other projects: $0
  • 2 1x2 x10' for gunwales $22.80
  • 2 1 x3 x 8 firring strips $3.94
  • 1 bag of clamps $17.80
  • 4 1x4 x 4' for cleats and thwarts $11.08

Total: $104.81

To be continued, yet again...

Tuesday, March 27, 2012

This is a safety issue

Are your bow and stern pulpits welded up, or are they fabricated using fittings?  If the latter, then Steve on s/v Siempre Sabado has something important to tell you:
Way back when we were in Newport, Oregon, before we ever ventured down the coast to Mexico, I replaced the lifelines in the cockpit with rigid stainless steel rails. The main reason for this was so that we’d have something to mount our solar panels to. However, the added security of rigid rails helped to make the cockpit a wee bit safer. Gave us something to hang onto when the boat was rockin’ and rollin’, too.

Last summer, while we were cruising the Sea of Cortez, the solar panels were usually oriented in the horizontal position, the better to catch the sun’s rays. In the early mornings, I might lower them a bit to catch the rising sun better and, of course, they were set vertically whenever we motored anywhere as the engine-driven alternator was more than ample for keeping the batteries charged. Once in awhile, I’d come out on deck and notice that the previously horizontal panels were drooping a bit. I’d loosen the clamps, raise them back to horizontal and then tighten the clamps again. Later, I’d come out and find them drooping again. WTF? I’d loosen the clamps again, reorient the panels and then really reef down on the clamps. One time, right after doing this, I leaned lightly on a panel and it immediately drooped under very little pressure. That’s when I realized that the clamps weren’t at fault. Rather, the rail the panel was clamped to was rotating.

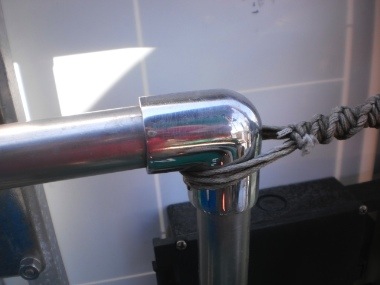
To give you a picture, here are what the fittings that hold the rails look like:

The only thing keeping the rails from turning inside the fitting is a set screw on each end. The set screw on the elbow is underneath. Even if the set screws are tightened down as tight as possible (considering the size of the 1/8″ allen wrench used, this isn’t really all that tight), it doesn’t take too long for the rail to start turning if it’s got a big enough lever on it. And the solar panels are pretty big levers.

Even worse than the solar panels turning, one time I got to looking at the rails and noticed that one end of the tube had almost completely backed out of the fitting. That could have resulted in, at the very least, the loss of a panel over the side and, in the worst case… well, let’s just not think about the worst case. Something had to be done.

The easiest and most obvious fix was to drill a little dimple in the tube (rail) so that the set screw would be able to burrow in and not just be jammed up against the side of the tube. I did this and it worked OK for quite awhile. But, over time the set screws must vibrate loose because eventually the tubes started turning under the weight of the solar panels again. Today I took the more serious step of replacing the set screws altogether.

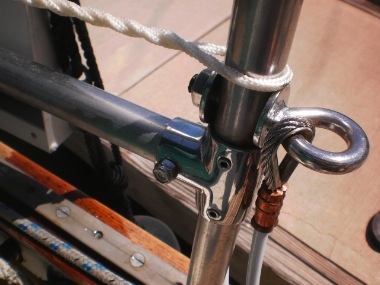
I drilled a 1/4″ hole clear through the fitting and the tubing and thru-bolted the pieces together. I used a Nylock washer as well as Loctite to ensure the nut won’t come off of its own accord. Drilling through the stainless steel was a PITA but I eventually got it done.

Right now you’re probably saying, “Well that’s fine, Steve, but what the heck is that twisted nylon cord in the bottom picture about?” Well, I’m glad you asked. After I removed the set screws, I wanted to make sure that the tubes were seated all the way into the fittings. One way to do that would be to dig out my pipe clamps. Unfortunately, none of my pipe clamps are long enough to span the distance between stanchions so I’d have to clamp two of them together. Awkward but doable. However, you would not believe how much stuff has to be unloaded from the under-settee locker in order to reach the pipe clamps. And, since this was going to be a most-of-the-day project, all that stuff would have to sit out until I was done unless we wanted to unload and load the locker twice (we didn’t). Hmmm…. What would Popeye do in a fix like this?

I know! A Spanish windlass! Yes sir, that’s the ticket! So I strung a loop of nylon line between the stanchions, pulled it as tight as I possibly could using a trucker’s hitch, and then started twisting it up using my largest allen wrench for a handle.


Before long, that nylon was bar-tight. I gave the fitting a whack with the rubber mallet, heard a ‘pop’, and tightened the windlass a few more turns. I could tell by looking into the set screw holes that the tube was definitely seated further into the fitting than it had been before. At this point, I drilled my holes, inserted the bolts and released the windlass.

Thursday, March 22, 2012

Fuel Tank Vent Filters--Better Boat Keeping?

What's the problem with diesel stored in tanks?   Moisture accumulates in the bottom of the tank due to the tank "breathing" with atmospheric pressure and temperature changes.  And then this moisture supports colonies of bacteria who make that water acidic, corroding your tank, and when they finally die, their corpses either clog your filters (if you are lucky), or trash your injection pump.  Over at Sail Delmarva, Drew is attacking this issue from the point of view of ethanol "enhanced" gasoline, but it applies just as well to diesel.  Read on...
For all the talk and trouble water in the gasoline causes--far worse with e10--to me it's rather conspicuous by its absence that neither owners nor builders ever took a serious look at vent filters. Cars have had sealed tanks fitted with both pressure controls and filters since 1971. I considered this a few times--I've installed very large descant traps on very large chemical tanks--but figured if it was so against the conventional wisdom in the boating community, it couldn't be right. Funny.... That's not like me.

In a prior post I began a discussion of some testing for Practical Sailor. We've got two test boats going at this time. I've started monitoring the humidity inside and outside. Yup, it's drier inside the tank, after filtration. We expect some positives that should add up to a good value proposition for the owner:
  • Drier gas/fuel.
  • Less evaporation, to the tune of $8-$12/year. The unit should last ~ 10 years without service, so that will nearly pay for it.
  • Less loss of volatiles means better starting, particularly in cold weather.
  • Less loss of volatiles means better resistance to phase separation/emulsion blobs. I have only been able to recreate true phase separation from atmospheric absorption if the ethanol evaporates after it is saturated, and I've tried many combinations. This is why we generally only see it in carbs (they're small).
  • Less loss of volatiles mean less gum formation (better solvency).
  • Less loss of volatiles is good for the environment. Yes, that counts.
  • Less oxygen (less convection, more vapor space) means less gum formation.
It won't stop these things from happening in the carburetor, but it should significantly extend gasoline stability in the tank considerably. Preliminary calculations suggest at least double.

But can we demonstrate how this actually effects the fuel over time on a small scale, in a controlled manner? Calculations only go so far, since water condensation and absorption, differential evaporation, and fuel oxidation work together in complex ways. Science project time.

One liter bottles with 500 ml e10, starting levels marked with tape. From left to right:
-  Plain 1/8-inch ID vent.
-  10 ml silica gel descant
-  10 ml activated carbon  adsorbent

Actually, both carbon and silica gel are both adsorbents that pull water and organic vapors from the air. Silica gel (the packs you find in with your new DVD player) has a high affinity for water, while carbon has a high affinity for organic vapors. However, both adsorb reversibly; that is, if exposed to high temperatures and either clean air, or an excess of something else, they release what they have previously adsorbed. Carbon can be flushed by water vapor and air, while silica gel can be flushed with hydrocarbon and air. Both should have the effect of keeping the tank drier and reducing evaporation, adsorbing and desorbing with each day/night breathing cycle. Both should reduce oxygen in the tank. But how much?

Results in the fall. The long version will be in Practical Sailor.These things can't be rushed. I expect we are going to find the improvements are small and that a sailor won't "feel" any difference. But his engine will start a little easier, he'll buy a little less gas, and have a few less problems. The math works, it just won't be obvious, not like some new bit of deck hardware $100 he could buy. More like changing the oil; "pay me now, or pay me later."  

But meanwhile, like the holding tank vent filter that I installed (and am very pleased with), I've got installed a carbon vent filter on Shoal Survivor and I'm not planning on taking it off.

-------

Note for the spelling or technically obsessed: sometimes I say absorb, and sometimes I say adsorb; both are correct. Alcohol absorbs water. Silica gel adsorbs water. The mechanism is very different and the reversibility is very different. This is the reason adsorbents are so useful.

-------

Although the test filters photographed above were fabricated from PVC, this is NOT safe practice for permanant installation. PVC is not highly resistant to gasoline vapors and the adhesive is quite vulnerable over time.  While it won't fail in this laboratory setting, based on refinery expereince with PVC, the joits will fail if I add heat, vibration, and wait several years.

Tuesday, March 20, 2012

DIY Lifelines

Steve and Lulu needed new lifelines, and like the SmallBoatProject'ers that they are, they made them themselves, right there on board s/v Siempre Sabado:
Our lifelines were getting sad. Although it’s possible to tighten them up when the gates are closed, when the gates are open they sag like a sad old man.


Besides that, the plastic cover is cracked and broken in places and a lot of the fittings are somewhat suspect. Some are rusty, some have after-market welds on them, and on some of them, the amount of metal left to hold a cotter pin in is nearly non-existent. Our extended stay in Mazatlán combined with Lulu’s fortuitously-timed trip back to the USA made this the perfect time to renew the lifelines which are very likely original issue. That is, they are now probably 35 years old. Keep in mind that, as a general rule, the lifelines don’t keep us from falling off the boat. Our good sense and caution do that. But the lifelines do provide a last chance to stay aboard when all else has failed. It’d be nice to know they were up to the job.

If I were to replace all the original fittings with the same kind of fittings, the project would have probably cost a over $1300.00. A wee bit steep if there’s another alternative. By choosing to make my own swaged fittings, and using welded stainless steel eye bolts several sizes larger than the original fittings, I was able to keep my costs down to around $600.00 including the tools I needed to do the job, which of course, are reusable. And, I think I ended up with a stronger installation.

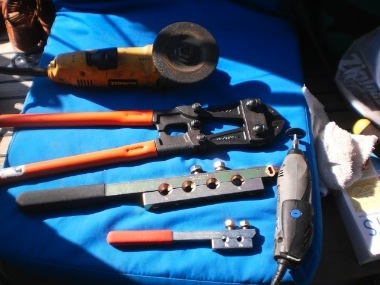
Lulu returned from the States lugging an extra checked bag that weighed a bit over 30 pounds. It had my lifeline wire, all the end fittings I’d need, and the swaging tools. The only thing I had to buy here was a pair of bolt cutters to cut the cable with and some stainless steel 3/8″ all-thread since the eye nuts I bought were a different thread than the eyebolts I bought to put them on. Here are some of the tools I needed for the job.


Working from the top down, we have the angle grinder with the abrasive cut-off wheel. I used this to cut the too-long eyebolts down to size as well as to cut the all-thread to length. Next are the 24″ bolt cutters. I tried cutting the cable with a hacksaw at first but that’s a poor way to spend one’s time. The bolt cutters work way better. And besides, every cruising boat is “supposed” to have bolt cutters aboard so that when you get dismasted in a huge storm, you can cut the standing rigging so the mast will fall away from the boat and quit trying to gouge a hole in the hull. So now I guess I’m well-equipped. Below the bolt cutters is the Nicopress swaging tool. This is used to crimp a copper alloy collar around the cable.


They have an expensive version that looks a lot like the bolt cutters but this cheaper version, while being more work, filled the bill quite nicely for me. The smaller swaging tool below the Nicopress is made by Johnson and is used to crimp their stainless steel fittings onto the wire.


Mostly I tried to stay away from the Johnson fittings because they are so freakin’ expensive. But their pelican hooks were about the most reasonably priced adjustable ones I found. Over to the right side is the Dremel tool with an abrasive cut-off wheel. I used this to trim the wire sticking out of the end of the swage collar.

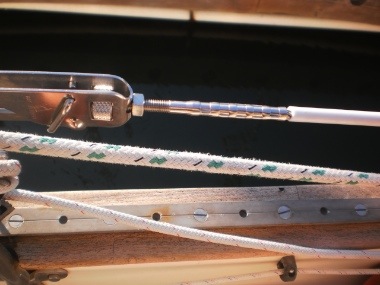
Usually, the slack in a lifeline is taken up by a turnbuckle on one end.


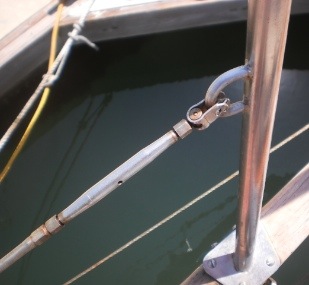
However, there are a couple of things I don’t like about turnbuckles. First, if they’re not tended to fairly regularly, they can freeze up and be un-turnable. It’s usually possible, with lots of WD40, long handled tools, vice grips, and muscle, to refurbish them. But what a hassle. I know that many folks out there do just fine with their turnbuckles and probably think I’m being a big baby. Maybe I am. Or maybe I’m just justifying doing without. The other thing I really dislike about turnbuckles is that they are EXPENSIVE! How expensive? Well, my Bosun Supplies catalog lists the turnbuckle with the swage on one end and the toggle on the other, just like in the photo above, at $48.63 each. And I need 6. That’s almost $300.00 just for one end of each lifeline. Also, you see the u-shaped piece that is attached to the loop on the stanchion? Well, that’s a toggle. There is a pin that runs through holes in the end. The pin is kept in place by either a split ring or a cotter key. On some of the toggles I inspected, the cotter key had slowly worn the hole until there was almost no metal left on the end of the pin. Scary. So what did I do instead? I applied a lashing in place of the turnbuckle.


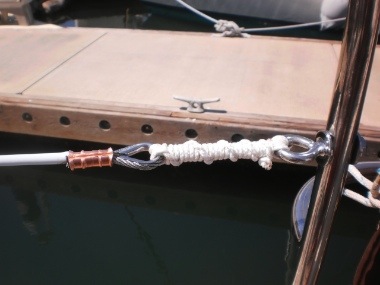
I may or may not be able to pull these quite as tight as a turnbuckle but I can definitely make them plenty tight enough. This is 1/8″ nylon braid. There are 5 or 6 loops connecting the lifeline to the stanchion. Then the whole thing is wrapped in overhand knots, closing the loops and making the whole thing extremely tight. Our friend Mike (s/v Tortue), a Brit, says that the yacht racing rules in England require lashings on the lifelines. The reason being that, in the event of a man overboard, it’s very difficult to drag someone over the lifelines and it takes too long to lower them by backing the turnbuckle off. The lashing can be cut through with a knife and the lifelines immediately dropped. I don’t know if this is true or not and, in our case, since we have a gate on both sides of the boat, it’s probably unnecessary, but I still prefer my lashings to turnbuckles.

This is the first time I’ve done any swaging. I must say that it got easier, and I did it better, as time went on. The first one was very frustrating. Trying to bend a short piece of 3/16″ 7×7 (7 bundles of 7 wires each) cable 180º is a bitch! Would have been easier without the PVC coating because you could slide the collar down, make your bend, and then slide the collar back up. But, with the coating, the collar had nowhere to go so all movement had to be done with a short piece of cable. But I eventually got better and it got a little easier.

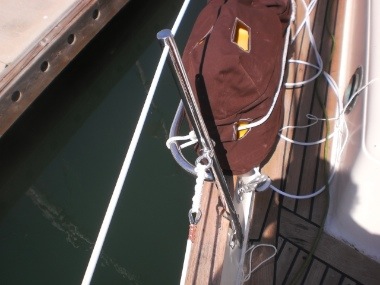
A few shots of the starboard side, which is all finished:


Found a couple of scary things when I took the old lifelines down.
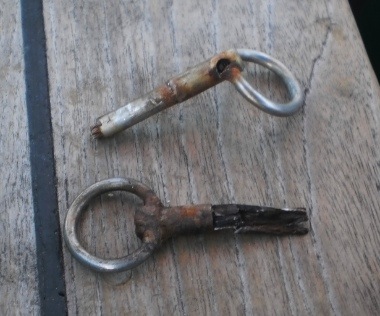
The old gates were attached to a ring that was swaged to a short lifeline heading aft. The ring end is screwed on to a threaded, swaged fitting. When I attempted to unscrew the ring, this is what I got:


Scary, huh?

So, the starboard side is done. We can open the gate and still have the lifelines forward of the gate remain taut. The scary, rusty pieces are gone and, should we ever find ourselves signed up for a sanctioned sailboat race in the UK, we’re ready. Or we will be in a couple more days after I finish the port side.

Thursday, March 15, 2012

Climbing gear for tethers

There is a lot of crossover between rock climbing and sailing.  Because he is deep into both sports, Drew over at Sail Delmarva serves as a good resource for crossover opportunities.  Carabiners (climbers call them 'biners) are one such item:
I've always used locking carabiners on the jack line end; non-locking biners can lever off a fixed point or tight rope in any number of ways, and the jack line end gets dragged all over all sorts of edges and fittings. Ice climbers, wearing heavy winter gloves, take advantage of this very mechanism to clip gear in and out without fumbling with the gate. We generally leave the tethers attached to the jackline anyway, so a screw-lock biner is safe, dependable, and snag-free. We use climbing biners rather than "marine" biners; their clunky stainless designs bang on the gel coat and their weight makes them more snag-prone, and to me, snags present a safety hazard.
I'm not a fan of snap shackles on the harness end of  a tether. I've seen them break FAR below their rated strength and I've seen them open easily when not closed just right. Can you see or feel that they are fully closed , in the dark, with gloves on? Ask a climber--or a rigger or anyone with an ounce of common sense--to hang from one up the mast and they will look at you as though you have none. Use one in the mountains and no climber would join you again, convinced you are a complete safety menace and an idiot as well. Yet we're supposed to trust them in a storm, with the boat leaping about. No thanks.

I'm not a fan of the current crop of locking "marine" biners; the webbing loves to catch in the grove at the gate, they don't slide over obstructions well when used on jacklines, and they're difficult to open when wet. I don't need difficulty when things are going badly. The Kong biner does not have the grove (it's a key-lock style biner), it's lighter and smother (not cut from plate), and has a much smoother action.

Wire gate biners are easy to use and unhooking at the harness end is very, very unlikely. The attachment isn't rigid isn't being dragged up and down the deck. But it could happen, and I think about that when working down the sugar scoops, landing a fish or fooling with the tender while underway, often single handed.

The Kong Trango seems to be the best of both worlds. Opening is effortless and instinctive; the same light squeeze that opens the gate releases the lock. It's heavier and bulkier than climbing biners, but it's aluminum and 1/2 the weight of the stainless alternatives. Some have expressed concern over corrosion, but Practical Sailor left one in saltwater until it grew a reef and it still worked, and I treat my safety gear a bit better than that. As usual, I will keep the pivots greased.

Why do I use knotted tethers, in preference to sewn?
  • Because climbing slings never break at the knot, they cut over an edge.   
  • Because tethers clipped to a jack line with appropriate stretch and impact absorption characteristics will never see a force over 500-600 pounds. 
  • Because because knotted slings encourages replacement of warn parts. Cost and time are no object.
  • Because I like to change things from time-to-time. Lengths. Biners. Mid-tie locations. We currently have 2 styles: fixed at 7 feet long, and 11 feet long with a tie-in 4 feet from the harness end. The longer one reaches the transom, where landing fish presents a significant risk.
  • Because they cost $2.00 at REI. Far less, for me, since I bought a spool of webbing years ago at wholesale, but that's cheating.

    ___________________

     Notes on lubrication:
    • Waterproof grease is best on screw gates. very dependable.
    • A good corrosion blocking spray should be applied to all pivots, and critically, to the spring inside the base of the gate. Be liberal there.
    • Cor-Block and Bo-Shield did very well in Practical Sailor wire corrosion testing in a salt environment chamber/accelerated aging test. Many others, like WD-40, are basically useless. 
    Rock climbers are generally advised not to lube biners. Lubricants attract grit when biners are thrown on the ground in dusty crag-side environment. Additionally and very importantly, there is a risk a climber will try to revive a bent carabiner with lubrication, which is an obvious risk; the biner may be weakened and there is a risk that the gate could hang open at a critical moment. These are good reasons, but they are not too relevant in the marine environment. However, if a biner or other piece of climbing equipment does stick because it is bent or burred, discard it. Though I am a dedicated fix-it guy, I don't repair damaged biners.

    ____________________

    I have several other posts on jacklines, climbing gear for sailors, and the stresses involved. As a life-long sailor, rock climber, and engineer, it's a favorite topic.

Tuesday, March 13, 2012

Boat show consequences

There's always a consequence, isn't there?  Tho sometimes it may be delayed.

When Jane and I attended this year's winter Boat Show, we stopped by the booths of all of our favorite local vendors.  One of those is Sure Marine - like Hank Hill, they deal in propane and propane accessories.  Tho that was a joke, it pretty well covers things if I also include marine space heating and cooling in the mix.

At the show, amongst a lot of other things, Sure had on display all the newest offerings from stove vendors, and we took a quick gander at the new version of our stove.  Not much has changed since 1998 when we bought ours.  Unlike ours tho, the new one  had sealed burners (which would be really nice).  And unlike ours, the old piezo burner ignitor had been replaced with an electronic one.

The old ignitor -
impossible to turn with wet hands
Our old piezo ignitor, unlike the push-button one which seems to be standard on BBQ's, required you to turn a knob.   Doing so wound up a spring and then finally released it - bang!  But when your hands were greasy from cooking (on a stove?  Who would have thought!), wet from washing them during the course of cooking...  or even slightly moist, even I didn't have enough strength in my fingers to grip the knob tight enough to be able to turn it against the spring.


So, those consequences?  I stopped in at Sure Marine and bought one of the new electronic ignitors  - a repair part for the new stoves.  Because so little has changed with these stoves, it installed right into the same hole that held the old one.  Now all it takes is a gentle press of the rubber-coated button, and you get those repeating sparks you may be familiar with if you have a household gas stove.

And it was way, way less expensive than a new stove.

Thursday, March 8, 2012

Lazy Jacks--Done the Lazy Way

Spring must be coming.  Drew is working on his rigging...
My PDQ came with a very functional set of non-adjustable lazy jacks. One block, 2 legs; perfectly adequate with a full batten main. Chafe has never been an issue; the main is original, reasonably blown-out from years of use, and yet not a stitch has frayed. But they can be annoying on the hoist, catching the top 2 battens. In lighter airs close attention will do, but in rough conditions it can be a little pesty.

Anyway, a $20.00, 2-hour project, including the time spend figuring and returning wrong parts to the store. Maybe I can save you a little time.

________________

The Harken system is adjustable and fancy, but not optimized to be retractable. Not much better than the PDQ system; the PDQ system could be adjusted by retying a knot on the boom, but in practice, once it's set, it's finished.
  • I think Harken makes them just to sell blocks. Lazy jacks aren't under load and don't need blocks in the smaller sizes.
  • The blocks chafe on sails and clank on the mast and boom. I've known folks to remove Harken systems.

The EZ-Jax System looks easy. I've seen them on boats and watch the demo at the Annapolis Boat Show. But they have some features I don't like:
  • They pull down on the spreaders. I've seen spreaders pulled out of place.
  • I would need to climb the mast to re-rig. Not a big deal, but not needed.
  • I would need to replace more parts. Not a big deal, but not needed.
  •  I would have to add a cleat on the mast (sheets love to snag on those) and a retaining hook or bungee cord (one more thing).
  • Reaching the mast-mounted cleat while working a snag at the far end of the boom is annoying.

The Lazy Way

I drilled and tapped  4 holes, mounted 2 small cleats on the boom, and replaced 2 lines, all from the comfort of the hard-top.
  • Mount a small cleat about 1-foot aft of the mast on each side of the boom. Further forward and the jacks may ping on the mast in higher winds. I hate lines pinging on the mast. Mounting them slightly aft gives the line a little angle as it crosses the mast and stops the flapping. Further aft and the the lazy jacks won't fit under the sail cover at the mast end. Be certain you are drilling into unused space and don't use self-tapping screws in a spar; they will snag on lines or wires at some point in the future.
  • Replace the lower line (3/16-inch solid braid nylon was used on my boat) with one ~ 25 feet long. Tie it to the aft eye strap, up through the hanging block, and down through the forward eye strap. On a much larger boat replacing the forward eye with a cheek block might be better, but the eye strap is just fine on the PDQ. Tie 2 big stopper knots near the end of the line, to prevent un-threading when retracting.
  • To deploy, pull the line semi-tight and cleat. Coil the excess, if it's going to be a while, and tuck it between the line and the boom, up against the cleat.
  • To retract, uncleat the line, pull the lazy jacks forward and tuck under the forward ear of the cleat, and cleat the line over this. Pull tight.
I suppose you could even make the system single line, adjustable from one side. No one does, because in reality, the lines often need to be worked around wrinkles in the flaked sail, and that would be very difficult if the cleat was on the other side.


Are Retractable Jacks Better? 

The down sides?
  • Something else to fool with when heading out. I find I don't always bother.
  • They aren't as easy to retrieve from under a big pile of as they would lead you to believe. Doable.
  • You need to redeploy them prior to reefing, if you like to keep things simple.
The upsides?

  •  In a breeze, yes. In lighter air, maybe.  More important when single handed, less so with a crew that can keep the boat exactly into the wind. Hoisting is a breeze with the lazy jacks pulled forward.
  • The sail cover fits a bit better with the lines out of the way. Of course, it fit well enough before, for me. Also, adding slits in the sail cover to accommodate fixed lazy jacks is easy.
  • Speed. At least a 1/100th-knot improvement. Probably equivalent to sticking my hand out the window.
Do I recommend this project? If you like having more things to tweak and like small improvements, sure. If you single hand a lot, perhaps. If you like bare simplicity and can hoist OK with fixed lazy jacks, leave them be.

Tuesday, March 6, 2012

Boob tube

Jason on s/v hello world does another superb fiberglass fabrication job:

Christy and I haven't owned a TV since we've been together. That isn't really the hardship that it sounds like. We watch Netflix. We have DVD's. We have digital movies, etc. We haven't extracted ourselves from visual pop culture, we just view it through a computer and more recently an iPad.

Now all that has changed. Mostly because I'm tired of staring at a laptop screen only incrementally larger than a phone. We have a great space for a TV/monitor inside of the housing for our fold-up table where our bar currently resides. And if mounted on an articulating arm mount, we can use in a couple different configurations, and then tuck it neatly and safely inside behind the fold up table for when we're in a seaway.

We had two problems to contend with in this arrangement:
  • I don't want to drill holes in our bulkhead to mount this TV. If this one craps out and we have to buy a new one, we will likely have to move the mount and drill more holes. Do not like.
  • However, even more importantly, Christy did not want to lose her bar. We store bottles of booze in the space I want to mount the TV/monitor and by god - we are not going to diminish Hello World's booze carrying capacity.

In the end, we came up with a solution that makes everyone happy. No bottles of booze were harmed (or even re-located) in this project. No holes were drilled in the bulkhead. And I have a shiny big TV/monitor.


In order to solve the no-holes-in-the-bulkhead problem, I built a fiberglass mounting bracket to be hung from one of the shelves inside the table housing. I made the bracket out of high strength G10 fiberglass with loads of thickened epoxy and some extra layers of fiberglass to tie it all together. Even though the TV only weighs 8 pounds, when fully extended, it will put a fair amount of leverage on this piece.


Mounting the bracket.


The TV in place on the articulating arm.


The arm mounted off the bracket hung off the shelf.


Watching a little Arrested Development.


The TV turned sideways.

The older we get, the more we learn just how hard core we're not. I really love having this TV. Probably more than I should.

(Can't wait to see what kind of search term hits we get based on that blog post title.)

Thursday, March 1, 2012

Hinges

Drew over at Sail Delmarva, has installed hinges on his under-seat locker covers. This is an excellent idea!
I don't know why PDQ left hinges off most of the locker covers. They didn't cheap-out much. But they missed this one. Every time you need just one little think, off comes the cushion, the lid must be leaned somewhere... a big pain. With a hinge, lifting the lid just a bit to snag just one thing is reasonable.

I added hinges to my under-berth lockers some time ago, and it was a big improvement. They get used a lot more.


I added these drop-in trays to the salon lockers. A big help--commonly used and small items don't disappear into dark corners.


And now I've added hinges to the salon lockers. A big help.


Notes:
  • I didn't bother with the corner lockers (they won't open properly because of the backrests) or the cover over the charger.
  • I didn't bother with stainless hinges. I did oil them lightly (Corr-Block) and I haven't seen any signs of rust. It's a dry cabin.