One of the pieces of equipment on our to do list is a generator. We much prefer to anchor out when cruising and at times we can get weathered in for days. During those extended stays we still like coffee in the morning, still have the need to recharge the batteries and like to watch TV. All of this uses power and we have been using our handy Honda 2000 portable generator until we can have a more permanent installation. The Honda will handle most of our power needs, with the exception of the air conditioning system. But that suits us just fine for now. One of the things I don't like to do is to fill the built in tank every day when the generator is in constant use and for long term when charging that batteries it might mean shutting the generator down, filling the fuel tank, and starting it again. It is also hard to fill the tank without spilling gas on the deck, especially if the boat gets waked. So, the need for a remote extended fuel tank. To build one of these only takes a few inexpensive fittings, a fuel tank and about an hour of your time, at the most.
The first thing that I did was to buy a spare cap for the built fuel tank in case I messed up doing this, or if I wanted to run without the extended tank. I found it locally for $15.00 from a Honda dealer in the area. Next was to get all of the miscellaneous parts. We decide on a 3 gallon tank instead of the larger 6 gallon since we don't run the generator that much. We already have a 3 gallon tank for the dinghy outboard so this could also be used as a spare. We also decided we wanted to be able to use the same fuel line as the dinghy outboard so we would not have to carry different fuel lines and again it could do double duty. To accomplish this we would need the attachment fitting that would be the same as on the one on the dinghy tank and on our Johnson Outboard. The two fittings totaled about another $15.00 and then another $4.00 for a brass hose barb. The plastic fuel tank was another $25.00. The assmebly was pretty easy.
Step 1.
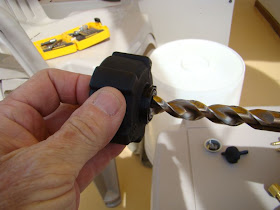
Remove the inner workings of the fuel cap and drill out the center to fit the connector. Be careful to not drill the hole too large. It should be slightly under sized to allow the fitting to be screwed into the plastic cap.
Step 2.
Fill a thin amount of epoxy around the threaded base of the fuel line fitting inside the cap and screw on the female brass hose barb. Allow the epoxy to dry and then replace the rubber gasket inside the cap. The hose barb may or may not be needed but it makes the connection fitting stay in tight and I beleive it will help to draw the fuel into the generators built in tank.
Step 3.
Install the second connector fitting into the fuel tank.
Step 4.
Fill the fuel tank with gas, fill the generator built in fuel tank with gas, connect the fuel lines and start the generator. Be sure the vent on the fuel tank is open. That's it.
It is very important that the cap be completely sealed. If any air can leak at the cap, the generator will not pull fuel from the extended tank. As the vacuum builds up in the internal fuel tank for the Honda, it will pull fuel from the extended tank. Mark the generator tank so that oil will not get added to it by mistake like the outboard tank. The Honda does not require a fuel/oil mix. The Honda will now run for a much longer time and annoy your neighbors for hours.
There are many variations for doing this, using a 6 gallon tank, installing only hose barbs, putting an inline filter in the fuel line. But the basics are the same. This should work just fine for us until the permanent genset is installed.
Life aboard is living large, in a small space. Every boat owner has found ways to make life in that small space easier, more comfortable, more convenient. The idea behind this site is to provide a place where these ideas can be shared amongst the boating community. To participate, send your contribution to SmallBoatProjects at gmail dot com.
Pages
▼
Monday, May 2, 2011
Generator extension: 4 easy steps
In a nicely layed out How-To, Chuck on s/v Sea Trek shows us a way to hook up a larger fuel tank to your Honda generator.


No comments:
Post a Comment