Pages

Monday, May 30, 2011

A very clever bug filter

Steve and Lulu on s/v Siempre Sabado have a perfect example of a Small Boat Project:
  • It is easy to do
  • It is inexpensive
  • It is clever
  • It solves a real problem
  • And it replaces an expensive "marine" solution
I love it!
Since we're planning to spend our summer further north in the Sea of Cortez, we've been advised by many seasoned cruisers that we need adequate bug screens. Besides mosquitoes and bobos, we need to be able to keep bees and jejenes (no-see-ums) out of our living spaces. Lulu made a nice screen for our forward hatch and also included a screen in the wind scoop she made. She's currently working on the design for a screen for our companionway. We've been stymied, however, by trying to come up with a way to screen our round portholes.

We've tossed around a lot of ideas and even tried a couple. The simplest seemed to be to just use long cable ties to attach screen to the outside of the ports. Problem was, there's only a very small lip to attach to and it's hard to get the screens on, especially on the ports that have the PortVisors on them. And, the end product looked ugly as all get-out.

Some round ports are made for screens and have a little groove around the inside that a screen attached to a sort of wire snap-ring fits into. However, we don't have those grooves. I thought that the best remedy was to come up with something similar but flat, instead of round like a wire. Something that could be made smaller to fit into the opening and then would expand, holding the screen material in place. Sure, great idea, but what the heck can I use to do it?

I thought I'd hit on the perfect solution when we bought a mini-blind that we could cannibalize for the slats. Seemed like the slats would have just the right amount of spring to do the job. They didn't. The problem with them was that they were so thin that, when I tried to form one into a circle, it wouldn't stay circular but rather would bend into a misshapen triangle.

I toyed with the idea of having some sort of flat snap ring made out of metal, maybe stainless steel. Of course, I'd have to come up with a clear drawing of what I wanted but that shouldn't be too hard, should it? This looked like the most promising idea yet.

Then, one night it came to me. I got up and measured the inside diameter of the ports: 6" and 4". What if I got some 6" and 4" plastic pipe? The outside diameter of the pipe would be a little larger than 6" and 4" so. if I cut it, removed a little chunk and then pressed the ends together, it should fit inside the port and, when released, it's springiness should make it expand out to fit snugly. Yes?

Yesterday, I got 2 short pieces of 6" and 4" plastic sewer pipe and proceeded to saw rings 3/4"-1" in width.


Then, I cut through the edge of the ring but, instead of removing a chunk, I instead heated the pipe and bent the ends down, forming ears that could be pinched together to reduce the size of the ring for insertion or removal.


Lulu sanded the edges so they wouldn't snag the plastic screen.


Attached the screen using double-sided tape and then trimmed it to fit.


Squeezed the tabs together and tried her on for size:


Obviously the screen in these photos is not fine enough to keep jejenes out. But we didn't want to have super-fine screen in all the time as it severely restricts airflow. So, the plan is, when we reach no-see-um country, we'll simply lay a piece of the super-fine mesh screen over the existing screen and snap the ring back in place without taping the screen to the ring. That way it's still very removable.

Ahhh... One less thing to lie awake at night trying to figure out.

Cost of 2 pieces of pipe: 40 pesos (about $3.20)
Cost of screen: free at a boater's swap meet
Cost of tape: ?? we already had some on hand but will have to buy more.

And the beauty is, I still have enough pipe left to make at least another dozen frames for both sizes of portholes.

Wednesday, May 25, 2011

When you're hot...

Rather than just replacing it when it failed, Paul on s/v Solace hot-rodded his BBQ grill:

Original Magma BBQ
Some of us have BBQ's on our boats, which after time, seem to not perform as well when new, and in my case had an annoying feature. Mine progressively produced less heat and had  grill bars which allowed fluids to drip into a "catch tray" but often overflowed and dripped on my deck. In the end I couldn't bbq any way, because the heat from the element just seemed to die.

With the cost of new BBQ's being very expensive, I decided to rebuild the unit myself and hopefully save some money.

Two ring burner
So, first I "gutted" the heating element from the BBQ. Then I purchased a 5.5KW [that's 18,700 BTU/hr -Ed], two ring propane burner. This I purchased in New Zealand for about $30USD from a hardware store, but I remember that these where very common in the islands at most of their hardware stores. They use them to put large pots on to cook with.


Control valves for gas. Comes with burner.
Next I cut the end of the BBQ with a Dremel to open up to allow the valves of the burner to protrude through and allow gas hookup.

Next I purchased a BBQ plate with it's own raised ridges and channels for fluid to drain away from the meat. The BBQ plate was a generic plate and wasn't quite the right size for my Magma. I used a metal cutting wheel and cut to size. But to keep all fluids produced while BBQing, I welded a metal strip along where I had cut. The BBQ plate came with handles at the sides, which proved to be a bonus for handling the plate. Plate cost $15USD from the BBQ Factory Store.

Finally, I purchased a small 3KG propane tank along with a new regulator and hose. The tank had a bracket made for it so that it could be mounted on the railing close to the BBQ.

BBQ plate in place. Metal strip at front.

Finally, to "season" the plate, a coating of oil, was rubbed into the plate and the plate "cooked" to allow for the burn in. It is now important to heat the plate and then turn down the heat, because it actually gets too hot and burns off the seasoning. Cooking steaks is now a great success, with the steaks being seared on the plate with ease, rather than a slow broiling which use to happen. All guests have declared my BBQ steaks  to be wonderfully cooked.

All fluids seem to "evaporate", including fats, so it is important to spray periodically with oil to keep the "seasoning" up. Otherwise the plate will just turn rusty.

Bottle to BBQ
Cost for the BBQ mods. $45USD and about a days work looking in the stores and the workshop work. A small piece of scrap mild steel strip I had lying around and a welding machine was needed in addition to the dremel and steel cutting wheel on the angle grinder.

Monday, May 23, 2011

Dock steps from one sheet of plywood

Craft a Craft recently featured a step design which originated on the Make Magazine site (a good spot to haunt for ideas).   Although Craft a Craft was seeing this as part of a boat, I think it could be an interesting set of dock steps...
Visit - Single sheet steps

We've seen a variety of single sheet boats, where people see what kind of boat they can build from a single sheet of plywood or the like, but this is slightly different.  The plans are for a set of steps built from a single sheet of ply.

I don't know that in boat-building you are really desperate to save wood in building a set of steps, but the overall design, with the single "foot" treads looks like something that might be neat or useful on a boat.  It even has some good "included" storage areas.
one-sheet-staircase-00.jpg

Friday, May 20, 2011

You know you worry about it...

Paul on s/v Solace has a nifty way to monitor the temperature in his refrigerator and freezer.

We have recently changed our method (compressors and evaporator plates)  to our fridge and freezer. We wanted a reliable method to monitor the temperatures with out extra wiring. We have tried the manual thermometer, but found them less than satisfactory due to having to open up the boxes to read the temperature. We came across these wireless "indoor, outdoor temperature monitors" on ebay for a reasonable cost. This model has one LED monitor, with two sender units. It is able to monitor two temperatures at a time. We put one sensor in each box, and the LED monitor in the galley in a convenient place. They have been going two years with only one battery change. They measure about 2.75 inches square each.

Wednesday, May 18, 2011

Floating neutral

Have one of those seemingly ubiquitous Honda 2000eu generators? And does it successfully drive your inverter?  You're in the minority, apparently.  Over on s/v Letitgo, they have the solution.  And it's one time when a short is a good thing...
So far this has been one of my most frustrating item, I just crossed it off my list so it deserves its own post! Don’t you think?

I am really hoping that the knowledge I just gained will help others who have the same issues on their RV or Boat. It was a nonstop fruitless search to find a picture showing exactly what to do, so hopefully what is to follow will be of help to you!

What do we need to look for? What is the symptom? You will not see it, you will not hear it. The generator works perfectly, you plug it, and it works or so it seems… As when you put the fancy charger inverter from a boat, it simply doesn’t recognize the electricity produce as clean. So here is the problem: the setup of the Honda and lots of other generators as a matter of fact is a floating neutral, also referred as a floating ground (not proper apparently). Hence, something is floating and the device only recognizes 68 volts and shuts everything down. In the house your ground is linked to the main box to the neutral, well,  not on a boat. This is all done for safety purpose, which is completely understandable but it made me scratch my head for quite a while!

So solution: Which is actually against everything you learn in life so far- “short” the plug inside the generator or outside via a cable. The principal is the same, we will only use ours on the boat, so I did a permanent fix internally.

You will need the proper set of tool to crimp two cables, one about 3 inches and one 7 inches. Finish it with open U shape connector and you are ready.


Once you have those two, you will need to install them as per picture below. I have made a label to indicate that the output has been modified on the casing itself.


If you put a regular household tester, it will show that the neutral is open. But once you plug it on your regular R/V or Boat AC input, magically it registers 128 Volt and everything work like magic.


It took me a long time to really trust myself and my reading. I would like to thank Ron for his professional advice and hand holding during the entire process. You see for a “normal” human being to create a short in a plug is not natural at all.

Monday, May 16, 2011

Endless hot water

Now there's something we'd all like to have...  Paul on s/v Solace will have it now, even at anchor!

One thing lead to another with these boat projects. This blog is about linking three boat projects, and each one is worthy of it's own post. But for now, I'll give a precise of the  events.
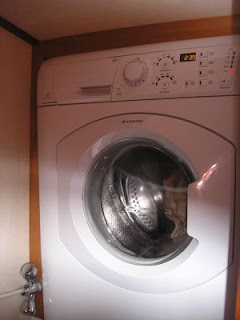
Firstly, in the shower cubicle of the boat, I had a cupboard with a large 12 gallon hot water tank that I wanted to replace with a washing machine. So I set about removing the HW tank and then installing the washing machine. Because the doors were only 18 inches wide, the WM had to be disassembled to get through the door and then reassembled in-situ. This may become another blog at some time.
Now, because I had removed the HW tank and our only method of heating water, I then set about installing a califont, or probably better known as a "heat as you go, propane water heating unit". This was a unit sold in New Zealand, but I have seen similar units sold in RV World in the USA. The igniter is powered by two "D" size batteries, and is small enough to install in boats and RV's.

I installed the unit under the aft vanity unit on a bulkhead. I have a means of varying the temperature output and have placed some blue masking tape for the shower temperature so that we don't need to use the mixer tap to get the temperature right. The ducting is 4 feet in length and vents to the bilge. Heat at the end of the 4 foot ducting is almost nil, and one can hold your hand over it easily. I saw many units installed on other boats with out the ducting to outside, and as others have said, "it's no worse than running the stove". Propane and co2 monitors are a safety measure. Now we have hot water on tap with no need to run the generator to supply power to the old HW tank.
Finally, when installing the propane califont, I had to install a propane hose to the unit. Initially, I "Teed" into the existing propane line with the one propane cut off switch to be used to supply both the califont and the stove. This however proved to be less than satisfactory, because the califont would remove some of the gas from the stove line while it was in use. This then made igniting the stove burners, a little more time consuming as we had to wait for the gas to flow back through the line to the stove.
New Brass T to Propane Tank
The solution was to use another solenoid and regulator for the new califont and "Tee" in both solenoid/regulators to that "Tee". Each solenoid has it's own on/off switch.
We also plumbed a hot water line to the aft of the boat so that we can have hot showers on the aft deck. We also think we will use less propane, than heating a kettle of hot water on the stove to do the dishes. I'll comment on that as data comes to hand.
The "T" also allows us to carry a spare propane tank to swap to when running out on the tank in use.
I am curious to find out how the propane usage will work out in practice.

Friday, May 13, 2011

A challenge

This is a project, it is boat-related, and it qualifies as small, tho the effects are potentially huge. Here is a challenge issued by Livia aboard s/v Estrellita 5.10b:
P1010839 (1280x960) Many of my non-boating friends are outdoors enthusiasts of some sort and most outdoors enthusiasts (I hope) make it a practice to pack out all of their own trash and a piece or two of someone else's. When hiking I would always grab other trash and pack it out (within reason), in part because I wanted to keep the forest clean, but also in part because I realize that it is surprisingly easy to litter on accident – things fall out of your pocket, or blow away, etc.

Similarly I think there are two kinds of boaters: the kind that has littered on accident by losing a few things overboard…and those who lie ;)

On a boat, on an extended cruise, I’ve had more difficulty adopting my practice of packing out some communal trash. Reason #1: There is soooo much plastic trash lying around that I feel overwhelmed. Reason #2: Because we tend to stay remote as long as possible, we have to carry our trash around for a long period of time and stowing it becomes an issue.

I recently read in a BC magazine that they estimate that half of the plastic trash on BC’s beaches is industrial but half is from, yes, you guessed it, “recreational marine users”. Ahem. That’s *us* kids.

What I have decided to do is to commit to something simple, that we can manage aboard, but that hopefully covers at least our own accidental littering (if and when it happens despite our best efforts), if not covering some of the accumulation as well.

The Plastic Challenge: In every anchorage, if we go ashore, I pick up a single plastic item and carry it back to the boat to join our trash.

Simple, huh? Not that difficult to adopt, huh? So…I double dog dare you.

The picture above is my “Copeland Island Trash”.
OK folks, the challenge is yours to accept - you know you'll feel better when you do.

Tuesday, May 10, 2011

Bug strainer

Over on s/v Solace, Paul has done a beautiful job of straining the bugs out of the fresh air coming aboard...
We had soft mesh covers, with bug mesh screen, made for the out side of our hatches. The problem with these, was when it started to rain we had to rush out side to remove them so we could close the hatches; otherwise the mesh would get stuck in the hatches as we closed them. So, having seen this idea on another boat, I copied the design to suit my boat. In essense, we could use the bug screens from inside the boat and close the hatches when it rains without stepping outside.

 First, I made my wooden frame to match each hatch surround inside the boat. On the back side of the frame, I  routed a 5mm groove in a square pattern. I used a glazing rubber which is 5.5mm in diameter with a hole through the middle. It also had a row of longitudinal ridges on the outside for gripping. This allowed the rubber to be compressed down from 5.5mm to about 4.5 mm. A polyurethane was applied to the frame, front and back.
I placed the mesh over the frame with about an inch extra on the dimensions for each side of the routed groove. Starting at one side, I pushed the glazing rubber into the groove with the mesh. Once done, I went to the other side and as I pushed it in, the mesh starts to tighten up. With the remaining mesh still exposed out of the groove, I ran a sharp blade along the edge, of the outside of the groove, to trim off the mesh.
Finished product. Note rain on hatch!
Hinges were applied to the side of the frame, opposite the levers for the hatch. In the corners, to secure the bug screen up, a couple of aluminum triangular plates were secured with one screw and allowed to pivot to allow the fame to swing down on the hinges. Just above the closed frame, a strip of half inch x half inch foam strip was applied to the inside of the hatch surround. This seals against the closed frame to prevent any small bugs getting down the side of the frame and prevents the pushing inwards of the frame.

Monday, May 9, 2011

Solar panel design and installation

In a typically thorough treatment, Drew from Sail Delmarva takes us through his analysis, decision-making process, design and construction for installation of solar panels on his PDQ catamaran.

Cruising farther means more nights on the road. Limited battery capacity flat means more nights in marinas. That's money, but more importantly, it means bending our plans to fit in marina stays, and I don't like that. We could go sans power, but when the mid-summer Chesapeake humidity hits and the wind fades, fans equal sleep.
 
The Choices
We could run a Honda generator or use a wind generator. Too much noise. I like passive and silent, so panels it is. We have a substantial deck, but we use all of it, either lounging or sailing. Only 2 small areas on our hard top remain low-traffic, no more than 15 square feet.

We have 270 amp-hours (AH) in nameplate storage  capacity from 3 x group 27 batteries, but realistically we can only use 140 AH without straining the batteries and shortening their life. We know from expereince that we run about a 40-70 AH deficit each day, depending on use of lights, DVD, fans, and CPAP.

The available 15 feet square will fit 2 x 80 watt panels, or about 50 AH in real-world charging results. While this won't replace out entire deficit when we're energy hungry, it will stretch our battery life and may be enough if power is used responsibly and charging is supplemented with some coincidental engine time. For better or worse, this is our chosen compromise.

The Panels
Price matters. We also needed a specific shape. I hunted for something cheaper with good customer ratings and came up with these:
UL Solar
80 Watt Panels

They are of a simple design that appears to be well executed. I load tested them in the front yard, in the sun, and they were on the numbers. Nice wiring boxes; accessing and additional knockout required some very careful drilling, since smacking it firmly with a screw driver seemed unwise. Once inside, there are plenty of extra terminals.

The Mounting
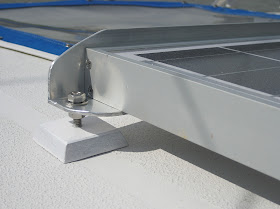
The hard top is not flat; in fact, it domes asymmetrically about 3/4-inch over 3 feet. Additional, we need to protect the panels from accidental dropping of the boom and provide air flow under the panels (PV cells lose efficiency when hot--more on that later). I also dislike the idea of drilling holes in a foam core deck. The solution? A simple aluminum frame and 4 adjustable feet for leveling and load distribution.

The feet are 2" x 1/2" prelaminated FRP with 1/4" x 1 1/2" stainless threaded rods tapped and epoxied in place. This material holds threads very well, and even without the epoxy, any thickness over 1/2" will break the bolt before stripping.

Installed with nuts and washers above and below, these provide a solid mount that easily accommodates the curve of the deck.

The frame is nothing more than two  2" x 1/8" aluminum rails bolted to pre-drilled holes in the underside of the panel frame. These rails are as stiff as a pine 2 x 6 and are high enough to keep the boom off the glass. This mounting allows free air circulation under the panels, for cooling and drying.

Pre-bonding adjustments were made.
The Charger
A 15 amp charger with an LCD screen is mounted in the starboard hull equipment bay, behind the steering gear and galvanic isolator. Short wire runs, out of the weather, and easily accessible. PDQ did a nice job with the access panels.
Morning star 15 Amp charger

What about MPPT (Maximum Power Point Tracking) chargers? Photovoltaic cells (PV) don't simply crank out 12 volts of electricity and magically charge batteries; they put out something between 23V and 0V at variable current. The maximum power point, where V x I = W is at a maximum, is generally at about 16.4V. An MPPT controller senses this and keeps the panel output in the sweet spot while providing the battery the voltage it requires for proper charging. That is assuming cool temperatures and a blue sky.

For a little more on MPPT charging, Wikipedia is always a quick source: Wiki on MPPT chargers

If there are clouds or haze, or if the panel is heated above it's rated temerature, the maximum power point will shift. On the Chesapeake in mid-summer heat can easily shift the MPP from 16.5V to 15V. What is the actual required charging voltage? That varies with the state of charge; when near full charge 14.5V is a very good match, but when first charging a 50% discharged battery we may need only 12.5V and some efficiency will be lost, perhaps 15%. MPPT is at it's best when first charging deeply discharged batteries.
What does a power curve look like? The below table and graph are for a 1.1 watt panel, but you can easily scale it to fit your application. All 36 cell panels will have very similar voltages and power curves, regardless of wattage.


How much does heat lower efficiency? the output voltage is lowered by about 0.041V/F, or about 1V lower on a scorching day than on the cool spring day when you did your installation (assuming you allowed good ventilation to the underside--it could be worse). In other words when it hits 95F, the MPP voltage will be about 16.4 - 1V = 15.4V. Since out electric load is maximum on a hazy 95F day, this is the most relevant MPP. (Some will argue that cool weather charging is more critical, since the days are shorter and the sun lower, but it is running the fans in the heat that always does us in. Plan according to your reality.)

Shading due to haze lowers the output amperage but does not significantly lower the MPP until severe (evening or heavy clouds). Spot shading (a sail or even a shroud) can be devastating, depending on whether it takes a portion of a column (small amperage drop) or a row (small voltage drop that effectively shuts the panel down). However, the reason we did not put a panel under the boom was not shading (if we want zero shading we take the boom far to the side); it was because we walk there when furling the sail and wanted to leave one free impact zone where we wouldn't worry over sailcovers and ropes and even loungers.

For some detail on panel output corrections: PV cell output

Series vs. Parallel Wiring
This has been debated to death on the web. When panels are wired in series an MPPT controller can deliver slightly more power during periods of low light; simply put, the voltage can stay at usable levels longer and resistance losses can be a bit less. However, if any shading occurs, the drop in output is much larger than it is in parallel installations, where only the blocked cell is depowered, not the train. For boats where some shading is likely, parallel wiring is more practical. For a terrestrial roof top installation, series wiring and higher voltages can be explored.

And I didn't even analyze the shading loss owed to seagull poop.

I've probably given up 5-10% in charging capacity on a typical day by using a simple controller. I suspect for most people, larger panels are a better investment at this scale, but it could go either way; for a larger project, choose and MPPT controller.

Wire Routing
I expected hiding the wires to be a battle, but pulling the wire took less than 30 minutes. Unique to the PDQ 32, but here it is:

  • The panels are connected to each other above the deck by hiding the wire (2 x 12 awg) in wire duct. The stuff is intended for hiding phone cables, is strongly self adhesive, and would probably fit 3 x 12 awg wires. It snaps open to the side, should you need to service the cable.
  • From the panel to the deck above the helm light is only ~ 2 1/2 inches; wire loom covers this.
  • From the light to an existing hole in the stainless hardtop support is only 2 inches. Again, a bit of wire loom covers this plus the existing wires nicely.
  • The wire runs down inside the support, forward across the aft cabin ceiling above the liner to the steering gear/instrument cluster access, and down to the charger, below the galvanic isolator.
  • From the charger to the main bus bars.
  • In-line 15 amp fuse between the bus and charger.
Total wire run, about 15 feet each side.

Total Cost
With all materials (of course, the might-need stash coughed-up some bits an pieces, including the wire and FRP), about $700.00. I struggled with the decision, but if it becomes a 20-year investment and saves a few nights a year charging batteries for $1.50/foot + electric + taxes, then I come out ahead in only 2 1/2 years. Not too bad and better than my 401-K in the best of times. Installation only took 8 hours, including making the feet and frame at home, so not too bad. Time spent puzzling it through? We don't count that.

Wednesday, May 4, 2011

The local Grange can be your friend

On s/v Letitgo the local Grange (farm supply store) is proving to be a great chandler:

On our recent cruise, I was confronted to the need to get sea water onboard. Not to refresh or clean the blood from the fish we caught yet though…. The bucket we had onboard are not up to the task, handle with let go under the weight, they are hard and scratch the side. This is when on the back of my small brain, I remember reading a few years back about horse feeding bucket. A little research brought us to our local equestrian shop and the wonder of the rubber bucket.

Sturdy but at the same time flexible to avoid scratches, flat on one side to easily bring it back onboard. The ideal boat bucket.


Monday, May 2, 2011

Generator extension: 4 easy steps

In a nicely layed out How-To, Chuck on s/v Sea Trek shows us a way to hook up a larger fuel tank to your Honda generator.
One of the pieces of equipment on our to do list is a generator. We much prefer to anchor out when cruising and at times we can get weathered in for days. During those extended stays we still like coffee in the morning, still have the need to recharge the batteries and like to watch TV. All of this uses power and we have been using our handy Honda 2000 portable generator until we can have a more permanent installation. The Honda will handle most of our power needs, with the exception of the air conditioning system. But that suits us just fine for now. One of the things I don't like to do is to fill the built in tank every day when the generator is in constant use and for long term when charging that batteries it might mean shutting the generator down, filling the fuel tank, and starting it again. It is also hard to fill the tank without spilling gas on the deck, especially if the boat gets waked. So, the need for a remote extended fuel tank. To build one of these only takes a few inexpensive fittings, a fuel tank and about an hour of your time, at the most.


The first thing that I did was to buy a spare cap for the built fuel tank in case I messed up doing this, or if I wanted to run without the extended tank. I found it locally for $15.00 from a Honda dealer in the area. Next was to get all of the miscellaneous parts. We decide on a 3 gallon tank instead of the larger 6 gallon since we don't run the generator that much. We already have a 3 gallon tank for the dinghy outboard so this could also be used as a spare. We also decided we wanted to be able to use the same fuel line as the dinghy outboard so we would not have to carry different fuel lines and again it could do double duty. To accomplish this we would need the attachment fitting that would be the same as on the one on the dinghy tank and on our Johnson Outboard. The two fittings totaled about another $15.00 and then another $4.00 for a brass hose barb. The plastic fuel tank was another $25.00. The assmebly was pretty easy.


Step 1.
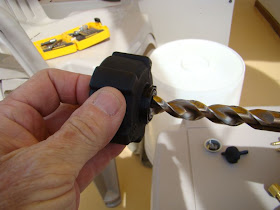
Remove the inner workings of the fuel cap and drill out the center to fit the connector. Be careful to not drill the hole too large. It should be slightly under sized to allow the fitting to be screwed into the plastic cap.


Step 2.
Fill a thin amount of epoxy around the threaded base of the fuel line fitting inside the cap and screw on the female brass hose barb. Allow the epoxy to dry and then replace the rubber gasket inside the cap. The hose barb may or may not be needed but it makes the connection fitting stay in tight and I beleive it will help to draw the fuel into the generators built in tank.


Step 3.
Install the second connector fitting into the fuel tank.


Step 4.
Fill the fuel tank with gas, fill the generator built in fuel tank with gas, connect the fuel lines and start the generator. Be sure the vent on the fuel tank is open. That's it.

It is very important that the cap be completely sealed. If any air can leak at the cap, the generator will not pull fuel from the extended tank. As the vacuum builds up in the internal fuel tank for the Honda, it will pull fuel from the extended tank. Mark the generator tank so that oil will not get added to it by mistake like the outboard tank. The Honda does not require a fuel/oil mix. The Honda will now run for a much longer time and annoy your neighbors for hours.

There are many variations for doing this, using a 6 gallon tank, installing only hose barbs, putting an inline filter in the fuel line. But the basics are the same. This should work just fine for us until the permanent genset is installed.